Almost all motherboards have a small indicator that is responsible for its status. It glows green during normal operation, however, it changes to red if any errors occur. Today we will analyze the main reasons for the appearance of such a problem and describe in detail the methods for solving it.
In most situations, such a malfunction occurs after certain user actions with the computer, for example, the thermal paste was replaced or the dust was cleaned with a preliminary analysis of the main parts. Let's look at solutions, starting with the simplest.
Method 1: BIOS beeps
If there are errors and it is impossible to start the operating system, the BIOS will emit appropriate beeps, which are the code of this problem. Each manufacturer has its own decoding of sounds, and there are many combinations. We advise you to seek help from our other article at the link below to deal with this issue.

Having found out the source of the malfunction, you can proceed to its solution by finding the appropriate options on our website or other open sources of information. If there is no speaker in the case or on the motherboard, no signals will be emitted, therefore it is not so easy to determine the cause of the breakdown. We'll have to go through the main options manually.
Method 2: Checking RAM
Memory errors are the main factor behind the red light on the motherboard. Checking the RAM can be quite simple. If you are using one strip, move it to another free slot. When installing multiple dies, we recommend checking each one in turn. Pay attention to the contacts. If necessary, clean them with a dry cloth from dust and other debris. Detailed instructions for installing RAM can be found in the material below.

When you just buy a RAM strip, it is important to make sure that it fits the motherboard, because different modifications are incompatible with each other.
Method 3: Checking the processor
Problems with the processor mainly arise after replacing it or applying new thermal paste. Even one bent contact can damage the entire system, causing the red light to appear. Checking the CPU begins with removing the cooler. Our other article is devoted to this procedure, which you will find at the following link.


If during parsing you notice that the area around the CPU and the component itself are at a sufficiently high temperature, you will need to solve the problem with overheating, since it is this that can provoke the appearance of other malfunctions. Read on to learn how to ensure good cooling.
Method 4: Checking the hard drive
Hard disk malfunctions are less likely to cause such problems, but such cases do happen. First of all, it is recommended to disconnect it from the motherboard and start the system, paying attention to the BIOS beeps. They can tell you where to look for a solution. In addition, we recommend trying to use a different SATA connector and check the cable itself for damage.

Method 5: check power
It is important to provide all components with sufficient electricity. Make sure that when you start the computer, all coolers are spinning, the hard disk is working. We advise you to calculate the watts consumed by your system and compare them with the wattage of the power supply. This can be done using a special service.

If you find that there is not enough power, replace the unit. Read more about this in our other materials using the links below.
All good, I ask for "help from the audience"))
There is an M5A99X EVO motherboard with an FX 6200 processor:
The background is as follows - the processor stuck to the radiator and, accordingly, was pulled out of the socket along with it. At the same time, a couple of dozen legs were not crushed catastrophically - they were straightened under a microscope. They turned out to be crushed, of course, not when pulling out - but when trying to "insert as it was"))
Total: legs are aligned, the board is inspected for fur. damage, the processor is inserted with a heatsink and new thermal grease.
Turn on the power supply: the duty room LED lights up. We turn on PWR ON - the processor cooler started to rotate, there are dashes on the post-card - and the red LED on the board is on CPU_LED. The speaker is silent.
After standing in this position for about 15 minutes, it turns out that the radiator of the feed unit, both bridges and the processor are moderately warm, there are some microcircuits on the board too, nothing is critical. I check the voltages in the processor power supply - 0.99 volts on six phases, 1.18 volts on the other two.
The first thought - the BIOS has flown: I first flash it with the latest firmware - then the very first one that is relevant for this processor - no changes. Reset to default - no difference ...
I start to measure the voltages on the memory slots - VDD, VTT, VDDSPD, VREF - all are normal.
In turn, I disconnect everything that is possible - memory, video card, remove the processor - even without a processor, it's CPU_LED
I change the power supply unit (still a percentage of 125 watts) FSP 350 to CHIEFTEC 450 - the same picture.
I measured the USB ports - everything is alive.
I looked for similar situations on the Internet - from repetitive only a contact in the socket or a blade, or a mismatch in the firmware or it is not supported.
I climbed into the socket, removed the top cover (suddenly something was damaged when the processor was pulled out in a closed state) - all contacts are in place, no visible damage.
There are several such LEDs on the board. CPU_LED, BOOT_DEVICE_LED, DRAM_LED, VGA_LED - but all of them except the first are not included.
That is - this CPU_LED hangs rigidly even without a processor. Moreover, at start-up (when the duty officer is off), it turns on without any time delay at all, as if it were just being turned on.
Otaka bullshit, lads))
Moreover, the processor's performance is unknown (although personally I have not yet held the processor that gave the oak in my hands). But he is warming up in denomination, like a worker ... he ordered a Sempron 145 AM3 to be put on trial - but this is not today, until he arrives.
Sho tell me where else to measure - my thoughts are over ((
Another point - the memory that I tried - is not in the list of those supported by this board on the Asus site. Does this mean that even a BIOS with such a memory will not be able to enter? Goodram DDR3 4Gb PC3-10600 DIMM GR1333D364L9 / 4G?
Information about the performance of a personal computer (PC) or the results of its preliminary testing at boot time can be communicated to the user in different ways. The main one is by means of a sound signal, the content of which is the result of passing (successful or unsuccessful) the initial test at power on - POST. If it is passed successfully, the user will hear one short signal.
The various errors that will be found when passing this test may sound differently depending on the manufacturer of the motherboard (MP). However, in some cases, this information can be communicated to the user by other methods, for example, visually. Many manufacturers supply their MPs with LEDs of different colors (usually red, yellow and green), the burning or flickering of which, in combination with their color, gives more detailed information about both the results of the initial testing of the equipment and about the problems that occur in the PC during working hours.
What to do if the red light is on
Usually, several indicators are installed on the MP, each of which is responsible for the performance of a particular device. In addition, MPs are equipped with indicators that indicate the occurrence of certain emergency situations.
For example, on many MPs manufactured by ASUS, there is a visual display of information about the passage of the PC test when it is turned on. It is implemented in the form of alternately lit red LEDs. In some cases, multi-color LEDs are used.
Attention! The modern level of development of electronics makes it possible to realize the indication of the same LED in different colors. Therefore, you should not be surprised that the same indicator may glow red in some situations and green in others.
These LEDs are usually located near one of the chipset chips, or next to the MP power connector. All such indicators are subscribed directly to the MP. Also, information about what exactly they display can be found in the instructions for the MP.
These bulbs are usually arranged in the order in which the stages of the fast are passed. Their work can be as follows:
- At the very beginning, the processor is tested. In this case, the lamp labeled "CPU" starts to glow red. If the test goes well, it either goes out, or turns green for a while, and then goes out.
- A similar situation is repeated at the next stage of the test - memory check. This uses an indicator labeled "RAM".
- At the next stage, the video card is tested (a light bulb signed "VIDEO")
- The last to be tested is the hard disk controller, "HDD".
If at some stage an error occurs, the POST test is terminated, a corresponding error signal is issued and the indicator related to the faulty device starts blinking, or lights up continuously. Its glow continues until the PC is turned off or until it is forced to restart.
Accordingly, the actions in such a situation should be to replace the faulty PC unit: if the memory fault indicator is on, the memory changes, if the video card fault indicator is on, the video card changes, etc.
On those MPs where there is no detailed decoding of the stages of passing the test upon switching on, there is only one red light that comes on when any of the above devices fails. In this case, you can find out which node is faulty and requires replacement only by looking at the POST sound signals.
What is the green light on the motherboard responsible for?
Like red lights, green lights also refer to certain hardware parts of the PC, however, their glow indicates the normal operation of these devices and there is nothing to worry about.
In addition, on the overwhelming majority of motherboards, the green LED only indicates that power is supplied to the MP, and its voltage levels are within normal limits.
Some motherboard models are equipped with a CPU Led indicator located near the processor. In a normal situation, it lights up literally for a second when the computer is turned on and then goes out. But in some cases, it does not go out, but continues to burn in red, while.
This is how the CPU_Led light on the board looks like
In this article, we will consider a situation in which a red cpu led light on the motherboard is on and the computer does not turn on further.
What is this indicator?
As many should be aware, when the computer is turned on, a test of its main components takes place, among which there is a processor. CPU Led is an indicator of the passing processor test. If everything is fine with it, then literally a second after turning it on, it goes out, but if there are any problems at the stage of testing the processor, then the CPU Led continues to burn.
It is worth considering that if this indicator is constantly on, then this does not give a 100% guarantee that there are problems with the processor. Yes, the problem was identified during the processor test stage, but is this the case?
Causes of the problem
Here is a list of possible causes of a problem with a burning CPU Led indicator in descending order, starting with the most common.
- Poor contact between processor and socket.
- Power supply problems.
- Incorrect BIOS settings.
- RAM failure.
- Problems with the processor itself and / or motherboard.
Now we will dwell on each of the reasons in more detail and talk about options for eliminating them.
Solution options
First you need to remember after which the problem with the burning CPU Led indicator appeared. It could have been disassembling or cleaning the computer, installing new parts, flashing the BIOS, and so on. Electricity surges in the network, a thunderstorm, a kick on the system unit or its fall can also be the reasons.
Bad contact of the processor in the socket
This is the most common reason. Therefore, it is better to start with it. You need to carefully remove the processor cooling system and take it out of the socket. Next, we look to see if all the legs are intact and not bent. Recall that Intel's legs are in the socket (socket), while AMD's are on the processor.

Removing the processor cooling system
If everything is fine, then we put everything in place and try to turn on the computer.
Reset BIOS and swap RAM
The next step is to remove all RAM modules from the slots. Try swapping the memory, install it separately in each slot, as it is possible that there are problems with the RAM connectors on the motherboard or with the memory itself.

Removing the RAM module
If the problem appeared after replacing the processor, then it is possible that the new processor is not compatible with the motherboard or with the BIOS version on it. To check this, just go to the official website of the motherboard and see a list of officially supported processor models.
Checking the power supply
It is better not just to ring the power supply, but to replace it with another one, obviously working, for example, by borrowing it from friends, since often the power supplies work normally without load, but under load they show all their problems.
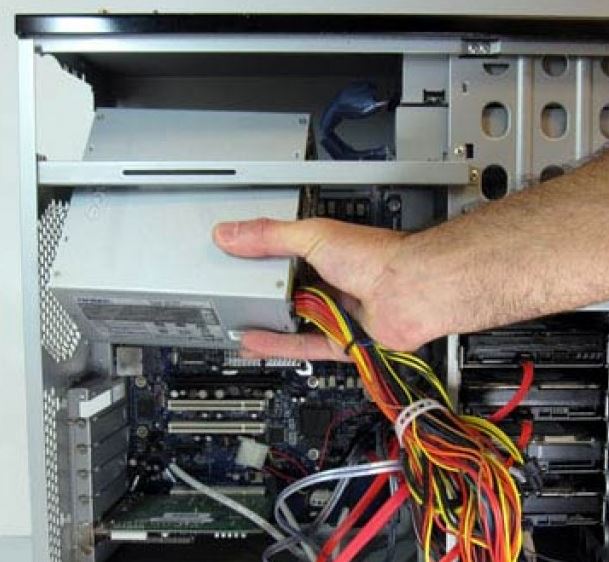
Replacing the power supply
Pay attention to the processor power connector. Take it out and see if it's charred.

4 pin processor power connector
Disable all additional devices
It is also worth trying to disconnect hard drives, DVD drives, various network and sound cards from the motherboard. We try to start the computer without a video card and see if the CPU Led goes out in one of the options.
Checking the processor and motherboard
If none of the above helped you and the CPU Led is still on, then only the motherboard or processor remains. Here, if possible, try to install another processor, borrowing it from someone, or try your processor on another compatible computer. After that, it will immediately become clear what exactly the problem is and what needs to be changed.
The best way to thank the author of the article is to repost to your page