The Renault Duster radio tape recorder is a standard head unit that was created specifically for this car brand in such a way that it fully meets the technical requirements and harmoniously fits into the car interior. Usually the radio is installed during the assembly of the car dashboard. As a rule, the standard head unit is included in most basic car configurations.
Usually, in the basic configuration, the radio has very limited functions, being ordinary, or absent altogether, and the buyer has access to audio preparation - wires stretched in the cabin and installed speakers, to which any alternative radio tape recorder can be connected. This is done in order to create the most advantageous vehicle configuration. As a result, each motorist himself can choose the most optimal option for himself.
The audio preparation of each car is made in such a way that you can independently install another device you like with improved technical functionality.

The radio tape recorder for Renault Duster can be made in any country. Manufacturers often order such components from other companies, while only coordinating the design and the necessary technical functionality. Therefore, equipment marked "Made in China" does not mean poor quality. By installing such components in their vehicles, manufacturers take responsibility by providing a quality guarantee. This is relevant not only if you have a Renault Duster head unit, but also for alternative devices.

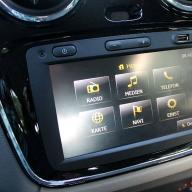
Recently, more and more motorists are inclined to ensure that the radio tape recorder for Renault Duster combines the following functions:
- Operating system with Apple CarPlay and Google Android Auto support
- Large touchscreen with multi-touch function
- GPS and Glonass navigation
- DVD reading function
- Digital FM and TV tuner
- Hands-free system

When choosing a car radio, you should pay attention to the fact that it is compatible with Renault Duster, otherwise the steering may not be available.
Selection of the code for the radio tape recorder.
To protect the car from robbers, a special radio code for Renault Duster is used as one of the preventive measures. The only thing that the manufacturers did not take into account is that at the moment it is quite easy to calculate this code. Car owners themselves may face the problem of finding a code when replacing a car radio with an alternative one, with a prolonged disconnection of the battery or when changing the firmware of a standard radio.

You can find out the code in several ways. For this you need:
- Read the instructions for audio equipment
- The code of the Renault Duster radio tape recorder installed by the manufacturer can be viewed on a sticker, which is duplicated in the technical passport and in the glove box. In the pre-styling model, it can be located in the luggage compartment under the carpet.
- When removing, you can inspect the radio. It can be applied to the back of the panel.
- If you hold down buttons 1 and 6 on the radio tape recorder at the same time, then after a while the necessary numbers will appear on the screen.
Prekod consists of a letter and three numbers. It is installed by the manufacturer and assigned to the device at the stage of assembly.

If you need to know the precode for a touchscreen radio, you must choose one of the three most acceptable options:
- Study the technical data sheet of the device
- Contact an authorized dealer.
- Find out the code yourself through a special program - a calculator.
The code calculator for Renault Duster allows you, using simple manipulations, to obtain an encryption code, with which you can flash the radio tape recorder, change the navigation program, change the monitor resolution, reconfigure the button action and much more. To do this, it must be entered into the memory of the Renault Duster radio.

To enter the code on the radio, you must use the buttons from 1 to 4, which correspond to the ordinal numbers of the code. To fix the dialed code, you must press and hold the number 6 for a few seconds.
It is important to remember that if you enter the code incorrectly multiple times, the device may be locked for a while.
Hello everyone! My friend decided to update the head unit in his car. We began to look for options. The option, of course, should fit like a native to the interior of the car, so we chose it according to the car model. Fortunately, there are many options now. I present to your attention a head unit with all the goodies, except for the DSP, on android 8.0.0, with 4 GB Ram and 32 GB ROM, with a 7-inch display, and with support for steering wheel controls. In short, Everything fits perfectly into place, all functions work. For details under cat.
Characteristics:
CPU: Rockchip PX5 64Bits Octa-core Cortex-A53 1.5GB
PowerVR G6110 GPU
DDR3 4GB, 32GB internal memory
Support Dual Zone function, you can listen to music when navigating
Screen
Capacitive and multi-touch screen
HD TFT Screen Resolution: 1024 * 600
Screen size: 7 inches
DVDdecoder IC: Sunplus SPHE8202VGQ
Laser Lenses: HITACHI 1200XH
AVI / DVD + R / DVD-R / DVD + RW / DVD-RW / VCD / MP3 / CD / CD-RW / JPEG compatible
Bluetooth
Support A2DP Bluetooth, can play stereo music via Bluetooth from your phone
Hands-free microphone.
Radio
RDS support
Radio module: NXP6686
30 preset radio stations (FM: 3 * 6, AM: 2 * 6)
AM: 522 kHz-1620 kHz; FM: 87.5MHz-108MHz
Premium TDA 7851 amplifier
Audio output power: 4 * 48W
CANBUS decoder
WITH CANBUS BOX
Support for steering wheel control.
Packaging and equipment
The product comes in a box made of recycled cardboard, inside which is a more beautiful original box. 
I did not find information about the manufacturer 
there is a sticker on the corner with the model number 
We open the box, we are greeted by packaging made of foamed polyethylene 
We open a sheet of polystyrene, here a rich bundle awaits us 
In the kit we will find a complete list of cables for connecting the radio itself and connecting peripheral equipment such as cameras, subwoofers, OBD scanners, etc. to it.
Additional Information


There is also an external GPS sensor


 antenna WIFI
  a piece of tape 3M
And as a gift we were given an anti-slip mat, Spatulas for disassembling a torpedo, a stylus for the touch screen.


Plus, an 8Gb memory card was already inserted into the slot for maps with maps (topographic).
Appearance
.The radio is itself made 1 Din. The display is much wider though. 
The display occupies almost the entire front area, surrounded by buttons. 
To the right of the display there are 4 buttons: get the disc, Band, volume ±. Below there is a plug labeled SD. We open it and it is possible to insert a memory card up to 32 GB. 
There are also 4 buttons to the left of the display. Power, Menu, Navigation and Bluetooth. Below there is also a plug with a slot for cards with cards. A memory card is already inserted into this slot and a Russian map for Navitel is already installed there.

Naturally, there are shipping bolts. 
The sticker on the back describes the connectors. 
Behind the connectors for connecting both the radio itself and the infrastructure for it. 
There are a couple of signed but unused holes. 
A few more photos of the radio from all sides. 


From the side, it becomes clear that the plugs are slightly recessed, in relation to the buttons. 

Between the buttons, there are plastic chrome inserts for beauty. 
Installing the radio. Here it should be noted that the installation is very simple, no special knowledge is required.
Before


Let's see those same stubs with memory cards 

There is nothing special to paint here, the radio tape recorder clearly began to look like from our century, and not like a regular one.
The display is visible well, but it is difficult to reproduce solid reflections in the photo. however, we did not remove the factory film, for reliability, therefore, it is a little worse to see with it. In general, the film is matte, does not glare much.
Display
The display here is 7 inches with a resolution of 1024 * 600Touch supports 5 touches

no color distortion on either side
But there is a glare situation.
The touch is sensitive, flawlessly. works both on a finger and on a complete stylus ...
BY
The head unit is based on Android 8.0.0. As we launch, we immediately get to the main screen. Here Date / Time, radio, music player, video player, bluetooth and connected cameras control.
Let's consider the basic settings of the device.
Here we see that the android is really 8.0.0, the memory is crammed with 5 GB of 32GB, the RAM is under 4 GB. 

If we press the equalizer icon, then predictably we will get into the sound settings, here you can come off, use ready-made blanks or adjust everything to your liking on a 15-band equalizer. It is possible to select speakers in any order. 
Do you see a white dot on the display, on each display ???
This is a special point, click on it, and a hot menu comes out: Settings, back, all running applications, Home page, cleaner. And the most important thing is the highest point. It extinguishes the display completely. You can turn it on with a tap. 
When we connect a smartphone via bluetooth, it is possible to use the benefits of civilization, such as a speakerphone, a phone button on the multifunction steering wheel, and you can also download and use an application to connect to the car's CAN tester. 
Navitel also works right out of the box. Cold start for about half a minute. There is a standard program for testing satellites. 
We can listen to music through radio applications or through a player. The player can control music from a smartphone connected via BT. 
The Internet can be distributed from a smartphone, the WiFi reception is good. For example, I download the software I need just standing next to the house and connecting to the WiFi of the home Internet.
Video with a resolution of 1920 * 1080 from YouTube flies without any problems from the native youtube application.
Files in the same resolution of the SD card are also easy to view.
Here are a couple more settings 
I checked the hardware using Hw device info and antutu
Additional Information


But the radio tape recorder refused to pass the test antutu, it just hung at 0%. Well, God bless him, GU is not for games.
Until we installed additional cameras, the GPS sensor is not held under the skin on the glass, it just hangs with a bundle of wires right behind the radio tape recorder, while it works great. There is no additional acoustics / subwoofer, only standard one. Compared to the standard head unit, there is more sound, it is deeper and more spacious. Although describing the sound is a thankless thing. The sound reserve is enough with the head. Listening louder than 70 percent is already hard. Navitel works well, leads even in yards, without hooks and lags. Well, you can see this further in the video. A general map of Russia has been installed. The smartphone automatically clings and contacts are supported in Cyrillic. I have not tried voice input, I am not accustomed to such innovations. To watch the video, you need to disable the checkboxes in the settings. Of course, I do not recommend watching on the move. Only positive impressions. Everything works out of the box and is intuitive. There was a moment when for some reason the sound disappeared. After a night of inactivity of the car. Reboot ... Well, that's all the moments that I could tell about this product. The seller still has a lot of models of car radios, you can select them for many brands of cars. You can vary the amount of memory and the presence of an additional audio DSP. Our complete set is without. But we don't get sick with sound. So, the sound is just great, even if you listen to the Radio. I haven't tried the disc, who needs it in our century. Of complaints, but here it is conditionally ... there is no USB input in front of the radio, someone will say a minus. someone will say a plus. At the very least, it's easy to get the wires out into the boot box. If you want to connect a hard drive, you will need additional external power. The power button turns off the sound or a long hold on the power button puts the radio to sleep. Rise in a second. It is possible to connect a USB DVR camera. Rds in the radio works. The steering wheel buttons work. It is possible to connect TMPS systems for monitoring tire pressure. It is possible to make a dual display mode to use two applications at the same time.
Also for you, I created a Video Review where I will show a little the real operation of the radio tape recorder, as a navigator.
The product was provided for writing a review by the store. The review is published in accordance with clause 18 of the Site Rules.
I plan to buy +22 Add to favorites Review liked +39 +65From the date of its release in 2010 until today, it amazes motorists. First of all, it is attracted by its stylish and catchy appearance, as well as its low cost, compared to other models. But in this article, we will pay attention exclusively to the car radio and common questions related to its operation.
It is worth recalling that the radio tape recorder is developed individually for the car and is included in its basic configuration. Its dimensions and design are tailored to the style of the car and it is one of the recognizable features of the car. But there are both basic (or standard) models and alternative ones. Here, we will look at the features of the standard model.
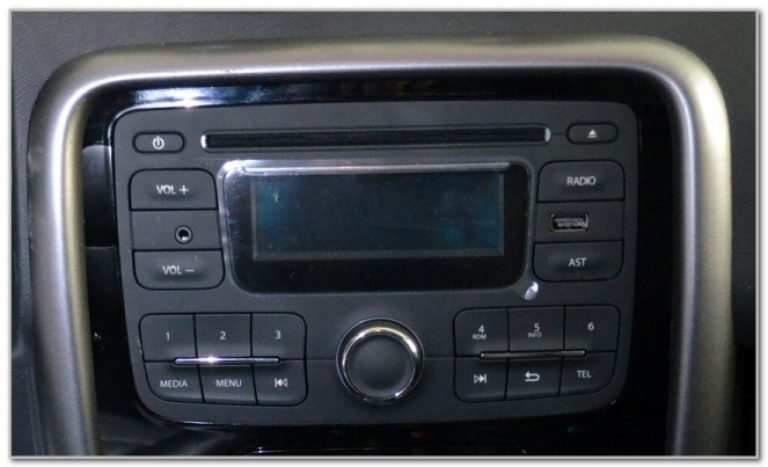

It looks like a head unit Renault Duster
So, what will please its owner with the Renault Duster radio tape recorder? The basic kit contains everything you need:
- Antenna;
- User manual;
- Hands-free system;
- Steering column joystick;
- Audio preparation with standard speakers.


There is a second remote control under the steering wheel to adjust the sound volume of the radio.
The Renault Duster radio tape recorder is fully compatible with the electronic system of the car, which allows you to control the music with a special joystick with buttons under the steering wheel. Its operation does not require additional transition frames.
To find out the model number and firmware version, you must press the buttons simultaneously "five" and "Radio" and hold for 5 seconds until the information appears on the screen:
The main advantage of the Renault Duster car radio is that it has a built-in Bluetooth firmware. Due to this, you can connect to a mobile phone and hold hands-free conversations using the system "Free hands", such a system is usually installed on more expensive cars, which is a good bonus for a budget crossover. In addition, there is access to the phone book of the smartphone with a quick search. You can enter the number directly on the keyboard displayed on the touch screen of the radio. It is possible to connect the head unit to rear view cameras, video sensor and intelligent parking.


Hands-free microphone located on the ceiling above the rearview mirror
What is a "radio code" and where to get it
There are two types of radio tape recorders - removable and built-in. In the first case, for safety, the motorist simply removes the radio panel and takes it with him when he leaves the car. And what to do in the second case, when it is built into the car panel, how to protect the device from theft? For such situations, the so-called radio code.


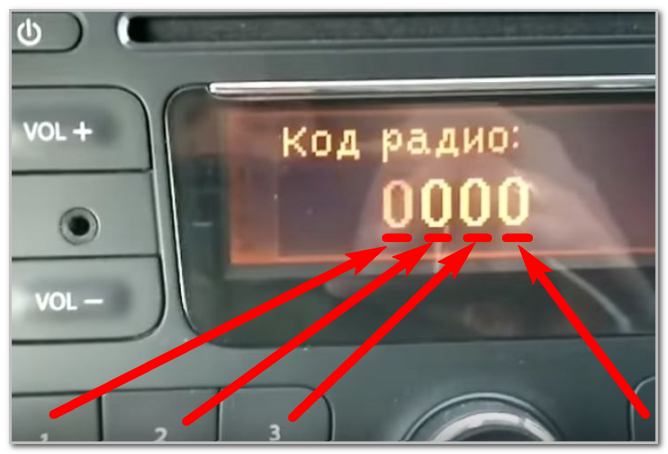
Initial state for code entry
It is a code that must be entered to activate the front panel. Without its activation, there will be no access to any function and the radio tape recorder, accordingly, will be useless. It must be remembered that when the battery terminal is removed, all settings on the radio are reset. Accordingly, you will need to re-enter this code.
When buying a new car from a dealership, you will be given a card with a code written on it. It must also be indicated on the vehicle's service card. Therefore, when buying a car "from hand", it is imperative to check with the owner the code from the radio, otherwise decrypting it may become a small problem for you.
How to enter a code into a radio tape recorder
Entering this code is very simple. Most often, it is a four-digit number, for example "1357". Each digit of the code corresponds to a button on the radio control panel: "1" - "2" - "3" - "4":

Buttons 1-4 are used to enter the radio code
To enter the first digit of the code, press the "1" button until the required number is displayed, for example, to enter the second digit of the code "3", press the "2" button three times in a row. Dial the remaining numbers accordingly. Then, you must press and hold the "6" button until the data is confirmed. This will be signaled by a sound signal.
You will have to unlock the radio tape recorder every time the power is turned off. It is worth remembering this when changing the battery or if there are any problems with its operation.
Video "How to enter the radio code":
How do I find out the radio code if I forgot?
There are several ways to find out a forgotten code. The easiest is to contact the dealer where you bought the car. Its database contains all the ciphers, so yours should be there too. However, this operation is often accompanied by the collection of additional fees, which does not suit all car owners.
The code for the standard model of the Renault Duster radio is always a single sample - four digits from "0" to "9". If the cipher specified in the service book does not fit the specified format, then this is an error in the code recording, and not in the radio tape recorder itself.


PRE code is located on the radio housing
There is another way. For this you will need pre-code car. It can be found on a sticker on the body of the car radio. There is a tag on which this code is written. But for this you have to remove the device from the panel. The found code will need to be entered into a special generator program that will help find the lost cipher. This program is contained in many forums or simply freely available on the Internet. Free code generators:
The third way is to simultaneously press the buttons with numbers "1" and "6" and hold it for up to 5 seconds. After that, the screen will display four digits - this is the desired code.
Due to the simplicity of this operation, using such a security code for the radio is a very dubious decision on the part of manufacturers. It is quite easy to spend 10 minutes on finding the desired cipher, which is what many car robbers use. Yes, yes, Renault Duster has become quite popular with car thieves, but see how this is done.
Diagnostic menu that not everyone knows about
In addition to everything, there is one menu in the radio tape recorder, which few people know about. You can see it if you click on the button "Menu" and hold it for 5-7 seconds. After that, the menu sections will appear on the screen:


The most useful is in the "Diagnostics
"

The section "Monitor" contains useful information
You can switch between sections using the large round knob in the center (rotate left-right). Of all the sections we are interested in "Diagnostics", in which we select the item "Monitor", by going to which we will see the following:


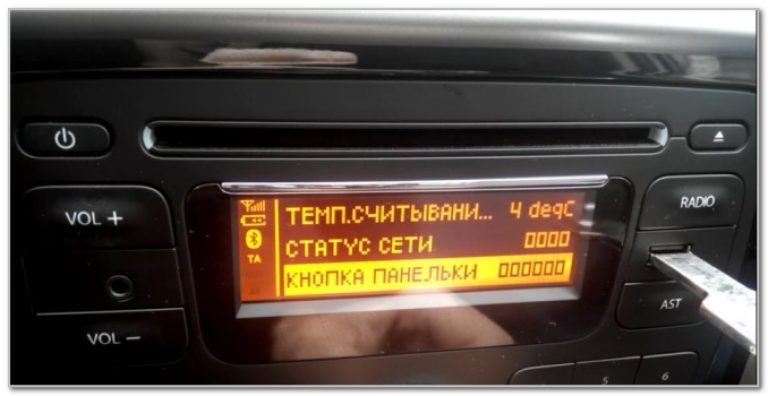

The item "Monitor" contains the following information:
- Battery voltage
- Vehicle speed
- USB device connected or not
- Cabin temperature
- Network status
- Socket button
- The instrument lighting is on or not.
To exit this menu, press the return button (located under the button with the number "5").
In the next section "Errors" may contain possible errors (usually clean).
In section "Autotest" contains information on the performance of individual elements of the radio: AM, FM, microphone, speakers, Tweeters, VT-module, CD, Power IC, Local ID.
You can also find out the model and version of your radio there:


In principle, this can be the end of the consideration of the questions most often arising from owners on the use of a radio tape recorder in Renault Duster.


 Pros and cons of alarm with auto start
  Removable tinting: varieties, pros and cons
 Duster breaks records: more than 200,000 sold in 2 years in Russia
 Renault Duster: owner reviews, all the cons and cons
 Renault Duster: photo how to prepare for winter
 Renault Duster 4 × 4 gas tank protection
 Renault Duster - how to save money on annual maintenance at a dealer?
 The long-awaited updated Renault Duster (video)
Reno Duster car owners with sad statistics note the failure of the head unit. If in the "standing" position the sound is tolerable, then at a speed the decibels of overtones and bass are mixed into low-quality hard rock. We found a review of the owner, who decides the issue radically - by replacing the radio.
Search options
I know firsthand that a "firm" radio tape recorder of an expensive model sounds completely different, so I really wanted to change our "bell". First of all, a decent sound was needed. At first glance, it seems that the head unit is not bad. But this is only static.
When driving at a speed of 100 km / h, the acoustic system gives out a "mess" (even with the replacement of the front acoustics for component). Some frequencies are not enough, others are too much. As a result, if a child falls asleep on the track, I turn down the volume, and my head gets tired of hard-to-hear familiar music. Just in case, I will note that I have made full soundproofing from specialists with expensive materials.
The second point: infuriated the video, which is "not a damn loud." Although I did not use it, passengers were constantly in a stupor. Curved bluetooth (at least with my phone), running away radio stations, etc. I'm completely fed up.
Initially inclined towards "Pioneer". In the previous car, the one-diner served for 5 years. But I also considered other options.
I dismissed the screen immediately because of the cost. By the way, Pioneer couldn't even look after the screen: everything I saw on sale had volume buttons instead of a "twist". And I wanted a "twist". JVC somehow calmly had enough space for the "spinner".

Further, I began to consider only double-sided ones without a screen. I immediately came across the X700, and I began to compare it with its analogues. In principle, branded "mafons" are all similar to each other and at the same price. Just who likes which manufacturer. Then I determined for myself a budget of 5000-5500 rubles. and began to look used.
Several of these "pioneers" were caught on the "secondary". As a result, we managed to take for 4500 rubles. Additionally, I had to buy a naturally transitional frame (1000 rubles), an antenna adapter (400 rubles). But the toad strangled the European adapter for power supply and I connected everything through the crimping terminal blocks.
Watch an interesting video on this topic