What is a download manager? Basically, not the most experienced users of the Windows system, who for the first time decided to reinstall their operating system without any special visual instructions, are faced with it. This installation occurs on a whim and tooltips. The latter, in turn, do not always differ in easy-to-understand language, and then some problems appear.
What is Windows Boot Manager
The boot manager is the first welcome screen in Windows. It allows you to choose which OS (operating system) from those installed on the device should be loaded at startup. It does not appear if the choice is obvious and consists of only one item.
How to disable the selection of unnecessary operating systems when loading Windows 7
The proposed options may be different, since more than one operating system can be installed on one computer, that is, several operating systems can be installed.
A rough-deleted OS still leaves a mark on the PC, which means that the boot manager perceives it as a separate option for the subsequent boot of your device.
Complete removal of the operating system when reinstalling Windows can only ensure the formatting of the hard disk partition on which it is installed.
So, you get bored with a black, gaudy screen that keeps you waiting for beautiful Windows to load. Correcting the situation is not as difficult as it seems. There are several solutions for every taste.
Disabling the selection of operating systems through "System Configuration"
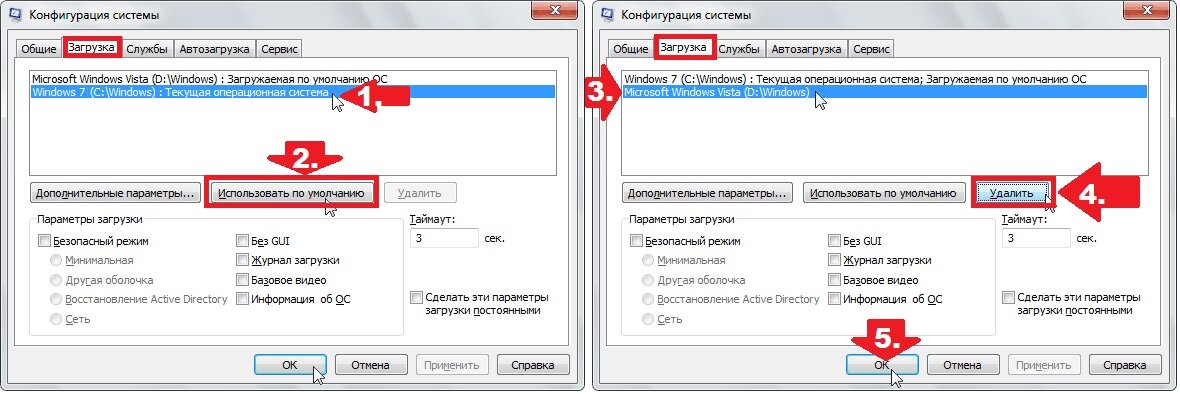
- Open the Start menu and type msconfig in the program search box. Then we select the program that the Windows system found.
- In the window that opens, go to the "Download" tab. In it we see how many and which OS recognizes DZ (boot manager) Windows.
- Click on the item "Current operating system". Click on the "Use as default" button. This action leads to the auto-selection of your OS among others, transfers it to the first line in the manager.
- If other systems are not needed, they are a mistake, or you simply do not want to watch the remote sensing screen for 30 seconds, the rest of the OS must be removed from the configuration. Select an unnecessary system in the list and click the "Delete" button.
- After all the actions to optimize the download, simply confirm the changes with the OK button.
Disabling the selection of operating systems through the command line
There is another option to clear the download manager, this time through the command line terminal:
Video: how to remove the choice of boot options for Windows 7
How to configure the boot manager in Windows 7 through the computer properties interface
For those who do not really like to type commands and look for services among their abundance in the Windows system, as well as for those who do not have a keyboard at the moment, there is a very simple way to configure the boot manager with a few mouse clicks.
- First, open the properties of the "Computer" through the context menu. To do this, right-click (right-click) on the appropriate shortcut on the desktop or in the Start menu.
- The properties window of the "Computer" opens, click on the item "Advanced system settings".
- Another window will open with five tabs. We are interested in the "Advanced" tab.
- In the "Boot and restore the system, debug information" block, click on the "Settings" button.
- Another settings window will allow us to select the default OS, enable or disable the selection of operating systems. That is, unchecked this item will allow you to bypass the download manager service and immediately start working with the OS, which is selected by default. And you can also choose the duration of the download manager before auto-selecting the OS.
If you do everything right, then your operating system will now boot directly, quickly and without any delay.
Learn how to fix problems with the Windows Boot Manager to speed up your boot and save you time. Instructions and commands are suitable not only for Windows 7. In versions 8 and 8.1, they are used with success. If you suddenly decide to install a new OS - do not forget to format the system disk before installing Windows.
Google Play, he is Play market or Play store- all this is the same program, which is one of the main ones in the Android operating system, because it is it that opens the door to the world of applications and games for our smartphone and tablet. But sometimes it happens that when you launch the Google Play market, instead of the usual applications, we see a page with the inscription "Check your connection and try again" and the Repeat button or the market gives some errors. Unfortunately, the Google Play application, like absolutely any other program, is not immune from all sorts of errors and failures in its work. This happens quite often, and if suddenly you have a similar inscription or the application does not load at all, then this article is for you.
In this article, we will try to answer the question: "What should I do if the Google Play market does not work or does not start on a smartphone or tablet?", As well as describe all kinds of problems when working with the Play Store and how to solve them.
Method number 1
Check the Internet on your device
It would seem that the answer is tritely simple, but for Google Play to work, a working Internet connection is required. Therefore, first of all, check on your smartphone or tablet whether the Wi-Fi network or mobile Internet (packet data transfer) is working, maybe you just forgot to turn them on. If everything works, go to any of the browsers that you have installed - Chrome, Firefox, Opera and open some page to make sure the Internet is working. If the Internet does not work, then reboot your router or router.
Method number 2
Reboot your Android device
Usually, just like when working with a computer, restarting will help solve many problems that may arise when using the Android operating system, including Google Play.
Method number 3
Check the firewall settings or antivirus software installed on the device
Usually, antivirus applications do not restrict the operation of the Play Market, unless you accidentally blocked the application's access to the Internet in the firewall settings. Check the settings of your installed antivirus software and firewall applications.
Method number 4
Clear cache and data in Google Play app
This method solves the problem in most cases.
Step 1 Go to the Settings app on your smartphone or tablet
Step 2 Find and open the menu item Application Manager or Applications and go to the All tab

Step 3 Find and open the Google Play Store app by tapping on its name

Step 4 In the window that opens, click on the buttons Erase data and Clear cache

Method number 5
Uninstall all Google Play app updates
If the steps from method #4 did not help, you can also uninstall updates for the Google Play Store application. To do this, in the "About the application" window, click the Uninstall updates button. All updates to the application will be removed and it will return to its original state, as it was when it was first launched. Restart your Android and try to go to the Play Store again.

Method number 6
Clear the cache in the Google Play Services app
If you still have a broken Google Play, then try clearing the cache in the Google Play Services app. You can also find it among all installed programs. In the About window, click the Clear cache button

Method number 7
Clear data in Google Services Framework app
The Google Services Framework is responsible for the correct operation of all Google services. If neither clearing the cache, nor deleting data and all Google Play updates helped you, try also clearing the data in the Google Services Framework. To do this, find the application in the menu Application Manager or Applications and open it. In the "About the application" window, click on the Erase data button and restart your smartphone or tablet.

Method number 8
Enable Disabled Google Apps and Download Manager (Downloads)
Often, Google Play stops working if you accidentally turn off key Google apps and Download Manager, which play a direct role in the service's performance. To check this, go to Settings → Applications → Disabled, if there is no such tab, then All (disabled applications will be at the very bottom) and see if Download Manager and Google services are disabled, such as Google Accounts, Google+ social network, Google Services Framework and others, if any, be sure to enable them.

Method number 9
Delete your Google account and restore it again
Sometimes a non-working Play Market app store can be restored simply by deleting your Google account and then adding it again.
Step 1 Go to the Settings app and find the item there Accounts (Accounts)

Step 2 Open your Google account, and select Delete account

Step 3 Then restart your Android device and re-add your Google account.
Method number 10
For "No connection" error, check the time and date
If you have the wrong time on your smartphone or tablet, then there is a chance of getting an error "No connection". Therefore, check that the time is correct and indicate your time zone. It is best to sync these settings via your carrier's mobile network or WI-Fi. To do this, in the Settings application, select the Date and time item and check the boxes "Network date and time" and "Network time zone".

Method number 11
Do an Android settings reset (Hard Reset)
This method is the most radical if none of the methods listed above helped you. How to hard reset a smartphone or tablet, you can read in the article How to reset Android to factory settings. But before you do this and delete all data, applications and contacts from your Android device, we recommend that you make a backup copy of the information you need, which you can then restore back.
We hope that at least one of the methods will help you solve the problem with the Google Play market. But it may happen that none of the above methods will help you, then seek help from specialists.
Add the article to your bookmarks and share with friends, as well as subscribe to our communities on social networks, where you can find a lot more useful information
During the installation of a new Windows OS on a computer, many novice users often forget to format their hard drive. Everything would be fine, only if you miss the right moment, as a result, every time you start the PC, you will have to admire the meticulous system window with the offer to load one of the two installed versions of the operating system. Something awkward, right? In this case, in order to return to the normal start of the computer, you will first have to figure out how to remove OS Windows 7 from your boot manager. And, frankly, there is more than one way to do this.
Option #1: Troubleshooting the System Configuration Utility
The Windows Boot Manager can also be reconfigured using the System Configuration program. You can launch it in various ways:
One way or another, after performing each of these actions, the system window we need to work will appear. In it, go to the "Download" tab, select the operating system suitable for automatic startup and click the "Set as default" button with the mouse. After that, we return to the list, click on the unnecessary boot entry and delete it by clicking on the "Delete" option. The final touch is to save the settings by pressing the OK button:
As practice shows, as a result of such simple actions, problems with loading Windows OS disappear at once.
Option #2: Debugging startup using the "Command Line"
You can also remove the obsessive list of operating systems when you boot your computer through the command line. There are a lot of ways to launch it today (read about them here), but in Windows 7, the easiest way to do this is to use the search query in the Start menu.
What are we doing? Press on the keyboard and enter the value cmd or "command" in the search bar. As a result, the system will automatically issue the program we need at the head of the list. We click on it twice, and then in turn we drive in, alternating with Enter, the commands:
To make Windows 7 the default operating system:
bcdedit.exe /default (current)

To remove a second Windows OS (for example, Windows XP from the boot manager):
bcdedit.exe /delete (ntldr) /f
When the commands are completed, close the window and restart the computer. In principle, after such a setting, Windows should boot normally without displaying a list of available operating systems.
Option number 3: Setting the launch through the "System Settings"
You can remove the second operating system when you boot your computer in a matter of minutes straight from your desktop. To do this, right-click on the “Computer” tab, select “Properties” from the menu that appears, and then click on the “Advanced system settings” tab in the new window:

Next, go to the “Advanced” section and click on the “Settings” button opposite the “Download and Recovery” item. After that, select the operating system suitable for loading, turn off the display of the list and save the changes by clicking OK:

As a result of such simple manipulations, Windows 7 will boot without any delays and failures. However, if the miracle did not happen, you can either use the special EasyBCD program to debug the computer startup, or check the hard disk for errors. In the latter case, the procedure will be as follows:
- open the command line (see option number 2);
- we drive the command CHKDSK C: / F / R into it and press Enter;
- give permission to check by pressing the Y button;
- close the command prompt and restart the computer.
As a result, on a new boot, the system will automatically search for and fix errors on the C drive, including those related to starting Windows. If this method did not work either, you will have to pick up a bootable USB flash drive (disk) with the operating system and repeat the Windows installation process, not forgetting in this case about formatting the hard drive.
Why do Android devices with Google Play Store experience problems? Many users are familiar with such situations. The reason may be technical problems of Google services or malfunctions of the smartphone (tablet) itself from which you operate. There are a lot of options, but we have selected a dozen of the most common difficulties and described ways that make it possible to find a way out.
Rebooting your smartphone or tablet is the first thing to try if the Play Store suddenly refuses to work. Alternatively, the cause could be a system hang (users encounter this situation quite often). The most interesting thing is that a reboot often helps not only with failures in the Play Store, but also with problems that arise with other services and applications. It also happens that the device rebooted, but the market does not want to work. Then you can try other methods.

Method 2: Reset Google Play Store settings
Resetting the service settings also helps quite often, and it is done in the following way:
1.
We go to the settings menu of the smartphone (tablet);
2.
Select the section " Applications" or " Application Manager»:

3. Find in the list Google Play Store, select it;

4. In the application control window that opens, select " Clear cache" or " Erase data”, click on this button.

5. We reboot the Android device so that the system reacts to the changes made to the settings.
6. If the Play Store does not work, try other methods.
Method 3: Remove Google Play Store Updates
Everything is done in the same way as in method 2 described above, with the only difference that instead of "Clear cache" the button " Uninstall updates". The application will return to the original version, in which it worked fine before installing the updates. If the problem is really in the new version of the software, or the Android device, due to technical imperfections, does not “pull” these updates, then the service will work in the usual mode for the user. No new features, but ok.
Method 4: Reset the settings of the Google Play Services app
Resetting settings is one of the effective options for solving problems with the operation of the Play Store. The procedure in this case is as follows:
1.
Menu « Settings»;
2.
Chapter " Application Manager" or " Applications»;
3. Choose " Google Play Services»;

4. Open the menu, select " Clear cache”, press.

Method 5: Activating the "Download Manager"
It is possible that during the operation of your tablet or smartphone you accidentally turned off " Download Manager” and did not attach importance to the fact that the service application stopped working. To reactivate it, you need to go to the settings menu of the Android device, then to "Applications", then using the "All" swipe, then find the "Download Manager" and turn it on by pressing the desired button. Restart your smartphone and check if the Play Store is working.

Method 6: Remove Google Account
We warn you right away: by deleting your Google account, you may lose the necessary and important information, so it is recommended to create a backup copy in advance (synchronize data).
1. Enter the settings menu;
2. Select " Accounts"and find yours in the menu that opens, click;

3. In the synchronization menu that opens, click on your mailbox;

4. Select items for synchronization (saving in a backup copy). Usually these are "Contacts" and other personal information available in the device's memory. To select sections, just click on them. If you care about all the information contained in the Android device, click on "Options", then select " Synchronize» - you will receive backup copies of all available applications.

You are now ready to delete your Google account. When you re-enter from it to the device, you will receive an offer to restore information from a backup.
But let's get back to the procedure for deleting a Google account to normalize the market. After creating a backup, you need to return to the previous menu and this time select " Delete", not "Synchronize". Click on the appropriate button, then reboot your smartphone (tablet) and log in again. Usually, deleting your account helps to get rid of problems related to the operation of Google services. If this does not happen, try other methods.

Method 7: Remove incompatible applications
Sometimes users install applications on their own, the presence of which adversely affects the operation of the Play Store service, and in some cases can even lead to its blocking. The list of such programs is very long, but the most common culprit of problems is software popular with gamers. Freedom, which allows you to make in-game purchases for free. Most likely, it is this application that will have to be removed in order to solve the problem with the market.
1. In the "Settings" menu, find "Application Manager", then "Installed".
2. Scroll through the list until you find Freedom, select it.
3. Press " stop” in the application menu that opens in front of you.
4. Remove Freedom. It is very important to first stop the program and only then uninstall the application.
5. Reboot your Android device.
6. Check if Google Play is working.
Did not help? We are trying other solutions to the problem.
Method 8: Setting "hosts"
This system file in Android devices is located at /system/etc/hosts. It is used to block access to unwanted resources. Initially, the file contains a single entry localhost 127.0.0.1. Due to the actions of intruders who wished to block your Google account and receive money for unlocking, the address of the market may also be there. Remove this line, reverting the hosts file to its original state. For such actions, you may need to obtain root rights. We have repeatedly described how this is done on various devices on our website.


Method 9: Hard reset all settings of the Android device
Full reset- the method is radical and effective, but preparation is necessary for it. Otherwise, you may lose valuable information. Perform data synchronization - create a backup, as shown in method 6. Make sure this procedure completed successfully. Now you can go to "Settings", find the "Backup and reset" section, where you can perform "Reset settings". After that, restart the device and restore the information using the backup.

Method 10: Checking the Internet connection
Before setting up an Android device and deleting something from it, make sure you have Internet access. Check the connection speed, restart the router and recheck the connection quality again.
Method 11: Activate your Google account
Quite often a Google account turns off. This can be checked by going to the appropriate section of the menu. Find the Google Accounts app, activate it if it's disabled. The problem with the market is 100% solved.
Method 12: Correcting the time and date
An incorrectly set date or time can cause problems with Google Play. This is due to licenses and other nuances of the operation of Google services, depending on time constraints. If you have a network connection and the quality is good, reset the time and date. Do not forget correct time zone. This is done in the "Settings" menu in the items "Date and time", "Date and time of the network", "Network time zone" by ticking the desired option.

We hope that at least one of the methods we offer will be saving for you and will help you to normalize the operation of your Android device with the Google Play service. If you find your own, then send it to us - perhaps it will help someone else.
Sometimes a file can "get stuck" in the download block, the reasons for this failure are different, but they are all programmatic. We will consider the most relevant ways to solve this problem: we will give step-by-step instructions and analyze non-standard cases of this error.
Where do stuck downloads come from?
The main problem of the Android OS is the presence of a large number of background processes and data. The system passes through itself a huge number of files and processes them "in the background". A number of these processes are often not needed at all, so programs that clean up the boot manager, and thus the processor, are gaining popularity. Many people ask the question: how to stop downloading on Android?
The symptomatology is usually this: there is some file known to us or unknown at all, hanging in the download tray. Nothing really happens to him. In addition to the fact that it strains and torments the system, plus it can eat up traffic.
Disable download
A "hanging" download often appears when a connection is broken or an error occurs in an application. It may show a flurry of activity, but it never ends, moreover, a reboot does not always help. You can install a new download to "push" the stuck: but sometimes we just get two stuck lines. Stopping the download is usually easy, using an elementary algorithm of actions:
- We call the menu, usually it is the left button.

- We are looking for a list of applications, which provides a complete list of installed programs.

- In the general list, go to the "All" tab: there you need to find the "Download Manager".

- Inside the program settings, click the "Erase data" button. This command will clear all current downloads regardless of their status.

- A warning window will appear to which you must agree.
Glitchy downloads can also provoke certain types of viruses that spread through free Wi-Fi hotspots or through Internet pages. Now Android is full of free and effective antiviruses that almost instantly deal with the problem.
Alternative way
The algorithm is relevant for system versions starting from 4.0. It gives a plus in that it saves time: the number of necessary actions is reduced.

The effect is the same, no additional action is needed.