USB Disk Security is a free application to provide complete protection against all kinds of malware distributed via removable USB drives. The application works with external hard drives, memory cards, digital cameras, flash drives, and other devices that can be connected via USB. Disk Security is based on a special threat detection technology; as an anti-virus program, the utility is able to work in stealth mode, only letting you know about its existence only if malware is detected.
Basically, the infection of a personal computer with viruses occurs at the time of using the global Internet, a little less often it happens during the installation of a dubious or unverified program. An infected file can also penetrate a PC through the most common flash media.
When an infected flash drive is connected to a personal computer, malicious software penetrates the hard drive, and most importantly, it happens so quickly that the installed anti-virus programs do not always have time to respond in time. Especially for such cases, it is necessary to use programs that can easily cope with this type of threat. Today, Disk Security is one of the best programs for protecting against infected files distributed via USB drives.
If viruses are detected, the application, depending on the settings, will remove or block them, thereby preventing them from automatically launching. In addition, the utility is able to restore the system after it has been infected with malware, clear the hard drive of temporary files, prohibit copying files from the computer's hard drive, checking URL addresses, completely blocking USB ports, autoload control, forced scanning of hard drives.
The program is equipped with a convenient and simple user interface in Russian. The control panel is located on the left side of the working window, consisting of seven main items. The following sections deserve special attention: data protection, scanning and USB shield.
The last section is responsible for displaying a full report on all detected threats. You also need to take into account that the utility automatically removes any malicious application by default. So in order to avoid deleting important documents, it is better to disable this option, for example, after deleting the boot file, your USB drive will not be able to start. After disabling, Disk Security will act as follows - it will automatically move the infected file to quarantine or simply mark it.
In addition to tools for automatic checking of flash media, the "Scanning" section is equipped with a vaccination function. Vaccination can be carried out both on removable media and on the personal computer itself. At the same time, a special file is created on the flash drive or on the hard drive, which prohibits the launch of some malicious applications. Vaccination can be turned off if desired.
The "Data Protection" section is able to provide devices with higher protection, for example, you can set a ban on moving data from a computer to a memory card or generally block access to a PC via a USB port. To close access, you will need to restart your computer, only after that the settings will take effect.
Key features of USB Disk Security:
- Perform a more thorough scan of external drives. If malware is detected, they are either removed or quarantined.
- The presence of a resident anti-virus scanner that works when a new USB drive is connected. Without making changes to the settings, infected files will be automatically deleted.
- If necessary, you can completely disable automatic startup on the PC.
- When using the utility, it is possible to view content without the risk of infecting a personal computer.
- Websites are checked for infected applications. The following services are used during the scan: Trend Micro, McAfee, VirusTotal, Symantec, and Google.
- The linkzb.com search service provides an opportunity to use the Internet safely.
- The application is able to prevent unauthorized connection of a USB drive to a PC.
- Blocking the copying of unauthorized data to USB is performed through the use of the Access Control tool.
- Using the system for cleaning temporary files, if the virus is located in temporary directories, it will be removed immediately.
- You can set a password in the program settings.
- Full control over the applications included in autorun.
- The presence of a built-in system for restoring important directories in the registry that were affected by malware.
- You can download Disk Security for free.
- Runs on Windows XP, 7 and 8.
- An automatic check for updates is in progress.
- The application does not need to update virus databases, as it does not work like a standard anti-virus program.
- Due to the small volume, the utility can be installed even on a weak personal computer.
- Full compatibility with many modern anti-virus programs is viewed.
- Using a multi-language interface, a total of 12 languages are available.
USB Disk Security is a simple and effective program to provide complete protection against malware distributed via removable media.
It's always like this with security. It’s worth relaxing and, after chatting with a friend, you insert his flash drive into your well-functioning computer, and to Kaspersky’s question - should we check this flash drive, you carelessly answer - no need ... And then you get entertainment for the whole weekend ...
And even more often there is another situation - when you have to insert your USB flash drive into someone else's computer. This is not necessarily the computer of friends, friends, now you can pick up a virus in a photo printing studio, and even in a tax office ...
In this article I will tell you how to protect your computer and flash drive from viruses without additional programs.
You will learn 3 time-tested quality methods that save in most cases.
Do not go into the registry if you have never done this and have a poor idea of how a section differs from a parameter, and how parameters are created and their values \u200b\u200bchanged!
1. Protecting your computer from viruses on a flash drive. Disable autoload.
Let's start by first protecting your computer from infected flash drives. You never know where we ourselves inserted our flash drive, or someone came to us with an unknown flash drive ...
To reliably protect your computer from viruses on USB flash drives, it is enough to disable autoload (autorun) on all disks connected to the computer. To do this, you can use special programs (Anti autorun), or make simple settings.
Anti-autorun is a program for protecting flash drives, memory cards, mp3-4 players and other removable storage media from viruses.
All further actions are done with administrator rights.
Ways to protect your computer from autostart on flash drives
1. Disable autorun in group policies
Open the Local Group Policy Editor:
Start - Run (Win + R) - gpedit.msc or start typing "group" in the search bar
Computer Configuration - Administrative Templates - All Settings - Disable AutoPlay

Right click - Change - Enable - All Devices - Apply.
2. Disable autorun using the registry editor
You can also completely disable autorun from all disks using the registry editor.
Launch Registry Editor (Win+R). Open a branch
HKEY_LOCAL_MACHINE\Software\Microsoft\Windows\CurrentVersion\Policies\Explorer
and in the value of the binary parameter " NoDriveTypeAutoRun”, and instead of “95” (or “91”) write “FF”.
Valid key values:
0x1 - disable autorun on drives of unknown types
0x4 - disable autorun of removable devices
0x8 - disable autostart of non-removable devices
0x10 - disable autorun network drives
0x20 - disable autorun CD drives
0x40 - disable autorun of RAM disks
0x80 - disable autorun on drives of unknown types
0xFF - disable autorun for all drives.
In Windows XP, by default, this key is missing (as well as the Explorer section itself), so you may need to create a corresponding section (Explorer) and the parameter NoDriveTypeAutoRun, which controls device autoloading.
All registry changes take effect after a reboot.
3. Writing to the script registry
The following method provides more advanced options for removing potentially dangerous security holes in the system, including those associated with autorun.
Create an arbitrary reg file (named noautorun.reg for example) with the following content:
Windows Registry Editor Version 5.00
[-HKEY_LOCAL_MACHINE\SOFTWARE\Microsoft\Windows\CurrentVersion\Explorer\AutoplayHandlers\CancelAutoplay\Files]
«*.*»=»»
"NoDriveTypeAutoRun"=dword:000000ff
"NoDriveAutoRun"=dword:000000ff
"NoFolderOptions"=dword:00000000
"CheckedValue"=dword:00000001
@="@SYS:DoesNotExist"
"AutoRun"=dword:00000000
Then run this file, and answer “Yes” to the system’s question about making changes.
Disable autorun temporarily (for example, in the absence of administrator rights), for the period of connecting the device (flash drive) by holding down the key Shift. At the same time, it is recommended to open the USB flash drive not through “My Computer” (otherwise autorun will work), but through Explorer.
2 Protecting the flash drive with autorun.inf
Once upon a time, to protect a USB flash drive from viruses, it was considered sufficient to create an empty autorun.inf file on it and assign “read-only” rights to it. In this case, the virus could not create its own autoload file there, since such a file already existed and had the appropriate attributes.
The essence of the method is to protect a special file that is responsible for automatically launching the program when the disk is connected to the system.
The file is called autorun.inf. Viruses love it.
The fact is that if you write a virus to a USB flash drive, and then specify the command to run it in autorun.inf, then the malicious program will be launched EVERY TIME when the drive is connected to the system.
So, to protect your flash drive, do the following:
Step 1. Open the Notepad text editor (Start-Accessories-Notepad).
Step 2. Copy these lines and paste them into Notepad:
attrib -S -H -R -A autorun.*
delautorun.*
attrib -S -H -R -A recycler
rd "\\?\%~d0\recycler\" /s /q
attrib -S -H -R -A recycled
rd "\\?\%~d0\recycled\" /s /q
mkdir "\\?\%~d0\AUTORUN.INF\LPT3"
attrib +S +H +R +A %~d0\AUTORUN.INF /s /d
mkdir "\\?\%~d0\RECYCLED\LPT3"
attrib +S +H +R +A %~d0\RECYCLED /s /d
mkdir "\\?\%~d0\RECYCLER\LPT3"
attrib +S +H +R +A %~d0\RECYCLER /s /dattrib -s -h -r autorun.*
delautorun.*
mkdir %~d0AUTORUN.INF
mkdir "?%~d0AUTORUN.INF.."
attrib +s +h %~d0AUTORUN.INF
You can select text with the mouse, copy it to the clipboard, then switch to Notepad and execute the paste command.
What do these commands mean? How does it work?
First, we delete files or folders that the virus may have managed to create by removing protective attributes from them.
These are various types of files named autorun, folders recycler and recycled, masquerading as a trash can.
Then we create the Autorun.inf folder in a special way, containing a folder with the system name LPT3. Since the time of the unforgettable DOS, there have been a number of names that cannot be used to name files and folders, with which no operations can be performed. An example of such reserved names: LPT1, LPT2, LPT3, PRN, CONF , con, nul, AUX, COM1…. and others. Try creating a folder, say PRN. You won't get anything. You cannot create a folder using the usual Windows tools. But there is a way. It is he who is used in this script.
Line
mkdir "\\?\%~d0\autorun.inf\LPT3" means:
mkdir- command to create a directory.
\\?\
- this is exactly what helps to create a folder with a reserved system name.
%~d0\- designation of a specific directory.
If you specify f:\ instead, then it will be possible to run the script from anywhere, it will create it on the f: drive.
autorun.inf and LPT3 are the names of the directories to be created.
By the way, you can delete this folder in the same way, otherwise nothing. If you want to delete, run on the command line:
rmdir \\?\f:\autorun.inf\,
where f: is the drive from which we delete the "autorun.inf" folder.
One more point: adding attributes to folders is an additional protection.
Team attrib adds the following attributes to these folders: system, hidden, read-only, archive.
Step 3. Save the document to a USB flash drive as a .bat file. Required on a USB flash drive and always with the bat extension. The name can be anything, for example: locker.bat
Step 4. Launch Explorer, go to the flash drive and run the file.
After launch, a folder will be created AUTORUN.INF with attributes that protect it from recording and hide it from prying eyes.
Now, if you insert a USB flash drive into an infected computer, the virus will not be able to change the autorun file. Since instead of a file we have a folder, and even hidden and write-protected. Nothing will work for him.
But look: the virus can write itself to another location on the disk or change some file.
Therefore, without fear, insert a USB flash drive into your computer and - I strongly recommend - check it for viruses. The time spent on the scan is not commensurate with the losses that will occur after the system is infected with a virus.
I draw your attention: our protection only prevents changing the autorun file.
To protect another flash drive, vaccinate: copy the tablet file locker.bat to it and run it in Explorer.
3. Protection of the flash drive from viruses.
The protection is very high quality, in my opinion, the best, it has been tested by time and viruses, it saves in 99% of cases!
A flash drive made using this method, after contact with an infectious laptop, or rather with dozens of laptops, will remain crystal clear. So we do it without thinking!
1. Check the file system type.
We go to "My Computer", find our flash drive, right-click on it, then select " Property"and we see this picture:

If you, like me, have an NTFS file system, then proceed to the next step. For those who have Fat32, you need to change the file system. This can only be done when formatting.
Right-click on the removable drive and select "Format" - NTFS - Quick Format.
I hope you are aware that when formatting, all data will be deleted from the flash drive.
2. Create a folder for data.
Create an empty folder on the flash drive. For example - 'Data'
3. We close access to the flash drive.
Open the properties of the removable disk again, tab .

We see the "Allow" column with checkmarks. This means that we have full access, you can easily create new files, delete, edit, and so on. Viruses from this are simply happy and skillfully use their freedom.
Since this case categorically does not suit us, we click on the "Change" button with the mouse. In the window that appears, uncheck all the checkboxes except for " List folder contents" and " Reading” and click “OK”.
Thus, we closed access to the flash drive. Now, if we want to create a new folder or file on it (or copy it), we will get an error. It will not work to perform the "send to a removable disk" function. But the good news is that the virus will not be able to register on a flash drive in this situation.
4. Open the access rights to the created folder
We need to return all rights to the folder that we created at the root of the flash drive, otherwise it will be impossible to work with it not only for viruses, but also for us. To do this, as usual, right-click on the folder and "Properties" - Edit, and check all the boxes in the " allow».
After pressing the OK button, the virus protection of the flash drive is installed.
All data will be stored in this folder, they will have full access. You can always delete, create, copy, rename ... yes, you can do anything with files and folders. But viruses (more precisely, as I immediately said, not all, but 99% for sure) will not be able to do anything, since they automatically climb into the root folder.
Remember that it is much easier to prevent a virus on a USB flash drive than to repair damage later.
tweet
If the antivirus installed on your computer does not detect anything suspicious, but there are symptoms (freezes, incomprehensible running processes, autorun.inf appearing on flash drives, etc.), a “one-time antivirus” is necessary. It is easy to handle it - just download the link and run it. At the same time, it is advisable to disable the antivirus, which is installed on a permanent basis, for the duration of the scan.
Advantages of disposable antiviruses
1. Free. For home use, almost all disposable antiviruses are free.
Flaws
1. They are not able to protect your computer all the time (there is no module for real-time protection) and there is no anti-virus database update.
2. You have to download it again every time so that such an antivirus detects new viruses.
Dr.Web CureIt!
Dr.Web CureIt!- a good disposable antivirus. Knows how to deal with running viruses (does not allow himself to be killed during a scan).
HerdProtect
An online antivirus that scans all computer files with 68 antivirus databases. How to use it, told in a separate article
This is a good option if unlimited internet is connected.
Minus: does not know how to disinfect infected files.
A plus: You don't need to redownload to check, the databases are always fresh.
Kaspersky Virus Removal Tool
ESET Online Scanner
Plus Online Scanner - no need to worry about downloading new versions with fresh databases. Just open the link or run esetsmartinstaller_rus.exe, the antivirus will start, update and scan your computer for viruses.
Norton Security Scan
Norton Security Scan- Another one-time antivirus. You can download The interface is in English, but simple.
Scans hard drives very quickly. Requires an internet connection, like Eset Online Scanner.
When you first start it creates a shortcut to itself, which is strange.
In general, it is better not to use it, since viruses common in Russia get into its database too late. The newest winlockers (ransomware banners) are unlikely to be detected.
AVZ or Zaitsev Antivirus
Powerful antivirus utility (not a full antivirus!) for advanced users. Functions are not the sea, but the whole ocean.
When your computer is infected with viruses to such an extent that the operating system no longer even starts, there is only one way out - SCAN IT ON BOOT.
That is, we need to scan it, find all malicious programs and remove them even before the operating system boots. Then restart our PC and enjoy its working state again.
The fact is that when I first encountered a problem when the computer was infected with a virus and the operating system refused to start, I was simply horrified. Usually, if there is a virus on the computer, then you simply find it with the help of an antivirus program and delete it. And then the system did not boot at all. Just after turning on the computer, a window appeared where they asked how to send SMS as usual, enter the code, and so on. In short another DIVORCE FOR MONEY!
What did I decide to do right away? I immediately came to the conclusion that it is necessary. I did this and was horrified when the virus again prevented the system from starting. How so? What to do if REINSTALLING THE SYSTEM DID NOT HELP?
Salvation can be scan your computer for viruses while loading it! It's great that I remembered this, but I had never used it until that time.
We need to write an image of an anti-virus program to a disk or USB flash drive. Such images can be found on the official websites of such antivirus developers as, for example, Kaspersky, Doctor Web, and so on.
In this tutorial, I will tell you how to take an image of Kaspersky Anti-Virus, write it to a USB flash drive and scan all disks on your computer, removing all viruses.
So, now we will start creating bootable flash drive with antivirus.
For this we need:
1. Formatted USB flash drive.
2. Image of Kaspersky Anti-Virus
3. A program for writing an image to a USB flash drive.
I hope you already have a flash drive, it remains to download the necessary programs.
First, let's take a look at the program. Double click the left mouse button on the downloaded file.

Then in the window that opens, specify the folder for unpacking the program, or leave it by default, then it will be unpacked to the same place where it lies. Press the button "Install»

After unpacking, the program will automatically start. Press the button " Browse".

We indicate on the computer where the ISO image of Kaspersky is located.

After the path to the image is specified, you need to select USB drive, on which Kaspersky antivirus will be written, and click the " Start».

Our flash drive must be formatted for the FAT or FAT32 file system. Therefore, if we previously formatted it in NTFS, a window will appear where we must confirm the formatting in FAT32. Click "Yes".

The recording has gone. We are waiting for completion.

After the bootable USB flash drive with the antivirus is created, a window with the text will appear: Kaspersky Rescue Disk was written successfully. Click "OK".

Now we need to prepare the computer for download fromUSB media. You need to go into the BIOS and put the boot from the USB flash drive. I will show on the example of my BIOS. It may differ for you, but the process will be similar, it is in any case!
We restart the computer, the USB flash drive with the recorded antivirus, we do not remove it from the computer.
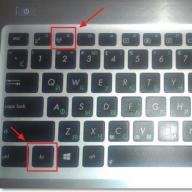
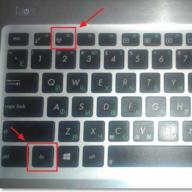
When restarting the PC, we need to go into the BIOS, for this we press the DELETE or F2 key on the keyboard, it all depends on your motherboard.
After entering the BIOS, we find the tab Boot, select the item Hard Disk Drivers.

We put USB first.

We save the settings made using the F10 key and exit.
Now our computer boots from a USB flash drive.
If we did everything right, then in a few seconds Kaspersky will start. We are asked here to press the Enter key. We press.
Then, using the arrows on the keyboard, select the language " Russian».

We accept the terms of the license agreement by pressing the key 1 .

Choose Graphics Mode.

We are waiting for the program to start.

A program is launched to scan your computer for viruses. We indicate with checkboxes which disks need to be checked, and click " Run object check».

Disk scanning has started.

If any threats are found in the process, we will need to take some action. For example " Delete"If the risk of infection is high, or" Skip"If it is not dangerous at all.

After all threats are found and removed, we will have to restart the computer.

And most importantly, put the boot from the hard disk again, and check the system's performance.
This completes the lesson on creating a bootable USB flash drive with antivirus.
Along with cloud services, we very often use ordinary flash cards to store photos and movies. We connect it to other people's computers and laptops, which carries the risk of infection with viruses and other malware. The statistics are relentless: every 10th computer is a direct threat. The question arises: how to protect a flash drive from viruses without compromising the comfort of using it?
Standard Windows Methods
Most often, infection of a USB drive occurs through a file autorun.inf. This file serves a very specific purpose: automatically launching or installing applications from a flash drive to a computer. It is hidden, but present on any flash drive. As in other areas of life, early protection and prevention is better than time-consuming treatment that does not guarantee a 100% positive result. Therefore, the main task is to make the autorun.inf file invulnerable to attempts to infect it.
It is extremely important: the methods described below will protect the media from malware that uses the USB-flash as a means of distributing itself (they are the ones who seek to overwrite the mentioned file in their own way). Viruses, trojans and other troubles in program installers will not go anywhere: use antiviruses to detect them.
Disabling autoload
This is a method of protecting the computer itself from a possibly already infected flash drive, both from yours and from someone else's. The easiest way to do this is to follow the steps below. For Windows 7:
- Press key combination Win+R.
- In the Run window that opens, enter gpedit.msc and click on OK.
- Click on "Allow" when a message prompting you to take action as an administrator appears. You may also need to enter an administrator password.
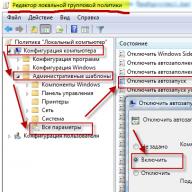
- In the Local Group Policy Editor window that appears, expand the "Computer Configuration" list, and then "Administrative Templates".
- Select "All Settings".

- In the list that opens on the right, right-click on the line "Disable autorun".

- Click "Change", make the item "Enable" active, the value "All devices" should be set below.

- Click "Apply".
Please note: in some versions of Windows (8.8.1), the sequence in steps 4-6 may be slightly different and look like this: "Computer Configuration" - "Administrative Templates" - "Windows Components" - "Autorun Policies" - "Turn off Autorun".
A reboot may be required for the changes to take effect. That's all - now any flash drives connected to the computer will not start automatically on it and will not cause harm without user intervention.
Autorun file protection
Now a way to protect the flash drive itself from malware that spreads using physical storage media. We are talking about the same autorun.inf.
In the good old days, it was enough to create an empty write-protected file on a USB drive. That is, with read-only rights. Today, such measures are not enough. But the essence of the action is similar. On a flash drive checked by a good antivirus, making sure that there are no dangers, create a special file. Open notepad and copy these lines into it:
attrib -S -H -R -A autorun.*
delautorun.*
attrib -S -H -R -A recycler
rd "\\?\%~d0\recycler\" /s /q
attrib -S -H -R -A recycled
rd "\\?\%~d0\recycled\" /s /q
mkdir "\\?\%~d0\AUTORUN.INF\LPT3"
attrib +S +H +R +A %~d0\AUTORUN.INF /s /d
mkdir "\\?\%~d0\RECYCLED\LPT3"
attrib +S +H +R +A %~d0\RECYCLED /s /d
mkdir "\\?\%~d0\RECYCLER\LPT3"
attrib +S +H +R +A %~d0\RECYCLER /s /dattrib -s -h -r autorun.*
delautorun.*
mkdir %~d0AUTORUN.INF
mkdir "?%~d0AUTORUN.INF..."
attrib +s +h %~d0AUTORUN.INF
Save the result to a USB flash drive, naming the file locker.bat. After the dot - the extension, it is extremely important and should look exactly like .bat. Open the flash drive through the explorer and run the newly created file with the usual double click of the mouse. It will run as a small program and create a protected folder called AUTORUN.INF.
What does it give? By inserting a USB Flash Drive into an infected computer, you can not be afraid of the viruses present on it that spread via USB. Such a virus will rush to overwrite the autorun.inf file, but it does not exist! Instead, a folder, and even under protection.
Important: viruses can write themselves to other places on the flash drive by changing other files. Therefore, when inserting it into a computer, check it with an antivirus before opening it.
radical way
If you have to connect a USB flash drive to someone else's computer, but only to drop files from it, the option of switching the file system to read-only mode is suitable. This is an effective, but, in most cases, inconvenient way, making the “send to removable disk” option and similar operations inoperative.
In order to apply this method, you must:
- Format the USB drive to the NTFS file system. Please note: all data from the flash drive will be deleted! If the flash drive is already in NTFS, skip this step.

- Write down all the necessary data, put them in one folder.
- Open the properties of the flash drive (right-click) and in the "Security" tab, click on the "Change" button.

- In the "Allow" column, uncheck all the checkboxes except for the "List folder contents" and "Read" items.
Press OK.

Now not a single virus will be able to register on the flash drive.
Using Third Party Programs
You can also protect a USB drive from malware with the help of programs specially created for this. For example, Panda USB Vaccine. This free utility is designed specifically to protect removable media.
After downloading and running it, connect the USB flash drive you want to protect to your computer. Take 2 easy steps:
- In the drop-down menu, install the desired USB drive;
- Click on the Vaccinate USB button.
And that's it! The flash drive is protected from overwriting the autorun file. In fact, the program simply disables autorun, but does it by pressing a couple of buttons in a user-friendly interface.
Conclusion
Unfortunately, you will not be able to 100% protect your flash drive from viruses. The measures described in the article only prevent malware from automatically penetrating first to a USB drive, and then to your PC. Always keep your antivirus up to date and scan flash drives before opening them in File Explorer.