The presence of Wi-Fi allows you to use the Internet in a variety of places. But before you can, comfortably sitting in a cafe or on a park bench, plunge into the world of the Internet, you need to deal with your laptop and find how and where to turn on the network on your laptop.
How to turn on the wireless network on a laptop?
There is nothing complicated about turning on wireless on a laptop. You just need to know the function keys to enable wireless communication on your brand laptop, because each manufacturer plays key combinations in its own way. For those trying to understand:
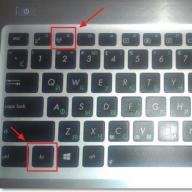
- how to turn on wireless on an Asus laptop, you just need to press Fn and F2;
- the wireless button on an HP laptop is a combination of Fn and F12, or a touch button with an antenna pattern on models where available;
- on Lenovo, press Fn and F5 or a special switch, which is indicated in the instructions;
- Acer and Packard bell turn on the network with a combination of Fn and F3;
- on different Samsung models, this is either Fn and F9 or Fn and F12.
If the standard combinations are not suitable (another one may be introduced in new models), then attention should be paid to the instructions from the manufacturer, which must indicate all the necessary information related to the functionality of the laptop. In any case, it should be the Fn button, and in its absence, a special button with an antenna pattern or a switch is pressed.

Enabling wireless communication on a laptop in other ways
If a switch is not marked on the keyboard, it can be placed on the side panel or the bottom of the laptop. The buttons located on the bottom are made inconspicuous, so you need to pay special attention to find it there. If neither the combination nor the switch could turn on the wireless network, then most likely the Wi-Fi is simply not configured, and it's time to do it.

How to enable the wireless network adapter?
Any setup begins with checking for the presence of the necessary drivers, which are connected if they are, but not connected, and are first downloaded and installed, and then connected if they are not in the laptop. You can check the drivers through the "Control Panel", the menu item "Device Manager". If this subsection is not immediately visible, then it may be located in the Hardware and Sound section.
From the "Dispatcher" you need to go to "Network Adapters" and find the Wireless section there, which is what you need. It may be that there is no inscription, or it is marked with an exclamation mark. This is direct evidence of problems with drivers that will have to be installed first. They must be present on the disk that came with the laptop. If the disk is lost or for some reason the installation fails, you can search for them on the manufacturer's website.
If there are drivers, but marked with an exclamation mark, then you need to right-click on this icon and select the appropriate item in the menu that appears. Usually it is the phrase "Engage". You may need to turn it on additionally if the adapter is connected to the power saving mode.
You can eliminate the savings factor in the Windows 7 menu in the "Properties" section, where there should be a "Power Management" subsection. It has a checkmark on the item "Allow shutdown to save."
After unchecking the box, the drivers will work, and the connection can be made by standard keystrokes. If the above manipulations did not bring results, the laptop should be shown to a specialist - it may be damaged.

Strange as it may seem, but it is this problem that often occurs among users of new laptop models. After a short use, for some unknown reason, Wi-Fi turns off. But this is done to reduce battery power consumption. Today I will tell you how to quickly turn on a wireless network or Wi-Fi adapter on laptops: HP, Lenova, ACER, etc.
Diagnostics
To quickly fix the problem, simply find your network connection in the lower right corner. And it does not matter what operating system you have Windows 7, 8, 10 or XP. Find the wave icon and right click on it. Then select Diagnostics.
The Windows operating system itself must find the problem and programmatically solve it. After that, you should see the phrase that the adapter was disabled and the operating system reactivated it.

But sometimes you can see this message: "Wireless disabled - Not fixed (With a red cross)". But you should not be afraid, the system itself simply could not turn on the transmitter on the laptop, and we will do it manually.
Buttons
On 50% of laptops, you can find a separate button or switch that turns the Wi-Fi network on and off. For starters, I would look at the additional buttons next to the main keyboard. You need to find a button on which will be depicted: an antenna, a computer - with waves departing from them.

If there is no such button, then you can look for it on the side of the laptop. Sometimes laptop companies put the power buttons there. But as I wrote earlier, not all laptops have such a button. But you can turn it on in another way, for this you need to find a similar icon on the main keyboard in the F key row.

To activate, you must simultaneously press the auxiliary key "Fn" and this key. On my laptop, this combination is "Fn + F2", but sometimes the keys F3, F5, F9, F12 are used.
If nothing happened when you clicked it, then this means that you don’t have drivers installed on your machine that are responsible for these buttons, so we will turn it on in a different way.
Enable via control center
- Press the Win keys (May look like a window) and R at the same time. You already know how to do this.

- After that, you will see this window. It is necessary to enter the ncpa.cpl command in one field and click on the button below "OK".

- Find the wireless connection with the ladder icon, right-click on it and select "Enable".
Windows 8 and 10
If you have an eight and a ten, then you may have Airplane mode turned on. Then you will not be able to turn on WiFi while it is working.

- You need to go to "All Settings".

- Next, enter the section with the planet icon.

- Click on the airplane and turn off the mode. You can also move the bottom sliders to On. Then, even if you have Airplane mode turned on, the wireless network and Bluetooth will not turn off.
Check Driver
- Press Win + R;

- We write the command devmgmt.msc;

- Go to the Network Devices section. Now look closely to see if there is an icon with a down arrow. If it is, then right-click on it and then select "Enable".
Checking the WLAN function
I must say right away that this function automatically controls all network devices and, in theory, it should be enabled. But sometimes, when installing some programs or when harmed by viruses, the setting can crash.
- Win+R;

- services.msc

- The list will arrange the data in alphabetical order. So just scroll down to the "WLAN Auto-Config Service" section. After that, select the properties of this section.

- In the line "Startup type:" set the automatic start. Then click "Apply" and "OK".
Driver installation
If I were you, I would reinstall the drivers for your WiFi adapter. They should be downloaded from the official website of your laptop company.
- To do this, connect the laptop to your router via a wire to any free LAN port. Or you can find where else you can use the Internet.

- After that, open any search engine and enter the name of the company. I have an Acer laptop, so I enter it exactly.

- We choose your product. We select the version of the operating system and then download the drivers for your wireless adapter.
If you did not find the necessary firewood on the site or just got confused, then you can download the whole pack from the site - https://drp.su/en/foradmin. You need to download "DriverPack Offline Network". After installing the driver, do not forget to restart the machine.

What to do on the computer?
Unfortunately, manufacturers of ordinary stationary personal computers do not install a built-in wireless network module. But you can buy it separately. It looks like a regular flash drive. Sometimes an antenna is also installed in it to improve communication. Such external modules cost from 800 to 1800 rubles in any computer store. Drivers are quickly installed offline the first time you connect to the internet.

The question of turning on wi-fi on a laptop is of interest to many. Difficulties may arise due to the fact that each model has its own recommendations and instructions. Sometimes a key combination is enough, in other cases a mechanical switch is used.
Turn on Wi-Fi on laptops

Turning on Wi-Fi on a laptop using the Fn + F5 keys
Usually, on the keys responsible for connecting to the Network, there is a stylized image of the antenna. It doesn't matter which laptop - Acer or HP. You can always find such a button. But the combinations with it are different.
- Fn + F2 is a working combination for the Asus WiFi range.
- Fn + F12 needs to be pressed by those who purchased an HP laptop. Or there is a separate button that depicts a wireless network.
- Fn+F3 is a combination to enable WiFi connection for MSI models.
- For Samsung, there are two options: Fn + F12, or Fn + F9.
- Lenovo is different from HP or Acer. To establish a connection, mechanical switches are more often used in this model range. But the Fn + F5 keys also work.
- F8 + Fn - keys that allow you to establish a connection on any Toshiba laptop.
- The presence of a mechanical switch is also characteristic of the Sony Vaio lineup.
You can look for a button that plays the role of a switch on the end of the device if Fn is missing. Did you manage to connect WiFi on the laptop, but something else does not work? Perhaps the problem lies in the WiFi settings of the Windows operating system.
What about software inclusion?
Sometimes you need to use special software in order to enable the adapter on a laptop. For Samsung models, the Easy Settings utility is responsible for this function. Intel PROSet is a program installed on almost any laptop from Intel. This must be taken into account if it was not possible to find a mechanical switch when the combinations indicated above do not work.
Establishing communication in the Windows operating system
Sometimes the adapter is built into the operating system from the very beginning, at the software level. Then turning on Wi-Fi is as easy as shelling pears, without additional steps.
Open the desired item on the control panel, as our figure shows. We need a button that offers to change the adapter, its parameters. 
A list will appear in which there will be more than one adapter. We need one that has the Wireless or "Wireless Network" label. This is the Wi-Fi adapter itself, and we need to connect it.
Users may encounter two situations in this case.
- Gray icon when the adapter is off.
- The adapter is colored, but a red cross is lit on it.
More about the first problem
It is necessary to click on the image with the right mouse button if the adapter is gray, or remains completely colorless. A context menu will appear where we need to select the option to turn on Wi-Fi. After that, an image should appear either with a working network or with a red cross. 
What about the second situation?
The device was successfully connected, but the Wi-Fi network is not turned on.
Sometimes this is due to the in-flight mode being running. In other situations, the shutdown occurs in additional parameters. Just right-click on the Wi-Fi icon to turn on the connection.
A separate window will pop up, where we need to select the function to enable “Wi-Fi”. Or a wireless network. After you turn everything on, a list of available Wi-Fi networks that you can work with will appear. It remains only to connect.
We check the drivers. Are there any problems with them?
Sometimes it is not possible to set up a Wi-Fi network due to missing drivers. Either when they are accidentally removed by the user, or when they are not installed at all.
First, open Device Manager. It's located in the Windows Control Panel, under Hardware and Sound.
We need to see if the equipment next to which the exclamation mark is lit is yellow or red. This is especially true for the elements responsible for receiving WiFi.
If there are problems, you will need to install drivers for WiFi.
About some connection settings
Incorrect router location is a mistake that many users make. Because of this, WiFi is not as fast and stable as we would like. Even on quality Acer models. Routers are recommended to be installed at some distance from electronic household appliances. This is due to the operation of devices at the same frequency as that of WiFi - 2.4 GHz. Because of this, on a laptop, the WiFi speed is reduced, even if everything was turned on according to the instructions.
Setting up WiFi for the local network
We connect the computer and the router with a cable. Before trying to configure or enable something, make sure that the connection has been established. If everything is in order, a corresponding image will appear next to the clock. This scheme of work is equally suitable for Acer models. HP and others.
In the properties of the connection, you must enter a specific set of data.
IP Address: 192.168.0.2 Subnet Mask: 255.255.255.0 Default Gateway: 192.168.0.1 DNS: 192.168.0.1
The manuals for some models may provide other data. We insert exactly what is said in the accompanying documentation. Open a command prompt to explore other options. You can configure WiFi through the Start menu, just write "cmd" in the search. In the command line that opens, type the combination ping 192.168.0.1. In response, packets will be received from this address if everything went well. We need to find out what IP address the router accepts on the internal interface if a message appears that "wait limit exceeded." Otherwise, you will not be able to configure and enable WiFi.
You can set up WiFi by changing the last two digits if the limit message continues to appear.
1. 1.2
2. 1.1
3. 0.2
Go to the Wireless Settings section to configure Wi-Fi. After that, we need to give the name of our Wi-Fi network. This is done in the Name (Ssid) line. In the Channel item, specify the Auto function, find your region from the list. Thanks to this solution, you can configure the Wi-Fi router so that it automatically searches for channels with the least amount of interference. Click on the Apply button to save what we managed to configure.
How to enable WiFi in Windows 8?
Setting up WiFi on this operating system is no more difficult than on others.
- Select Start, and then go to the Control Panel.
- Click on switch to classic view. We find the center responsible for managing network connections. Here we will see the section with a wireless WiFi connection.
- Click on the utility with the right mouse button. And select the item with WiFi properties. There should be a line with automatic obtaining of an IP address. Press the OK button if there is a check mark.
- We return to the folder with network connection management. Again, you will need a WiFi network connection section. Click on it with the right mouse button, select the item "connect-disconnect".
- It remains only to choose and connect to the desired WiFi network.
The corresponding icons usually appear on the screen, in the right corner, at the bottom. If everything is done correctly, then the WiFi image will always be active. If everything is in order with the network itself, you will always be able to connect to it.
Problems connecting to a wireless network from a laptop often occur even for experienced users, and beginners do not even know how to approach the settings. Therefore, we decided to consider this issue in more detail. In the article we will understandhow to turn on wifi on laptop, while providing a connection algorithm for different types of operating system. We will also find out what are the main problems users face and how to solve them.
How to turn on wifi on laptop
First of all, let's figure out how to activate the Wi-Fi module on the device. Without this, you will not be able to use wireless communication and set up a connection. Usually, the inclusion depends on the laptop model and varies slightly in each case. Certain function keys are involved in the process.
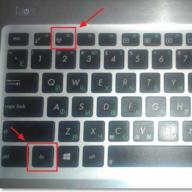
- For an ASUS laptop, this is FN + F .
- If your gadget is called Acer or Packard bell, then you need to press FN + F3.
- Gadget from HP turns on the WiFi module with a dedicated touch button marked with an antenna icon or FN+F12 . A number of models from this manufacturer have a simple button with an antenna to activate the wireless connection.
- Lenovo - FN+F5 if there is no dedicated button.
- Samsung - FN + F9 or FN + F12, depending on the model.
We have listed the most common manufacturers of equipment. If your laptop is manufactured by another company, then the desired combination can be clarified in the instructions for the gadget or on the company's website. Usually this is the FN function key, which is available on all modern laptops and an additional one from the F1-F12 series. 
If the button to turn on is dedicated, then you can search for it in a separate block or even on the ends of the case. Usually it is indicated by the corresponding icon associated with the signal distribution.
Wi-Fi settings depending on the OS
Now let's talk about those inclusion methods that are intrasystem. Simply, how to enable a wireless network connection in the operating system. We will analyze the two most common, by analogy, you can make settings on other versions of Windows.
Windows 10
How to turn on wifi on laptop, if everything is in order with the settings, the answer to this question is no less important than turning on the module. So, we bring to your attention a step-by-step algorithm for the tenth version of the operating system.

That's all. As a result, the laptop will connect and you will be provided with Internet access.
Windows 7
We also consider setting up for this version, provided that the system is equipped with the necessary drivers and has a network adapter. That is, all the nuances are technically observed and the WiFi module is turned on. 
In the case of this version of the OS, everything is much simpler. You can simply click on the Internet connection icon in the lower right corner and select the desired network from the list of available wireless connections. Enter the password and wait for the connection to be activated. That's all.
What to do if you can't connect

Often there are situations in which, when the above algorithms are executed, the connection to the network is not performed. In this case, two options are available:
- disabled WiFi adapter;
- required drivers are missing.
Don't be afraid. In both cases, the issue is not as terrible as it seems, and everything is completely solvable.
The seventh version of the operating system
For the seventh version of Windows, the verification algorithm will be as follows.

The absence of an entry or the presence of a yellow sign next to the inscription means there are problems with the drivers for the adapter. In this situation, you will have to reinstall them from the disk provided with the laptop or the official website of the manufacturer. In any case, the process is simple, just download the necessary programs and reboot the computer, the system itself will distribute the software to the right place and activate it.
If there is a yellow icon, then click on it and in the menu that opens, click the “Enable” command. Then right-click on the adapter and in the "Properties" section select "Power Management" and in the option to turn off the adapter in power save mode, uncheck it if it is. 
Turn on the adapter in "Network Connections", here find the wireless connection and click the "Enable" command next to it. On this, all the problems in Windows 7 that the user can solve on their own have been fixed, and if the problem remains, then the matter is in the technical component and it is better to contact a professional.
Tenth version of Windows
If you have a "Ten", then, solving the issuehow to connect wifi on laptop, you should also rule out problems with the adapter and drivers.
If the icons for connecting to Wi-Fi are not found on the taskbar, then the adapter is disabled. To be able to connect to the Internet, you must first enable it.

If there is no “Wireless Network” icon at all, then we go to the first section of our article and read how to enable WiFi hardware.
To check the drivers, you need to right-click on an empty spot on the taskbar and select the "Settings" section in the context menu. Then in the main section, select "Devices" and go to "Device Manager". Expand the "Network adapters" block and look for an entry with the word Wireless. If the icon is supplemented with an exclamation point, then the driver is not working correctly and needs to be reinstalled. If after downloading new drivers the problem is not resolved, then it is also worth contacting a professional.
What could be easier than connecting to a wireless WiFi network? It is enough to enter the password and wait for the connection to be established. This usually happens, but what if the connection is limited (no Internet access) or the connection is not established at all? Let's talk about the reasons why such failures occur, and how to deal with them.
Why Windows 8 Can't See or Connect to WiFi Networks
A computer or laptop running Windows 8 does not see the Wi-Fi network for the following reasons:
- WiFi adapter is not installed, disabled or defective;
- the system does not have a wireless network driver;
- Airplane mode is enabled on the computer;
- there is no wireless network access point in your area;
- the access point (wireless router) that is nearby is disabled, misconfigured, or malfunctioning;
- computer and access point communication standards are not mutually supported;
- there is a device nearby that interferes with the radio signal;
- the WiFi adapter is in monitoring mode.
If the network is visible, but the connection is not created or is limited:
- Internet access for this network is not configured or denied;
- network connection is limited by the administrator;
- the access point cannot process the request due to congestion;
- Wrong access point settings are being used.
Restoring the connection to the wireless network
Checking the network adapter
Desktop PCs are sold without WiFi network adapters, so you will need to purchase and install an adapter separately to connect to wireless networks. For example, such as in the picture.
You do not need to buy a Wi-Fi adapter for a laptop - it is already inside.

In order for the laptop to see and connect to wireless networks, WiFi must be enabled. On some models, a switch or button on the case is provided for this.

Others use the Fn+F1…F12 key combination. The key with the image of the antenna is responsible for turning on the wireless adapter.
After enabling the WiFi adapter, it should appear in the Windows 8 Device Manager. To check this, launch the manager from the context menu of the Windows button (Start)

and expand the "Network adapters" list. If your adapter is on this list, then the system recognized and installed it. If it is displayed as an unknown device, go to its manufacturer's website and install the driver.

If the adapter is connected, but the system does not see it, make sure that it is enabled in the BIOS.
The option that is responsible for the operation of the built-in WiFi is called OnBoard Wireless LAN or Wireless LAN support. Its value must be "Enabled".

Among other things, make sure that the wireless adapter is not in monitor mode. Although those who use this mode always know about it (it requires a special driver to be installed).
Checking the access point
If your PC or laptop does not see your home hotspot, try connecting to another one. To check, you can use public networks, for example, in cafes or parks, or private ones - with your friends. To check a stationary computer without taking it out of the house, you can temporarily create a virtual access point on another device.
If wireless networks are not detected anywhere, problems should be looked for in the WiFi adapter or settings on the computer, and if there is no connection to only one access point, the problem is probably in it.
Diagnostic steps (if the previous step did not resolve the issue, continue to the next one):
- Make sure the access point is turned on and emitting a signal (detected by the glow of the wireless network indicator).

- Make sure that there are no devices that create electromagnetic interference near the router and the computer - cordless phones, microwave ovens, powerful power cables. Try moving the access point closer to your PC to improve the signal strength.
- Turn off the power of the router and turn it on again. If problems persist, reset the settings: with a sharp object - a toothpick or a paper clip, press the recessed Reset button, which is located on the back or bottom of the device. After this manipulation, all settings will be restored to the state as after the purchase.

- Change the frequency channel of the broadcast. Connect the computer to the access point via a cable, enter the wireless settings menu, find the option " Channel” and switch to another channel. Perhaps one of them will reconnect.

- In the same menu, check the "Hide SSID" setting and, if it is active, check "No". Hiding the SSID disables the broadcast of the network name - such a network is not displayed in the lists of available connections. Also enable support for b/g wireless standards in case the Wi-Fi adapter on your computer works on one of them, and the access point on the other, for example "a", which "b" and "g" do not support.

- If many devices connect to the access point at the same time, it may stop responding due to overload. At home, such situations are unlikely, but often happen in organizations. Try connecting to a different, less busy network, or try again after a while.
Checking Windows 8 Settings
Airplane Mode
WiFi may disappear due to the fact that the user has activated the "Airplane" mode in Windows 8 - in this mode, the network adapter turns off and the computer does not see any wireless network. To determine that the problems really arose because of this, the network icon in the system tray will help - it takes the form of an airplane.
![]()
To exit Airplane Mode in Windows 8, open the Charms pop-up bar and click the Settings charm.
Then click "Change PC settings".

Make sure Windows sees WiFi again and the network tray icon is back to normal.
Network Diagnostics
Windows 8 has a tool that automatically diagnoses network connection problems. It's called Windows Network Diagnostics. This tool sees and removes many obstacles to WiFi, for example, when there is a connection, but the computer does not access the Internet (connection is limited), or the Internet is available, but access to sites is limited.
When the connection is limited, the network tray icon is marked with an exclamation mark.
![]()
To launch the Windows 8 Network Diagnostic Tool, right-click on the network icon and select Troubleshoot from the menu.

The utility will check all network connections on the computer and determine what limits access to the Internet. Local problems that can be fixed will be fixed automatically. And if the connection cannot be restored, for example, due to problems with the access point or problems on the provider's side, the information will be displayed in a window marked "Not fixed".

If your PC has multiple connections, of which only one is limited, or if the diagnostic tool does not see a problem, you can only diagnose the selected network. To do this, enter the "Network and Sharing Center" and navigate to the "Network Connections" folder (click "Change adapter settings" in the navigation bar).
Open the context menu of the connection, which is limited, and click "Diagnostics".

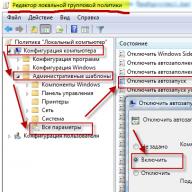
WLAN autoconfiguration service
Connectivity problems can also occur after network services stop, either accidentally or through ignorance. The WLAN autoconfiguration service is responsible for WiFi operation in Windows 8. If the wired Ethernet connection is not limited by anything, and the system simply does not see wireless networks, start checking with this service.
- Launch the Services application: open the context menu of the Windows (Start) button and click Run.

- Next, type in the line "Open" the command services.msc and click OK.

- Find WLAN autoconfiguration in the list of Windows 8 services, open its menu and select "Properties".

- If the service is stopped, click "Start", and from the "Startup type" drop-down list, select "Automatic".

In order for the WLAN AutoConfig Service to start, another service, Windows Connection Manager, must be running. Find it in the same list and set similar settings for it.
The rest of the WiFi connection settings on the PC do not require manual configuration. All data for accessing the Internet - IP, gateway address, DNS, etc., the network receives automatically from the access point's DHCP server.