If you want to open your own server, but don't know how to do it, then this article will be of interest to you. In minecraft, create a server that will allow you to play with friends or with other players in your own world. There is also an assembly of mods that will decorate your world in better side. The assembly is put without much difficulty. Use various commands, they will allow you to control the game in your world: ban players, change the weather in Minecraft and much more.
You can find a lot of videos on youtube on how to have fun. And also, if you are interested, you can create your own channel and make all your adventures on video. By creating your own server, you will have complete control over it. Minecraft is a game where fantasy is given free rein, so you can evaluate not only your imagination, but also your friends. The assembly of various modifications to the game will fill it with more features. Also, the assembly for the game can be made by the players themselves and distributed across sites. An assembly can be created by combining several mods in minecraft.
You can also put on the server various cards that you can play with your friends. You can install them on our website in the Maps section. You can install them and have fun going through them, you can make them yourself, creating your own world. And if you are planning to create something really cool, if you wish, you can put them up for general download. If players wish, you can create a map of incredible beauty that will justify your work, looking at a beautiful minecraft map.
The commands on the server also play an important role, as already mentioned above, they allow you to “hold the control panel in your hands”. Commands are written so that the server is under your control.
The commands are shown in the screenshot below (CLICK ON THEM):

Creating a server in minecraft
First you need to go to http://www.minecraft.net/download.jsp and you will need to download a file called Minecraft_Server.exe. This is the official site, therefore, it contains all the latest versions.The file that you downloaded Minecraft_Server.exe (or otherwise it is called minecraft_server.jar) needs to be opened and transferred to the folder where you will have the server.
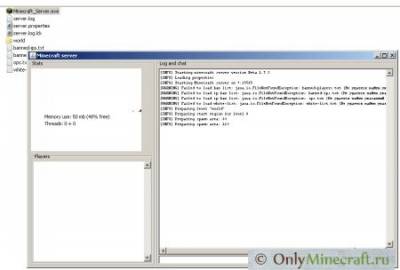
Now let's move on to the ports, you need to open it, but if you have it open 25565, then you will see the following inscription:

Now keep calm and wait for the process to minecraft games will come to an end. Once completed, you will need to close the window.
Another case will be if you have a port closed for minecraft, or some program, such as a firewall, blocks the operation of Minecraft_Server.exe or Java, as shown in the picture below. If this happens, try uninstalling java and reinstalling it, a message will pop up from the firewall and you will need to allow the application access.
How to open port 25565. In any case, to begin with, you must allow java access, if, of course, such a window pops up. Of course, you allow java these rights. The screenshot shows an example of blocking.


If everything goes well, then new files will appear in the folder, and the world folder.
We definitely need a file called server.properties. You need to open given file notepad. Now you should take note of the information that is given below. In order to find out your IP address, you need to go to sites that will show you it. For example, I can cite the site 2ip.ru, where you can freely see your ip address, as shown in the screenshot.

If your ip is changing, and most of it is, then you need to enter to update the server-ip= line before each server start.
Sites that show ip should be bookmarked to make searching easier.
We start and go to our server (c video)
The information is relevant for Minecraft versions 1.2.5, 1.5.2, 1.6.1, 1.6.2, 1.6.4. Next, you need to run Minecraft_Server.exe and wait for the download to finish. We go into minecraft (it is not necessary to enter a username and password).Click on Multiplayer, then Add Server, as shown in the picture below.

Next, you need to enter the server name (this name will be shown in the list) and the server ip
Next, click Done, and you will have the server listed. Green stripes on the right indicate that it is working, and is also shown online. Next, you need to click Join Server.


Done, now you are playing on your own server.
Sooner or later, every Minecraft player comes up with the idea to create their own server. The reasons for this can be completely different: someone is simply tired of playing alone, while someone, on the contrary, wants to narrow their circle of friends and protect their creations from inadequate players. This article will describe in detail how to start a Minecraft server, set it up for a comfortable game, and also give a number of tips for those who have problems starting. All of the information below is only relevant for computers running Windows.
The first step is to install the server files, for this you need to go to the official website of the game and follow the link "downloads / downloads", where the distributions of the game and the server are located. The downloaded executable file with the "exe" extension must be placed in separate folder(its name can be anything). Then run setup file and wait a couple of minutes. At this time, the necessary files will be unpacked and a server configuration file will be created - later we will see how to set up a Minecraft server using it. After the first start of the server in the World folder will be generated random world for Game. If you want to play with friends in an already created world, then delete the contents of this folder and transfer your saves from a single game into it (as a rule, the saves are located in users/AppData\roaming\.minecraft\saves).
After the above steps, you will not need to perform any operations other than starting the server. Minecraft uses the default settings for this. What if you want to play in custom mode or remove some restrictions? Proceed as follows: before starting the Minecraft server, change the settings manually. To do this, stop the server and open the folder where its files are stored. Operations will be performed on the server.properties file (don't forget to do backup), which can be opened with any standard notepad, for example.

It makes no sense to list all the variables, so let's focus on the most important and frequently used ones: the server name is entered in the level-name line, the gamemode line changes the game mode (0 - survival, 1 - creative). Optionally, you can disable the damage caused by players to each other (pvp=false). In case you are going in the online-mode line, change the parameter to false. Now there is nothing left but to start the Minecraft server and check if it works correctly.

If after following the necessary steps, the Minecraft server does not start for you, there are several ways to fix the situation. First, remove all mods from the server folder and check the stability of the clean server. If it starts, then you just have to connect the mods one by one and find out which one disrupts the server. If a clean server does not start, then it should be on the computer. Very often, it is the disabling of Java auto-update that leads to the inability to start the server. It does not hurt to check the antivirus in case the server is blocked for system security reasons. If this does not help, try deleting the server with the game and reinstalling them again. Now that you know how to start a Minecraft server, you can enjoy playing with your friends by setting your own game rules.
As exciting as Minecraft's single player mode is, multiplayer where you can play with friends is much more interesting. There are several ways to play Minecraft in multiplayer. One is to create a Minecraft server that you and your friends can connect to. Of course, existing servers can also be used for this purpose.
In this guide, we will show you how to create a Minecraft server for yourself and your friends on your home PC.
First you need to download the .jar version of the server
Put the downloaded jar file in a folder. It doesn't matter where she is. Next, you need to prepare a file that will start your server.

Create a batch file
Create a new Text Document and add the following lines to it:
@echo off
title run-minecraft
java -Xms1024M -Xmx2048M -jar minecraft_server.jar nogui
pause
This means we want java to run our "minecraft_server.jar" server with 1024 megabytes (1 gigabyte) random access memory. If an error appears, reduce the RAM values to 512 MB, it helped me and the server started!
To run a server with more memory, simply change the -xms and -xmx values. Moreover, they should be equal to the numbers 64, 128, 256, 512 and so on.
To save the file in .bat format, click the File button in the upper left corner of the screen, select Save As, then select All Files under the File Name field. It is very important. Name your file start or start server and click save. Then change the file extension from .txt to .bat
Or you can download my bat file here: (to change it, right-click on the file and select "Edit").
User agreement and server launch
After completing the previous step, start your server. At first, it will close instantly as you need to accept the user agreement. To do this, open the text document with the agreement that appears in the folder, change the line eula=false to eula=true, save it and restart the server.

Your server should start normally and start generating the world and creating others important files, like server.properties, whitelist, banned-players and so on.

Server connection
To connect to the server we just created, you, as the owner, just need to go to multiplayer and add the server, specifying "localhost" as the IP address.
As for your friends, you can give them your external IP address, to find out, go to the site 2ip.ru. In addition, your router should have ports 25565 to 25566 forwarded. An excellent video on port forwarding can be found below.
I hope this short guide will help you create a Minecraft 1.8 server for yourself and your friends, and then have a good time together! If you have any questions, ask them in the comments below!
Before I start talking about the technical details, I want to clarify the situation at the expense of creating a “live and visited” server. These steps are divided into three parts:
- Server creation;
- Setting up and installing plugins;
- Attracting players.
If the first point takes 30 minutes, the second - you can spend the whole day (due to plugins, you can make your own, unique "world" of minecraft), and the third - an occupation for an indefinite time.
Creating your own server, inviting friends to it, playing a couple of evenings is not a difficult task, but in order for your server to become famous and visited, you will need to work hard, and this work will be far from the game - buying a dedicated IP, creating a server site, its advertising, promotion, purchase of a dedicated server for the game, etc.
In this article, I will only talk about the first, most simple point - creating your own server on a personal computer, without a dedicated IP.
Server types
There are several "packages" of servers - the original, so to speak "clean", and immediately with some package of mods. The instruction is based on the example of installing the official version. Deal with her and deal with others.
Instruction
1. Go to the page http://www.minecraft.net/download.jsp
Download Minecraft_Server.exe. The official website always contains the latest version of the server.
Note: as of today (November 5, 2011), the official server has version 1.8.1, while most players already have . Download server part for 1.9.5: (downloads: 32767)
2. Transfer the downloaded file Minecraft_Server.exe (or minecraft_server.jar) to the folder where you will have the server (do not run it on the desktop).
3. If you have port 25565 open, you will see the following window:
Wait for the process to finish. Then close the window.
If the port is closed, or something is blocking Minecraft_Server.exe or Java, the following message will appear:

What to do if nothing works?
I myself suffered when I made the server for the first time (especially with this port 25565), and I tried to write all the conclusions in this instruction. But if something still doesn’t work out for you, then go to our forum in the minecraft section (don’t be afraid that it’s empty there for now - we just opened the section), and create a topic where write in detail: your operating system, the antivirus / firewall that is on the computer, what you are doing, and what errors occur, preferably with screenshots.
And we will deal with each separately(determine what is the cause of the error, and how to fix it), and then supplement this instruction with new conclusions. It is useless to write about errors in the comments - because. Many comment, but you need to deal with each individually.
In the comments to this instruction, it is better to write not about problems, but about how you solved a problem. In this case, the comments will be helpful.
Offers to go to Skype or connect via TeamViewer and “solve everything” there - I reject, because firstly, I can leave / be busy, and other participants can help you on the forum, and secondly, because my task is to write instructions so that you can start the server.
How to create your own server in minecraft?
Sooner or later, many players think about how to create their own server in Minecraft. There can be many reasons: the ability to install any mods and plugins, access to administrator rights, the desire to make money on donations or make a good project. Whatever your goal, in this article we will teach you how to make your own server in Minecraft.
Server creation
- Before installing the server, download and install latest version java.
- Download the Minecraft server. The best place to do this is on Bukkit.org. Download the recommended build (marked in green).
- Create a server folder and place the downloaded file there.
- For ease of reference, give the buckkit file a shorter name (don't forget to include the .jar extension).
- Next, create a batch file. To do this, in Windows 7, in the top bar of the folder, click the "Organize" button, then select "Folder and Search Options" from the drop-down list. In the window that appears, select the "View" tab and, almost at the very end of the list, uncheck the "Hide extensions for known file types" line. Next, create a text document, give it a name and give it the .bat extension.
- Open the resulting file with any text editor.
- Write "java Xmx1G". With this command, you set the amount of RAM that will be used to maintain the server. In this example, 1 gigabyte. In the event that you want to set one and a half gigabytes, two and a half or another non-integer number, then you need to write the value in megabytes (512M, 1536M, etc.). For normal operation of a server with twenty players, you need about 2G of RAM.
- In the same line write - Xincgc. This function is designed to load "chunks" from the RAM that are out of sight. If you do not register this option, the download will not occur, and soon the server will hang.
- Write -jar in the same place. This option specifies the file to which the previous ones will apply.
- Start the server using a .jar file.
- A window will open in which you can observe the progress of the launch. Meanwhile, in the folder with the server will appear additional files and folders.
Server Tuning
To set up configurations, open the server.properties file that appears in the server folder using Notepad++ or another code editor. You will need to change the following settings:
- Change online-mod to false - so that players using a pirated client can enter your server.
- The server-IP value should not be set, since the server itself picks up your ip-address, and if you write it in the configuration, the game may crash with port errors.
- The server-port value should only be changed if you have more than one server, but several.
- Max-players is the number of players that can be on the server at the same time.
- Spawn npcs has two values - true and false. Toggles the spawning of villages and villagers on and off.
- In the white-list line, separated by commas, you can write down the nicknames of the players who have the right to enter the server. Be careful, because after changing the value of this option, only the players specified in the list and no one else will be able to enter the server.
- Changing Hardcore to true will enable hardcore mode.
- The ops.txt file contains server operators.
Plugins
Consider the four most essential plugins:
- home spawn warp. The most necessary function of this plugin is the ability to teleport to some points (for example, home).
- ServerSave is needed to autosave the world.
- WorldEdit is needed to manage the territory on a massive scale.
- WorldGuard is used for private territory and property. It is an excellent protection against griefers.
There are many plugins for Minecraft. We have listed the most important ones. The rest you can install as you wish.


