Continuing the topic of connecting to EGAIS, let's move on to the practical part of the issue. Unfortunately, system developers change rules and technical conditions literally on the go. This material was almost ready when the developers unexpectedly limited the list of supported browsers to just IE, and they had to redo the finished material. Therefore, despite the fact that all our articles are necessarily checked in practice, it may happen that this information turns out to be incorrect or outdated, at the same time we will try to promptly keep this material up to date.
First of all, make sure that your computer meets the system requirements to install the transport module. Specifically, you must be running Windows 7 or later and Internet Explorer 9 or later. As you can see, nothing special is required from the system if you use the latest versions of the OS and regularly update the system - you already have everything you need, otherwise you will need to bring the software into compliance. You will also need to install Java 8, which is required for the transport module to work.
Installing software for working with JaCarta crypto key
As we have already said, the JaCarta crypto key used in the system contains two GOST and PKI repositories, to work with each of them you need its own software, which can be downloaded and installed separately, there is also a single client that combines all the necessary tools in one package.
 Let's go to the page http://www.aladdin-rd.ru/support/downloads/jacarta/ and take a look at the list of offered software. First on the list is offered Single Client JaCarta and JaCarta SecurLogon 2.7.0.1226, in our opinion, this is the most convenient solution and there is no reason to refuse it. Nowadays Single client does not support Windows 10, so if you are using this OS, you will need to download and install packages JaCarta GOST for Windows And JaCarta PKI for Windows.
 Actually, the installation of the specified software is carried out in the usual way and does not pose any difficulties.
 After installing the software, we connect the crypto key and make sure that it is detected in the system and all the necessary drivers have been installed.
 Obtaining a test CEP
If you did not immediately receive a qualified electronic signature (CES) when purchasing a crypto key, which we strongly recommend doing, you can use a test CES during setup and verification. To do this, go to the page http://egais.ru/testkey/innkpp and enter the TIN and KPP of the organization.
 All that interests us on this page is a link to the generator, download it.
 We launch it, fill in the required fields and click Generate, the key will ask for a password from the GOST storage, by default it is 0987654321, enter it and wait for the request to be generated. The only subtlety is that you need to indicate as the postal address the one you used to register in your FSRAR personal account.
 We upload the received request to the site, do not forget to select the request file before clicking the button Download and continue.
 Now you can go have lunch or do other things, the certificate will be generated within some time and will be sent by email. Download it to any convenient location and write it to the key using the generator utility.
 Then run the JaCarta Unified Client or the utility for working with the GOST storage and make sure that the recording of the CEP certificate was successful.
 RSA key generation
After you have received the CEP, you should generate certificates for retail outlets. To do this, go to the page https://service.egais.ru/checksystem and click the button Read the terms and conditions and check their compliance, a page for checking system requirements will appear. Unfortunately, there is no other way to your personal account and you will have to go through verification every time, fortunately you do not need to visit it so often.

If you have fulfilled all the software requirements, then you should pass the first two check points successfully. By the way, the mention in the first paragraph of Windows XP is quite interesting; theoretically, you can try to launch a transport module based on it.
Added. As of 12/13/15, Windows XP SP3 has been officially added to the list of supported systems.
The next step is installing the module Fsrar-Crypto 2, to do this, simply download and run the installer from the link.
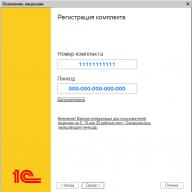
 After which, repeating the check once again, you will finally get to your personal account. First of all, you need to get an RSA key for a secure connection; to do this, go to the section of the same name and select the desired outlet. Please note that each key must be written to its own token, and this entire operation can be done on one computer.

The process is as simple as possible. Select a retail outlet and click Generate key, then enter the password for the PKI storage, by default 11111111, after which the key will be generated and written to the token.
 After successfully writing the key, the token is completely ready for use and you can proceed to installing the transport module.
 Installing the transport module
To receive the transport module, go to your personal account again. Please note that there are two versions of the transport module: test and production. All data transmitted via the working UTM is recorded in the Unified State Automated Information System and it is unacceptable to use it to check and test the work. At this stage, you should install a test transport module, and only after you have configured the entire system and are sure that it is working, should you reinstall the transport module to its working version.
 Download the required distribution and start the installation; the first stage of installation should not cause any particular difficulties.
 But then you will need a crypto key and a certain amount of attentiveness. First of all, it would be a good idea to find a permanent location for the crypto key, since if it is missing, the transport module will not load and its services will need to be started manually.
After unpacking the necessary files, the transport terminal will be installed, which uses encrypted files and requires a key. First, the installer will ask you for the password to the PKI storage (11111111) and ask you to select an RSA key. This is necessary to establish a secure connection with EGAIS servers.
 Remember the certificate code, this is your FSRAR ID, you will need it later, when setting up merchandise accounting software, you can also always view it in the properties of the certificate.

Then you will need to specify the password to the GOST storage (0987654321), which contains the EPC, which is required to authenticate the data transmitted on behalf of your organization.
 After which the installation will move to the final stage, at this stage the installer will connect to the EGAIS servers, receive the necessary data and perform the initial configuration of the software for a specific client. Subsequently, working with this transport module will be possible only if you have the copy of the crypto key with which the installation was carried out.
 You can check the operation of the transport module by typing in the browser the IP address or host name indicating port 8080.
 Setting up inventory software
In our example, we will use the inventory accounting software of the 1C:Enterprise system; if you use software products from other manufacturers, then refer to the technical documentation for them.
First of all, you should update the configuration to the current version with EGAIS support; today the certified configuration for EGAIS is 1C: Retail, but working with EGAIS is also supported in Trade Management. In the future, all examples will refer to 1C: Retail 1.0, however, other 1C configurations are configured in an identical way, the differences are insignificant.
After updating the configuration, go to the accounting parameters and on the tab Alcohol accounting check the box Consider alcohol products.
 Then follow the link below Transport modules and create a setup for working with our UTM. You can choose the name arbitrarily, you need to correctly indicate your FSRAR ID and UTM network address. We remind you that the FSRAR ID can be found in the RSA key certificate number.
 Below we will follow the second link Transport modules used and indicate the transport module used at this outlet. Let's explain, reference book Store transport modules contains information about all UTMs in all retail outlets, you need to select the one you need from this list. This setting makes an entry in the information register that connects the place of sale (Store in terms of 1C: Retail), the legal entity and the UTM related to them.

Finally, let's move on to setting up the schedule, since at the beginning of working with EGAIS you have to request data quite often, we set the task to repeat every 30 seconds, subsequently this value should be adjusted in accordance with real needs.
 Finally, take a look at the tab Data exchange and make sure that it is enabled and the user is specified to perform routine tasks.
 Having completed all the necessary settings, restart the program, now a new menu item will appear in it - EGAIS. The purpose of the sub-items is quite clear, and working with them is intuitive and should not cause any difficulties for any confident 1C user.
 However, before starting work, you need to compare your own directories of counterparties and nomenclature with the EGAIS classifiers of organizations and alcoholic products. To do this, go to the appropriate menu item and complete the request indicating the counterparty’s TIN. To obtain a classifier of alcoholic products, you must indicate the TIN of the manufacturer or importer. Special attention should be paid to this point: it is the TIN of the manufacturer (importer), not the supplier.
Then, having received the requested classifier, you should compare it with the data from the program directories; to do this, select the appropriate items in the classifier (left) and directory (right) and press the button Compare. Matched items are highlighted in green.
 As you can see, there is nothing particularly complicated in the practical implementation of EGAIS. Now, after making sure that everything works as it should, do not forget to get a working EPC (if you have not done this before) and reinstall the UTM from test to working.
An alcohol control system is mandatory for all trade organizations selling alcoholic beverages. But the presented software solutions do not always work correctly from the moment of installation. Errors occur. Most often they are associated with the operation of the universal transport module (UTM). One of the common ones is not open. We will tell you about installing the UTM, possible errors in its operation, diagnostics and elimination.
Start: installing UTM
The universal transport module is a server running on your computer, which, in turn, connects to the EGAIS servers and is responsible for data exchange. Programs access the transport module. It can be installed either on a separate server on your network or on the same computer where 1C or another alcohol products accounting program is running.
It is better to download the transport module in your personal account at http://egais.ru. There you can always find the current version. To log in and work with your account, you will need a JaCarta key with a working certificate, an installed JaCarta client, Internet Explorer 9 or later, Windows 7 or later. Run the UTM installation and follow the instructions. After installation, restart your computer.
From the moment the computer boots, it will take some time to start the UTM services and establish a connection to the EGAIS server, after which it should work.
If the installation is successful, you will be able to access the transport module page. You can get to it in a browser: UTM EGAIS server address 127.0.0.1:8080 (localhost:8080). If the transport module is installed on another computer on the network, then you can access it in the format computer_address:8080 (for example, server:8080 or 192.168.0.254:8080). In any case, the EGAIS UTM port is: 8080. There is no need to change it, otherwise some programs will not be able to find the transport module. Not all solutions allow you to set parameters manually.
UTM EGAIS does not work
You cannot get to the UTM page, programs cannot receive and send data. This indicates that the universal transport module does not start. The reasons may be the following:
- UTM services do not start (in particular, the transport service);
- The UTM EGAIS server address is used by another application (port 8080 is busy);
- Connections to the EGAIS UTM address are blocked (services are running, the port is open, but programs do not see the transport module).
It is easy to find out about problems in the operation of the transport module: in the programs 1C, BukhSoft and others, the message “Enter the correct address and UTM port” will appear. How to diagnose the problem:
- At the command line, enter netstat -a -b. We find the address and port of UTM EGAIS: 127.0.0.1:8080. The -b option will show the name of the executable file of the program occupying the port. If another program really uses this port, it must be turned off or reconfigured. If this does not work, install the transport module on another computer where the port is free;
- Disable your antivirus and Windows firewall. If after this the transport module works, allow connections to the address 127.0.0.1 in their settings;
- If the port is free, but UTM EGAIS still does not work, reinstall it. An error may have occurred, and it is easier to repeat the process than to look for the cause.
The transport module is installed and working, but invoices do not arrive, acts and requests are not sent. This means that UTM does not connect to the EGAIS service. Reading the logs:
- If the transport module is on the computer - folders c:\utm\transporter\l, c:\utm\monitoring\l and c:\utm\updater\l;
- For Atol HUB-19 and similar hardware transport modules, the actions are described in the instructions.
The logs will contain messages about the lack of connection to the server. Reason: the EGAIS port is not open or connections are blocked.
The transport module uses the protocol to transmit data on the InternetHTTPS. Servicetransport connects to the EGAIS server addresses:utm.egais.ru And update.egais.ru.
How to open the EGAIS port
Port 443 is intended for the HTTPS protocol. The reason for its inaccessibility, connection failure or unavailability of the EGAIS service in general can be:
- Windows Firewall;
- Antivirus;
- Setting up an Internet connection.
Disable the firewall and antivirus, and restart the transport module. If it works, you need to:
- Add its services to trusted applications or antivirus exceptions;
- Open connections to remote port TCP 443;
- Allow or add EGAIS server addresses to firewall exceptions.
Let's check the third point: go to the page https://utm.egais.ru in any browser, first disabling the antivirus and firewall. If you see a window asking for a certificate or the line “SSL_ERROR”, the address is available. Set up your firewall and antivirus.
If pages do not open and “No connection to server” messages continue to appear, then the Internet connection is not configured correctly. Depending on its implementation, you can open the EGAIS port in different ways. In any case, you need to allow connections to the addresses utm.egais.ru:443 and update.egais.ru:443.
The transport module may have received invoices before the failure. Save them so you don't have to resend them later. It is better to configure backup of the module database using third-party tools.
Conclusion: the main thing is that the UTM works
Check that at all places where programs for working with EGAIS and the transport module are installed, the Windows firewall and antivirus are correctly configured: they do not prohibit connections to servers on the Internet and to the local address of the UTM EGAIS server, port 443 is open. Add addresses to the exception EGAIS servers and make sure that other programs do not interfere with the operation of the transport module. By doing this, you can eliminate problems and downtime.
Remember: organizations face liability for selling alcohol without using the Unified State Automated Information System (EGAIS) system or for untimely submission of information on alcohol circulation.
UTM is software for sending information about the turnover or retail trade of alcoholic goods. Since the module does not have a graphical interface, UTM should be integrated with the used commodity accounting system.
This module is installed on a PC at the place of business of the enterprise. If an organization has several structural divisions for wholesale or retail sales - installed in each component of the enterprise.
To ensure that no questions arise when working with UTM, it is necessary to take into account the following recommendations:
- UTM can be installed either independently or by contacting the territorial bodies of Rosalkogolregulirovaniya;
- The module must be installed in accordance with technical requirements;
- sending information from one workstation via UTM is impossible; a separate installation is required for each structural unit;
- Individual entrepreneurs selling beer, beer drinks and cider install the module on one workstation;
- For work they use any accounting system that transmits information in the established format through UTM.
Personal Area
If you have access to EGAIS, you can start registering in your personal account.

Actions in your personal account:
- open the portal and enter your personal account;
- click “Read the terms and conditions…” – this is necessary to verify that the access conditions are met correctly;
- if there is a lack of components, the system offers to download and install the required distribution;
- After checking, click “Go to your personal account”;
- in the “Enter PIN code (GOST)” column, specify the password for the application;
- click “Show certificates”;
- then open the personal account window displaying the CEP certificate.
Required terms for registration are:
- availability of OS from Windows XP, RAM from 2 GB, processor from 1.9 GHz and disk drive from 50 GB;
- a software component for working with ECES (enhanced qualified electronic signature), it will work correctly when using the Internet Explorer browser version no lower than 9.0;
- availability of UKEP hardware key.
Before registering in your personal account to drink alcohol, an organization must:
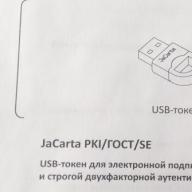
- have a JaCarta crypto key with the SE PKI/GOST crypto provider;
- have UKEP for secure communication with EGAIS.
Only after this, on their own or with the help of UTM, do they register in their personal account, purchase a program for working with EGAIS, or upgrade the goods accounting system to meet the technical requirements of EGAIS.
If the company's activity is retail trade of alcoholic products, then before registering in its personal account it will also need to have a hardware crypto-key JaCarta and UKEP for. Afterwards, UTM is installed on the PC and POS terminals that interact with the module and have scanners for reading stamps are purchased.
Installation Features
For registration in your personal account and subsequent work on the official EGAIS website egais.ru there are two installation files: for working with or without an Internet connection.
After downloading the required module, the following is immediately performed:
- check whether the current time or date is set on the PC;
- to disable account control, click “Win + X” - “Control Panel” and uncheck the “Use account control” option;
- disable the antivirus program;
- turn off the firewall and Windows Defender built into Windows, which is done by pressing “Win + X” - “Control Panel” - “Administration” - “Services” - “Stop”;
- all media except the key and certificate are removed;
- JaCarta has only one GOST and RSA key each;
- then right-click on the distribution kit, select “Properties” - “General” - “Unblock”;
- After RMB, the installation file of the module distribution package is launched by selecting the “Run as administrator” menu.
Then they connect, generate an RSA key and load the transport module.

Connection to EGAIS includes next steps:
- recording an enhanced qualified electronic signature certificate on the key;
- Login to your personal account on the official website of EGAIS.
RSA key generation
- click on the certificate in your personal account;
- click “Get key”;
- select the required item from the list that opens.
After generating the key, the carrier can work with the module.
With internet connection
When installing the universal transport module, the user does the following:
- right-click on the saved file as administrator;
- opening the universal transport module installation wizard;
- selecting an installation folder;
- selecting the shortcut creation folder;
- click on the “Next” button;
- selecting an additional proposed task (create a shortcut on the desktop);
- click on “Install”;
- Click on the “Finish” button when the corresponding dialog box appears.
 Next, the media with the certificate for EGAIS is inserted into the USB port of the PC, and in the dialog box that opens after installation, the standard PIN code without spaces, JaCarta and Rutoken media are indicated.
Then you need to click “Search”, check the “Use certificate with code” checkbox and click “Next”. A new dialog box will open. It contains settings for Internet access. When you provide the correct information, green checkmarks will appear in the window.
If the installation is completed successfully, click “Next”, open the browser and check that the transport module is installed correctly. If the settings are correct, a window opens with UTM, certificate validity period, shangeSet and program build number.
No connection
The UTM installation algorithm includes the following steps:
- launching the module distribution package as an administrator;
- waiting for the installation to finish;
- specifying the user's PIN.
Next, the services of the transport module are started and the correctness of its operation is also checked. If configured correctly, a window opens with the UTM version, build number and shangeSet identifier. This indicates that the transport module has been installed correctly.
detailed instructions
The module provided by the Federal Service for Alcohol Market Regulation does not have a graphical interface.
Detailed instructions for installing and working with the transport module include the following steps:
- in your EGAIS personal account, click “Transport module”, enter your email address, click on the “Submit” button;
- download the distribution kit to the hard drive;
- click “Next” to install the module;
- select a folder and click on the “Next” button;
- choose places to create a shortcut;
- click “Next” again;
- click on the “Install” button;
- waiting for installation to complete;
- click on the “Finish” button;
- after that, enter the PIN for the JaCarta hardware key (by default it consists of eight units);
- press the “Search” button;
- check the box next to the “Use certificate” line;
- click “Next”;
- enter PIN for GOST (default consists of the combination 0987654321);
- press the “Search” button.
The system will automatically install and load the transport terminal, and launch it via EGAIS.
How to check your work
The correct operation of the transport module is checked by entering the access address created when setting up the store in the address bar of the browser. If the module is installed correctly, after entering localhost:8080, information about the version of the transport module is displayed in the window.

The absence of this tab indicates that the transport module either does not work or is not running. It is also worth checking whether the JaCarta media is inserted into the USB port.
The module is launched in the following ways:
- in the notification panel: right-click on the coat of arms icon “Run”;
- using the combination “Win+X” - “Control Panel” - “Administration” - “Services”, after which you need to find Transport or Transport-Updater, select the required one and click the “Run” button.
Please note that it takes time to start the transport module. If UTM is working correctly, it is recommended to check the settings of the browser itself.
In some cases, manual installation is required, in which the following steps are performed:
- find the “Transport”, “Control Module” and “Monitoring” services on the PC;
- run them as administrator;
- if the services are not active, the issue can be resolved through “Win+X” - “Control Panel” - “Administration” - “Services”, find the necessary items and launch them with the right mouse button.
Then the functionality of the universal transport module is checked by entering “localhost:8080” in the browser address bar.
Setup and update
Connect UTM in the “Administration” section by clicking the “Nomenclature Settings” and “Exchange Settings with EGAIS” buttons, and checking the box next to the phrase “Alcoholic products”.
- In the field “Date of start of work with EGAIS” the date of formation of the register for registering retail trade of alcohol-containing products is set. Usually the first of January of the current year is chosen as this date.
- In the menu “Start date of retail sales in EGAIS” the date from which requests for a brand code will begin when registering retail sales of alcohol-containing goods is set.
- In the list of the accounting program, click the “Create” button and enter the necessary data on the UTM.
Users can choose the sharing format.
The transport module is updated automatically for all users at any time. During this period, most users have anti-virus programs and firewalls running on their PCs, as a result of which the UTM update may be incorrect and the module will stop working. The documentation base of the old module will also be deleted, so users are recommended to save the database and update the UTM version manually. For this:
- stopping the transport service;
- run the StopDaemon.bat file;
- download the latest version UTM installation file from the official EGAIS website;
- uninstall the old version;
- install a new one;
- when the window for permission to “Java” appears, set “Private networks” and “Allow access”;
- in the dialog box that appears, enter the PIN for the certificate, do a “Search” and check the box next to the phrase “Use certificate...”;
- click on the “Next” button;
- select “No proxy” or enter proxy settings;
- enter the PIN for GOST, press the “Search” button.
Afterwards, a dialog box will open asking you to use the old version. Click “OK” and select the path to the transportDB folder. When the phrase “Installation completed successfully” appears, click on the “Next” button and check the correct operation.
Setting up UTM to work via Wi-Fi is presented below.
Description of the problem. The transport module is responsible for transferring invoices to and from the EGAIS system. Reasons for not launching UTM:
- The JaCarta PKI/GOST/SE hardware key is not inserted
- The certificate has expired (GOST/RSA)
- UTM or other software needs to be updated
Solution to the problem. If the UTM is not running or was launched before problems with the media (certificate) were resolved, follow the instructions to start or restart it.
Instructions using Microsoft Windows 10 as an example.
Step-by-step instructions on how to start or restart UTM
Step 1. Launch UTM
If UTM is not running, launch it from a shortcut on your desktop.
Rice. 1. UTM shortcut on the desktop
Upon successful launch, the UTM icon will appear in the lower right corner of the Start menu.
Step 2. Checking the status of the UTM
If UTM is already running (there is an icon in the lower right corner of the Start menu), check the status of UTM:
UTM is not running:
Rice. 2. Status “UTM is not running”
UTM launched:
Rice. 3. Status “UTM launched”
If UTM is not running, right-click on the icon. In the context menu that opens, select “Run”. Wait until the icon changes its status.

Rice. 4. Context menu
Order a consultation with a specialist on working with EGAIS!
Step 3. Restart UTM
If UTM is running, but the EGAIS system is not working (without receiving TTN), right-click on the icon and select “Restart”. Wait until the icon disappears and reappears with the status running.

Rice. 5. Context menu
If the EGAIS system does not work, then the problem lies in something else - contact technical support.