Everyone has to at some point install or reinstall Windows XP for the first time. Many are afraid to do this themselves and entrust the installation to specialists, although even a novice user can easily cope with this procedure.
Actually, the installation process of any version of Windows is initially developed by Microsoft specialists in such a way that even a beginner can handle it. After reading this article, you will learn how to do this and understand that installing Windows is not difficult.
* Preparing to install Windows XP
If you want to install or reinstall Windows XP on a computer that is no longer new - transfer from the system partition (Usually C) all the files that you want to save to other partitions of the hard drive. This does not apply to programs; they will still have to be reinstalled.
It is advisable to have disks with drivers from:
- motherboard
- video cards
- other devices
 In principle, Windows has its own driver library, which it uses during installation, but there is no guarantee that everything you need will be found. Although you can always find the missing driver on the Internet. If you are reinstalling an already working system, make a backup of the installed drivers and save it on any partition other than the system one.
Programs such as Double Driver and the like will help you with this. It is very easy to find a description of the process and download the program via Google.
Of course, you must have a disk with the operating system itself. If you downloaded an image of the installation disk on the Internet, burn it to disk.
*Installing Windows XP
Windows XP disc load it into the drive (disk drive). Now we need to set the BIOS to boot from this disk.
To do this, we restart the computer and at the very beginning of booting, we begin to press the DEL key (for laptops, the F2 key) over and over again until we get into the BIOS. Then we will need to find the tab responsible for setting the download priority.
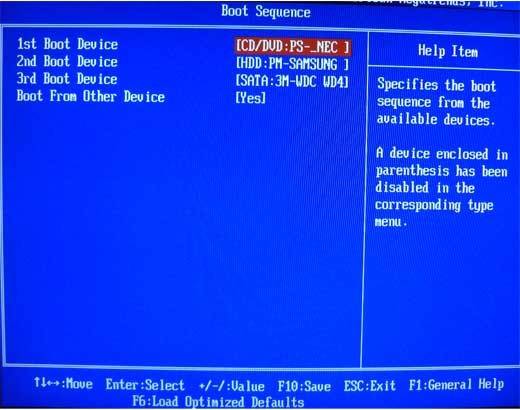
In different BIOS versions This tab may be called differently. One of the common options is this: Find the “Boot” tab at the top (move using the arrows on the keyboard), go to it (press Enter) and use the arrows or +/- keys to move to the top position - “CD/DVD Drivers” (now it’s “Hard” Disk Drivers"). For more information about this, watch the video at the end of the article.

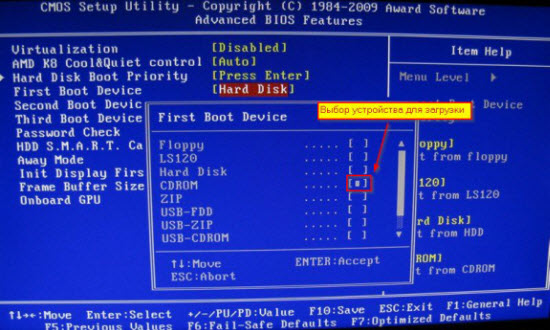
Another BIOS option: find the “Advanced Bios Features” tab and go to it (Enter)

Next, we are interested in the parameter, which tells the system what it should boot from first. By default, this line is “Hard Disk” (or HDD). Again, use the arrows to highlight it, press Enter, select “CDROM” from the list that appears (we instruct the system to use the CD drive to boot), press “Enter,” press F10 (save changes) and “Enter” again.
In different BIOS versions, the names of tabs and parameters may differ slightly (for example, instead of a CDROM there may be a DVD, etc.), but the meaning of the actions is now clear to you and you can always figure it out. You can go into the BIOS first to familiarize yourself before reinstalling the system and find all the necessary parameters so that you don’t have to look for anything later.
After pressing the last “Enter”, the system reboots and begins to boot from the disk with Windows XP, which we previously inserted into the drive. The following screen will indicate this:

Press any key, even space, and the installation begins.

The Windows XP setup program starts. We are offered a choice of one of three actions and the keys that correspond to them are indicated. Since we want to install Windows XP, we press “Enter” accordingly.

A license agreement appears, which usually no one reads. Press “F8” to continue (by the way, all the keys that you can use for actions are displayed in the tooltips that you see in front of you and at the very bottom).

In the next step, we are asked to select the hard drive partition in which the operating system will be installed. Usually this is section C. Select it using the arrows on the keyboard and press “Enter”.
If you are installing Windows XP to a new computer, then your hard drive is not yet divided into partitions and it’s time to create them. As written in the tips, to create a partition you need to press “C” on the keyboard and select the size of the future partition in megabytes.
Let’s say if you want to allocate 50 GB for the system partition, that’s 51200 megabytes. The section has been created. Press “C” again and create the next partition. At a minimum, it is enough to divide the hard drive into two partitions: partition C for the operating system and programs, with a capacity of 50 GB, and another partition for everything else (for all the remaining free space).
However, we cut as many sections as you require. After creating the partitions, select the one in which we will install Windows XP and press “Enter”.
In the next window we are asked to format this section. We choose exactly the option that is shown in the picture below and no other. Press “Enter”.
Most likely, no drivers will be needed, since in assemblies from the Internet, everything is often already included. After this, do not forget to reboot into the BIOS again and change the first boot device from CDROM back to HARD DISK (HDD).
Those who install a licensed version, or an assembly without automatic installation and activation, will have to go through a few more steps. The first one is regional settings. Here you can configure the language and regional standards for your country. The default is “Russian”. Click “Next”.

Then there will be a window for entering a name and organization, you can enter any, it doesn’t matter. In the next window you will need to enter your Windows XP activation key. If there is a license, look on the OS box. Either buy it online or find it anywhere else. Enter the key - “Next”.
Then enter the computer name (any) and password (remember). Next, we customize the time and date. If a window appears asking you to configure network parameters, simply click “Next”. That's all. Windows is installed. Don't forget to reboot and change the first boot device in the BIOS to the HDD.
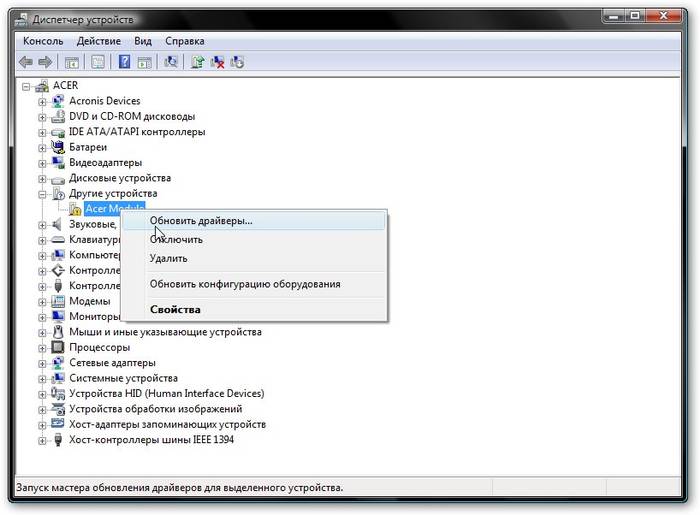
After starting the freshly installed operating system, go to the device manager: “My Computer” – “View system information” – “Hardware” – “Device Manager”.


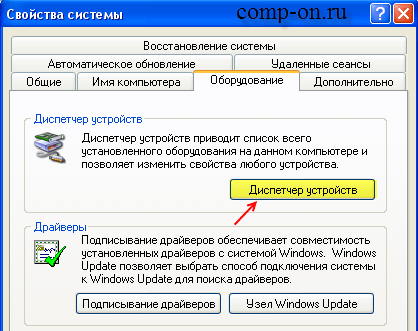
We look at devices marked with yellow question marks as not having drivers. We install drivers on them. If it doesn’t work automatically, we search for drivers on the Internet by device name or code and update them manually.

By double-clicking on any device, we get a window with all the information about it. On the “Driver” tab you can find information about the installed driver; on the “Information” tab you can find out the device code.

This completes the installation of Windows XP. If, after installing the operating system and all the necessary software, you make a copy of the system partition using Acronis, you will always have at hand an image of a fresh working operating system without bugs and everything else, which you can deploy at any time.
Windows XP Installation Video
Detailed description of reinstalling Windows Xp on a computer or laptop
Perhaps you were looking for:
How to install/reinstall Windows Xp without a disk (from a flash drive)
Step #1. Burning a disc
If you have a disk with Windows XP, then you can safely skip this step and go to [step No. 2] since here we will talk about what to do if you do not have a disk with Windows, but have a key (for example, you bought a laptop with on which the OS was installed, there is a piece of paper pasted on the back or side of it, on which is the key that we need, or another situation, but as a result you should have a key to Windows). We copy the key number onto a piece of paper so that it is at hand, and move on. Select one of the versions of Windows Xp. Both versions are time-tested
or 
Now search the Internet Windows Xp Sp2 Professional license disc. Since distribution is illegal, we have no right to provide a link to Windows. But I will give you a link to the ORIGINAL VERSION of Windows xp sp3 proffessional - By the way, if you want a pirated version, I will give you a link, but considering, again, that I do not have the right to post files on my resource, I will give you a link to a torrent with Windows Xp sp3 Simplix Edition
Original version of Windows Xp Sp3
Download Windows Xp Simplix Edition
After you have downloaded the Windows Xp image, download the program to burn our image to disk
To do this, download a program to burn our image to disk
Download Portable ImgBurn
After the Windows image and our ImgBurn program have loaded:

Step #2. The disk is ready. We set First boot device CD-Rom in BIOS
So, after Step #1 we have a disk with Windows Xp. At this stage our
the task is to get into the BIOS and set it to initially boot the disk with
installed Windows XP. To do this: Reboot or turn on
computer and press the delete key (there are other options, for example
F1,F2,F8,Ins. 
The initial splash screen should usually show you which key to press to enter the BIOS 
As a result, we should get to the BIOS blue screen, in our case it looks like this 
We set the first boot from the Disk to do this, go (with the usual arrows) to Advanced Bios Features -> First Boot Device, select CD-Rom, press enter, then esc, go to save&exit setup, press enter, then Y and enter again. 


Note: if you have a different BIOS, the essence does not change. The main thing is to find the First Boot Device and select CD-Rom. After step 2, the computer reboots itself and if you did everything correctly, then when you reboot, the message Boot from Cd/Dvd will appear on a black background: 
And after a while Press any key to boot from Cd.. 
(press any key on the keyboard to boot from the disk), press the key. If a blue screen appears with the Windows installation at the top, then at this stage you have done everything correctly. If the keyboard cannot be pressed, you need to go into the BIOS and set SUPPORT USB: YES 
Step #3 Formatting the partition. Installing XP or answering the question: " How to install Windows Xp for a teapot«
Now we wait (2-5 minutes) until a blue window appears with the inscription “Welcome to the installation program” 
Press Enter, then read the agreement and then press the key F8
A) If you already have a partition where we will install Windows Xp formatted and created (if not, read point b) -> select the partition 


If you see the message “The installation program is copying files,” everything is done correctly! Let's move on to point c 
B) If the disk is not formatted 
Select it and click on D
Attention: with this action we delete all data that is on the disk C:
Click L
Next, click “Unallocated area” WITH to create a new partition 
Enter the size of our partition in megabytes 
Select it from the list 
Format in NTFS system (fast)
If the message “The installation program is copying files” appears, everything has been done correctly and you can now continue starting from point in
C) When the installation load reaches 100%, the computer will reboot itself. (When the reboot is in progress, we DO NOT PRESS ANYTHING, we just wait) 
At the 33rd minute, fill in the language parameters 
Enter Name and Organization 
Product Key 
After you have entered the key, the installation will continue and Windows will be installed for at least 10-15 minutes and we will not take part in this. When Windows is installed, the computer will reboot again and we will only have to fill in the account name, which Internet you use, etc. 

Congratulations, Windows XP has been successfully installed!
Hello everyone, today we will talk about how to install Windows XP to your computer. I will write several options, for example, installation from a flash drive and in other articles - on a virtual machine. Windows XP is a very old system that evokes nostalgic feelings for many, so let's try installing it on a PC again and do a little work!
By the way, before installing Windows XP, I advise you to read the material: “”. This is necessary to set boot from disk to first place. If you are doing this from a flash drive, then read about, with which you can not rearrange drives, but immediately select a flash drive to boot.
Preparing to install Windows XP from disk
If you have an old distribution kit with Windows XP lying around, then let's proceed directly to the installation. If you don't have a distribution kit, I recommend downloading the image from the following links:
https://win-torrent.net/windowsxp_torrent
http://free-max.ru/windows_xp
Using them you can find images without keys.
We enter the BIOS and move to the tab Boot or Advanced(depending on the BIOS version). We get into the parameter Boot Devices Priority and use the F5 and F6 keys to move the desired device to the first place, for example, a CD/DVD drive. Or Using Enter, select the desired boot device.

For the settings to be saved, you need to go to the tab Exit and select the option there "Exit & Save Changes".

If you have a different BIOS version, say Award, you can do the following: open the section "Advanced BIOS Features".

Select a parameter First Boot Device. Nearby there is an option HDD0, which is responsible for booting from the hard drive. Press Enter and select CDROM if you are booting from a disk.


To save the changed parameters, you need to go to the option in the main window "Save & Exit Setup". A red confirmation window will appear, where we press the button Y.

How to install Windows XP using a disc
Once you have done everything necessary and exited the BIOS saving the settings, you should see this black window with the phrase "Press any key to boot from CD", which means "press any key to boot from disk." Be sure to press any key for the installation to proceed.


The welcome menu is revealed to our eyes. There are several options here that we can use:
- Proceed directly to installing Windows XP.
- Recover Windows XP using the Recovery Console.
- Exit the installer.

Naturally, you need to select the first option by pressing the key ENTER.
In the next window, accept the terms of the license agreement using the key F8.

Now we need to deal with the sections. In this example we see three sections. You can delete all sections to put them together (done with the D key), or install them in a ready-made section. I'll select the drive called "Section 2", it just has the letter C. The selection is made by pressing the Enter key.

In the next window you need to select the formatting type. To completely clear the partition table, you can select full formatting, but this is not necessary. Select a parameter “Format partition in NTFS system<Быстрое>» .


As soon as the installation files are copied to the disk, a window will appear asking you to specify the regional data. In this case, click Next.

If you are asked to enter a product key, enter it. In case you downloaded another image, the key may be embedded in it, so you will not see this window.
Another window where we are asked to specify the date and time. Then press the button "Further".

To further configure the system, click the “Next” button.
In order not to install any updates during the installation process, select the option "Delay this action"
To complete the installation of Windows XP, click the button "Ready".
Now you can rejoice in the appearance of a desktop with that same green field in the background and your favorite Start menu.
Now the question of how to install Windows XP will disappear for you, right? Everything is quite simple and clear. For any questions, please ask in the comments. Later, as a supplement, I will post articles on installing various modifications of Windows XP, such as Zver and others. I’ll also try to make a video for those who don’t like to read it.
If you decide to get rid of this system, I recommend reading.
I suggest looking at a few links
Windows XP is the classic and most popular operating system, which is still installed on computers by antique lovers. Unfortunately, due to its obsolescence, serious problems may arise during the installation process. In particular, installation may not occur at all due to errors. But almost all of them can be solved.
What could be the reasons
There are two options in which it may suddenly become impossible to install Windows XP on a computer:
- The problems are directly in the software.
- Problems with computer components.
In both situations, significant conflicts may arise with the operating system installation process. However, any of them can be easily and simply solved if you understand a little what the problem is.
Damage to the installation disk
One of the most common reasons why Windows XP does not install is a malfunction of the installation disk itself. In most cases, no one pays attention to scratches and wear on the disk, although massive damage is quite capable of preventing the reading of some files. The same applies to recording - incorrectly “burning” the media will not allow the operating system to be installed correctly. So if the reason is scratched, it is recommended to look for another installation disk.
Incorrect input and output device
The most common and far from sad mistake is an incorrectly positioned I/O device. The operating system is trying to install from some media, but the BIOS does not see it, so the installation fails.
So to fix the problem you will have to look into the BIOS. To do this, immediately after pressing the computer's power button, you must begin very actively pressing one of the keys on the keyboard. As a rule, this is F2, Esc or Del; more precisely, you need to look at the motherboard manufacturer.
After this, we directly set the download priority. Using AMI BIOS as an example:
- Let's go to Boot.
- We find Boot Device Priority there.
- Let's see which device is displayed first. It is necessary that the First Boot Device line contains the device that is needed for installation (floppy drive or flash drive).
After this, you can exit the Bios and save the settings.
If this does not help, be sure to replace the small battery that powers the CMOS on the motherboard.
Boot viruses
The next problem, which is also related to Bios, is the function of boot viruses. Or rather, its on state. In the original, this item should fight off viruses during boot, but for some reason it only interferes with the installation of the system. Therefore, you need to disable it by changing the position to Disabled.

Drive failure
In some cases, a damaged drive may prevent Windows XP from installing. The likelihood is especially high if there were problems with it before - it did not read or read information incorrectly. If this is not so noticeable in everyday life, then during the installation process every file is important, which is why it freezes.
There are two ways out of this situation - either install a new drive if you plan to install from a CD/DVD, or try installing the operating system from a flash drive.
Hardware problems
The next reason is any malfunction in the computer hardware. This could be a warped hard drive. It occurs if the computer for some reason falls or hits something. In this case, the hard drive is damaged and recording can no longer be performed on it.
The next “internal” problem is disconnected contacts on the motherboard. Or, for example, there was a failure in the data input/output device, which is located on the motherboard itself.
And there is only one way out - try installing a copy of the operating system on another PC. If it starts, it means that the problem is in the computer’s hardware. If not, the problem lies in the copy itself.
Conflict with modernity
This problem is relevant for the latest motherboards. They work slightly differently, so the installer simply does not recognize the device's hard drive. The essence of the problem is this: in the BIOS the value for the IDI/SATA controller of the chipset, specifically AHCI, is set incorrectly for the installer. The outdated Windows XP operating system is simply not able to recognize such a value, since it appeared much later than the last patch for it.

The solution is the following - enter Bios, then SATA Mode. Find there the value called IDE and set it as used. XP is familiar with it and will not be capricious.
Other problems
In addition to the problems described above, other unpleasant malfunctions may occur:
- Overheating of any component. During operation, one of the components of the processor heats up excessively and cannot perform functions correctly. So you should first eliminate the cause of overheating.
- Conflict with newer system. If the disk already contains a version of Windows 7 or higher, installation may not occur. First you need to format the disk with the old system and only then start installing the new one.
- Service pack conflict. If this error occurs, you should format your local drives. A clean system is then installed on a free hard drive.
These were the most common and easily resolved problems, but many others may also occur. Most often, they can be determined either by a specialist or by a program designed for diagnostics.
(Visited 3,981 times, 1 visits today)
In this article we will tell you in detail how to install Windows 7 on Windows XP. Late last year, Microsoft announced that XP would no longer be updated. In this regard, this issue remains very relevant.
What is needed for this
There are still many users who are loyal to XP. This is largely due to the fact that the “seven” is very demanding and cannot be installed on an old computer. In the era of rapid development of high technology, even software products have become very demanding.
Owners of old hardware have no choice but to use an outdated system. This allows the system to operate normally. Those users who decided to install “Seven” were sometimes dumbfounded by the terrible sluggishness of their computer.
Nevertheless, having updated their equipment, the lion's share of people immediately decide to update Windows. This allows you to take advantage of all the innovations of modern technologies.
- processor with a clock frequency of at least 1 GHz;
- 1 GB of RAM (for 32-bit) and 2 GB (for 64-bit);
- at least 16 GB of free hard disk space. If your version of Windows includes additional software (office, antivirus, drivers, etc.) you will need much more;
- Internet access (for further registration);
- a video card that is compatible with DirectX version 10 or higher;
Advice: this condition is only necessary for modern games. If you plan to use only office programs, then you can omit it.
- Some functions may require additional hardware (for example, a TV tuner or flash memory);
If you are confident that your equipment fully meets these requirements, you can proceed with installation. You can view all the parameters through the control panel, then the “system and security” item, in which we select the “system” tab.
BIOS setup
First of all, you will need to make some settings in the BIOS. To many inexperienced users, this seems like a complicated operation, but in reality everything is quite simple.
We do the following:

That's all, now the next time you start the computer, the system will start from the desired device and the installation will begin. Also in the BIOS you can immediately make additional settings, for example, increase the intensity of coolers. However, if you are not very familiar with BIOS, it is better not to do this in order to avoid mistakes.
How to install Windows 7 if you have Windows XP
Before installation, you will need to transfer all files from your computer to removable media, because it is better to install the OS by formatting the disks. If you don't have enough space, you can upload some files to a file hosting service.
Having completed all the preliminary manipulations, it’s time to begin the main procedure. Almost all the latest versions of the OS are installed automatically, so this usually does not cause difficulties even for less experienced users.
Once you start the installation, you can go do other things. The system will do everything itself, and you will only need to specify some additional parameters.
Installation process
After turning on, the computer will immediately begin installing the operating system. Almost the entire process occurs automatically, so usually there are no problems with it.

The only thing you need to do is make some settings:
- the language in which the system will operate. However, it can always be changed through the control panel;
Important! Choose the full installation as it will save you some extra hassle
- creating partitions. You can divide the entire disk space into several parts. It is recommended to make a separate partition for Windows;

That's all. Now all you have to do is wait until the installation is complete. When finished, a window will appear in which you will need to enter your username and password (if necessary).
Some versions themselves enter the username at the end (usually the standard “Administrator”). If desired, you can edit this parameter.

If you did not format the partitions, then in one of them (most likely in C) all the XP files were saved. They need to be removed to avoid errors in the future.
This is done like this:
- Open Start and enter “Disk Cleanup” in the search menu. A list of found items will appear, among which you need to select the very first one;
- The disk selection window will appear. You need to select the one on which the previous OS was installed and click “ok”;
- in the window that opens, select “clean system files”;
- Next, you need to check the box next to “previous settings” and click “ok;
- When finished, click “delete files”;
- After a few seconds, the unnecessary folder will be deleted.
Install the drivers
Now all that remains is to install drivers for all existing devices (video card, chipset, network, sound, etc.). If you have a disk with drivers specifically for your computer (it is usually given upon purchase), then all you have to do is insert it and trust the instructions.

However, if it is missing, you will have to select drivers for all equipment.
You can do this in several ways:

Now you can judge with confidence that all the work is finished and you have completed the task. Don't forget that you will have to reinstall all software again. Therefore, get distribution kits in advance so as not to experience problems in the future.
In addition, software products that run on XP may not work on Windows 7. Therefore, before switching to this system, you should acquire more modern software products.
As you can see, this is a completely simple process and by strictly following all the instructions, you will certainly cope with it. If necessary, you can supplement the system with various additional utilities.
>