The monitor screen goes blank, but the computer continues to work? Almost every user has encountered a similar situation, regardless of their level of computer literacy. Let's consider all the factors that can lead to such a situation, and also consider how this or that situation can be resolved.
Why does my monitor screen go blank?
In some situations, a similar problem may arise due to simple user errors, for example, accidentally turning off the monitor's power button. Everything is much more complicated and unpleasant when the computer hardware fails or the monitor itself breaks down, because in this case you will either need to completely replace the component part or contact a service center. Let's consider various reasons separately and ways to solve them.
- Monitor failure.
To understand the reason, it is always necessary to go through a certain screen test procedure. Turn off the computer completely, and then turn it on again and monitor its behavior:
- if the monitor shows the image, but after 2-3 seconds. the picture disappears, most likely the reason for this is the failure of one of the incandescent lamps and it needs to be changed.
- If the monitor screen does not light up, but when an external LED lamp is connected it lights up and shows some image, then the problem is in the voltage inverter, which must be replaced.
If, when the system unit starts, nothing is displayed on the monitor, disconnect it from the SB by pulling out the cable. The operating monitor should display a “No Signal” message, or something similar, depending on the model and manufacturer. If this does not happen, then we can unequivocally say that the output device has failed and you cannot do without a service center, since there can be many reasons for the malfunction and this cannot be checked at home.
- Video card malfunction.
The display of the image on the monitor screen directly depends on the health of the video card, which can also break at some point. If you have a discrete one, unwind the system unit, take it out and reconnect it to the motherboard. If nothing has changed, additionally try inserting it into another system unit to fully verify that the graphics adapter is working.
If you are using an integrated video card, try to get a discrete one and connect it. If the computer starts normally, the problem lies precisely in the failure of the built-in adapter.
- Presence of dust.
If your PC has not been cleaned of dust for a long time, then try. The fact is that dust is electrically conductive and, if it gets on components, it can make work difficult. Clean the computer with brushes and a vacuum cleaner, and then reassemble it and try turning it on again.

- Damaged cable.
This reason is one of the most common, but it is quite difficult to recognize and for some reason users always pay attention to it last. Even if the connection cord has no visible damage and has not been subjected to any mechanical stress, it can also break on its own.
Try using a different connecting cord, and if the display is normal, the reason will be clear. You just need to be absolutely sure that the other cable is probably working.
- Incorrect connection.
If several people have access to the PC, then it is possible that when reconnecting, the connecting cable was inserted into the wrong connector and nothing will actually be displayed on the monitor. Modern motherboards have video connectors, although there may not be an integrated graphics adapter on the processor or motherboard, and accordingly, nothing will be shown on the screen when connected. And even if there is integrated graphics, it will only recognize the preinstalled discrete one, which is usually more powerful, and therefore no image will appear on the screen.

- Failure of the processor or motherboard.
Sometimes, when you turn on the computer, only the appearance of correct operation of the system unit is created (the power supply is working, the coolers are spinning, etc.). In fact, this does not always indicate serviceability. When you turn on the system unit, listen to see if there is an intermittent sound signal, if the mouse and keyboard turn on (if the indicators light up), if power is supplied to the flash drive (the LED should light up, although some models do not have it).
- Life situations.
There are times when the user may accidentally pull the power cord, after which the monitor simply theoretically cannot turn on. Incorrect settings may be set.
Not long ago I was solving a problem when my computer monitor was not working. Detecting a malfunction is not a pleasant pleasure, so I decided to write an article about the most common problems that can arise in this situation. Therefore, our conversation will focus on why the monitor does not turn on when the computer is turned on. As usual, I will tell you about several ways to correct the situation, among which, I hope, you will find exactly the one that will help you.
First, you need to make sure that it is your monitor that is not working. Turn off the computer by pressing the “Power” button and hold it until the noise stops coming from the system unit (usually in older computers). After turning off completely, turn on the computer again; if the system unit makes noise or any indicators are blinking on it, indicating that the computer has turned on, but nothing is shown on the monitor, then read the article further.
Important manipulations
Before you start reading the article, make sure that the surge protector is turned on. If there is no power, then you will never see any image on the screen. It is possible that one of the household members turned off the monitor through the button, or maybe you did it yourself on purpose. Check if everything is ok with this.
So, what should you do first when the monitor does not turn on when you start the computer? Some monitors, like system units, have a power button. It is usually located at the back of the monitor, sometimes on the side. To turn on the monitor, you need to move it to the “On” position (1), for clarity, look at the image below:
To determine whether the monitor is turned on, look at the front of the monitor. At the bottom there are usually indicators that allow you to determine whether voltage is being supplied to the monitor.
The very first common problem is bad contacts. Moreover, this nonsense can be, as in the place where the wires are connected to the motherboard, at the back of the system unit, or there is a bad contact between the video card and the motherboard, and the most common thing is when there is a bad contact at the back of the monitor. In general, you need to check both ends of the wires, namely the wire that transmits the picture to the screen and the power wire from the network.
There may be another pitfall here, the type of signal transmitted to the monitor. Modern video cards have two built-in connectors through which it is possible to connect a monitor: white (DVI) and blue (VGA). The latest type of connector that can be found in the newest monitors is HDMI, and it’s hard to make a mistake when connecting with it.

If you are using a DVI connection, try changing it to blue and vice versa. Did not help? Then find the monitor connector on the motherboard itself.
It will be there if the above board has a built-in video adapter. Connected? Works? Then the problem is in the video card, namely in the settings, or the worst thing is that it has burned out. You can also connect another monitor, disconnecting it from another computer; you can borrow it from your neighbors for a couple of minutes if you do not have a second home computer. When you turn on another monitor, turn off the computer, disconnect your monitor and connect the other one, and only then turn on the computer.
Monitor settings
If everything is connected correctly, and you have no idea why the monitor does not turn on when you turn on the computer, then it is possible that the settings for the monitor have been changed. Press the "Menu" button on the monitor and go through the settings. You need to change the brightness and contrast. If you don't know how to do this on your monitor, then find the user manual. When you purchased the monitor, you should have been given a disk or a printed manual. If for some reason it is not there, then the Internet can help you search.

For those who are not afraid to tinker with the settings, you can do this without any disks or documents. In fact, everything is clear there. To make this task easier, first switch to the “Russian language”.

After which it will be more or less clear. By the way, if you see the settings menu on the screen, then everything is fine with your monitor. You don't have to worry about replacing it.
Non-working motherboard
The next possible malfunction is a partial failure of the motherboard. In this case, the computer may turn on and even boot, but the monitor will not show the picture. To check this manually, we will have to open the system unit and carefully examine the motherboard.
It cannot be ruled out that the connector on the motherboard where you connect the video card could be damaged. To check this, you will need to install another video card and try to send an image to the monitor from it.
If everything depends on the motherboard - it is not working, then you will have to call a specialist to your home, since the problem may not lie in the computer screen.
The monitor burned out
If it is the monitor that is not working, you can try to disassemble it. However, it is highly not recommended for ignorant people to do this; it is better to take it to a service center or buy a new one. It just so happens that monitors are rarely repaired by ordinary users; the process is too complicated.
I have a story about this: when I was in college in a programming class, smoke came out from behind the monitor. At that time, I was not experienced and immediately ran after the teacher to report this “joyful” event. He was sitting in another office when he burst in with this news, he asked - did you disconnect him from the power supply. The answer is Nope 😉 . Then a mime formed on his face, which he saw on me a couple of seconds ago. When we entered the office, the smoke had almost gone, and a classmate who was sitting next to him turned it off. The teacher smiles for a couple of seconds and says, “Well, go sit down next to me 😉.” The whole group laughed.
I think this story will be instructive for you. If smoke comes from any device, you must immediately turn off the power so as not to burn down your apartment or office!

Dust in the system unit
How long have you carried out preventive maintenance on your system unit? If the window of the room where the computer is located is opposite the roadway, then in the summer you probably noticed a lot of dust on the window sills. So, the system unit is a vacuum cleaner that swallows this dust. Open the cover of the system unit and use a vacuum cleaner.
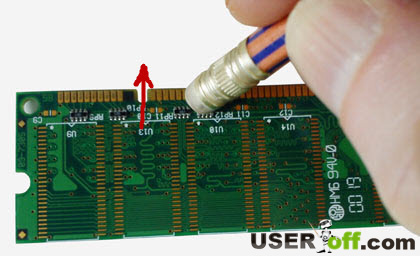
Important! Do not touch the vacuum cleaner to the motherboard or other devices. After collecting debris, disconnect the video card from the motherboard and clean the contacts with a pencil eraser. Using light pressure, go through the contacts of the video card. No need clean with a pen eraser, as it contains solid particles.
In the image below you can see what it looks like, only instead of a video card in the picture there is RAM:
In one of my articles I talked about a video card, many novice users will need this information, follow the link to read it: “”.
Software
If you recently updated drivers and Windows does not boot, then you need to remove the installed software. This usually happens due to an incorrectly installed driver.
To bring your computer back to life, go into safe mode and perform a system restore. If you know for sure that you installed or updated video card drivers, then you need to remove them from your system.
I wrote about entering safe mode for different systems in 3 of my articles:
BIOS
If your computer has 2 video cards, that is, one is integrated into the motherboard and the other is external, then the problem may be that the device is selected incorrectly in the BIOS. You may ask why the computer does not automatically detect
To reset the settings in the BIOS, thereby setting them to Default, just disconnect the battery in the motherboard. You can read more about this in my article: "".
Other problems
It is possible that the cable contacts may be slightly oxidized. To fix the problem, take alcohol and wipe both ends of the cable. Do not press on the pins under any circumstances, so as not to bend them or even break them. If you break it, you'll have to buy a new cable. By the way, gold-plated contacts are of better quality in this regard, namely, they are more resistant to oxidation. If the pins are bent, then you need to carefully align them. To do this, use, for example, a thick needle or a narrow screwdriver.
Monitor does not turn on (repair):
The situation when the laptop screen goes blank is quite common. It is most often encountered by novice users who have recently purchased a device.
Note! It is quite possible that this is due to some technical errors. Statistics show that this applies to only 10% of cases, the remaining 90% are due to incorrect settings or software problems.
It is worth considering the most basic reasons why this problem occurs. Moreover, once you become familiar with them, you can easily correct them.
The most common cause is a lack of power settings. It’s very easy to deal with this, just follow a simple algorithm:

If the user has a laptop from the manufacturer Acer, then he just needs to press the “Fn” and “F6” keys simultaneously. With this simple action the problem can be resolved. On laptops from other companies, you need to press other keys, which are indicated in the technical instructions for the device.
Dirty laptop
The second most popular reason is congestion. Asus owners most often encounter this situation. It was noted that immediately after cleaning the device stopped going off.
You can take your laptop to professionals for cleaning, but it’s quite possible to do it yourself:
- First you need to completely turn off the device, it should not be in sleep mode. It also needs to be disconnected from the network. The user will then need to carefully flip it over so the lid is facing down and disconnect the battery.

- The next step is to remove the cover of the device. In some cases, it can be removed not completely, but only partially. You will need the part where the cooler is located, which is needed to ensure that the laptop does not overheat. The bolts for each model are different, it all depends on the manufacturer. They need to be carefully unscrewed. Most often, manufacturers hide the mount itself behind special stickers or rubber inserts. Usually the cooling system is immediately visible, as it accumulates the largest amount of dust.

- When disassembled, the device will look like this:

- Since the user only needs the cooler for cleaning, it must be carefully removed. It is important to remember that you must first disconnect the power cable.

- Now you need to arm yourself with a brush and a vacuum cleaner. They need to thoroughly blow out the entire case, paying special attention to the corners and the radiator. It is a yellow or orange plate with many different slits in it. You also need to thoroughly blow out the cooler itself. At the end of cleaning, simply brush away any remaining dust with a brush.

This completes the cleaning process. It is necessary to attach everything back, namely the cooler (after first reconnecting it to the power cable) and the cover. All bolts must be reinserted and the existing stickers must be pasted over them and rubber inserts must be attached.
Incorrect driver operation
It also often happens that one of them does not work quite correctly. For example, if the video card driver does not work correctly, the screen may often go dark or work with some glitches. Simply installing them again is enough to solve the problem of dim color and causeless fading.
It is necessary to download them only from official sources, otherwise you can only harm your computer.

If the user does not know which drivers he has on his laptop and which he does not, then he can use the DriverPack Solution program. It will not only help you find existing drivers, but will also update them to the latest version. It also needs to be downloaded from the official website.

Experts recommend not working on your laptop at this time, closing all other files and applications, and letting the program update the selected devices. On average, this procedure takes no more than 20 minutes, depending on how long ago the drivers on the PC were updated.
Note! This program is useful not only if the laptop screen goes blank. Updating drivers can improve performance and speed up the system.
The reason is in the BIOS
If the methods described above did not help, then it is likely that the reason lies in. You need to go to the official website and see the list of updates. If so, the BIOS will need to be updated.

Viruses
Malicious applications often lead to various problems with your computer. However, statistics show that in this case the reason lies in them quite rarely.
If the methods described above do not help, you will need to resort to this method and make sure whether there are viruses or not. To do this, you need to run a scan with any antivirus. If it is not there, you will need to download it. Let's look at virus cleaning using the example of the popular Avast antivirus. There are both paid and free versions. In this case, we will consider one for which you do not need to pay, but the user can install a paid option.

After getting rid of malicious applications, the laptop screen should stop going dark.
If nothing helps, you will have to take your device to a service center, where specialists will find and fix the problem.
Video - Backlight turns off or laptop screen goes dark
Since the days of cathode ray tube monitors, automatic screen shutdown has been provided after some time of system inactivity. This was necessary so that the phosphor of the kinescope did not burn out under the influence of electrons. LCD monitors are not in danger of burning out, but the screen turns off to save energy.
You can change the screen blanking time yourself. Right-click on an empty space on your desktop and select “Properties” from the context menu. Go to the "Screensaver" tab and click "Power" in the "Energy Saving" section. In the “Display off” drop-down list, specify the amount of inactivity after which the monitor will turn off.
technical issues
If the monitor turns off during heavy gaming or when working with 3D graphics, there may be a problem with the video card, especially if small artifacts such as dead pixels appear on the screen. Disconnect the system unit from the power supply, remove the side panel and carefully remove the video card from the slot. If the card has a fan, use a vacuum cleaner to blow it out. Wipe the video card contact connector with an eraser to remove oxides. Carefully insert the card into the slot and check the operation of the monitor.
Try replacing the interface cable from the monitor to the system unit - its malfunction can also cause shutdowns. Insert the cable tightly as poor connections may cause problems. Connect the monitor to the system unit only when the power is turned off.
Modern video cards consume a lot of electricity. Your power supply may not be able to handle the load, especially if it is older than 3 years. Replace the power supply with a more powerful one or check the operation of the video card on another computer with a obviously more powerful power supply. Using Everest or a similar program, look at the temperature of the components inside the system unit - perhaps shutdowns occur due to overheating.
Download a new driver from the video card manufacturer's website and install it. If the disconnections continue, connect the monitor to another computer to determine the source of the problems.
If the screen fades, try turning the monitor power on and off with the Power button several times. If the image appears, there may be a problem in the power circuit - usually a dry or swollen capacitor. This technique will not help if the backlight lamps or monitor matrix are faulty.
We will not talk about situations when the monitor does not work, turns off or does not display, but about why the monitor screen goes out, but the computer continues to work. Such situations are rare and are caused by a variety of reasons.
The problem is in the monitor itself
Most often, turning off the monitor indicates its breakdown, when the screen itself or the electronics fail. It is worth noting that despite the variety, it is breakdowns that lead to malfunctions least often. Usually a broken monitor simply does not turn on at all. But the situation is considered when the display turns on again and stops working again. Specific faults leading to shutdown:
- Failure power controller or its elements. In this case, during operation, the faulty element will heat up to a temperature that at a certain value will turn off the monitor. When the element has cooled down, it can be turned on again. Repair will require replacement of the problematic component.
- Fuse failure. The problem completely coincides with the previous one and has the same reason - shutdown due to heating of the element. The difference is that instead of a planned one, there is an unscheduled shutdown due to a failure of a spare part.
The simplest of problems
The simplest case when the monitor goes out during operation is problems with the cable. After all, this element, compared to everything else, is a consumable material and is not expensive. In the cable itself it can be like no contact(rare case), and a failure may occur due to a violation wire integrity.
Frayed or broken The cable can work in one position for a long time, but as soon as the position changes a little, the display will immediately turn off. As soon as you move the cord a little, the image on the screen is restored. The easiest way to check if the cord is faulty is to replace it, take a known working one and install it:
- the image was restored– you can throw away the old wire;
- display is still black– the problem is not in the cord.
A faulty cord is the source of the problem most often; it is from this reason that you should start troubleshooting.
Video card failures
A potential source of temporary display blackouts could be a faulty video card. It is not necessarily completely broken; there may be other reasons.
Fast heating
Overheating is both a cause and a consequence of a malfunction. High video card temperature may not cause the computer to shut down, but turning it off itself(protective operation). In this case, the image on the screen will disappear. There are three reasons for this:

Driver problem
Incorrect drivers are also problems with the video card. Installation incorrect drivers Usually it turns off the monitor instantly while the system unit is working.
Usually a driver problem appears instantly. Immediately after installing the wrong program, the screen immediately goes blank. The problem is corrected by starting the system in safe mode and removing the wrong driver. When installing the correct drivers, even if they were outdated, such problems were not noticed.
Incorrect extension
The user rarely thinks about permission. Install what you need and use it. Most often, fans of computer games can see a black screen when they first launch the game. In default settings inappropriate resolution is selected. Non-advanced users need to start changing this option themselves. 
Usually, when changing using the system, you have 15 seconds to confirm the action. If the action is not confirmed, it is canceled. Therefore, if the screen goes blank when setting the resolution, you need to wait the allotted time. Only if the image has not returned will you need to start the computer in safe mode and check for the presence of the image.
Connection error
The data cable has a large number of contacts for connection. If at least one of them is not fully connected, the signal may not pass through. In exceptional situations, if one of the contacts is slightly damaged, it is possible incomplete signal transmission. The monitor will work until a certain point, and then turn off and go dark. But such situations are quite rare. 
Planned shutdown
The last possible factor for the monitor to turn off could be setting energy saving mode. If the computer is idle for the specified time (there is no mouse movement or keyboard presses), the monitor will turn off and go dark according to the energy saving plan. Most often, the computer “wakes up” from moving the mouse or pressing any button. In rare cases, it “wakes up” only from the power button. This option can be turned off in the energy saving settings. 
RAM failures
In a situation where the computer uses RAM as additional video memory, minor RAM malfunctions will turn off the monitor. However, this will also happen with “jamming RAM”. Just in case, you should check the RAM using special software, for example Memtest.