I’d like to start with the fact that there are several articles on habrahabr and geektimes about the previous version of App Inventor. Here they are:
MIT opens Google App Inventor in beta
App Inventor - creating Android applications for everyone: Lesson 1
Reading an XML file using App Inventor
This version of App Inventor (beta) ran from 2011 to 2015, but is no longer supported. Since 2014, the version of App Inventor 2 has been running, which is incompatible with the previous one. Until 2011, there was a version of Google App Inventor within Google Labs
So, App Inventor is a visual development environment for Android applications that requires minimal programming knowledge from the user. It looks like this: 
This development environment works directly from the browser. There is no need to download or install anything. You can create applications either from an Android tablet or from an iPad. The main requirement for hardware is a good screen resolution. As an example, I will give a screenshot from a FullHD resolution screen. You can compare it with the previous one, which was made from an HD screen. 
Ready-made applications can be placed on the Play Market; for example, I will give a developer account in which all applications are made in App inventor.
I will not describe MIT App inventor 2 in detail, since it differs from the previous version mainly in many small improvements, which are released on average once every few weeks. After reading the articles mentioned above, you can easily master the current version.
There is quite a lot of life on VKontakte community, in which participants share their experiences using App Inventor with each other.
Part 2. App Inventor+Arduino projects.
Recently, the topic of the “Internet of Things” has been rapidly developing. Many projects on this topic use Arduino. Sometimes in such projects you need to create an Android application, and here you may need App Inventor 2. There are several articles on this topic on habrahabr and geektimes.
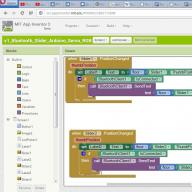
1. App Inventor+Arduino projects using a Bluetooth connection. (bluetooth module HC-05\06\07)
Robot vacuum cleaner on Arduino
A simple Bluetooth machine on Arduino
Bluetooth remote control for TV using arduino
2. App Inventor+Arduino project using wi-fi connection (wi-fi module ESP8266)
Internet of Things (IoT) and plumbing
3.App Inventor+Arduino project using a wired connection (Ethernet module Enc28j60)
Multi-zone amplifier volume control using Android and Arduino app
4.App Inventor+Arduino project using GPRS/GSM connection (GPRS/GSM shield SIM900)
Heating control in a country house
Well, I would like to end with positive news that since August 2015 App Inventor 2 supports the Russian language. If anyone has their own interesting applications made in this development environment, you can post them in the comments, I think many will be interested in seeing what other applications can be made using App Inventor.
P.S. A collection of more than 100 educational materials on Arduino for beginners and professionals
P.P.S. Online course on Arduino on Giktimes
Installing the Windows software for App Inventor Setup has two parts:
- Installing the App Inventor Setup software package. This step is the same for all Android devices, and the same for Windows XP, Vista, Windows 7, 8.1, and 10.
- If you choose to use the USB cable to connect to a device, then you"ll need to install Windows drivers for your Android phone.
NOTE: App Inventor 2 does not work with Internet Explorer. For Windows users, we recommend using either Chrome or Firefox as your browser for use with App Inventor.
Installing the App Inventor Setup software package
You must perform the installation from an account that has administrator privileges. Installing via a non-administrator account is currently not supported.
If you have installed a previous version of the App Inventor 2 setup tools, you will need to uninstall them before installing the latest version. Follow the instructions at How to Update the App Inventor Setup Software.
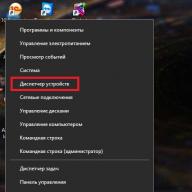
Locating the Setup software
In most cases, App Inventor should be able to locate the Setup software on its own. But if it asks for the location of the software, the path to enter is C:\Program Files\Appinventor\commands-for-Appinventor. If you are using a 64-bit machine ((How to tell if you"re on 64-bit Windows) , you should type Program Files (x86) rather than Program Files. Also, if you did not install the software as an administrator , it was installed in your local directory rather than in C:\Program Files. You"ll need to search for it to find the correct pathname.
I remember in one of the articles on App Inventor I wrote that there was an attempt to Russify it, but I didn’t really like it. I don’t even remember why. Meanwhile, Russification from App Inventor2 has disappeared.
But the world does not stand still and here again we have App Inventor in Russian. This happened thanks to the efforts of enthusiasts from "Learning with Google" community. Next I’ll try to figure out what happened, but now, first of all, applause for the enthusiasts! Well, simply because it turned out quite well, in my opinion, and the work was necessary in every way.
But, from enthusiasm to action.
You can switch to Russian in the language selection drop-down menu at the top right. 
Now what I liked:
Competent and pleasant translation into Russian of various menus on the “Designer” and “Blocks” desktops
This will immediately allow a person far from programming and the English language not to get lost. I myself am far from the first, and only a little closer to the second, so I like it, damn it! Although I’m already used to the English interface.
We click the question next to it in the “Palette” menu and what do we see?

Bah! Yes, this is a small hint, also translated into ours, the great and mighty. Great too! If I figured out a thing like a button without resorting to a dictionary, then, for example, to figure out sprites, I had to scratch my head. And here everything is on a silver platter.
Let's go further and look at the blocks. And here there is complete splendor and Russification. 
I admit honestly that I seem to have figured out the AI (well, okay, only part of it), but some blocks make me strain because, again, my English, alas, is lame. So App Inventor in Russian is here to help.
There is also an error index in App Inventor. And his guys didn’t ignore him.
In general, I repeat, I liked the Russification.
There are, of course, small mistakes: for example, some words are missing in the “Properties” of the components. 
But, by God, this is such a small thing!
Yes, here, the tooltips for the blocks are still in English. But their correct understanding is often lacking.

Now about whether I personally will switch to the Russified version. Most likely not, and here's why: the vast majority of programming languages use English. Hence the conclusion - anyone who wants to advance further in learning programming must work with the original language. And I want.
And the next argument: in the process of dealing with AI, I raised my level of English. And this is also very useful.
But! I will still turn to the Russian-language App Inventor, since not everything is always clear. And what’s more, you don’t always have the time and desire to learn a foreign language if you need to write yourself, say, an alarm clock application with your own features. And here App Inventor in Russian will help. What if you want to teach how to create mobile applications for kids who have just started learning English? Yes, with English-speaking AI you will only confuse their heads. After all, remember that this thing was created for training.
So, the work done deserves all the attention and respect. And, without a doubt, use.
It would also be nice for the guys to create a complete Russian textbook... Stop! Stop! What will I do then?
App Inventor- a visual development environment for Android applications that requires minimal programming knowledge from the user. Originally developed at Google Labs, after the closure of this laboratory it was transferred to the Massachusetts Institute of Technology. At first March 2011 year, the Massachusetts Institute of Technology launched a public beta version of the project, available on the website appinventor.mit.edu.
This development environment works directly from the browser. There is no need to download or install anything. The result can be viewed on an Android device. Ready-made applications can be placed on the Play Market.
Since August 2015, App Inventor 2 supports Russian language.
In the online editor MIT App Inventor 2, applications are built on the basis of standard components, which are the main element of Android application development.
App Inventor blocks. Important Concepts and Principles
App Inventor blocks are tools for manipulating components and look like puzzles.
The blocks in this Android application designer are divided into two large groups based on what they influence and what they relate to:
- directly related to components
- related to the application as a whole
Let's start with blocks that belong to components. They can be divided into three types, which are easily distinguished by color:
1. blocks describing the properties of the component. They are green and look like this:
this block denotes the current property of the component. This picture shows the background color block for the TextBox1 text component. It involves obtaining an existing value.
and this one sets the required value to the component (give TextBox1 a background color...). “set” - set. This type of property block could be classified as commands (handlers), since it actually gives a command to change any property of the component, including field values. However, the App Inventor developers decided this way - after all, these are properties too.
2. event blocks, that is, those blocks that monitor the occurrence of an event in the application, for example, pressing a button and then launch a block command. They are painted bronze and look like this:
this block, for example, performs an action when a button is clicked (when Button3 is clicked do...)
3. block command, in App Inventor this block is often called a handler. This block specifies what needs to be done with the component to which the block belongs:
This particular block calls data from the device timer.
The second group of blocks relevant to the entire application, is organized somewhat differently.
To begin with, here is their list of subgroups: 
- Logic blocks– logical blocks
- Math blocks– math blocks
- Text blocks– text blocks
- Lists blocks– blocks for managing lists
- Color blocks– blocks for color management
- Variable blocks– blocks for controlling variables
- Procedures blocks– blocks of procedures.
All of them, with the exception of Procedures blocks, are built into other blocks. That is, they cannot serve as an initial block, unlike event blocks belonging to components - all actions are performed when some events occur with the components.
Here it is worth talking more about the types of “puzzles”. So, you probably noticed that there are four types of puzzles.
From their form it is quite obvious that any chain in a mobile application begins with the first type. This is an event and it is quite logical that it initiates all further actions. And this type is no different from that adopted in this Android application designer.
But the following two types of block, according to the App Inventor typology, belong to different types: properties and commands (handlers), respectively. But according to the shape of the puzzle and the meaning, they could be classified as commands, since they set the action. Let's say second the puzzle shown in the picture gives a command to assign a specific value to a component, A third Puzzle - call a component with a specific value. In addition, these puzzles are “intermediate”; they cannot be used to complete the chain.
And here fourth the species is final value, existing or calculated, and ends chains with it. For example, the fourth picture represents the current value of the Clock1 component.
The IT company announces a competition for the development of mobile applications for the Android OS, created in the App Inventor programming language.
Dates of the Competition
- Reception and registration of competitive works: from January 1 to May 15, 2017.
- Review of works by the competitive Jury - from May 15 to May 30, 2017.
- Announcement of the results of the competition on May 30 on the competition portal.