Many of us lead an Instagram profile in a certain style, in which all objects have their own shade. What to do when cool pictures appear in the Photo Gallery, but they are slightly different in color from others? How do I change the color of a subject in a photo, or how do I paint pictures?
Pics Art
A light effect is quite simple to make. You can change the color of an item in a photo using a free app called Pics Art. You can download the program in the official stores AppStore and GooglePlay.
How to replace colors in a photo:
- Open Application Pics Art and choose a photo.
- Select the tab in the bottom menu "Effects".
- Then click on "Colors" and "Compensation".
- Choose a specific shade to be replaced.
- Click on the small colored square that appeared after choosing a color.
- Use the sliders to find the perfect replacement tone.
- Save photo. You are gorgeous!
Often the objects in the pictures have similar shades to the selected ones, from this they are replaced in the same way with a different color. In this case, you need to click on the eraser from above and carefully erase those parts that are painted over.
Recolor
This free photo color changer is called Recolor. It is quite simple to use, but you need to carefully paint over all the details.
- Open the app Recolor.
- Upload a photo to the program.
- Press the middle button on the bottom panel Recolor.
- Next, tap on the palette icon in the upper left part of the editor.
- Select the desired shade.
- Use your finger to gently paint over the desired item.
- Click again on the palette icon, which is located on the top left, and tap on the oranges.
- The color of the item will immediately change.
- You can fix the action using 2 stripes with an arrow (the icon is on the bottom right panel).
- Optionally, you can apply any second shade on top, blending them together.
- If there are any flaws in the picture, you can remove them. Eraser.
Darkroom
Another app for changing colors for iPhone and Android is called Darkroom. I would like to note that this program has in-app purchases (459 rubles), but you can try a similar color replacement effect for free.
How to change the color of the item in the photo:
- Open the program Darkroom and select a snapshot.
- Click on the three circles that intersect together.
- Choose any desired color shade.
- Use the sliders to adjust the desired tone for the subject.
- If you don't want to buy the app, just take a screenshot of the image.
FROM Orvi applause
Be the most stylish! Use super effects.
How to change the color of an object in Photoshop?
Probably every girl at least once in her life thought about changing her hair color. But not everyone dared to do this. After all, a new color can both decorate and ruin the whole image. But how can you check this even before staining? Everything is very simple, you just need to use the Adobe Photoshop photo editor.
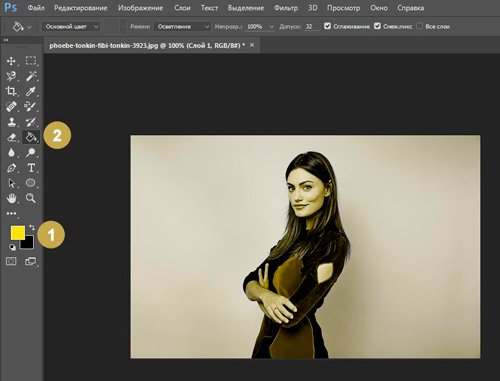
So open your photo with File> Open or Ctrl + O. Select the hair using the Magic Wand Tool (W key).
To do this: set the tolerance, and select the desired part of the photo, alternating the buttons "Add to the selected area" (1) and "Subtract from the selected area" (2). If the Magic Wand has selected too large an area, you need to reduce the tolerance.
In the Image menu, select the Correction item and the Color Balance sub-item or press Ctrl + B. In the window that opens, you can change the color of the selected part of the photo (in this case, the hair) by adjusting the sliders in one direction or another.


When you get the color you want, click "OK". If the hair color is too dull, or, conversely, bright, in the Correction item select the sub-item "Brightness / Contrast ...".

Move the sliders to the left or right to set the desired contrast and brightness.

Now save the image in a new file, compare with the old one, and conclude: do you need to change your hair color? :)

Of course, in Photoshop you can change more than just hair color. It can be the color of the dress, the car, the sky… .In general, whatever your heart desires!
37631 ,When editing images in Photoshop, it is often necessary to change the color of an object or part of it, and do it so that it exactly retains its texture, shadow, transition effects and other attributes. For obvious reasons, simple recoloring with a brush is not applicable here, this method is only valid when working with solid objects.
When replacing the color of textured or non-uniform objects in color, you cannot do without using additional tools. So, how to replace the color of an object in Photoshop.
Replacing color with changing layer blending mode
The easiest way to replace a color in Photoshop is to use a blend mode. Now we will not analyze how exactly the interaction of colors works when using different modes, it is better to get down to business right away. In our example, we will change the color of the inner circle of the drawn gear. It is now blue, but we want it to turn red while retaining all of its gradients and effects.
Open the images in Photoshop, create a new layer and change its blending mode to.

Select the desired color in the palette and start painting with a regular brush directly over the object. Isn't it too simple?

Yes, if the areas close to the edited object are black, white or gray (any gradation). In all other cases, the area to be recoloured will first need to be selected with a lasso, a magic wand, or by applying a mask.
Replacing color by color correction
This method is more suitable for replacing the color of objects that have a more or less uniform tone, for example, clothes, flowers, car bodies, etc. Open the image in Photoshop and choose from the menu Picture -> Correction -> .

In the window that opens, take an eyedropper and click on the color that you intend to replace, after which it will immediately appear at the top of the window.

Then click on the square with the color (Result) at the bottom of the dialog box and in the palette that opens, select the desired color.

Changes can be viewed in real time. For a more accurate definition of the recoloured object, you can use the scatter and eyedropper option «+» and «-» allowing you to add and remove adjacent areas.
Replacing color with a custom brush
In recent versions of Photoshop, there is a special brush that allows you to replace the selected color, including neutral, with any other. It is located in the same group of tools as a regular brush. The essence of its work is to replace the color of adjacent pixels, the error of which is determined by the user himself. So, with the admission 1 percent only one specific color will be replaced, which will fall into the focus of the brush.

With admission 30 percent the brush will replace the color of not only those pixels that will be in its focus, but also adjacent ones that have a similar color shade. When 100 percent all colors will be replaced. The main difficulty when working with a brush Color Swap the fact that the user has to select the admission empirically. As in our opinion, 14-17 percent for a start it will be enough, if necessary, this threshold can always be raised.
There are dozens of ways to change color in Adobe Photoshop. The easiest and fastest is to use the special command Replace color or “Replace color”. This function is convenient to use when working with any object in the photograph. This command is also useful when replacing the color of several small details that are randomly scattered throughout the image. This article provides detailed step-by-step instructions for completing this simple task.
Open the image in Photoshop. Duplicate the main layer. To do this, go to the "Layer" tab in the top menu and select "Duplicate Layer" or press Ctrl + J. Go to the "Image" tab (Image). Select “Adjustments” - “Replace Color”. A dialog box will appear. At its top, check the box next to Localized Color Clusters . There are 3 pipettes below. With the first selected, click on the area of the object where you want to change the color. It will appear in the top square of the dialog box.


Hello dear readers of my blog. Today we will again comprehend the basics of working with the Photoshop program. I wonder how you would look if your hair or skin color were completely different? I already talked about.
Today I will tell you how to change the color of a layer in Photoshop without unnecessary problems. I will not once again mention how to work with them, well, I will also tell you about various instruments: magnetic lasso, magic wand, and so on.
All relevant articles are already in my blog, and if you accidentally stumbled upon this publication and want to fill in some gaps, then you can easily find out all the information of interest from the materials prepared in advance.

Today we will quickly go over the main tools, at the end you can find a good video instruction, and over the next 5-7 minutes you will meet a sea of screenshots that will help you figure out what manipulations will be necessary in order to change the color of the picture or her site.
I will work in Photoshop CC, but if you have a different version, then it's okay. All functions are simple. The software is installed in Russian. By the way, if you have an English version, I can also recommend the article "". Very convenient, makes life easier.
Color correction
So, I have already selected the object, or rather the background of the photo, and transferred it to a new layer using the keyboard shortcut Ctrl + J.

Now I go to the "Image" - "Correction" tab. There are a lot of options here that will help you change the hue: Brightness / Contrast, Color Balance, Photo Filter and even Gradient Map. You can try each of them in order to understand from your own experience how this or that tool works, to choose an interesting method that suits you specifically.
I will use Hue / Saturation.

You can tug on different sliders for an excellent effect.

As you can see, the differences cannot be called striking, but you do not need to fool your head with the selection, so that the layers look uniform and professional, and the object does not stand out from the general background.
Striking changes
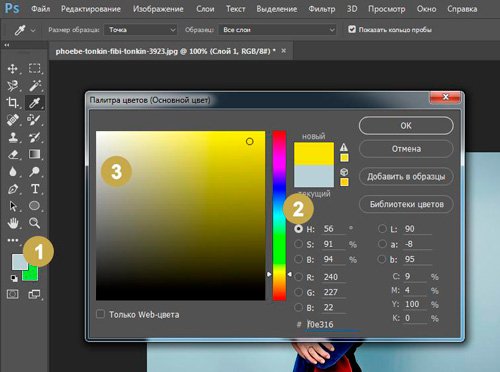
To make the background of a completely different color, I will use the Color Replacement tool all in the same Adjustments tab (how to draw a black background for Photoshop -).

After opening the dialog box, your cursor will change. The eyedropper tool will be hidden in it. Just click on the color you want to change. Use the Spread slider to define the area you are going to work with, and then click on the color bar above the Result entry, or again work with the Hue, Saturation, Brightness sliders.

I chose the first option. I clicked on "Result" and now choose a shade and color from the palette so that the subtle blue turns to pink.

Professional, fast, easy
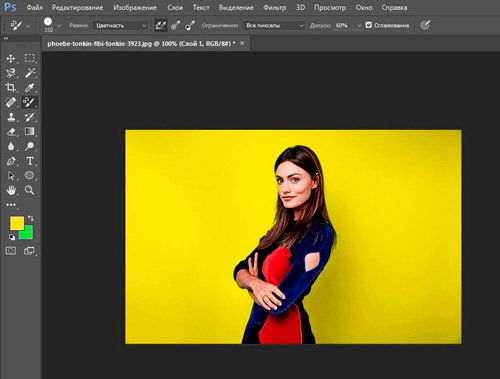
In my opinion, the most successful tool for working with the colors of complex objects is the color replacement brush. Hold the left mouse button on a regular brush for a long time until an additional menu opens.

Now select the shade to which you will change the color of the layer.
It remains only to paint over the necessary areas, as you can see, all the shades are preserved. Very fast and convenient.
Can be repainted to any suitable option.

Video instruction
Bonus
Another way to change the color with the help of a new layer does not appeal to me too much, but I suppose that some may like it and it will certainly come in handy sometime in the future. So, create a new layer, and then select the "Hue" blending mode for it.

This is how it should turn out in the end.

Now take any color, for example, yellow, the Paint Bucket tool and fill the layer we just created.
You can try other blending modes as well. Feel free to experiment.

With the help of an eraser, you can return the girl to a normal complexion.

By the way, do not forget that many professionals use it as an eraser. Still not able to work with her? Then the publication will come in handy, the link to which I gave.
Well, if you want to know the maximum about all the tools that are in Photoshop, I can recommend the course of Zinaida Lukyanova “ Photoshop for beginners in video format ". You don't have to wait for anything. Just a few weeks and you will know everything that this program is fraught with.

Until next time and good luck.