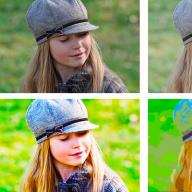
Final result 
Additional information: The peculiarity of this lesson is that it uses a lot of different text, so it is suitable for portraying faces who have something to say.
1. Open and enlarge the original photo to the desired size. The dimensions depend on how much " saturated»Portrait with text and what you are going to do with it next. In this case - 3000 pixels on the long side.
2. Desaturate Ctrl + Shift + U and posterize ((Image - Correction - Posterize)) the image.
I left only four levels.
3. Type text according to the shape of the face using the tool ().
3.1. We select a headset that matches the style of the person being worn. We write the text.
3.2. Modeling the shape by changing the size (letter size). The largest and lightest areas use the largest letters (this is only suitable for portraits on a dark background, where the text is written in light letters). Key phrases that will be most visible are located here. For shaded areas and small details, reduce the size. This is the most time consuming stage of the work.

3.3. Small details can be finalized using your own key phrases (). We stamp the remaining areas using the keys " [ "And" ] »To adjust the size.

4. Move the posterized layer up, place it above the black background and text and apply the Blending Mode - “” (Multiply).
In this tutorial Photoshop you will learn how to make an unusual portrait from words and their combinations. As you know, creating a typographic portrait in art requires a huge amount of time and effort. We'll create this kind of work in an accessible way using our own brushes and pattern fills made from words.
You will also learn about some of the principles of selection and posterization when working with photos.
So let's get started!
Preview of the final result:
Step 1.
Open the image of the girl's face Photoshopby downloading it in the lesson resources. There is no need to create a New Document as the base will be the original photo.

Step 2.
With the Pen tool (Pen Tool)separate the face from the black background. Double-click on the photo layer thumbnail, unlocking the background, and name the resulting layer "Portrait". Create a New Layer (Ctrl + Shift + N)under the face layer and fill it using the Paint Bucket Tool (Paint Bucket Tool (Shift + F5)), white (ffffff)... Then go to the face layer in Image-Adjustment-Posterization (Image\u003e Adjustments\u003e Posterize) and set the number of levels in the option window to 4. Make the girl's face black and white by desaturating it. Go to Image-Correction-Desaturate (Image-Adjustment-Desaturate) Ctrl + Shift + U)).

Step 3.
Hide the visibility of the face layer for a while (click on the eye in the layers panel) and activate the "Horizontal Type" tool (Horizontal Type Tool)... Choose your favorite font and in black (000000) write a few words on the canvas in a column. Arrange words on separate layers by clicking the icon after you finish writing each word Commit (checkmark) in the top menu to go to the next one. If you need to edit any word after writing it, go to the layer with this word and go to the "Symbol" palette (Window - Character)... In the options window, make changes if required.

Step 4.
Now, we will make the Brush (Brush) from each word of the text. First, select the first word in the column with the Rectangle Selection Tool (Restangular Marquee Tool) and go to menu Edit-Define Brush (Edit\u003e Define Brush Preset)... There, in the option window, you will see your word. Give the new brush a name and click OK. Now, if you open the Brushes palette, you will see your created brush in the set.
Repeat the process of creating brushes for each word in your text using this pattern. At the end of the work, deselect (Ctrl + D).

Step 5.
Now, we'll make our own pattern by combining all the words in the column. First, merge all the word layers into one (while holding Ctrl, click on the thumbnails of each word layer, then click Ctrl + E). On the merged layer, go to Edit\u003e Free Transform (Edit\u003e Free Transform) Ctrl + T)) and shrink it to a tiny size by holding Shift and pulling on the corners of the frame.
Turn off the visibility of all layers except this one. Select a column of words with the Rectangle Selection tool (Restangular Marquee Tool) and go to menu Edit-Define Pattern (Edit\u003e Define Pattern)... Give the pattern a name and click OK. Deselect the selection (Ctrl + D)... Your pattern should appear in the pattern set (Pattern Preset)programs.

Step 6.
Hide the visibility of the text layer and turn on the eye on the white background and face layers. Using the Rectangular Marquee Tool (Restangular Marquee Tool)select a small area of \u200b\u200bblack on the girl's neck.

On the layer with the face, go to the menu Selection-Similar shades (Select\u003e Similar)... This technique will allow you to select areas of the face with the same color as the selected area on the neck.

Step 7.
Before going further, activate the Brush tool (Brush)and click it anywhere in the document. Turn off the visibility of the "Portrait" layer, but keep the selection. Create a New Layer (Ctrl + Shift + N)at the top of the layers panel and start typing with the Brush (Brush)from words in places of selection. To quickly change the size of the brush, use square brackets on your keyboard. You can use the Clone Stamp tool (Clone Tool)to speed up the filling process. (Holding Alt, right-click on the place you want to copy, then move the cursor to the place where you want to paste the copy and right-click again).

Step 8.
To use smaller words in the portrait, let's apply our created word pattern. Create a new layer (Ctrl + Shift + N) under the brushstroke layer and name it Pattern. Activating the Fill tool (Paint Bucket tool)and in the top menu, select the option not color, but "Pattern" (or Regular). Next we find our pattern in the pattern palette and fill it with a selection by clicking on the canvas.

Step 9.
Filling the face with a pattern made our brush and stamp strokes less visible. Load a selection of the brush strokes layer ( Ctrl+ click on the icon of this layer) and go to the Select-Modify-Expand menu (Select\u003e Modify\u003e Expand)and set the expansion radius to 1 px. Next Select-Invert (Select\u003e Inverse)... Go to the Pattern layer and click on the Layer Mask icon at the bottom of the Layers panel (circle within a square). This technique will create a 1 pixel border around the words with the brush in the portrait and make them more visible.

Step 10.
Repeat steps 6 through 9 for other shades of gray on the model's face. Apply brush strokes and pattern fills to the selection on separate layers. Place the Pattern Layers below the brush stroke layers.

If you use all the shades in the image, you will get a wonderful result, as in the example below. This is the final result:

Although a black and white portrait already looks impressive, you can try adding color to the image and any texture. To add color to the letter layers of the face, merge the pattern and brush strokes layer in each individual shade into a single layer ( Ctrl+ click on the thumbnails of two layers, selecting them, then Ctrl + E). Double click on the merged layer thumbnail and open the Layer Styles window (Layer Style)... In the option, find the "Color overlay" option (Color Overlay) and by clicking on the color square, select any shade for the layer.
So you can play with the Layer Style settings by using the other options (Emboss, Gradient Overlay, Pattern Overlay, etc.).
Experiment and the result will exceed your expectations! Good luck!
Typographic portraits that many liked:
Today I am publishing a tutorial that will tell you about one of the possible techniques for creating such a portrait.
Preparing in Photoshop
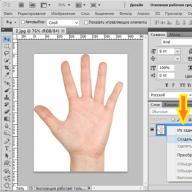
For example, let's take a photo of Milla Jovovich.

We open our jpeg in Photoshop.
Selecting the work area completely (ctrl + A), then duplicate the image layer (ctrl + J).

Desaturate the layer you just created (ctrl + shift + U).

Let's add some contrast to our image (ctrl + L).

In the window that opens, adjust the sliders to achieve the result shown below.

Next, apply the Cutout filter (filter\u003e Artistic\u003e Cutout ...)

Use the sliders to adjust the filter so that you have approximately 4-6 color tones.

Preparation in vector
Next, we save what we got in the format Jpeg, and, just in case, in PSD. Close Photoshop, we won't need it anymore. In principle, all further operations can be performed in Photoshop, but for flexible control over the size of the original image, we need a vector.
Open the vector editor. I prefer to work in Xara Extreme Pro... Create a new document (ctrl + N).
Importing a recently saved image with a keyboard shortcut (ctrl + alt + I) or (file\u003e import).
For the convenience of work, let's slightly customize the program interface. We need a window with layers Object gallery (analogous to the Layers panel in Photohsop).

We call it like this: (utilities\u003e galleries\u003e color gallery) or (F10)... I'll tell you a little about the purpose of icons in the Object Gallery window.

1. Lock layer.
2. Visible layer.
3. The hidden layer.
Although everything is pretty simple here.
For further work, you can increase the transparency of the photo. Selecting in the toolbar Transparency Tool (F6), at the top we change the percentage of transparency from 0% to 45%.
Lock the layer with our image (background). Everything, the preparatory stage is completed.
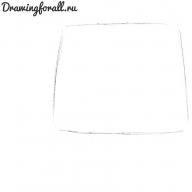
Draw a curve with the tool Pen tool (shift + F5).

After the line is completed, select the tool Text Tool (T) and move the cursor to the place from which we began to draw our curve. After that we drive in the text, periodically changing the font size, boldness and letter spacing. Starting with large spaces, filling in the area of \u200b\u200bcolor spots of the portrait, gradually move on to details.

To keep the guide lines out of the way, hide them.
To do this: select an object with text and a guide, while holding Shift click on the icon located in the color panel in the lower left corner. This way we desaturate the outline of the object.
As you add guides with text, the number of layers will increase, for convenience we group them into folders. Selecting the layer stack, click Ctrl + G.
1.
2.
3.
4.
After we finish filling large and small spaces, recolor certain areas of the text in the desired shades of gray, borrowing the color from the bottommost layer, using the tool Color Picker.
Let's hide the bottom layer with the photo and see what happens.

A bit watery, lacking in juiciness. To do this, again make the layer with the photo visible, and hide all other layers. Selecting in the toolbar Text Tool, click on the work area in the upper left corner. Then we start typing the text, filling in the places that need volume.

A small note:
This layer with background text should be below the rest of the layers.
The final
Then turn on the visibility of the other layers except for the background photo, export the result to Jpeg. (file\u003e export ...) or (shift + ctrl + E).

Everything is ready! Now you can have a cup of coffee and breathe a sigh of relief.
My goal is to familiarize you with the process of working in this technique, everything else is in your hands!
In this tutorial, you will learn how to create a portrait from text in Adobe Photoshop using a long piece of text that bends and deforms to match the shape of the face. This effect is known as Calligram and is often used to present famous quotes or speeches by depicting the author / speaker in the background. The key tool in creating the effect is the Photoshop Displace filter, which will allow us to neatly distort the text along the edges of the image.
Step 1.
This tutorial will combine a professional stock photo and speech from the movie The American President (1995) to create a completely surreal presidential address, but the effect can be perfectly applied to a series of speech designs from real famous personalities, including US presidents. ...
Open your selected image in Photoshop. A photo of an elderly man was used in the lesson. Using Crop Tool (C) Crop the image to fit the poster (or whatever size you want).

Step 2.
Add an adjustment layer Black and white: Layer\u003e New Adjustment Layer\u003e Black & White (Layer\u003e New Adjustment Layer\u003e Black & White). Set values \u200b\u200bper channel: Red (Red) -120; Yellow: 60; Greens: 40.This will add contrast to the image, but unlike the correction with Levelsor Brightness / Contrast, darkening the red channel produces more attractive tones.

Step 3.
Next go to the menu Filter\u003e Blur\u003e Gaussian Blur with a Radius of 20 pixels.This will help smooth out the displacement effect after the text has overlapped.

Step 4.

Step 5.
Take Type Tool (T) and create a text container to fit the document. Paste the piece of text of your choice and remove the paragraph breaks so that the text is solid. Uncheck Hyphenateand click on the full alignment icon (justify all) on the panel Paragraph.

Step 6.
If the text doesn't fill the entire portrait, just copy and paste it until it fills the entire portrait. Choose a font of your choice, the font is used in the lesson Montserrat Bold All Caps.Adjust the size and spacing of the text so that it closely overlaps the portrait.

Step 7.
Horizontal offset (Horisontal scale) 10; Vertical offset (Vertical scale) 10;
Displacement Map - Stretch to Fit;
Undefined Areas - Repeat Edge Pixels (Repeat edge pixels). Then click OK and select the displace.psd file, which you saved earlier.

Step 8.
Hold down the Ctrl key and left-click on the thumbnail of the shifted text layer to create a selection, then turn off the visibility of the layer by clicking on the "eye" icon to the right of the layer. Next go to the menu Editing\u003e Copy merged data - Edit\u003e Copy Merged (Ctrl + Shift + C)to create a layer from portrait parts and selected text.