There are two symptoms when the internal memory on the phone is sorely lacking:
- Apps and Android slow down
- The phone prompts you to take action to free up the used space.
The internal memory of the phone has a fixed size, and it seems impossible to increase it. Nevertheless, in the guide we will tell you how to clear the internal memory of your phone from unnecessary files and applications.
By increasing the free space in the Android memory, you will save time and stop noticing the brakes on your phone and tablet. The entire "cleaning" will take at most 20 minutes.
Error: Not enough memory on mobile device
Usually, Android displays such a message if a process or application does not have enough free space in the internal memory of the phone.
Lack of memory can make itself felt by constant freezes. If you don't notice it when you buy a phone, then over time, after installing dozens of mobile applications and getting overgrown with "garbage", you start to notice it.
The question involuntarily arises: are the characteristics of the phone “lying”? If not, why does the same smartphone / tablet work stably for others?
Checking the amount of free memory on Android
When a notification about insufficient internal memory appears, the question arises: how much memory is available, how much of it is occupied?
You can check the free space through the settings of your mobile phone. To do this, go to Settings - Options - Memory (Settings - Device Maintenance - Storage - Storage settings - Device memory). We carefully study the data, paying attention to the following figures:
- Total space - the amount of internal memory of Android
- System memory - the minimum amount of space reserved for system operation
- Available space - how much space is left in the internal memory.
Accordingly, if the built-in memory is not enough, you need to increase the memory on the phone to the size of System memory so that the system does not give a corresponding error.
In the next chapters, I will tell you how to clean the internal memory on Android.
Clearing the internal phone memory
You can remove unnecessary things through the built-in tools of the operating system and through third-party applications. They analyze the occupied space, help identify files that can be safely deleted.
Removing apps from Android system memory
Surely there are applications installed on your phone that hang like a dead weight and are not used for their intended purpose. Their size can reach hundreds of megabytes (including the cache).
You can delete useless programs through the standard Application Manager: Options - Settings - Application Manager (Settings - Apps).
In Android 8, it is convenient to use the free FIles Go utility to calculate unnecessary applications. For other OS versions, it is available for download via Google Play.
How to remove unwanted applications in FIles Go:
- Go to the Unused apps section,
- We sort applications by modification date or size,
- To uninstall, mark unnecessary programs with checkmarks and click Uninstall.
Video instructions for uninstalling applications:
Transferring files to a memory card
The internal memory of the phone, as already mentioned, has a fixed volume, so it is necessary to constantly check whether there is enough free space for the correct operation of applications and the OS.
In general, Android memory is divided into internal and external. External memory is easy to "increase", since sd cards are inexpensive today (you can buy a 256 GB memory card for $ 25).
Actually, you can transfer files through any file manager - via phone or PC.
Moving unnecessary applications from internal to external memory card
Removing unnecessary files with Piriform CCleaner
As an alternative to CCleaner, it is convenient to use the aforementioned Files Go app.
How to increase memory on Android manually
Any file manager is suitable for manually clearing the phone memory. We recommend ES Explorer or Total Commander.
Be careful and only delete unnecessary user files in the internal Android memory that you created / copied yourself.
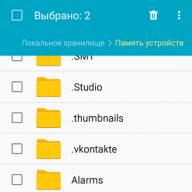
So, open the file manager, go to the root of the internal memory, start looking for and deleting unnecessary things.
What files are desirable to delete (transfer to a memory card) in the first place:
- Photos, videos, recordings on a voice recorder and other documents saved not on sd, but in the internal memory;
- Documents received by mail or through social networks (most often they are saved in the Download folder);
- E-books and other files saved by third-party applications to the device memory;
- Contents of folders DCIM, bluetooth, sounds.
We use Storage Analyzers (for clarity)
For clarity, we recommend using the Files Go application or any other storage analyzer for Android, which will show which files take up the most disk space and where they are located in the form of a diagram. Among such applications, we note:
Transferring photos and videos to the Google Photos service
It is the photos and videos that “eat up” the most space on the phone, due to them you can quickly free up space on a memory card or in the built-in storage. If your phone doesn't support a memory card, move the files you don't often access to the cloud. The Photos app, or Google Photos, is best suited for this. It automatically uploads photos to the service, where they are available in their original quality through a browser or application.
In addition to Google Photos, you can look at alternatives such as Dropbox, Flickr, or Microsoft OneDrive.
Even when the photos are only available on the server, you can easily access them if you have an Internet connection. And most importantly, this is a really convenient and fast way to free up a couple of gigabytes of internal memory!
Clearing memory: questions and answers
1. The phone did not have enough internal memory, I sent half of the photos to the sd card, then I open it, and they are all kind of cloudy. I tried to transfer it back to the internal memory of Android, but the pictures are the same. How can I get my old photos back, i.e. so that it was cleaned up as before without any distortions.
2. I did not have enough internal memory in my phone, I wanted to clear it. I transferred the data (photos, music) to the memory card. Now the files cannot be read, although the phone sees the card. How can you get back at least a photo?
3. Phone Samsung A5. I did not know how to increase the internal memory, I moved the folders with music and files from the internal memory to the sd card using a laptop. After that, when opening the folders, they were all empty. Files and music cannot be seen by either the phone or the computer. The internal memory of the phone did not seem to decrease after that. How do I find these files?
Answer... It is likely that you did not copy the originals to the memory card, but sketches. The original photos may have remained in the internal memory of the phone. If it doesn't, DiskDigger will help you.
If there is not enough space in the device's memory, you should copy the files to your computer (make a backup copy) and only then move them to the memory card. It will be useful for you to read the instructions on how to clear the internal memory on Android (see the text above).
I have a Sony Xperia phone, when I go to the Play Store, I want to download some program, the system says that there is not enough memory on Android, although the flash drive is 16 GB! What to do?
Answer... Most likely, the error "not enough memory" on Android is due to the fact that there is not enough internal memory - this is where the installation files are downloaded from Google Play.
- Transfer the most voluminous files from the internal memory of Android to your sd card.
- Uninstall unnecessary applications through the file manager or Files Go.
- Use the CCleaner utility to clean up unnecessary files in your phone's memory.
I cleaned the phone memory, deleted a lot of folders. And now I can not watch the gallery through Android, writes: "The storage is not available." How can I get it back?
Answer... You probably deleted the photo folder on the memory card (SDCARD / DCIM / CAMERA) when cleaning. You can recover files from there using CardRecovery or PhotoRec programs.
The built-in memory of Android devices often runs out quickly, so users have to store large amounts of information on microSD. But what if Android does not save downloaded content to the memory card - applications, photos, music, and other files?
This article is suitable for all brands that produce phones on Android 10/9/8/7: Samsung, HTC, Lenovo, LG, Sony, ZTE, Huawei, Meizu, Fly, Alcatel, Xiaomi, Nokia and others. We are not responsible for your actions.
Attention! You can ask your question to a specialist at the end of the article.
Memory card problems
First of all, you need to make sure that the memory card is functional and ready to receive files. What to do:
The memory card may not be compatible with your smartphone - for example, it may exceed the capacity for your particular phone model. If the flash drive is larger than a certain amount of gigabytes (32, 64, 128, etc.), then it simply does not recognize it, because not programmed for that volume. In this case, the only way out is to use another microSD medium with a smaller capacity.
If no card is detected, it makes sense to contact the service center. Perhaps there is a hardware problem with the phone that prevents it from working with external drives.
Wrong folder in browser
If problems with saving occur while downloading files in the browser, then you should check the destination folder. It may be specified incorrectly, due to which the browser does not understand how to save photos, music, videos and other content. Let's look at the example of UC Browser:
- Open the "Downloads" section in the main menu.
- Click "Settings".
- In the "Download path" field, specify the folder on the memory card.
 Enlarge
 After such a short setup, files in the browser will be downloaded only to the specified directory on the card, without clogging up the internal memory.
Files cannot be transferred to memory card
This is most often the case for built-in Android apps. In the phone, they can only be stored on the internal storage, otherwise the smartphone will not work. At the same time, any application from a third-party developer can be moved to micro SD.
- Open the Android settings, go to the "Applications" section.
- Find the program you want to transfer to the memory card along with all the files.
- Click Move to SD.
 Enlarge
 If the button is inactive, it means that the application cannot be moved. If it says “Move to phone” instead of “Move to SD”, it means that the program files are already stored on the memory card.
Lost settings for transferring files to a memory card
In Android settings, you can manually specify which memory is used by default - internal or external. Depending on the selected value, the files will be downloaded to the phone or microSD card. After updating the system, the settings can fly off, so it's worth checking them.
Not every model and manufacturer has this setting. Check with yourself.
- Open Android settings.
- Go to the "Memory" section.
- Select "SD" in the "Installation Location" or "Default Memory" field.
 Enlarge
 When there is no setting
If it is not possible to set the default location for saving files, then the applications themselves will come to the rescue. In the same Samsung "Internet" browser, it is possible to set the storage location:
 Enlarge
 Look in your application where you are going to save files from, if there is an option in the settings to choose a save destination. If this is not the case, then you will have to manually move the files from the internal memory to the microSD card.
Most smartphones and tablets running the Android operating system have a relatively small amount of internal physical memory, which does not allow storing large files on a mobile device. This drawback is easily compensated for by installing external memory, usually represented by MicroSD cards. However, photos, audio and videos are not the only type of content that requires users to resort to expanding the internal storage of the device; games and applications can also fill it.
There are two ways out of the situation - either remove some of the software, or try to transfer applications from the phone to the memory card. Why try it? Because this procedure, which is simple at first glance, can cause certain difficulties for a beginner. In addition, the method of transferring software from the internal memory of a mobile gadget may depend on the model and version of the operating system, however, these differences, if any, are not so significant. So let's find out how to transfer apps to SD card in Android.
Moving applications using standard Android tools
The function of transferring applications to the card by standard means appeared in Android 2.2 and was removed in version 4.4, however, it is still available in many firmwares. If you have the fourth version of the system, do the following. Go to Settings - Application Manager or Settings - Applications, select the desired program and press the "To SD Card" button, if available.
If the button is missing or inactive, it means that you cannot transfer the application to the card using Android tools. This concerns mainly system applications, as well as programs, manipulations with which are not provided by the developer.
You can try to move applications from your phone to a memory card on Android up to 4.3 in such a radical way. Go to the "My files" folder, by default it is denoted as sdcard0, select, and then cut out in Explorer all its contents or folders of selected programs and paste into the location extSdCard, that is, to an external memory SD card. Anything that can be moved will be moved, system files will remain in place. You can use this method if the application transfer button is not active, however, you cannot give a 100% guarantee that everything will work perfectly after that.
As a rule, when using the standard function of transferring applications to a memory card, not all data is transferred, but only part of it. The cache, for example, may remain, and special utilities are required to transfer it.
Now let's see how to move apps to SD card in Android 5.0 and 5.1. In Android 4.4 KitKat, due to improved protection, the application transfer algorithm was changed, but soon many third-party developers adapted their applications to new algorithms, thus making application transfer available. First of all, go to the section with third-party applications and check if there is a corresponding button in their settings. If yes, use it, if not, proceed as follows.
We go into the settings, select Memory - Main memory, activate the "Memory card" radio button and click "Change". After rebooting, the system will read the SD-card memory as internal, and from now on all applications and games will be installed on it. The disadvantage of this method is that already installed applications may have to be reinstalled, since they will not automatically move to the memory card.
In the sixth version, transferring applications from the phone to the memory card on Android has become a little easier, and the transfer function itself has been improved. Here's the simplest example. Having opened the settings, go to the "Applications" section, select the desired program, click Memory - Change and select "SD card" from the menu that appears. The application will be migrated.


In addition, in Android 6.0 and above, you can take advantage of the new function Adoptable Storage, which allows you to use the memory card, albeit with some restrictions, as part of the internal storage. To use it, after creating a backup copy of the data on the card, go to the phone settings, select "Memory", click there on your SD card and follow the chain of options Settings - Format as Internal Memory - Erase & Format.


Upon completion of the procedure, select the "Use as internal storage" option, click "Next" and restart the gadget. After these manipulations, a new tab "Memory" will appear in the applications menu, with which you can move applications from the internal memory of the smartphone to the external one.
Since the SD card will be encrypted for security purposes, you will not be able to use it as a regular medium, that is, read and write data from a PC to it.
Transferring applications to the SD card using special programs
Unfortunately, all of the above transfer methods, including the last one, cannot guarantee 100% success. If the transfer is not supported by the firmware or its capability is not provided by the developer of a specific application, you will not be able to move the software using standard operating system tools. In such cases, you should use special programs, however, even they cannot promise that everything will go as it should. Here you need to try, if one program does not cope with the task, you should choose another, and so on. There are quite a lot of methods and programs invented and intended for these purposes, but we will limit ourselves to only three examples of transferring applications from a phone to a memory card on Android.
Method 1
To move applications to external memory, you can use a free program AppMgr III (App 2 SD)... It is extremely easy to use. The program automatically sorts all installed applications into three groups: On phone (portable), On SD card (already transferred) and Phone only (not supporting transfer).

Pressing the icon of any application in the list brings up a menu in which you can find the desired option. If available, the function will also be available to automatically transfer the application to the card upon installation.

Method 2
This method is more efficient and reliable, but to use it, you need root rights and two applications - Link2SD and any disk manager, since you will need to create two partitions on the memory card, preferably one in the FAT32 file system, the other in the Ext4 file system (for older versions of Android Ext3). To divide the map into sections, you can use it as desktop programs like Paragon and mobile, for example, Aparted.
After the partition is created, launch Link2SD and immediately select the file system of the second partition (Ext4), after which the program will ask you to reboot the device to mount the new volume. After rebooting, start Link2SD again. This time you will see a list of applications installed on your smartphone. The rest is simple. Go to the "Memory" section through the main menu of the program, open the menu of the application being moved and click the "Send" button in the properties.

This method allows you to move almost any games and applications, including system ones, to the memory card, however, we would not recommend transferring the latter without special needs. The risk that after the completion of the procedure they will begin to work incorrectly, although not great, is still present. You should also be careful with the most commonly used applications, such as browsers and instant messengers.
Method 3
The two examples above showed how to transfer applications from the internal memory to the SD card on Android. The third method refers not so much to the programs themselves as to their cache, the size of which, as you know, can significantly exceed the size of the application itself. For the case, you again need root rights and a utility FolderMount... After launching this program, click the plus sign in the upper right corner, in the next window in the Name field enter the name of the application whose cache you are going to move, and in the Source field specify the path to the directory with the cache files.

The folders with the cache are located at SD / Android / obb, the name of the folder you need will contain the name of the application. Finally, in the "Destination" field, you must specify the directory on the SD card to which the cached data will be transferred. Having configured the transfer parameters in this way, first click the check mark in the upper right corner of the screen, and then the pin button opposite the selected application. After a few seconds, the application cache will be moved to the memory card.
A smartphone is not only a convenient “dialer”, but also a full-fledged entertainment center. However, immediately after the purchase, there are not many applications, games and interesting features in the device itself. To eliminate this drawback, the user is provided with a huge selection of applications for every taste in the On-line Google Play store (we described how to install applications in this article).
Sooner or later, anyone installing various applications on their smartphone or tablet will face the problem of lack of free space in the device's memory, although there are still a lot of free Gigabytes on the memory card. This is due to the fact that most applications are installed in the memory of the smartphone / tablet itself, which is not so much, and not on a memory card. The result is a lack of free space, a decrease in the speed of the device, constant slowdowns. There are several ways to solve this problem:
Option 1. Cardinal solution to the problem - Hard Reset
This step is good because the smartphone returns to factory settings, and starts literally "flying", as it is not overloaded with unnecessary data and is not clogged with files. But on the other hand, the user is forced to re-install all applications and recover deleted data. We described how to make a Hard Reset in this article.
Modern phones and tablets use excellent camera modules, which sometimes allow you to get professional images. However, along with the increase in the quality of the images themselves, the size of the photographs also grows, which take up a lot of space. If the device runs out of free space, it should be freed up. This can be done, including with the help of a memory card, to which we will transfer photos and, accordingly, free up space on the device.
Moving photos from main memory to a memory card
In order to transfer images to a memory card, you need the memory card itself installed in your smartphone or tablet, and a file manager.
Here is the memory card:

After you insert the memory card into your smartphone, you can make sure that the device "sees" it. To do this, go to "Settings" and select the subsection "Memory" (or "Device Maintenance", as is the case with Samsung and One UI firmware).


Here find the item "SD memory card". As you can see, our device recognized the card.

Now you need a file manager. As a file manager, you can use any application of your choice, since the transfer process itself will be the same. If FM is already installed in your firmware, you can use it. If not, download using Google Play Store. We'll use Samsung's built-in file manager, My Files.

Click "Images".

Select the files you want to move (press and hold the file, then select others, if there are several). At the bottom of the screen, click Copy or Move, whichever you need to do.

We go back one step and select the "USB flash drive" we added.

If you want to add files to the root of your memory card, just click "Move Here".

Happened.

You can create a folder by clicking on the three dots and choosing New Folder from the menu.

Set the name of the folder.

Open it and transfer files in the same way.

As you can see, nothing complicated. In this way, you can transfer other files to the memory card, except for applications, or from the memory card to the main memory.