In the world it is customary to compare Android and iOS. The main difference is the attitude towards the openness of the system for the user. If iOS does not even allow you to view individual folders on the device, then in Android the file system is available to the user. However, only at first glance it seems that Android developers are allowed to do whatever they want with their OS: many important and necessary functions remain unavailable. Therefore, CyanogenMod firmware has become popular among advanced users. To learn how to install, update and, if necessary, remove the firmware, read our article.
What is CyanogenMod?
СyanogenMod is an alternative Android firmware that extends the functionality of the operating system. The firmware has gained popularity: in 2016, CyanogenMod is installed on 14 million devices.
It all started with the fact that a simple programmer Stephen Kondik posted on xda-developers.com, the largest site with custom firmware for Android, his development for the HTC Dream smartphone. He did not think about the name for a long time and took his nickname - Cyanogen, adding Mod to it. Stephen Kondik did not expect that someone would be interested in his development, but already in the first days, users responded positively to the firmware. Then the programmer, in a creative impulse, intensively engaged in finalizing CyanogenMod, posting several updates per day on xda-developers.com.
Then Steven Kondik posted CyanogenMod on Github, a collaborative development service. Then other programmers joined in the improvement of the project, who brought their ideas and developments. Over time, it became clear that CyanogenMod turned from an amateur firmware into an exceptional project. The capabilities of CyanogenMod made the mobile device more functional than any other firmware.
Advantages
Why do users love CyanogenMod so much?
- High performance. CyanogenMod, thanks to its optimization, significantly improves the performance of the device. Both the menu and heavy games work on this firmware much faster and smoother than on the standard one. As an example, consider the Nexus 4, which produces 15-16 thousand Antutu Benchmark points on standard firmware. After installing Cyanogen makes 21 thousand points. In addition, Cyanogen allows advanced users to change the processor operation scheme and control its frequency at their discretion. There are five modes: Interactive - standard frequency distribution, increases when the screen is turned on; Ondemand - less productive, more energy efficient; Userspace - allows you to configure everything yourself; Powersave - minimum processor frequency, maximum power saving; Performance - the maximum frequency of the processor, the best performance, but strong power consumption.
- The only way to install a new version of Android for older devices. Few manufacturers support their devices even for 4-5 years by releasing firmware 5 and 6 of Android, so CyanogenMod is the only way to put Android Lollipop and Marshmallow on such devices. Cyanogen also allows you to get rid of the manufacturer's pre-installed firmware, for example, Samsung's TouchWiz.
- Customizable appearance. CyanogenMod allows you to change the design of every detail of the interface to your liking. There are thousands of custom themes in PlayMarket. The firmware also supports the original Android theme (Android Holo up to version 12 and Google Material Design in versions 12 and 13), unlike the official firmware of device manufacturers.
- System openness. The standard Android firmware has various restrictions for users. CyanogenMod removes these restrictions, thanks to which there is a Free Lossless Audio Codec, a compressed cache, a large APN list, an OpenVPN client, and a reboot menu. However, this advantage is only for knowledgeable and able people, because the device can be accidentally broken.
Firmware versions
The latest version of CyanogenMod is the thirteenth, based on Android 6.0 Marshmallow. Each new version of CyanogenMod is developed for Android updates. In addition, developers support and constantly update all versions simultaneously, releasing new builds of the project. There are six types of CyanogenMod builds:
- Experimental - experimental firmware versions for testing new ideas. These versions are extremely unstable, have an abundance of bugs and are only needed by developers for testing.
- Nightly - daily updates, the result of the daily work of programmers. Like Experimental, they exist only for developers, so that enthusiasts can follow the development of the project and help it with new ideas and suggestions.
- Millie stone is a raw version that collects all the innovations to test their interaction.
- Snapshot - already worked out assembly, usable. Usually not all bugs are caught and not all bugs are fixed yet.
- Release Candidaty (RC) is an almost finished version of the firmware. Developers last check for bugs, performance and stability.
- Stable is the final, stable version of CyanogenMod.
If you are a simple user who wants to install CyanogenMod, then it is worth choosing a stable firmware version. This ensures that there are no errors and operability. But for the sake of useful features that are not yet in the stable version, you can try the developer versions. But such firmware is almost impossible to use - there are too many errors.
How to install: step by step instructions
Please note: Installing CyanogenMod will void your warranty! This applies not only to Cyanogen, but also to any other custom firmware. There are certain ways to hide traces of third-party firmware, but the methods are unreliable and do not always work. So if you're not ready to void your warranty, don't risk it.
Installing CyanogenMod is non-standard and difficult for inexperienced users: it has more than 10 steps. The system update is also not the most intuitive. Of course, there is an easy way to install the firmware, but this is far from the best option. The latest version of CyanogenMod is automatically downloaded, which is not always stable, resulting in errors. But since not everyone wants to spend time on a more complex method, we will also analyze this option.
Easy Installation
- First, check if your device is supported. To do this, go to: http://wiki.cyanogenmod.org/w/CyanogenMod_Installer#Supported_Devices and see the list of supported devices.
- In the smartphone settings, enable USB debugging (Accessibility -> For Developers -> USB Debugging).
- Download the CyanogenModInstaller app from Google Play to your smartphone.
- Download a special program for Windows (Vista/7/8) to your computer: http://beta.download.cyanogenmod.org/install.
- Turn on the application on your smartphone and follow the instructions in the program.
- Connect your device to your computer via USB.
- Turn on the program on your computer.
- The program itself will start downloading the files necessary for the firmware. When everything is loaded, you will see the message "Everything is ready".
- Click on the "Install" button.
- When the firmware installation is completed, the program will notify you with the message "Installation complete".
- Ready.
The hard way
- First you need to get Root-rights (remove restrictions imposed by Android developers). Let's do this with Framaroot. Download Framaroot 1.9.1 from the Internet, install it and run it. If the antivirus issues a warning, click Allow.
- Now you need to unlock the Android bootloader. The best way to do this is with the BootUnlocker program. You can download the app directly from Google Play. Run the program and click the "Unlock" button. The bootloader will be unlocked.
- You need to install Custom Recovery. Let's analyze its installation using the example of TWRP (Team Win Recovery Project).

- Let's start installing CyanogenMod.

- Once the installation is complete, reboot the system. If everything went well, an empty desktop will open. If not, the phone will not boot. In this case, you need to enter the Recovery mode again, install the firmware on a new one, but only turn on the full Wipe.
- The last thing left is to install Google Play. To do this, download the Gapps package (http://opengapps.org), move them to the root folder and install the same way as the firmware itself, via Recovery.
- Ready!
Video: How to install CyanogenMod firmware?
Can I put CyanogenMod on an unsupported device?
The answer is unequivocal: no. CyanogenMod Installer will simply write that your device is not supported. If you install it manually, there can be a lot of problems, up to the point that the phone or tablet stops working. If the firmware could run on the device, the developers would have added it to their list anyway.
How to update the firmware
There are also two ways to update CyaongenMod.
The easy way
This method works for Cyanogen 10.0 and above. Everything is extremely simple: open the settings, go to the item "About phone", then "Update CyanogenMod". The device will automatically download the latest update and install it. In the process, the smartphone will reboot several times. All data will be saved.
Manual option
Please note that you should not upgrade your device to more than one version of CyanogenMod at a time (for example, from CM 10.0 to 10.2). Unpredictable errors and incorrect firmware operation may appear. It is also not recommended to roll back the device to earlier versions of CM (for example, from 10.2 to 10.1). Sometimes it leads to an error with an endless reboot of the smartphone. With any downgrade, you must first do a Wipe Data / Factory Reset.
It's almost always better to use the easy update method, as there's less chance of doing something wrong. However, if your Cyanogen is below the tenth version, and also if you use third-party add-ons (add-ons), you will have to use the difficult method, since the standard update does not allow you to immediately install firmware add-ons.
- To get started, download the latest stable (or whichever version of CyanogenMod you need) and the latest version of the Gapps package.
- Turn on recovery mode.
- Install the firmware first, then the zip archive with Gapps, and then third-party addons. There is no need to do a Wape, so all data is saved when updating.
- Ready.
When updating again, there is no need to re-install Gapps, since the data is saved, but add-ons will have to be installed manually.
In addition, only with a complex option, you can choose which update to install (which cannot be done with a simple installation method).
How to remove if necessary
If you decide to return everything as it was, you need to reinstall the firmware again, but this time replace CyanogenMod with the stock firmware of your device manufacturer. You can download such firmware from the official website of the manufacturer.
- When you download the firmware, save the archive in the root directory of the device
- Turn on the Recovery mode (hold down the power button and the volume up button while starting the device).
- Check all Wipe checkboxes. Please note that all data will be deleted.
- Then install the downloaded archive with the official firmware.
- Wait for the installation to complete.
- Reboot your device.
- Ready.
Sometimes a return to the native firmware of the device erases all traces of the presence of CyanogenMod, in which case the warranty is not reset. However, you should not count on this, as it depends on the luck and inattention of the support staff. It is forbidden to change the manufacturer's firmware according to the warranty service provision rules.
CyanogenMod is an interesting firmware that has grown from an amateur craft to a serious and ambitious project, which has no analogue in the world. CM allows you to do things with the device that no official firmware allows. But only advanced and knowledgeable users should install it, since open systems are not safe. In addition, the phone may fail, and warranty service will not be available. However, if you lack the standard features of a smartphone or tablet on stock Android firmware, if you are ready to learn and develop, and are ready to spend time and effort on overcoming errors, then you definitely need to flash your device with CyanogenMod. According to some users, CyanogenMod is the pinnacle of mobile development.
People who use standard firmware from Android often lack their functionality. Especially for them, an alternative was invented - CyanogenMod. It has many interesting features, gives access to advanced device settings, allows you to update the Android operating system to the latest version, and much more.
CyanogenMod is a modified and open source firmware based on Android. It allows you to expand the standard settings and functions of the phone that are not available in the factory versions.
CyanogenMod combines the Android source code and the experimental code created by the developers of Cyanogen Inc.
Firmware Benefits
- Original android. Smartphone manufacturers often change the Android operating system (OS) for commercial purposes beyond recognition. In CyanogenMod, this OS is exactly what it was intended from the very beginning.
- Ability to manage access settings for each individual application.
- Superuser. There are many dubious applications for rooting a device, with CyanogenMod you will not need them, since you are the default superuser there.
- The ability to transfer any application to a memory card.
- Themization. Most of the themes in standard firmware only slightly change the appearance of the device. Literally everything can be configured in CyanogenMod: fonts, icons, sounds, boot animations, system applications, etc.
You can customize not only the appearance, but also the system itself.
- Equalizer. Music lovers will appreciate the DSP Manager, which allows you to customize the sound of music and apply various effects.
- Update Android to the latest version. Manufacturers often forget to update the operating system, and a gadget with good technical characteristics quickly becomes obsolete due to poor filling. In CyanogenMod, this problem does not exist, the system is updated automatically to the latest release.
- Ability to combine settings into profiles. Each profile combines several settings that can be enabled with a single click. For example, at work, set quiet mode and turn on Wi-fi, turn up the music on the street, reduce the screen brightness and turn on GPS.
Various versions
Cyanogen releases several firmware versions, and which one to choose is up to you:
- Experimental - experimental firmware versions for testing new ideas. These versions are extremely unstable, have an abundance of bugs and are only needed by developers for testing.
- Nightly - daily updates, the result of the daily work of programmers. Like Experimental, they exist only for developers, so that enthusiasts can follow the development of the project and help it with new ideas and suggestions.
- Millie stone is a raw version that collects all the innovations to test their interaction.
- Snapshot - already worked out assembly, usable. Usually not all bugs are caught and not all bugs are fixed yet.
- Release Candidaty (RC) - an almost finished version of the firmware. Developers last check for bugs, performance and stability.
- Stable is the final, stable version of CyanogenMod.
How to install on the device
If your device is not listed as supporting CyanogenMod, do not try to install the firmware manually or in any way that you were advised on the forum. In the process, a large number of problems may appear, including the complete cessation of the smartphone / tablet.
Attention! After installing CyanogenMod or any other custom firmware, the warranty is no longer valid.
Devices on which you can install CyanogenMod - table
| The code | Device | Windows | Mac | Installation version |
| Crespo | Google Nexus S | Yes | Yes | 11.0-InstallerXNPQ08Q |
| crespo4g | Google Nexus S 4G | Yes | Yes | 10.1-InstallerBeta3 |
| d2att | Samsung Galaxy S III (AT&T) | Yes | Yes | 11.0-InstallerXNPQ09Q |
| d2can | Samsung Galaxy S III (Canadian) | Yes | Not | 11.0-InstallerXNPQ09Q |
| d2spr | Samsung Galaxy S III (Sprint) | Yes | Yes | 11.0-InstallerXNPQ09O |
| d2tmo | Samsung Galaxy S III (T-Mobile) | Yes | Yes | 11.0-InstallerXNPQ09O |
| d2usc | Samsung Galaxy S III (US Cellular) | Yes | Yes | 11.0-InstallerXNPQ09O |
| d2cri | Samsung Galaxy S III (Cricket) | Yes | Yes | 11.0-InstallerXNPQ09O |
| deb | Google Nexus 7 2013 (LTE) | Yes | Yes | 11.0-InstallerXNPQ25S |
| flo | Google Nexus 7 2013 (WiFi) | Yes | Yes | 11.0-InstallerXNPQ25S |
| grouper | Google Nexus 7 (WiFi) | Yes | Yes | 11.0-InstallerXNPQ25S |
| hammerhead | Google Nexus 5 | Not | Yes | 11.0-InstallerXNPQ25S |
| hercules | Samsung Galaxy S II Hercules | Yes | Not | 10.2-InstallerWPPQ50S |
| i9100 | Samsung Galaxy S II (Intl) | Yes | Yes | 10.2-InstallerWPPQ50S |
| i9300 | Samsung Galaxy S III (Intl) | Yes | Yes | 11.0-InstallerXNPQ08Q |
| jfltecan | Samsung Galaxy S4 (Canada) | Yes | Yes | 11.0-InstallerXNPQ09O |
| jfltechri | Samsung Galaxy S4 (Cricket) | Yes | Yes | 11.0-InstallerXNPQ09O |
| jfltecsp | Samsung Galaxy S4 (C Spire) | Yes | Yes | 11.0-InstallerXNPQ09O |
| jfltespr | Samsung Galaxy S4 (Sprint) | Yes | Yes | 11.0-InstallerXNPQ09O |
| jfltetmo | Samsung Galaxy S4 (T-Mobile) | Yes | Yes | 11.0-InstallerXNPQ09O |
| jflteusc | Samsung Galaxy S4 (US Cellular) | Yes | Yes | 11.0-InstallerXNPQ09O |
| jfltexx | Samsung Galaxy S4 (Intl) | Yes | Yes | 11.0-InstallerXNPQ09O |
| l900 | Samsung Galaxy Note II (Sprint) | Yes | Yes | 10.2-InstallerWPPQ50S |
| m7att | HTC One (AT&T) | Yes | Yes | 11.0-InstallerXNPQ08Q |
| m7spr | HTC One (Sprint) | Yes | Yes | 11.0-InstallerXNPQ08Q |
| m7tmo | HTC One (T-Mobile) | Yes | Yes | 11.0-InstallerXNPQ08Q |
| m7ul | HTC One (Unlocked) | Yes | Yes | 11.0-InstallerXNPQ08Q |
| maguro | Google Galaxy Nexus (GSM) | Yes | Yes | 11.0-InstallerXNPQ25S |
| mako | Google Nexus 4 | Yes | Yes | 11.0-InstallerXNPQ25S |
| manta | Google Nexus 10 | Yes | Yes | 11.0-InstallerXNPQ25S |
| n7000 | Samsung Galaxy Note (Intl) | Yes | Yes | 10.2-InstallerWPPQ50S |
| n7100 | Samsung Galaxy Note II (GSM) | Yes | Yes | 10.2-InstallerWPPQ50S |
| quincyatt | Samsung Galaxy Note (AT&T) | Yes | Not | 10.1-InstallerBeta3 |
| quincytmo | Samsung Galaxy Note (T-Mobile) | Yes | Not | 10.1-InstallerBeta3 |
| skyrocket | Samsung Galaxy S II Skyrocket | Yes | Not | 10.2-InstallerWPPQ50S |
| t0lte | Samsung Galaxy Note II (GSM LTE) | Yes | Yes | 11.0-InstallerXNPQ08Q |
| t0lteatt | Samsung Galaxy Note II (AT&T) | Yes | Yes | 10.2-InstallerWPPQ50S |
| t0ltetmo | Samsung Galaxy Note II (T-Mobile) | Yes | Yes | 10.2-InstallerWPPQ50S |
| t769 | Samsung Galaxy S II (T-Mobile) | Yes | Not | 10.2-InstallerWPPQ50S |
| tilapia | Google Nexus 7 (GSM) | Yes | Yes | 10.2-InstallerWPPQ50S |
| toro | Google Galaxy Nexus (Verizon) | Yes | Yes | 11.0-InstallerXNPQ25S |
| toro plus | Google Galaxy Nexus (Sprint) | Yes | Yes | 11.0-InstallerXNPQ25S |
How to flash your smartphone / tablet: step by step instructions
- Make sure your device supports the firmware.
- Enable USB debugging. To do this, go to Settings / Accessibility / Developer Features and check the box "USB Debugging".
- Download the app for phone/tablet and PC from the official website cyanogenmod.org and install it.

- Launch the app on your device and follow the instructions.

- Connect via USB to PC.
- Run the application on your computer, it should detect the connected device.
- Downloading all the necessary files will take some time. Wait until the end of the process.
- After a success message appears, click on the Install button and wait again.

- The Installation complete message indicates that the process is complete and you can use the new firmware.

Firmware installation - video
How to update CyanogenMod
Through the firmware interface
- Go to device settings.
- Then to the "About phone" section.
- Click "Update CyanogenMod".
- Wait for the update to finish.
Photo instructions for updating
Manually
- Go to menu Install Zip - Choose zip from /sdcard.
- Select the gapps package file, wait for the installation to complete.
- Return to the root menu, select Reboot System Now - the first time after the update it is better to boot without installing third-party kernels and mods.
- Enter recovery mode again.
- In the menu Install Zip - Choose zip from / sdcard - check the kernel and / or mod files one by one and install them.
- Click Reboot System Now.
How to remove / remove CyanogenMod
- Turn on Recovery mode (hold down the power button and the volume up button while starting the device).
- Check all Wipe checkboxes. Please note that all data will be deleted.
When you download the official firmware, save the archive in the root directory of the device.
- Then install the downloaded archive with the official firmware.
- Wait for the installation to complete.
- Reboot your device.
- Ready.
CyanogenMod has many advantages: advanced functionality, custom settings, etc. This firmware is definitely worth installing, especially since even an inexperienced user can handle it. If you don't like it, you can always delete it.
CyanogenMod is one of the most popular alternative ROMs for Android devices. The Cyanogen Team is responsible for its creation, which created a firmware that is characterized by high performance and optimization of the processes of the device on which it is installed.
Benefits of CyanogenMod
"Cyanogen" is the best alternative for owners of outdated gadgets. That is, those gadgets that can no longer be updated to the current version of Android. Owners of such devices, when flashing their device, will be able to experience all the delights of the latest versions Android. And this is just one of the benefits of installing CyanogenMod to your smartphone or tablet.
"Cyanogen" helps not only improve the performance of the device, but also bring interaction with it to a higher level. This custom firmware, using shortcuts, allows you to display on the lock screen applications that the user launches more often than others. In addition, the user can remove the on-screen buttons, thereby increasing the useful area of the display.
Another advantage of this firmware is Apollo built-in audio player. If you are not satisfied with the standard player Android and alternative players from the Play Market, then Apollo player can be the best alternative for such an application. And if you don't like the look, then you can find a lot of themes for this player in the official Google application catalog.
Except Apollo into the firmware CyanogenMod included very convenient equalizer. With it, you can set up music playback through headphones, external speakers or device speakers.

Standard shell "Cyanogen" constantly being improved and updated. It has a nice look and lots of features. But, its main task is the ability to customize the launcher for yourself. Which she is great at.

Standard CyanogenMod Applications:
- Camera. Not the most functional standard application of this firmware. But, this is not required. After all, in order to take a beautiful picture, just one button is enough.
- Contact list. A fairly convenient application that differs little from the regular "List of Contacts" Android. It also works flawlessly, smoothly flipping through the notebook.
- SMS client. Incoming SMS are sorted by contacts. There is a blacklist for incoming SMS from unwanted contacts.
- Audio client. The built-in Apollo player not only has simple controls, stylish design and an adequate equalizer, but also supports almost all possible audio files.
- File manager. It is also a fairly convenient regular application with which you can access the contents of the root folders.
- Calculator. The standard set of applications of this custom firmware includes a very modern calculator, which bypasses the standard Android solution in terms of functionality.
CyanogenMod settings options:
- Move the clock to the center status bar
- Changing how the battery charge is displayed
- Ease of editing shortcut icons
- Improved over the standard theme manager
- Saving battery power by limiting the smartphone's access to the network
- Restricting access to personal data for some applications
- Screen lock can be done using a pattern key
- Adjust screen brightness with a swipe on the status bar

Via CyanogenMod you can even change the frequency of the device's processor. And not only at the time of changing the settings, but also by setting the scheme for such changes for the future. To do this, there are several schemes for such a change:
- interactive. The processor frequency changes when the smartphone wakes up from standby mode (screen on)
- on demand. The ability to enable a more energy-efficient, but less productive processor mode
- userspace. Allows the user to set the processor speed for any program running as root
- power save. The processor runs at the minimum frequency. At the same time, the battery power of the device is significantly saved.
- performance. The processor runs at maximum frequency. The performance of the device increases, but so does the power consumption.

INTERESTING: Try to take the test Antutu with standard processor frequency settings and with an increase in this frequency. You can increase this figure to 25%-30% .
Installing CyanogenMod
Installing custom firmware CyanogenMo d is slightly different for different devices. Since it is physically impossible to talk about each device in the format of this article, we will focus on the simplest way to install this software. It is suitable for line devices Nexus.
IMPORTANT: You can not reflash other gadgets according to this instruction. After all, the algorithm for such an action for your device may be slightly different. In general, only its user is responsible for all actions with his gadget.
Though the team Cyanogen and facilitated the installation of its firmware on Android devices, this process must be carried out very carefully. One wrong action can lead to a serious error in your device, which can turn it into a "brick".

There are two ways to install CyanogenMod to your smartphone. The first is the use of the program installer submitted by the developer of this ROM. But, this method has one, but quite a significant disadvantage. With this setup, the installer "Cyana" can "pick up" the latest, but not the most stable firmware build for you. Therefore, it is better to install this software manually.
In order to install this firmware, you need to perform three steps:
- get root rights
- unlock bootloader
- install custom recovery
We told you about how to get root rights. From this step, we will begin the installation of "cyan":
- Download Framaroot 1.9.1, load it into the device's memory and install it through the file manager
- Now you need to run this application and select "Install SuperSU"
- The next step is to select any exploit available for your gadget
- After a window with a smiley appears on the screen, you need to reboot the device

Setting Superuser rights
Everything, root-rights received. The Framaroot app can be uninstalled.
The second step in installation CyanogenMod is to unlock the bootloader. The easiest way to do this is with BootUnlooker. The application can be installed on your smartphone or tablet from the official Play Market application catalog.
Important point: BootUnlooker only works with Nexus series devices. If you have a smartphone or tablet of a different line, find and download an application on the Internet to unlock the bootloader for your device.
Now you need to flash the device with custom recovery. The easiest option is achieved as follows:
- Download and install from Play market Goo manager app.
- In the application menu, activate "Install OpenRecoveryScr…"
- The program will ask for permission to do this. We answer with consent
- When a window appears on the screen with the name of the file from the recovery, you need to make sure that the name of the model of your device is in the proposed program. This may be his international code. For example, i9300 for Galaxy S3.
- We agree with the name and automatically get to the site where the desired file is located. After downloading and installing it, the program will report that everything was done successfully.

Now we find the firmware for your device on the Download page. The firmware can have several versions:
- Stable- latest stable working version
- Release candidate- version in pre-release stage
- snapshot- not fully "run-in" version. There are minor bugs, but in general, the firmware is stable and has several improvements compared to the Stable version.
- Miliestone, Nightly and experiences– various experimental versions that may have many bugs. You can install them only out of curiosity. For your working device, their installation is not advisable
When you find the firmware for your smartphone or tablet model, and decide on its version, then download the archive with it.
- Upload the file (no need to unzip) into the memory of the device that needs to be flashed
- Boot into recovery mode (press the power button and volume down while booting)
- Activate the menu Install and find the place where you uploaded the firmware file. Click on it and confirm the installation

It remains to wait a bit until the firmware is installed on your device and enjoy the new interface and functions. If the firmware has not passed, then most likely the smartphone will not boot. Do not rush to carry it to the service or throw it away. Boot into recovery mode (power and volume down buttons) and activate wipe mode.
IMPORTANT: After installing the firmware cyanogen mod need to install Play market and other Google services separately. Download the Gapps package from this link, upload it to the device and install it through the recovery.
As you can see from this guide, installing custom firmware such as CyanogenMod is not a very difficult task. The main thing is to find the right version and recovery for your device.
"Cyanogen"- This is one of the most popular alternative firmware today. With it, you can completely change the idea of the convenience of using a smartphone or tablet. Thanks to it, you can change the default settings for on-screen buttons, status bars, quick access bars, sound and LED notifications, and other interface elements.
Unfortunately, since December 31, 2016, the developer has stopped supporting the firmware. But, the assignee of this product was the firmware lineageOS. At the moment, the latest version of the product is Lineage OS 14.1 on the base Android 7.1.1 Nougat.
Video. TOP 5 features of Cyanogenmod for which I love and hate him
The Android operating system, despite its ease of use, does not always meet the needs of an experienced user. There are people who are specifically looking for the shortcomings of the stock firmware. Also, many developers don't bother releasing updated firmware for every device. Most often this applies. But even top companies do not release updates in order for users to purchase new smartphones or tablets. Also, the latest software versions are designed for more powerful devices, but older models do not have the amount of memory and processor power as expected. What to do, because many get used to their electronic friend and do not want to run for a new device?
Unofficial software may not support some apps or features
To satisfy the requests of such owners, alternative firmware based on the Android operating system was created. They are not official, often not approved by electronics manufacturers, but for the most part they untie the hands of users. A much larger number of settings are available on them, and some firmware is specially created for weak devices with a small amount of memory.
One of the most popular versions is the CyanogenMod firmware. But installing custom firmware is a complex process that requires certain skills. Even if everything is done according to the instructions, there is a big risk of turning the device into a piece of useless plastic. To simplify the installation process, the developers have released the CyanogenMod Installer utility. Consider how it can be used to quickly and easily flash electronic devices on the Android operating system.
A few words about Cyanogenmod firmware: is it worth updating
There are a few things to consider before deciding to upgrade the firmware. An Android device is essentially a complete computer, and flashing is likened to reinstalling Windows on a laptop.
Advantages of replacing the standard firmware:
- removal installed by the manufacturer;
- receiving more frequent security updates;
- the desire to use the latest version of Android and not depend on when the developers decide to release a version for your device;
- improved performance;
- additional features.

The disadvantages include:
- refusal of the manufacturer or seller of the warranty;
- threat to user security when installing rooted firmware;
- not every alternative system works stably.
Why should you use CyanogenMod? It is a secure system, easy to use and configure, undemanding to resources and completely open. Here are some of its features.
- Constant updates. Not only will you have the latest release, but you will be able to update on your own schedule.
- Security Settings. Choose what data apps can use about you.
- General blacklist. The system has a built-in application to block unwanted calls and messages from annoying people, advertisers and automatic messages.
- Quickly switch settings with one swipe.
- Customizable notification panel, where you can choose the location of the icons.
- Rich selection of topics.
- The built-in Trebuchet launcher has the ability to deeply customize the appearance of the entire system.
- Improved status bar.
- Excellent file manager.
- Synchronization of settings with your account.
- Setting navigation buttons (buttons "Home", "Back", "Recent applications").
- Powerful developer tools.
- Manage root rights as a superuser.
- Setting the limit of sent SMS messages. This is useful when you have "picked up" some kind of virus that sends SMS messages or your phone.

This is not a complete list of all the features of CyanogenMod, but this is enough to understand that not every version of Android has such a set of features. Some features are completely absent in stock firmware. Now let's figure out what is the CyanogenMod Installer?
What is Cyanogenmod Installer
To facilitate the task for those users who do not know how to install CyanogenMod manually, but want to install this firmware, the developers have released a software package consisting of an Android application and a computer client.
The task of CyanogenMod Installer is to simplify the installation of the firmware as much as possible and automatically prepare the device for this procedure. Now you do not need to look for a bunch of instructions, follow them letter by letter and be afraid to spoil something.
You need to install an Android application that will prepare the device, then connect the device to the computer, and the computer program will execute the firmware itself. All instructions are contained in the program menu. You only need to follow them.
Please note that according to information on the official website of CyanogenMod, as a result of the vulnerability found, it is impossible to download the installer from there, so we suggest downloading it from our website.
Firmware procedure
In order to install the CyanogenMod firmware, you will need a computer with Internet access, a connection cable, and the CyanogenMod Installer.
- Make sure your model is officially supported. This can be done at http://wiki.cyanogenmod.org/w/CyanogenMod_Installer#Supported_Devices. If it is not on the list, then we can only sympathize with you. Try installing an alternative operating system.
- Back up all contacts and personal files. Copy them to your computer or cloud.
- Charge the battery to 100%.
- Download CyanogenMod Installer for Android and Windows from our website.
- In the settings of your mobile device, enable the ability to install applications from unknown sources (Settings - Security - Unknown sources).
- Install and launch the mobile client. He will check your device for readiness for the procedure and tell you what needs to be fixed.
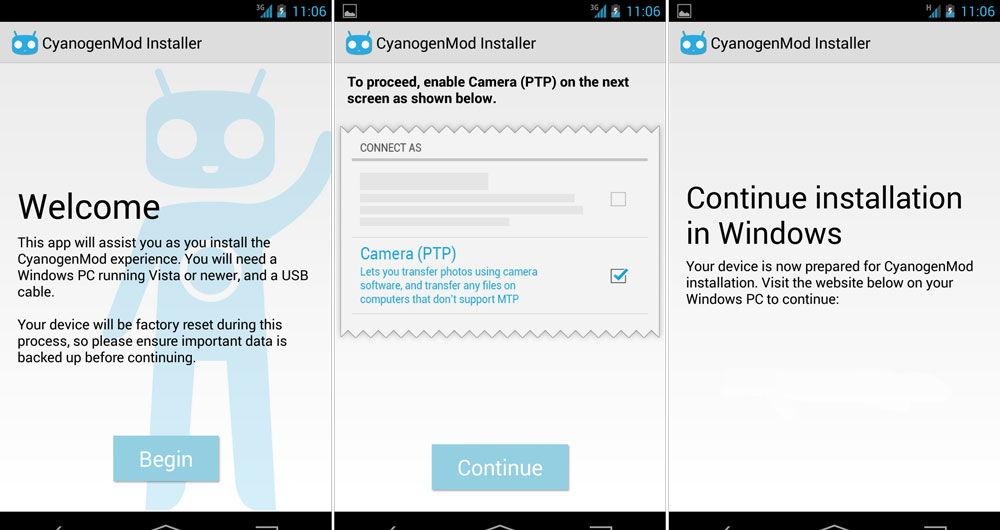
- Follow all recommendations. At the end, the application will offer to continue working on the PC.
- Launch the computer program. The first time you run it, it will check for possible updates.
- Searching for all the necessary files for the firmware will take no more than 15 minutes, after which you will be prompted to disable all antiviruses and connect the device.
- Connect your smartphone or tablet to your computer via cable. Never use adapters.
- After the program detects the device, the download of files will begin. Recovery and firmware files will be downloaded. The time spent will depend on the speed of your connection and the workload of the servers. Practice shows that this is usually about an hour.
- After the download is complete, click Install and wait for the installation to complete. The device will reboot several times. Everything, the CyanogenMod firmware is installed.
- Go to the Recovery menu by holding down the power and volume buttons (may differ on different models), then go to the Wipe Data / Factory Reset section and .

Manually, the entire procedure can be performed much faster, but with a great risk of getting a brick instead of a phone. CyanogenMod Installer simplifies the whole process several times, minimizing all risks.
Conclusion
As you can see, flashing a device using the CyanogenMod Installer is not at all difficult. You just need to press the buttons at the right time.
Did you manage to update the firmware using this utility? We would be grateful if you share your impressions of her work.
Click "Like" and read the best posts on Facebook
CyanogenMod is an aftermarket firmware for Android OS smartphones and tablets from the Cyanogen Team, now Cyanogen Inc. When creating this firmware, a lot of work has been done on optimization and it really improves the performance of the device.
First of all, this is a must have for owners of “outdated” devices, such as the Galaxy Nexus, for example. As you know, officially this device does not support KitKat, but with the help of Cyanogenmod, the owners of this phone can appreciate all the delights of the latest version of the OS from Google.
The very interaction with the device has also been improved. For example, using shortcuts on the lock screen, you can immediately open the application you need. There is an opportunity to reduce, or even completely remove the on-screen navigation buttons.
The user can completely change the notification panel and quick settings: here you can change the battery icon, and move quick settings shortcuts, and even adjust the screen brightness by swiping on the status bar.

If you like to use the on-screen buttons, then in CyanogenMod you can move them around to your heart's content. Optionally, you can add other elements, such as a search button or menu.
For a long time I could not find a suitable music player for myself on Google Play. I tried both the popular Poweramp and Play Music, but they all did not suit me for many reasons. CyanogenMod comes with the beautiful Apollo player. Its appearance can be changed the way you want. In addition, there are a lot of free themes for it on Google Play. Also, a convenient equalizer is built into the firmware, which will allow you to adjust the sound both in the headphones, and through the speaker, and through the speakers.

CyanogenMod looks exactly like KitKat on the Nexus 5. Transparent buttons and a status bar, Google Now, called by a swipe to the right, are all in place. The appearance of the firmware itself can also be changed. Cyanogenmod has support for themes that can be found in abundance on the Internet.
The firmware even has such “wildness” as changing the processor frequency at the discretion of the user. You can set not only the frequency, but also the algorithm for changing it. A few words about each:
Interactive - the frequency changes when the smartphone screen is turned on (standard Governor from version 4.1.1)
Ondemand - Predecessor of Interactive, more power efficient but less productive
Userspace - allows you to fully customize the principle of operation
Powersave is the minimum frequency to save power. By the way, in this mode, everything slows down wildly, even flipping through desktops resembles android 2.2
Performance - Sets a constant maximum frequency. Accordingly, we get the maximum performance
Personally, I use the standard settings, but in rare cases, to save battery, I lower the processor frequencies.

Device performance on the CM is noticeably improved. For example, on stock firmware 4.4.2, my Nexus 4 gives out about 16 thousand points in the Antutu test, and with Cyanogenmod installed, this figure increases to 20-21 thousand.
You can talk endlessly about all the small innovations of this firmware, but it's better to try it yourself. Next, I will try to tell you in the most accessible language how to install Cyanogenmod on your device.
Installation
I will talk about flashing the device using the LG Nexus 4 as an example, since I use this device. On other phone models, the installation may differ to some extent. It is not recommended to flash other devices according to this instruction. I also want to say that before starting the installation, I recommend reading the article to the end.
IMPORTANT! You alone are responsible for all your actions and no one else.
The Cyanogen team has provided an easy way to install their firmware for people who don't want to bother. This method is self-explanatory. You just need to click on the picture below and follow the instructions.

However, this is not the best way. The first time I installed CyanogenMod on my Nexus 4, this program gave me the latest nightly build (a nightly build is a firmware version that is built almost every day (night), and it can be both stable and contain a number of bugs. In my case, a firmware was installed that contained errors and sometimes prevented the normal operation of the device.But a friend who installed Cyanogenmod on his Galaxy S2 in the same way received the latest stable version for his device (4.3.1 JellyBean), which he has perfectly works.
Let's proceed to the second, more "geeky" method. I will try to simplify all manipulations as much as possible and write to you about the easiest installation ways. First of all, you need to get root rights, unlock the bootloader and install custom recovery.
If you do not have a file manager, then just follow the link to Google Play and install it on your device. We'll still need it.
First, let's get the root right. The easiest way to do this is with the Framaroot app. Download the Framaroot- 1.9.1.apk file and install it through the file manager (do not forget to allow installation of applications from unknown sources in the phone settings).
Now let's go down the list:
- We launch Framaroot and click "Allow" if the antivirus issues a warning about a security risk. Select "Install SuperSU" to get root rights.
- Click Gimli, Sam, Frodo, Legolas, Aragorn, Gandalf, Boromir, Barahir or Faramir, that is, any exploit available for your device. If it doesn't work with one exploit, try another.
- If we see a window with a funny smiley, then the root rights have been successfully obtained and we reboot the device.
After that, the Framaroot installation file will no longer be needed and it can be deleted through the same file manager, and thank the developer by purchasing a special application.
Now let's unlock the bootloader. Again, I suggest the simplest way. To do this, we need to install the BootUnlooker app directly from Google Play. Next, just go to the application and press the Unlock button, after granting administrator rights. Unfortunately, BootUnlocker only works with Nexus devices.
Next, we need to flash custom recovery. There are two options: CWM (clockworkmod recovery) and TWRP (team win recovery project). I use the second one and therefore I will tell you how to install it. Again, we will use the easiest possible way: first, download the GooManager application from Google Play. Let's go in order:
- Open the application and press the “Menu” button (on the device itself), select “Install OpenRecoveryScr…”.
- The program will ask you if you really want to install Recovery, click "Yes".
- Another window will appear in which you will be prompted for the name of the .img file with the recovery that will be flashed to your device. Make sure that the name of this file contains the name of your device model, for example for Nexus 4 it will most likely be called openrecovery-twrp-2.6.3.3-mako, and for Galaxy S3 the file name will be openrecovery-twrp-2.6.3.0-i9300.img , where i9300 is the international model code for the Galaxy S3.
- After you click “Yes”, you will be redirected to a site where the recovery file will be downloaded. The program will do everything for you and you just have to wait for a message from GooManager about the successful installation of the recovery.
- Now TWRP is installed on your device and you can boot into it directly from GooManager by pressing the “Reboot Recovery” button, or press the power and volume down buttons when booting the device.
Finally, we have come close to the most important thing - installing Cyanogenmod, for the sake of which we actually did everything described above. To do this, go to the Cyanogenmod website in the Download section. On the left we see the TYPE column, let's briefly dwell on each of the firmware types:
- Stable is the most stable and fully working version free from any bugs
- Release candidate - pre-release version of the firmware. Not much different from stable
- Snapshot is a solid midranger. It is considered not fully finalized, but from my own experience I can say that everything works fine. It is from this point that we will take our firmware
- Milliestone is an empty item. Pay no attention to him. Even if some firmware versions appear there, I do not recommend installing them
- Nightly - such builds are called "nightly" as they are collected every night automatically. They may contain a huge number of bugs, but many sit on them and use them with pleasure. We will pass by and will not focus on such versions.
- Experiments - forget about it. As the title says, it's clear
Well, click on Snapshot and look for the version for our device. The easiest way is to use the page search (ctrl-f) and enter the name of your device. In this case it will be Nexus 4:
- Downloading the zip file cm-11-20140210-SNAPSHOT-M3-mako.zip
- Although it is an archive, you do not need to do anything with it on the computer. We just put it in the phone's memory. For example, in the Download folder
- Next, boot into recovery mode either through GooManager, or when loading the device, hold down the power and volume down buttons at the same time
- Select the Install item, go to our folder and click on our file (the one that cm-11-20140210-SNAPSHOT-M3-mako.zip)
- We make a swipe to the right, thereby confirming the installation, and wait
After installation, reboot the system and wait for the device to boot. If everything went well, you will see a clean desktop. If everything went badly, then your phone will not boot up and, most likely, you will have to carry it to a service center or scrap it. (In fact, if the phone really did not boot, then you should return to the recovery mode and do a full Wipe in the appropriate paragraph, if this did not help, then write in the comments)
Now notice that you are missing Google Play and other Google apps. They must be installed separately. To do this, download the Gapps package from this link, throw them on the phone and install them in the same way as the firmware - through the recovery.
Congratulations! You have installed CyanogenMod 11 on your device and you can enjoy all the delights of this firmware.

If you liked this topic and want to continue, then be sure to write about it. In future articles, I plan to talk about how to make using the device as comfortable as possible: how to replace the on-screen buttons and the status bar, thereby increasing the amount of space used on the screen, and also talk about the MIUI firmware and installing it as a second system on your device .


