How to connect a drive SATA or IDE interface to the computer if there is not a single free connector on my motherboard. Everything is occupied by hard drives, two SATA connectors and one IDE connector. In other words, there are three hard drives installed in the system unit and operating systems are installed on all of them and there are files, all of them are needed. But there is no space for the drive, but there is a need for it, burn movies to DVD for friends, and so on. Do not recommend an external USB drive, it is expensive. Artur Kharkov.
How to connect a drive
We have a good article with you and me, in which we connected two SATA and IDE hard drives to the motherboard using a 3-port SATA and IDE controller - VIA VT6421A, which then perfectly defined and began to work. Moreover, we have adapted to make backups of the system in the Acronis program and store them on these hard drives (from the boot disk, the program perfectly sees the hard drives connected via our SATA and IDE controller and works with them). If anyone is interested, they can read our article.
Now we have a slightly different problem, namelyhow to connect disk drive, if there is simply nowhere to connect it and I propose to solve it, use the same method.
- Take note: keep in mind, you can connect a regular floppy drive or a simple hard drive even to a laptop using !
We take a simple system unit with one SATA hard drive, on which the Windows 7 operating system is located, as we can see, there is not a single drive inside it. We perform all actions on a turned off computer.
First of all, we take our 3-port SATA and IDE controller. As we can see, our controller has three SATA connectors and one IDE, more than enough for our two drives.

Insert it into PCI controller slot our motherboard and fix it with a screw.


In our article, we will complicate our task and connect to our system unit, through the aforementioned controller immediately two SATA and IDE drives Sony Optiarc,


then we turn on the computer and see if our two different DVD roms, our operating system and the programs that work with the DVD rom see it. An IDE-SATA adapter costs about 350-400 rubles and will suit us just fine.
So we have prepared two DVD-ROMs in advance, as I said, one is SATA, the other is IDE, we insert them into the case. Try to place the drives in the system unit, NOT close to each other.
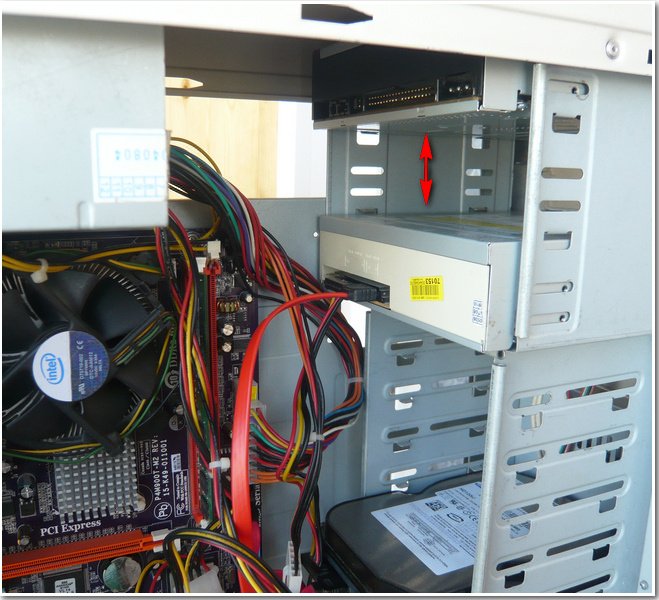
Then we connect them in turn to our adapter using SATA and IDE information cables, then we connect our two drives to the power supply with two cables.


We attach both drives to the system unit using four screws. That's all and it is ready, we will not close the lid yet.

We turn on our computer, the Winows 7 operating system starts up. We immediately open the Computer window and see our two drives.
How to connect CD-ROM?


Installing the CD-ROM won't take long if done correctly. Next, we will look at how a CD-ROM is installed using different types of connectors: IDE and SATA.
Connecting a CD-ROM using the IDE
First, note that there are three sections on the back of the CD-ROM. To install the CD-ROM, we need the two extreme right ones. The first one on the far right is for connecting power. The section located in the middle is needed to connect to the motherboard.
Follow the steps below to mount the CD-ROM:
- Open the system unit and fix the CD-ROM with screws.
- Take one of the wires from the power supply and connect it to the CD-ROM.
- Next, take a flat wire extending from the motherboard and representing a broadband bus. Connect it to CD-ROM.
- Now you just have to turn on the computer, and it will automatically detect the connected device.
Connecting using a SATA connector
If your CD-ROM has a SATA connector, then you will of course need a special SATA cable. Therefore, before purchasing such a CD-ROM, make sure that your motherboard has SATA connectors. In general, the connection process is completely identical to the previous one.
You can check if the CD-ROM is properly connected to the computer without turning it on. To do this, you will need to use a paper clip. Straighten the paperclip and insert it into the small hole on the front of the CD-ROM, which is usually located under the disc tray. Press a paperclip on the button located inside. The CD-ROM should react and eject the drive. Please note that these steps cannot be performed if the device tray is already loaded, as this may cause damage to the spinning disk.
I would like to point out that this manual is primarily suitable for those CD-ROMs that were produced after 2000. If you have an old CD-ROM model, we recommend that you seek the help of specialists to connect it to the power supply and motherboard. However, it should be said that such old CD-ROMs should be replaced with newer ones, since their work may be incorrect and even pose a threat to the media.
If you want to know more about the various accessories, then go to the section.
The drive - until recently a mandatory element in any computer, today is losing ground to flash drives and retires. Manufacturers have caught this trend and are now happy to follow it, refusing to install a drive in computers and laptops. But what if you need a drive? About this - in our article.
First we need to decide what we need a drive for. It's not about his type - by default, he should be able to read and write DVDs, such is the time. But there is such a thing as a connection type - an interface that our drive connects to a computer. He is to be chosen.
The easiest way to determine this is to visually inspect the motherboard and determine the available connection points.

Let's take it in order:

Have you considered the motherboard? Let's evaluate the availability of free ports. If there are several free SATA ports and an IDE port, then you definitely need to choose the first option. He has seriously more pluses, and it’s easier to connect. If there is only one free SATA port, then you can think about it - what if you want to connect another hard drive to your computer? He needs this port. Well, the easiest option is if you have either SATA or IDE ports. You have no choice, act according to the circumstances.
Removing an old drive
To do this, you will need a medium-thick Phillips screwdriver with a good slot and a vacuum cleaner.
Note! Take care in advance of collecting mounting hardware in a separate place - it will help a lot with reassembly. It is very unpleasant to look for bolts all over the apartment.
- Remove the side covers from the system unit. To do this, unscrew a pair of screws on the back of each side and pull the covers back. After shifting them a couple of centimeters and freeing the grooves, remove the covers.

- It's vacuum time. Carefully, without touching the electronic components (this is important!), remove the top layer of dust. Residues are best removed with a can of compressed air - there is less risk of damaging components.

- Find your drive from the inside. Remove traces of hot glue from the cables with a screwdriver. Be careful!
- Carefully remove the ribbon cable from the drive and motherboard connectors. Then take out the power.

- The drive is fastened with rather thin screws on the sides - their number varies from two to four on each side. Unscrew them and remember the approximate position.

- Now remove the drive. Pull it inside the system unit and pull it out, being careful not to touch the rest of the computer components. If the drive does not pull in, push it from the inside out and pull it towards you.

Note! Some models of system units do not allow you to pull the drive inward. Pulling it out is prevented by the front panel - for example, the drive bays have rounded edges, for which the drive clings. In this case, you need to remove the front panel by unscrewing the four bolts or slightly bending the latches in four places. Do this with the utmost care: a system unit with an insecurely fixed front panel will finally lose its presentability.

Installing a new drive in the system unit
In addition to a screwdriver, you may need pliers.
On a note! If you replaced the drive and completed the previous step to remove the old one, then you have already prepared everything for installation.
Now we will look at what to do for someone who wants to put a drive in a new computer where it never was, or wants to put a second drive in addition to the old one.
- Using the instructions from the previous paragraph, open the system unit and remove the front panel.
- Gently pull one of the 5" plugs out of the front panel. Be careful not to break the slots, as it may come in handy in the future if you want to get rid of the drive.

- Using pliers, break out the metal plate opposite the selected plug on the front panel. The plate is definitely not useful, so just break it out. You can bend.

- Remove the new drive from the antistatic packaging. Remove all shipping labels. Carefully insert the drive into its place in the system unit.

Note! It would be nice to find complete bolts from the system unit, but there are none, buy four or eight bolts along with the drive to mount it.
- Secure the drive with screws. Watch its position: it is important that it fits neatly with the front panel. One way or another, its position can be adjusted after.

- Replace the front panel. If the drive does not align with it, loosen the screws and slide it into position. Tighten the screws.
Connecting an installed drive to the motherboard
Consider first the option with the IDE

IDE is an old format with its own customization rules. The loop implies the installation of two devices, so it turns out that one device is always the master (“Master”), and the other is always the slave (“Slave”). This is where the problem may lie if the connected drive is not detected. To fix it, check the position of the jumper on the back of the drive. Pay attention to the screenshot.

Universal case: if there is only one drive on the cable and it is connected by the last connector, then set the jumper to the left position (“Cable Select”, or auto-detection of the connection type). If there are two drives or devices in general on the cable, then the jumper should take a position based on the position of the device: if the connector is extreme - “Master”, that is, the right position, if the middle one is “Slave”, that is, the middle one. However, IDE motherboards have been around for a very long time, so they can easily fall short of standards. In this case, there is only one advice - refer to the instructions.
Now with SATA option

It remains only to close the side covers, tighten their fixing screws and start using the computer. Ready!
Video - Connecting (installing, replacing) a PC drive
How to connect a drive?


Despite the fact that optical discs are becoming less and less popular media today, they still have not gone out of use, as happened with floppy disks. Therefore, a computer still needs a CD / DVD drive that can read, erase and write information to optical discs. However, not every user of a personal computer knows how to properly connect a drive in a computer unit.
How to connect a disk drive to a computer unit
To connect a drive to a computer, you need to follow several steps:
- Prepare your computer for connection.
- Remove the old drive, if available.
- Connect a new drive and install the necessary drivers.
Preparing your computer to connect a drive
Before you install a new drive, you need to prepare your computer for this. First of all, if there is an old drive, then you need to disconnect it from the system. This can be done in the "System Manager" by calling the context menu of the drive and disabling it.
Then you need to turn off the computer and turn it off by removing the power cord from the unit connector. You can also press the power off button on the unit. However, it is still recommended to disconnect the mains lead to avoid static discharge. After that, unscrew the bolts of the block cover and remove it. Now you can remove the old drive and connect the new one.
Disabling the old drive
To disconnect the old drive, you need to disconnect it from all the wires that are plugged into its connectors. Then just unscrew the old drive and pull it out carefully from the block.
It is important to know that the drive can only be inserted and removed from the unit from the outside. Do not try to push it inside, otherwise you will damage the case of the unit or the drive.
Connecting a new drive
To connect a drive, you need:
- Insert the drive into the block housing from the outside.
- Fix the drive with bolts in the case. It is worth at least four screws to screw in, because the drive can make a lot of noise if it is loose and vibrates while reading or writing discs.
- Connect a standard power cable to the drive.
- Connect the data cable from the motherboard. It all depends on the type of loop. Modern units are equipped with SATA cables, but older models use wide IDE cables.
- Close the computer unit and screw it in with screws.
- Connect the power cable and turn on the power supply.
- Start the computer and check if the drive is working.
Usually the drive is determined by default. However, if this does not happen, then you need to install the necessary drivers from the manufacturer's website or disassemble the unit again and check if the drive is connected correctly.
I recently received a question in the mail:
Hello Maxim. Your subscriber writes to you with a proposal - a request. Tell us how to properly connect the 2nd hard drive and 2 DVD burners. I think this is of interest to many ordinary PC users.
The fact is that it is impossible to describe all the connection methods and options in one note, due to the variety of connection interfaces and their combinations on motherboards from different manufacturers.
On the one hand, only two interfaces for connecting hard drives and optical drives are now the most common: IDE (IDE) and SATA (SATA), and it seems that connecting everything is simple.
On the other hand, motherboard manufacturers have made a very large number of motherboards with a variety of configurations of these interfaces: ranging from 2/4 IDE and 1 SATA at the time the SATA interface entered the market before 1 IDE and 6/8 SATA at the moment (hereinafter, the number in front of the interface means the maximum possible number of devices that can be connected via the interface to the motherboard).
At the same time, there are such motherboards in which the simultaneous operation of all interfaces is impossible, i.e. for example, when connecting one disk via SATA switched off 3rd and 4th IDE.
With a gradual transition to the interface SATA everything will become easier one device - one connector.
This means that each device is connected to its own connector, and the user does not need to additionally configure the device and think about which side of the cable to connect to the motherboard and which side to the device. And in case of problems, it is better to tell in detail about the option where the problems arose.
My home PC (motherboard GigaByte GA-P35-DS3L) has two SATA hard drives, one DVD-RW (DVD-RW) SATA and one DVD IDE. How they are connected, I will show in the following picture:
The figure shows approximately 1/6 of the motherboard. Green- this is a connector for IDE devices, I have a DVD IDE connected to it. yellow- these are connectors for SATA devices, I have two SATA hard drives and one DVD-RV SATA connected to them.
The southbridge heatsink and PCI-Express slot retainer are shown to help locate slots more quickly. In most motherboards, the IDE and SATA connectors are located near the southbridge.
The following figures show cables for connecting IDE devices. These cables have 80 cores and can be referred to as "IDE-100/133 cable" or "ATA-100/133 cable". There are also options for 40 cores, but they are practically not used anymore.


The following figure shows the cables for connecting SATA devices. GIGABYTE makes more than just connecting cables SATA but "with conveniences".
The first is a metal retainer at both ends of the cable. This latch prevents the cable from accidentally disconnecting, for example, when you insert or remove a video card from the system unit and accidentally touch the cable.
The second is an angled connector at one end of the cable. Such a cable is convenient to use for short cases, when the cable must be led directly down from the DVD or hard drive. I recommend using these cables.
At the moment, other manufacturers began to complete their motherboards with cables with such "options". You can also try purchasing them separately.

If you have purchased a new hard drive or DVD with a SATA connector, and your PC is not older than 2 years, then connecting via SATA is very simple.
First- install the device in the case. DVD - as you like, and a hard drive - preferably so that there is a small empty space above and below it for better ventilation.
Second- connect the information connector of the device and a free connector on the motherboard.
Third - connect power to the device. A device may have a new type of power connector (for SATA), it may have an old type (Molex), or both connectors.
The following picture shows the rear side of the hard drive as an example and the connectors are labeled: SATA power, SATA information, Molex power.

If there is only one connector, then connect it.
With the advent of SATA devices, power supply manufacturers began to equip their units with special power connectors for connecting such devices.
Most new devices are already being released without a Molex connector. If there are no SATA connectors in the power supply of your PC or they are already occupied, then you can use a special power adapter, which is shown in the following picture.

The white 4-pin connector is the connector Molex. The two black flat connectors are connectors for SATA devices.
If the power connector two, then you need to connect any one of them, but not both! I recommend using the power connector for SATA devices.
After that, you can turn on the PC, go into the BIOS and check that the device is visible. If it is not visible, all SATA connectors must be switched to AUTO mode. Then you need to save the changes in BIOS and exit. After that, you can work with the device
If you are not sure how to connect the device correctly or if you are having connection problems, then watch the video tutorial below or go through our step-by-step video course "Assembling a computer from A to Z".
The article uses materials from the site www.nix.ru


