The TeamViewer program is designed for remote access to a remote computer. When using the program, the user performs remote control of another computer via the Internet.
Using TeamViewer will help in solving any problems with another computer located in any other location. It will be possible to provide assistance in setting up a remote computer, it will also be possible to manage your computer from another location.
To do this, it will be necessary to fulfill only two conditions: the computers of the partners must be connected to the Internet and the TeamViewer program must be running on them at the same time. When using the program, data is encrypted, a secure connection will be established between computers.
After running the program on the local and remote computers and establishing a connection between them, the user can proceed to manage the remote computer. Thus, it will be possible to configure the remote computer, provide assistance in solving problems, provide support, show work in programs, etc.
TeamViewer is free for non-commercial use. This program does not even have to be installed on the computer. It will be enough just to run the executable EXE file, and then you should choose how to launch the program.
Naturally, if necessary, the TeamViewer program can be installed on a computer. After registering in TeamViewer, the user will have access to administrative rights.
On the official website of the German company, the developer of TeamViewer, versions of the program are available for download for operating systems: Windows, Mac OS, Linux, Android, iPhone, iPad, Windows Phone. The Russian version of the program is offered for download.
The popularity of the program is evidenced by the fact that TeamViewer has already been downloaded more than 200,000,000 times.
download TeamViewer Russian version
After downloading, the program can be installed on your computer. At the same time, TeamViewer is ready to use without installation on a computer.
Installing TeamViewer
To start the installation or run the program, you will need to click on the executable file in the ".exe" format.
To run the program without installation, select the "Run only" option.
In all cases of using the program, it will be necessary to check the box "personal / non-commercial use".
If you check the box next to the “Show advanced settings” item, then several additional windows will open when installing the program on your computer.
After selecting the TeamViewer installation settings, click on the "Accept - Finish" button.

First, a window will open with help information on how to use TeamViewer.

Then the main window of the TeamViewer program opens in the "Remote control" tab. In the central part of the program window there are two panels: "Allow control" and "Manage the computer".
In the upper part of the window there are program menu items: "Connection", "Advanced" and "Help".

If you click on the "Computers and Contacts" button, an additional window will open, from where you can, after registering in TeamViewer, manage computers and contacts without having to remember IDs and passwords.

Teamviewer settings
You can enter the program settings by following the menu path "Additional" => "Options". TeamViewer is already configured and ready to use by default. If necessary, you can customize the program to suit your needs.
In the "Basic" tab, you can select the display name, network settings, link the device (computer) to the TeamViewer account.

In the "Security" tab, you can add a personal password for access without confirmation. For a random password, you can set the strength. Standard mode (4 digits) is enabled by default. You can increase the strength to 10 characters, or disable the random password altogether.
You can also change the rules for connecting to your computer.

By entering the "Remote control" tab, you can change the display settings. Here it will be possible to select the display quality of the screen of the remote computer, the display of wallpaper on the remote computer in the program window.
If the Internet connection speed is low, displaying the wallpaper will slow down the session, so the “Hide wallpaper on remote machine” option is enabled by default.
TeamViewer can record a remote session.

With TeamViewer it will be possible to hold conferences among several participants.
Remote control of your computer
The "Allow control" panel is used to display data for remote control of your computer. There is information about the ID of this computer in the TeamViewer system, as well as a password that can be changed if necessary.
In the "Personal password" field, you can enter your password to access a specific computer from anywhere.
You will need to give your ID and password to your remote partner, who will remotely manage your computer.
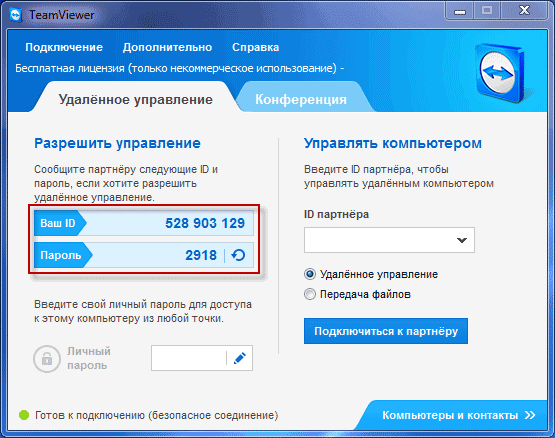
After connecting to your computer and entering the data received from you, your remote partner will control your computer.
Remote access to a remote computer
In the main window of the program, on the right side, there is the "Manage Computer" panel, which is designed to enter data from another computer.
In the "Partner ID" field, you will need to enter the partner's ID. These data (ID and password) you will have to receive from the user of the remote computer that you are going to manage.
In this case, the "Remote control" item must be activated. After that, click on the "Connect to a partner" button.

This will open the "TeamViewer Identification" window. In this window, in the "Password" field, you will need to enter the received password, and then click on the "Login" button.

On the screen of your monitor, you will see a window that displays the desktop of your partner's remote computer. By default, wallpaper will be disabled on the desktop.

At the top is the toolbar. Using the toolbar menu commands, it will be possible to manage and configure the program without going directly into the settings.
The Actions menu has the following commands:
- "Switching sides with a partner" - in this case, you will change control with a partner. Now your partner will control your computer.
- "Ctrl + Alt + Del" - transfer control of keyboard shortcuts to a partner's computer.
- "Enable computer lock" - the partner's computer will be locked.
- "Remote reboot" - "End session", "Reboot", "Reboot in safe mode". You can end the session or restart the remote computer in the desired mode.
- "Transmit keyboard shortcuts" - keyboard shortcuts that you press on your computer will be transferred to the remote computer.
- "Block remote machine input means" - the mouse and keyboard will be blocked on the remote computer.
- "Show black screen" - a black screen will be displayed on the partner's computer and he will not be able to see what you are doing on his computer. In this case, the function "Block remote machine input" must be active.
From the Windows menu, you can customize the display of commands and buttons for the Windows operating system.
The View menu controls the view settings.
The Audio/Video menu controls computer sounds, video, voice, and chat.
The File Transfer menu is responsible for transferring files using the TeamViewer program.
The "Advanced" menu contains other program settings. You can switch to full screen mode or minimize the toolbar.
After connecting, you can proceed to manage the remote computer. It will be possible to install or remove programs, view documents, perform various actions to configure the operating system or programs.

Through TeamViewer, you can not only directly control a remote computer, but also share files.
Transferring files in TeamViewer
To do this, on the toolbar, you can click on the "File Transfer" menu button, and select the "File Transfer" item in the context menu. After that, the "File Transfer" window will open, divided into two windows. The left window contains the files of the local computer, and the right window contains the files of the remote computer.
To send a file or folder, you will need to select the desired object on the computer from which the transfer will be made using the "Address" field. After selecting the object, you will need to click on the "Submit" button. First, on the receiving computer, using the "Address" field, select the place where the file or folder will be transferred.

You can also move files using File Storage. You can open the file storage window from the "file transfer" menu or from the side window of the program by clicking on the corresponding icon.
You will need to drag the file, on the computer from which you will be moving the files to the vault, into the File Vaults window.
In this image, you can see that the file has been placed in the file storage on the remote computer (dark window). After moving, the file became available on the local computer (light window).

Communication via TeamViewer
In the TeamViewer program, you can exchange messages in a chat, negotiate by voice, hold telephone conferences, and record video during communication.

The program allows you to take screenshots of the remote computer window.
Recording video in TeamViewer
In order to record a video session, you need to enter the "Additional" menu, go to the "Record" item in the context menu. Here are the items to control the recording of the video "Start", "Pause" and "Stop".
Using these commands, you can record a video file that will show your actions in the window of the remote computer. After the recording is finished, the video file will be saved in the ".tvs" format. This file can be converted to ".avi" format so that it can be viewed on any computer.
To do this, you need to enter the main program window, open the "Advanced" menu, and select the "Play or convert recorded session ..." item in the context menu. After that, the "Open" window will open, in which you should select a video file with the ".tvs" extension.
In the "Convert session recording" window that opens, click the "Convert" button. If necessary, you can change the conversion settings before starting the video file conversion process. To do this, you will need to click on the "Configuration ..." button, and then in the window that opens, change the settings.

After the conversion is completed, you can play the recorded video session using a regular player.
Article Conclusions
TeamViewer allows you to remotely access your computer, share files and manage a remote computer to help your partner.
TeamViewer - remote computer control (video)
When working with the TeamViewer program (13 and earlier versions), the user may encounter a sudden message about the end of the trial period and exceeding the limit of working with the program. A similar message usually appears when choosing a commercial version of the product that requires its own paid activation. Let's consider how to remove the 5-minute limit in Teamviewer 13, and what tools will help us with this.
As you know, the TeamViewer program is designed to work on a remote computer, perform various technical operations on it, exchange files with it, make video calls, and so on.
The program assumes two versions of its use:
- Free version(non-commercial use mode). Designed for home use and connection to a small number of PCs;
- Paid (commercial) version. The number of connected PCs and the duration of sessions are unlimited.
The free version of the product has a hidden toolkit for checking the terms of its use. In particular, if the user works with a large number of connected machines, often and on a regular basis, then such verification utilities may consider such use as commercial. In this case, the program displays a message about the use of the product for commercial purposes, as a result of which the free session is limited to 5 minutes, and subsequent sessions can be carried out only after a certain time.

Some negligent users, when installing a program, immediately choose the commercial version of the product, after which they are surprised at the appearance of the corresponding restrictions. And the need to remove the five minute limit in Teamviewer 13.
TeamViewer ID - the main identifier of the product operation
The version of the program selected by the user during installation is tied to the "TeamViewer ID" - a unique identification number of the user's PC. When installing the program and connecting to the network for the first time, it receives its own unique ID number, which contains, among other things, information about the TeamViewer version on this PC. When changing the status of the program from free to commercial, the structure of the ID automatically changes, and it will be quite difficult to remove it from the PC in order to return to the free version.

User ID in TimViewer
The TeamViewer ID is generated based on several unique attributes, the most important of which may be:
- MAC address of your network card;
- VolumeID of the disk partition;
- Creation dates of the Program Files folder.
To return to the free version of the program, you should think about changing all three of the listed attributes.
How to remove the time limit in Teamviewer 13
Before proceeding to consider ways to remove the 5-minute limit in Teamviewer 13, I will warn you that none of them is 100% effective. This is due to the peculiarities of the work of the TeamViewer program, which is quite individual for each PC. Therefore, even if the tips below have helped many users, this does not mean that they will work in your case.
I will also warn you that since the following contains tips on changing the MAC address of the network card and the VolumeID of the disk, programs such as 1C Accounting may lose the license installed on them. Please take this into account when performing the following operations.
So, let's move on to reviewing the available solutions to solve the problem "Teamviewer turns off after 5 minutes" on your PC.
Reset the ID in the standard way
The functionality of the program "TeamViewer" has a tool to reset an existing ID for your PC.
- To do this, click on the "Start" (Start) button.
- Find “TeamViewer” in the list of programs, and select the “Reset ClientID” program (if available) in the list of subprograms.
- Your ID will be reset and you will be able to use its free version again until the program suspects something again.

Use a dedicated program
You can also use the " TVTools_AlterID”, which can be downloaded from Yandex.Disk (users from Ukraine need to enable VPN to access the file). The procedure for working with it is as follows:
- Copy the program to the TeamViewer program directory (usually Program Files\TeamViewer).
- Run this program, select the "Trial" mode, and click on "Start".
- Your ID will be changed.
Install the TeamViewer extension for Google Chrome
Alternatively, you can try the TeamViewer browser add-on installed on the Chrome browser. The latter has no time limits in terms of its functionality, and can be recommended as an alternative to the stationary version of the product.
Complex ID change
The next way is to manually change the MAC, VolumeID and date attributes of the Program Files directory described above, which will get rid of the problem in Teamviewer 13 of the 5-minute limit. Do the following:
- Close the program "TeamViewer";
- Terminate all "TeamViewer" processes in the Task Manager. Press Ctrl+Alt+Del, select "Task Manager", go to the processes tab, find and terminate all TeamViewer processes there;
- Uninstall "TeamViewer" from a PC using specialized uninstall software (Uninstall Tool, IObit Uninstaller, etc.) which, when uninstalled, also removes all entries of the program being removed from the system registry;
- %appdata% and in the directory that opens, delete the “TeamViewer” folder;
- Press Win + R again, enter there %temp% , and in the directory that opens, completely delete all its contents. Also delete the contents of the Windows\ temp on the system drive
- Click on Win + R, enter there regedit and press Enter. Delete registry folders:


Now open the command prompt as an administrator, write in it the path to one of the specified files corresponding to the bitness of your OS. Put a space, specify the letter of the partition to change, put a colon, then a space and an eight-digit ID code to which you want to change your current Volume ID.
It might look something like this:
C:\Download\Volumeid64.exe C:2456-4568
C:\Download is the folder where 2 Volumeid files are unpacked
C: - changeable section;
2456-4568 is the new eight-digit partition ID
Press Enter to run the command and then restart your PC.
Reinstall the latest version of TeamViewer https://www.teamviewer.com/ru/ .
Conclusion
Effective ways to remove the 5-minute limit in Teamviewer 13 are the use of special software, as well as changing the ID by changing the MAC address and Volume ID. Performing the above operations will allow you to reset the commercial use of teamviewer 13 on your PC, and again enjoy the free non-commercial use of the program.
In contact with
It is very convenient if you need to provide remote assistance to a friend or connect to your home computer at a time when you are not at home, and access to it is simply necessary for some reason! The good news is that there will be no problems with the firewall, because if it connects to the computer, it will always turn out and no firewall will interfere.
Before you start using TeamViewer it naturally needs to be downloaded and the program must be downloaded from official website, I'll explain why.
TeamViewer is definitely a paid program, and when people hear about it, some of them try to find cracks, download it from torrents, and so on. Should not be doing that, You run the risk of downloading a virus, trojan and other malware onto your PC!
TeamViewer, you can use free, only if the program is used for non-commercial purposes. That is, this is what we need, we are not going to remotely maintain servers or administer computers of any company, right?
Here are some actions that you should not do if you are using the program for non-commercial purposes:
1)
Connect to your office/work PC from home.
2)
Connect from your work PC to your home computer.
Basically, that's all! You should not do this, because if the program considers that it is being used for commercial purposes, then significant restrictions will be imposed on its use!
After downloading the program from the official website "teamviewer.com/ru/", run the downloaded file. A window will appear:
In this window, check the box " Personal/non-commercial use” and press the button “ Accept - finish»Now it remains to wait until the end of the installation.

As soon as the installation of the program is completed, by the way, you won’t have to wait long, a window with brief tips will appear.
Ignore this window, as this will be discussed below and in more detail. Click the "Close" button in the lower right corner. Now TeamViewer itself will start and it is ready to go.
How to set up TeamViewer and how to use it!
After starting the program, you can immediately connect to a remote computer (naturally, if TeamViewer is also installed on it).
It is easy to find out the connection data, id and password are located on the left side of the main program window.

Respectively, if you need someone to connect to your PC, then you must already tell your partner your ID and password.
If you want to use TeamViewer to connect to your home PC, then you need to use a “personal password” for this, there will be a separate discussion about it below.
In this case, we will consider the option when exactly you need to connect to another computer, for example, to a friend.
When you know the ID and password of the remote machine, enter the ID in the "Partner ID" field

Click the "Connect to a partner" button, now after a few seconds a window for entering a password will appear.

Enter the previously received password into it and click the "Login" button and you will be taken to the remote computer.

As you can see in the screenshot, I connected to a Windows XP computer.
What can we do with a remote computer?
Absolutely everything with your computer. If not, no restrictions from the remote computer. Let's talk about some of the features and settings in more detail.
As you may have noticed, there is no desktop wallpaper on the remote machine - this happened due to the connection, since by default TeamViewer turns off the wallpaper, but the settings can be changed and the wallpaper will be displayed as before.
To display the wallpaper, select "View" from the menu at the top.

In the list below, click on "Hide Wallpaper" now the wallpaper will be displayed on the remote machine.

Concerning other interesting TeamViewer settings, then it is worth noting that, when working with a remote computer, it you can restart and continue working further with him.
A very useful feature. We all know that when setting up a PC, sometimes it needs to be restarted. For example, you have made changes in the "msconfig" utility, now you can remote reboot computer and continue configuring it further.
To reboot, select the " Actions»

Now the remote computer will start rebooting. You will be prompted to choose one of two actions.

Press the button, "Wait for a partner" Now you just have to wait for the remote computer to reboot and TeamViewer starts on it. The following window will appear on your PC:
Click the button Reconnect” and you will reconnect to the remote computer, but without entering a password.
In addition to the usual reboot, You can restart your computer in safe mode. To do this, you need to perform all the same steps, only select "" for the "Reboot" place.
In this case, you will have access to the PC in safe mode.

If necessary, from the same tab, you can use such features as:
Blocking the remote machine's input: in this case, the owners of the remote PC will lose the ability to perform any actions on their own computer. The computer will be completely blocked for the owner. You can do whatever you want, and the owner of the PC will only have to watch your actions.
At the final stage of setting up a permanent password, remember your unique ID and, of course, your password.
After the settings described above, TeamViewer will not turn off when you click on the cross, but will simply minimize to the tray waiting for the connection.
Do not confuse a permanent password with one that is automatically generated.
Never tell anyone a permanent password, this is the same as the password for an email or account somewhere in Yandex.Money. use this password only when you need to connect to your PC, and if you want to let another person in, tell him the password that the program itself generates, and after the session is over, generate a new one.
Now you can connect to your PC with your unique password, the only thing you need to remember is your ID.
As a conclusion;
Now you know how to set up TeamViewer and how to use it. The article discussed the key points on setting up the program, in the following articles on this topic we will also talk about how to set up TeamViewer. But about such features: how to use the chat, how to record a video of your actions on a PC in TeamViewer, and the most interesting, how to create a list of computers for quick connection to them.
If you do not have the opportunity to get acquainted with the program in action, then use a virtual machine.
The well-known program for installing remote control of a computer TeamViewer has recently become more and more often giving a connection error. Unfortunately, there are quite a few reasons for this, and it is not so easy to offer a universal way to solve the problem. But in this article, we will try to help you troubleshoot when TeamViewer does not connect to another user, gives a network error.
Working in TeamViewer
How to fix the problem will be described below, but now it’s worth telling how to connect to a computer through TeamViewer, because perhaps you are not doing it quite right, which is why problems arise.
So, to begin with, we launch the program itself, as a result, you should open a window in which your ID and password are indicated in the "Allow control" column, if this is not the case, then most likely you are on the wrong tab. At the top of the program, click on the "Remote Control" tab.
Next, in order to connect to another computer, you need to pay attention to the "Manage Computer" group. In it you should enter the ID of the computer to which you will connect, select the type of connection (remote or file transfer) and click the "Connect to partner" button. After that, a window will appear in which you must enter the password, it must be told to you by the user of another PC.
After all the steps taken, a connection should be established, and you will see the OS desktop to which you connected. If, after following this instruction, you did not achieve the desired result, then try to find a solution below in the text.
The first reason: the version of the program is outdated
The reason why TeamViewer does not connect to the remote PC may be an outdated version of the software. As you can easily guess, in order to fix the problem, you just need to uninstall the outdated version of the program, download the new one and install it.
After doing all these manipulations, try again - everything should work properly.
Second reason: firewall
For Windows users, TeamViewer does not connect to another PC also due to firewall issues. This system utility is able to block the program from accessing the Internet. To resolve this cause, follow these steps:
Sign in to the firewall. To do this, open the "Start" menu and click on the "Control Panel" button in it. In the panel, select the "Large Icons" display and select "Windows Firewall" from the list.
On the left sidebar, find the line "Allow an application or feature to interact with Windows Firewall" and left-click on it.
In the window that appears, you need to find the names of programs in the list and check the boxes in the "Public" column. More precisely, this process is shown in the image below.

After all the manipulations done, click the "OK" button to apply all the changes, and try to connect to the remote PC again. The problem of TeamViewer not connecting should go away.
Third reason: Internet connection problems
Knowing how to connect with TeamViewer to another computer, this is still not always possible due to network problems. There can be many reasons why your Internet is not working properly. The provider may be the culprit, or maybe it’s all due to a mechanical breakdown, it’s impossible to say for sure. Now we will tell you how to check the Internet connection on your computer to make sure whether it is a malfunction or not:
On the right side of the taskbar, click on the Internet connection indicator.
In the appeared small window it will be written whether there is an Internet connection or not.

Here is a simple two step guide. If something else is written instead of "Connected", then feel free to call the provider so that he tells you options for solving the problem.
Fourth reason: technical work
Continuing to understand the question of how to connect via TeamViewer to another PC if an error appears, we cannot ignore the presence of possible technical work on the program servers. To verify this, you just need to go to the developers' site - usually, when planned work is carried out, a mention of this hangs on the site. If this is true, then you just have to wait - by the way, the site may indicate the time of their approximate end.
Fifth reason: program failure
Having gone through all four possible causes of a malfunction in connecting the program, in the end we can only assume that the program itself is to blame. It is not known for certain why this happens and what is connected with it, but the "treatment" of such a problem is known. By the way, it is similar to the first reason: you need to completely uninstall the program, then download it again, be sure to from the official website of the developer, and install it back on your computer. After completing all these steps, try contacting another user again, this time everything should be successful.

Conclusion
So we have analyzed the five most popular reasons for which the program gives an error when connecting to another user. I would like to believe that some of them will help you, however, unfortunately, there is a possibility that there are much more reasons than were given in the article.
TeamViewer is a fairly popular software that allows you to remotely control another PC using one computer: install programs, download files and solve problems.
TeamViewer is free to use, but only if you use it for personal purposes. If you conduct commercial activities using this application, then you need to buy a license. But, even when using TeamViewer for personal purposes, many users are faced with such a problem as ending the session within 5 minutes after starting the program with a message about possible incorrect use - “Commercial use detected”.
The time limit when working in TeamViewer occurs when the program decides that it is being used for commercial purposes. Of course, it is best to purchase a license and forget about such a situation forever, but if you plan to use this software very rarely for personal purposes, then you can bypass the restriction.
How to remove the TeamViewer commercial message
There are tips on the Internet on which you need to uninstall TeamViewer, change the creation date of the “Program Files” folder, change the settings in the registry ...
Unfortunately, this will not help, you will only lose time!
There is only one correct option: Change the MAC address of your computer.
So let's get started.
1.
Uninstall TeamViewer from your computer via "Control Panel\\Programs and Features". After that, check the remnants of the program and, if necessary, delete the folder C:\Program Files\TeamViewer

We right-click on the "START" button, call the "Run" line, enter regedit, thereby opening the registry editor. We search for the occurrence of "teamviewer" in the names of the branches, we delete which relate to TeamViewer.

2.
After completely removing everything related to TeamViewer, change the MAC address of the network interface.
To do this, you can use the free utility "Technitium MAC Address Changer" from the Technitium website.
TMAC installation.


