But still, it offers you a fairly extensive online image editing program, perhaps the simplest, but very functional. Combining traditional simple editing features and filters with advanced tools such as smart recoloring (Advanced tab), color curve, and more, FotoFlex editor allows users to create, adjust, enhance and ultimately transform photos and images from virtually anywhere with access. in Internet. The editor also offers a wide range of enhancements, fonts and special effects.
FotoFlex also has functions such as rotation, size measurement and cropping, rotation, drawing, erasing, filling. Once you upload a photo for editing, you will see a simple interface on the basic tab: Auto fix, Red eye fix, Crop, Resize. The program has a wide range of effects, such as blurred contours, black and white photography, comic book effect, art, stencil and many others.
Unlike the program, this editor is simplified and has some effects, using which you do not need to be professionals in photo editing.
One-click effects
This photo shows how you can make a one-click photo effect in different styles and pop art style. And these are just two of more than 20 effects - pixelate, night vision, painting, blur outlines, old photo, saturation and much more!
Insert face
 This function is located in the Design tab, using it you can insert your face or the face of your friend into a hole in another photo.
In one click, you can “paint” your face onto another photo from the proposed assortment (bodybuilder, dollar bill and several celebrity options). You can change the size and angle of the face to fit the new photo. This option contains few templates to use, but it is surprisingly easy to use!
Let's look at how to fix red eyes or change eye color using this photo editor
1. First you need to add a photo in which we will remove red eyes. Click on the Add Image button and upload a photo.

Navigate to the folder containing the photo you would like to edit and double-click on it. The photo will be loaded into FotoFlexer and will be available for editing.
2. Go to the "Basic" tab at the top of the screen, and then click the "Fix Red Eye" button. 
If you want to know how to change your eye color, then skip to step 4.
3. Once you have clicked the "Fix Red Eye" button, you will simply need to click on the center of each eye and click the "Done" button.
 The photo shows how the eyes will look after using this function. Just a couple of clicks and no more red eyes!
4. Upload the photo you want and go to the Advanced tab at the top right of the editor and click the Custom Recolor button.
5. A window like this will appear. Zoom in on the photo by moving the slider to the right to make it easier to change the color. Under the View option, click on the arrows and select “Processed” and set the brush size you need and the color you want. There is no need to change anything else.

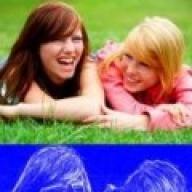
The pop art processing style does not lose its popularity. It is used for advertising posters, in magazine design and simply in social networks, as attractive avatars and propaganda banners.
In this article we will show you how to make art in Photoshop. More precisely, we will make an art picture from the photo. And undoubtedly, the best program for creating art from photographs is Photoshop. There are several ways to create art. We will consider the least labor-intensive and fastest.
For work we need a portrait. Open the image in Photoshop. Duplicate the image layer ( Ctrl+J).

The background in the image needs to be removed. We wrote earlier in the article how to separate an object from the background.
If you have a uniform background in the photo, use the tool "Magic Wand Tool" or . If the background is complex, then you need a tool Quick mask mode.
In our case, we can separate the girl from the background using the tool Quick selection tool. We work with a duplicate image.

Select the background without affecting the model. After that, invert the selection ( Ctrl+I). Now it is not the background that is selected, but the object on the background, in our case the girl.

After this, just press the key combination Ctrl+C, Ctrl+V, so that the image of the girl separated from the background is transferred to a transparent layer.


Now we need to select in "Filter Gallery" one with which you can trace the contours of our black and white photo and posterize the shadows and highlights. Posterization will break the shades into levels, the transition between which will be very sharp. At this stage of creating art, you should choose your own filter for each photo, or even two, if necessary. The following filters are most likely suitable: “Strokes”/Brush Strokes/“Stroke”/Ink Outlines And "Accented Edges"; "Sketch"/"Photocopy"; . The filter gallery is located at "Filter" main menu of the program. Important! When choosing a filter, the main working colors should be black and white.

In our case, the filter was ideal “Imitation”/Artistic/“Outlined Edges”/Poster Edges. The filter is customizable. On the left side of the dialog box, you need to move the sliders until you achieve the desired result. "Edge thickness" we ask 1 , "Intensity"/Edge Intensity - 0 , Posterization - 1 . Notice how the lights and shadows are divided into levels. When you have finished selecting the parameters, click Ok.

All that remains is to color the image. An adjustment layer will help us with this. "Gradient Map". You can call it in the list of adjustment layers, at the bottom of the layers palette.


A dialog box will open. Double-click on the gradient to bring up the settings.

In them we have to specify four color points for the gradient. We will move from left to right.

Even more about Photoshop - in the courses.
There are sliders at the bottom of the gradient. They are control points (stops). On the left is a point - on Positions/Location 0%, on the right - 100%. With one click of the mouse below, under the gradient, you can create a new point. Once you grab it, you can move it left and right. Extra points can be deleted by highlighting and clicking on “Delete”/Delete. We have to put points at positions 25%, 50%, 75%. Let's assign a color to each point. The last two dots will be the same color, approximately similar to a person's skin tone.
You can set the color at a control point by double-clicking on it (on the slider). The palette will open. On the gradient of all colors, move the slider to the desired color and select the appropriate tone in the large hue gradient window. We close the window.
And now the points one by one.

With the addition of each new point, the shadow levels will be colored.
Set the point at the 25% position and set the color to red.

The next point will be blue, position 50%.

Penultimate point 75%. We select its color close to the color of the skin. At the bottom there is a box with a note # . Copy the color code from this window (select and click Ctrl+C).

We already have the very last point. Position 100%. Double-click on it, open the palette, in the window marked # select the inscription and paste our copied code by clicking Ctrl+V. We close the window. We also close the gradient map by clicking Ok.

The gradient map adjustment layer needs to be attached to the girl's layer since we will be painting the background. To lock an adjustment layer, move your mouse between it and the one you applied it to. While holding Alt, click between the adjustment layer and the image layer. The adjustment layer will have an arrow indicating it will attach to the layer below.

Create a new layer ( Shift+Ctrl+N) and drag it under the layer with the girl’s image.

Staying on the new layer, take the tool Rectangular Marquee Tool.

Place the cursor in the upper left corner of the image and, holding down the left mouse button, drag it down; on the right, stick to the middle of the image. An area outlined with a dotted line will appear. Then select the tool "Fill"(key G). The color can be selected by double-clicking on the primary color swatches, which is located at the very bottom of the toolbar.
Graphic editors nowadays are capable of a lot. Using them, you can change a photo by removing anything from it or adding anyone you want. Using a graphic editor, you can make art from an ordinary photograph, and this article will talk about how to make art from a photo in Photoshop.
First, you need to download the program from the link above and install it, which this article will help you with.
Preparing the photo
After installation, you need to open the photo you need. To do this, you need to open the “File” submenu and click on the “Open” button, after which, in the window that appears, you need to select the photo you need.

After this you need to get rid of the background. To do this, create a duplicate layer by dragging the main background onto the “Create a new layer” icon, and fill the main background with white using the “Fill” tool.


Now erase the background using the Eraser tool and apply a layer mask by right-clicking on the mask.

Correction
Once the image is ready, it’s time to apply the correction, but before that, create a duplicate of the finished layer by dragging it onto the “Create New Layer” icon. Make the new layer invisible by clicking on the eye next to it.
Now select the visible layer and go to “Image-Adjustments-Threshold”. In the window that appears, set the black and white ratio that best suits the image.

Now we remove the invisibility from the copy, and set the opacity to 60%.

Now go back to “Image-Adjustments-Threshold” and add shadows.

Next, you need to merge the layers by selecting them and pressing the “Ctrl+E” key combination. Then we paint the background in the color of the shadow (we roughly match it). And after that we combine the background and the remaining layer. You can also use an eraser to erase unnecessary parts or add black to the parts of the image you need.
Now you need to add color to the image. To do this, you need to open the gradient map, which is located in the drop-down list of the button for creating a new adjustment layer.

By clicking on the color strip, we open the color selection window and select a three-color set there. Afterwards, for each square we select a color.

That’s it, your pop art portrait is ready, you can save it in the format you need by pressing the key combination “Ctrl+Shift+S”.

Perhaps you have long wanted to learn how to draw beautifully on your computer. Today there are a lot of programs on the Internet for this. Some are better suited for children, where there are several brushes and a lot of paints, others are better suited for professional photo processing, and others are for creating 3D characters. Which program to choose for drawing art on your PC? In this article I will describe the best software for you.
The ArtRage program was created specifically for creating realistic art drawings using a brush on a computer. Various tools for creating a drawing lie on the palette and are available with a click of the mouse. Among them: watercolor (Watercolor), oil (Oil), palette knife (Palette Knife), roller (Paint Roller), pencil (Pencil), pen (Ink Pen), airbrush (Airbrush), this is very convenient. Based on which instrument is selected, its settings are available to you (dryness, pressure, etc.). You can also observe all the properties of the selected tool in front of you and select, for example, the size of the stroke that needs to be applied.

The editor is perfect for those who want to learn how to paint in watercolors, oils, pastels and other artistic techniques. Users are provided with 2 versions of the editor: Studio and Studio Pro.
The "Pro" version has many additional and advanced features. It offers a Photoshop-compatible filter, scripted recording of a painting, locking changes in the transparency of enhancements and layers, etc. Versions of the ArtRage editor are available at https://www.artrage.com/artrage-4/. When creating pictures in this program, the final image is so high quality that it seems like it was created in a special art studio.
Pixia is a simple raster graphics utility for drawing art on a computer.
Despite its small size, Pixia is designed for drawing art on a computer and does it very well. This is because it is endowed with many functions that are not available in other programs at this level. The editor is considered a lightweight version of a full-fledged graphics editor. Each brush can be customized as you wish, and you can use various graphic objects as a brush.
You can download the Pixia editor from the link http://www.ne.jp/asahi/mighty/knight/download.html. It is distributed free of charge, created by Japanese programmer Isao Maruoka.

Its special feature is plugins that can be found on the Internet. Thus, its functionality can be expanded by adding some filters from Photoshop. The program is easy to learn and has a nice and intuitive interface. Here you can create any graphic file of 10240 x 10240 pixels. The developer claims that Pixia can process as many layers as your RAM can accommodate.
Inkspace - a program for creating artistic illustrations
Inkspace is a free and open source vector editor. It was specially created for editing SVG graphics. The program is equipped with a large arsenal of tools, has great functionality and is one of the most popular programs for drawing and editing vector graphics. Many web developers underestimate vector graphics, although its advantages lie on the surface:

To download the editor, follow the link https://inkscape.org/ru/download/windows/. If you want to learn how to work with graphics in the Inkspace photo editor, then you should use more practice. The program allows the user to convert all raster images into vector ones. Can work with layers, contours, text. Allows you to use various geometric shapes, edit and rotate them.
Artweaver - editor with filters and effects on Windows
If you decide to find a program to draw art on your computer, then Artweaver was created especially for you. This editor is aimed specifically at professionals and amateurs who have access to software like Photoshop, Corel Painter. For an artist there are all the necessary tools - brush, pencil, chalk, various paints, airbrush. You can complete each project in an artistic style, adding different filters, noise, blur. Every unfinished drawing in Photoshop can be finished in Artweaver. If you are interested in this editor, then you can try it by downloading from the link https://www.artweaver.de/de/download.
Advantages over other programs:

Flaws:
- The editor was developed by German specialists, so the default language is German, you can change it to English. To install Russian, you must install the file yourself.
- There is no support for layers for formats - PNG, JPEG, GIF, BMP.
- After the first version, the program becomes shareware.
Paint is a multifunctional and simple program to draw colorful art
The very popular graphic editor Paint has survived many versions of the Windows operating system with which it was bundled. The photo editor was included in the latest version of the OS, but remained virtually unchanged. It has all the same familiar tools - pencil, fill, palette, magnifying glass, eraser and various brushes. The most important advantage of the application is its simplicity. The program has 9 different brushes and a KZS color model for the artist to choose from, which is quite enough to create a full-fledged painting. The size of each tool when drawing art can be reduced or increased. Does not support working with layers and transparency.
 Using a pencil in Microsoft - Paint
 Gimp - a photo editor that will help you illustrate art images
Gimp is my favorite editor, which is in the same “weight category” with such a graphics giant as Adobe Photoshop. But unlike it, it is significantly smaller in size. Gimp is designed to work with raster images and partially supports vector graphics.
Gimp is a multi-purpose program that is used not only for drawing beautiful art on the computer, but also for fully editing photographs. Filters and tools will help improve saturation, color balance, remove various image distortions, change perspective, edit a blocked horizon, crop, remove defects, “revive” blurred detail and much more.
Download the editor on the Russian-language website - http://gimp.ru/download/gimp/.

When you launch the graphic editor, you will see three separate windows, each of them can be resized, they can be stretched or reduced. The editor for drawing art images can be customized to your liking. The artist has many different types of brushes to choose from, and each of them can be edited. Choose the one that suits you best and start working in Gimp.
Pop art is the stylization of images using certain colors. To take your photos in this style, you don’t have to be a guru, since special online services make it possible to create pop art stylization in just a couple of clicks, which in most photos turns out to be of very high quality.
Here you don't need to put in much effort to achieve the desired effect. In most cases, you just need to upload an image, select the pop art style you are interested in, perhaps adjust a couple of settings, and you can download the converted image. However, if you want to apply any other style that is not in the editors, or significantly modify the style built into the editor, you will not be able to do this due to the limited functionality of the service.
Method 1: Popartstudio
This service gives you a large selection of different styles from different eras - from the 50s to the late 70s. In addition to using already created templates, you can edit them using settings to suit your needs. All features and styles are completely free and available to non-registered users.
However, in order to download a finished photo in good quality, without a service watermark, you will have to register and pay a monthly subscription costing 9.5 euros. Additionally, the service has been completely translated into Russian, but in some places its quality leaves much to be desired.
The step-by-step instructions look like this:
- On the main page you can view all available styles and change the language if necessary. To change the site language, find in the top panel "English"(by default) and click on it. From the context menu, select "Russian".
- After setting the language, you can begin choosing a template. It is worth remembering that the settings will be adjusted depending on the selected layout.
- As soon as the selection is made, you will be redirected to the settings page. Initially, you need to upload the photo you plan to work with. To do this, click in the field "File" By "Choose File".
- Will open "Conductor", where you need to specify the path to the image.
- After loading the image on the site, you need to click on the button "Load", which is opposite the field "File". This is necessary so that the photo, which is always the default in the editor, changes to yours.
- Initially, pay attention to the top panel in the editor. Here you can flip and/or rotate the image by a certain degree amount. To do this, click on the first four icons on the left.
- If you are not satisfied with the default values of advanced settings, but do not want to mess with them, then use the button "Random values", which is presented in the form of a dice.
- To return all values to default, notice the arrow icon in the top bar.
- You can also customize colors, contrast, transparency, and text (the last two provided your template provides them). To change the colors, look at the colored squares at the bottom of the left toolbar. Click on one of them with the left mouse button, after which the color selection palette will open.
- The control in the palette is a little awkward. You initially need to click on the desired color, after which it will appear in the lower left window of the palette. If it appears there, then click on the icon with the arrow located to the right. As soon as the desired color is in the lower right window of the palette, click on the apply icon (looks like a white checkmark on a green background).
- Additionally, you can “play” with the contrast and opacity parameters, if there are any in the template.
- To see the changes you have made, click on the button "Update".
- If you are satisfied with everything, then keep your job. Unfortunately, normal function "Save" not on the site, so move the cursor over the finished image, right-click and select from the drop-down menu "Save image as...".


Method 2: PhotoFunia
This service has very limited, but completely free functionality for creating pop art, and you won’t be forced to pay for downloading the finished result without a watermark. The site is entirely in Russian.
A small step-by-step instruction looks like this:

Method 3: Photo-kako
This is a Chinese site, which is quite well translated into Russian, but it has obvious problems with design and usability - the interface elements are located inconveniently and overlap each other, and there is no design at all. Fortunately, there is a very large list of settings that will allow you to create high-quality pop art.
The instructions look like this:

It is possible to make pop art using Internet resources, but you may encounter limitations in the form of little functionality, an inconvenient interface, and watermarks on the finished image.