It's no secret that Dark Mode is very handy when working in low light conditions. Operating systems, smartphones and simply popular apps already have a dark theme or night mode to help users use their devices without straining their eyes in low light conditions.
Windows 10 is no exception and not too long ago also gave users the option to turn on dark mode, dark theme is available for more than just apps. You can apply a dark theme to Windows Explorer.
Starting with Windows 10 version 1809 (October 2018 Update), you can enable Dark Theme for File Explorer. In short, now you can change the color of File Explorer to black, without using third party apps. For many users, it would be nice if Microsoft offered a dark gray color instead of (or in addition to) the current black.
Here's how to enable black color for File Explorer in Windows 10.
Note: To enable dark mode for File Explorer, you must be running Windows 10 version 1809 or higher. To check the build information, type winver.exe in the Start menu search box and press the Enter key.
Step 1. Open the app "Options", the fastest way is to press two keys Win + I , or click on the gear icon in the menu "Start".
Step 2 Go to section "Personalization" → "Colors".
Step 3 Scroll down the page and select application mode "Dark" default. This is it!

You should immediately see the dark theme in Settings and Windows Explorer. You don't need to restart File Explorer or your computer.

At the moment, there is no way to apply dark mode to File Explorer only without changing app colors and settings.
Do you like the black theme for Windows 10 Explorer, share it with us in the comments below.
With the release of the new Windows 10 operating system, developers have significantly redesigned the personalization capabilities. Windows 10 users who are used to the personalization settings in the seven are now having questions related to the new personalization features and the lack of some settings.
In this article, we will look at how you can change the color of windows in Windows 10. In addition, we will show our readers how to open hidden options that allow you to change the color of window titles, taskbars, and also choose any shade from the color palette.
Standard window color change in Windows 10
Before changing personalization settings in Windows 10, you need to make sure that your OS is activated.
If the system is not activated, then the settings for changing the color characteristics of the window will not be available to you.
In our case, we use activated Windows 10 Enterprise version 1511. To change the color in the top ten and in the new menu " Start» we need to go to the new special panel « Options". This panel can be accessed via the menu " Start” and through the notification center located on the taskbar.
After entering the panel Options» you need to follow the links « Personalization» - « Colors».
In the window that opens, you can see that for the menu " Start” and blue is selected for the window borders. You can change the color in the color palette below. Now let's try to choose a green color in the color palette. After this action in the preview window, it became clear how the menu " Start» and window borders.
If we turn on the first switch, then we will enable the system to select colors itself. The operating system will choose colors automatically based on the background color that is currently selected. The second switch allows you to activate the color for the taskbar and window title. Below is a variant with a modified title and taskbar using this switch.
It is also worth noting that in previous versions of dozens this option was not available, and the user had to edit the registry to change the color of the window title and taskbar. The third switch activates transparency in the taskbar and in the notification center.
The example shows that the developers have simplified the color change options on the window borders and in the menu as much as possible. Start».
Two ways to choose your own color scheme
For first way we need to create a registry file. The registry file can be created with a regular notepad, saving it with the "*reg" extension. In our case, this file is called "Colors.reg". Before saving this file, we entered the data shown below into it.

Notepad shows that in the parameter " "AccentColor" = dword:» selected color with code in hexadecimal format « 2FFFAD". In notepad, this color is written correctly only for the registry itself. To decrypt this code in the color palette of any graphic editor, this code should look like this " ADFF2F". That is, three pairs of characters go in reverse order. It is also worth noting that this color has a name " GreenYellow". This color is activated by opening the "Colors.reg" file and confirming the entry of data into the registry. The color of the borders of windows and menus Start' may not change immediately. So it's better to log out and log in again.
Second way is simpler and allows you to change the appearance of the color in a special window. The developers deliberately hid it from users, but it is not clear for what reason. To launch this window, create a shortcut and enter the address of this window in it " rundll32.exe shell32.dll,Control_RunDLL desk.cpl,Advanced,@Advanced". You can name the label with any name. After creating the shortcut, run it and see the following:
In this window, you can see that the user can change the following parameters:
- color intensity;
- Hue;
- Saturation;
- Brightness.
Of the two methods, the second method is the most convenient and simple.
Change the look of windows with high contrast themes
In Windows 10, if you go to the control panel using the links " Decoration and personalization» - « Personalization”, then four high-contrast themes can be found at the bottom of the window.
These themes are specially designed for visually impaired people. When using these themes, eye strain is significantly reduced. This is also confirmed by the fact that many system administrators use these themes. In addition to enabling these four themes in Windows 10, you can also edit them. By editing the theme, you can change both the background color of the window itself and its title. To edit, go to the panel " Options» by links « Special abilities» - « High contrast» and choose one of the themes.
Here you can change the window in Windows 10 beyond recognition. After making changes in this window, the theme must be saved by clicking the Apply button.
Many high-contrast themes will not appeal to you because of the very simplistic style. But the very fact that these themes allow you to change the color settings makes them very useful.
Change window color settings with a tweaker
In this chapter, we will look at a tweak called Winaero Tweaker. The main purpose of this tweaker is is to reveal the hidden settings of Windows 10 and change the parameters of the operating system using them. In our case from Winaero Tweaker, we only need to change the hidden features of OS personalization. You can download the program from the site http://winaero.com. The utility does not require installation, so you can run it right away. In the running utility, we are interested in the tab " Appearance” and its six sub-tabs.
First tab " Aero Lite» allows activate light theme, which is used in Windows 8. Below is a notepad window using this theme.

Second tab " Colored Title Bars» allows activate the option to paint titles in earlier versions Windows 10: Newer versions of Windows 10 already have this option.
Third tab " Custom Accents» allows the user add a new kind of color to the color picker.
Fourth tab " Dark Color Scheme» allows activate special black theme for panel " Options". The black panel is shown below. Options».
Fifth tab " Inactive Title Bars Color» need to change the title of an inactive window.
Last sixth tab " Slow Down Animations» will allow the user slow down animation in Windows 10 by pressing the Shift button.
The website of the Winaero Tweaker program describes the principle of the program, which is based on changing registry settings. That is, everything that the program does, you can do manually.
Summing up
From the reviewed material it can be seen that although the developers have removed most of the options for changing the color of windows, we can still change their color quite easily. We also looked at what high-contrast themes are and how to use them to change the color in windows. In addition, we reviewed the work of a wonderful tweaker Winaero Tweaker, which allows you to quickly solve the problem. We hope that our material will be useful for our readers, and you will be able to solve all the questions about changing the color of windows in Windows 10.
Related videos
Have you ever wanted to somehow change the look of your operating system? Surely I wanted to. In this article, we will tell you how to change the color for all kinds of window components in Windows 10. Before we start looking at changing colors, it should be mentioned that previously Windows 10 users generally lacked the ability to change such a seemingly banal thing, as GUI colors.
But, with the advent of the new Creative Update (or Windows 10 Creators Update), users still received system and software features that can be used to change the color of windows. However, all these possibilities turned out to be rather non-functional.
Unfortunately, there is no single menu in which you can easily adjust all the colors of various elements. So you will have to follow various steps to change the color of a certain window element in Windows 10. But, all this is not difficult and even a green beginner can handle it.
How to change title bar color in Windows 10 window
- Press the key combination on the keyboard Win+I.
- Go to "Personalization".
- Then go to the "Colors" tab.
- In this menu, you will be able to choose the color you want. If you want to set a specific color to your taste, then click on the “+” icon next to the “Additional color” item.
- Also don't forget to check the boxes next to the options that will allow you to use the selected color on the Start taskbar, the Start Menu itself, and the notification area.
Once you are done with the settings, then all the parts of the Windows 10 GUI that you have selected in the specified settings will have the specified colors.
The note: you also have the opportunity to activate one remarkable feature in the above settings - "Automatic selection of the main background color". If you activate this function, the color will be chosen based on your currently set desktop wallpaper, i.e. the system will take the average of all available colors on the wallpaper and color the background with the calculated color.
How to change window background colors in Windows 10
If you don't like the selected color for windows in Windows 10, then there is good news for you, as it can also be changed according to your preferences. Unfortunately, to change this value you will have to be a little more sophisticated, but everything is within tolerance. Now we will look at a couple of ways to change the background color of windows: through the high contrast settings and through the Classic Color Panel programs.
Via high contrast settings
First of all, you can use themes with high contrast, which have settings for changing colors. So, follow these steps:
- Press combination Win+I.
- Go to "Settings" of the computer.
- Select the "Accessibility" tab.
- Next, go to the "High Contrast" tab.
- Once you're in the High Contrast Theme settings, click on the "Background" button.
By clicking on this button, you can easily select the background color of windows in Windows 10 that you need. However, since these are themes, they will have to be applied on the operating system, which will change the entire design of the graphs. Windows 10 interface. On the one hand, you can change the background color of windows, and on the other hand, you can sit with a high contrast design.
Through a third-party utility Classic Color Panel
There is one third-party, but incredibly useful utility with which you can change the background color of windows in Windows 10. This program is called Classic Color Panel and you can download it directly from the developers website, which will be available at this link.
Once you download the file colorclassic.exe, run it from anywhere on your computer. You should immediately see a notification in which you will be prompted to save your design settings - the choice is yours.
Once opened, the Classic Color Panel will provide you with a wide range of options for changing colors for various aspects of the graph. Windows 10 interface. To change the color of the window, check the box next to the item called "Windows" and select the color you need using the usual palette. Simply and easily.
Once you have specified the color settings you want, click on the "Apply" button in the menu bar of the Classic Color Panel program. You will then be logged out of your account to apply the changes. Log in to your account and you will see the selected colors. However, this program also has a minus - the colors will not be changed for all windows in Windows 10, but only for some. It is also possible that the utility may have lost some of its functionality due to the release of a new build update.
How to set your color for decoration
All of the above methods for changing the color of windows in Windows 10 are quite sufficient for most users of this operating system. But if you want something more unusual? What if you have to choose a color that cannot be provided by the methods already covered. For example, you want to use black for a window, but it is not provided there.
In this case, the Windows Registry Editor will come to your rescue, with the help of which we will now try to set the color you need. Go through the following steps:
The note: To find the required encoding, go to any graphics editor and open the usual palette, in which the necessary data will be located. So, you have found the right color, for example, blue (200EE3). You will need to enter E30E20 in the field, since in this parameter the color is set according to the BGR (Blue-Green-Red) system, and not according to the usual RGB (Red-Green-Blue), i.e. you will need to swap the first and last two characters - 200EE3→E30E20. For shades of gray, nothing needs to be changed.
In addition to digging into the Registry Editor, you can use the so-called "hidden" applet in Windows 10. In earlier versions of Windows, such as 8.1, these settings can be easily opened. On Windows 10, you will have to do the following:
However, it is worth clarifying that the color selected in this window may be very different from what you might have chosen. You just have to experiment and choose the right color.
How to change colors for inactive windows in Windows 10
Unfortunately, you will also have to set the color for inactive windows in Windows 10 through the same Registry. You will need to do the following:
Found a typo? Select the text and press Ctrl + Enter
In Windows 10, users can change the color scheme of the taskbar, Start menu, and Action Center by selecting any of the available colors in the Personalization -> Colors settings section. Unfortunately, so far the choice is limited only to those colors that are available in the palette. However, with a little registry trick, you can fix this shortcoming by specifying your own color in HEX format.
What exactly are we going to change? The color that will go last in the Colors palette. Notice it should have a thin blue border. Yes, if you don't see the palettes, set the "Automatically select primary background color" toggle to Off.

At the same time, also enable the option “Show color in the Start Menu, taskbar, and notification center”, since without it you will not see changes in the color scheme of the taskbar and other interface elements.

It may happen that there is no corresponding parameter in the registry. Then the color selected by the frame will not be in the palette. In any case, start the Registry Editor and expand the following branch:
HKEY_CURRENT_USER/SOFTWARE/Microsoft/Windows/CurrentVersion/Themes/Personalize

In the last subsection, find the SpecialColor DWORD value and double-click on it. If this parameter does not appear, create it manually. Double-clicking will open a window for editing the parameter value.
By default, SpecialColor is in ABGR format, which describes the Alpha, Blue, Green, and Red color channels, but you can use the more familiar six-character HEX format to set a new color. For example, to add white or black colors, by the way, both of them are not in the Colors palette, you need to enter the code FFFFFF or 000000 (0), respectively. For the new settings to take effect, exit and then re-enter Windows or restart your computer. After that, the color should appear in the palette. Click on it with the mouse and it will be applied to the specified elements of the Windows 10 interface.

Note: If you do not know which combination corresponds to which color, use any color detection utility or web design color chart.
Have a great day!
The standard Windows 10 tools include a utility for calibrating the image on the monitor (display) screen of your computer or laptop. It allows you to adjust the color, brightness and contrast of the screen for the best possible experience in your environment.
Note A: In this article, we will not delve into the professional intricacies of calibrating screens using special software or hardware. This manual describes the procedure for setting up the monitor using standard Windows tools, without the need to download additional programs. It is perfect for beginners who have noticed some deviations in the quality of a laptop or desktop computer screen, or just want to adjust the image a little for themselves. The perception of color / contrast / brightness is purely individual, so you should be guided by your own instinct, but do not go too far.
One more note: All procedures must be performed with an administrator account. Otherwise, you will need an administrator password.
Calibrate your monitor or display in Windows 10
You can go directly to the monitor or display calibration interface in Windows 10 by entering the command in the window Run. Click Win+ R and type dccw.
If you are not looking for easy ways, then you can find the screen calibration menu in the following way:
- Open Options - System - Screen. Go down a little and find the item Graphics adapter properties.

- In the window that opens, find the tab Color Management.

- A larger window will open. On it you need a tab in detail. Open it and then press the button Calibrate screen at the bottom of the window.

- This will open the Screen Color Calibration Wizard.

- The first step is to adjust the gamma. Before setting up directly, Windows will show you examples of incorrect and correct calibration.

- Try to adjust so that the picture meets the standard, but at the same time, no one forbids you to set the parameters that suit you.
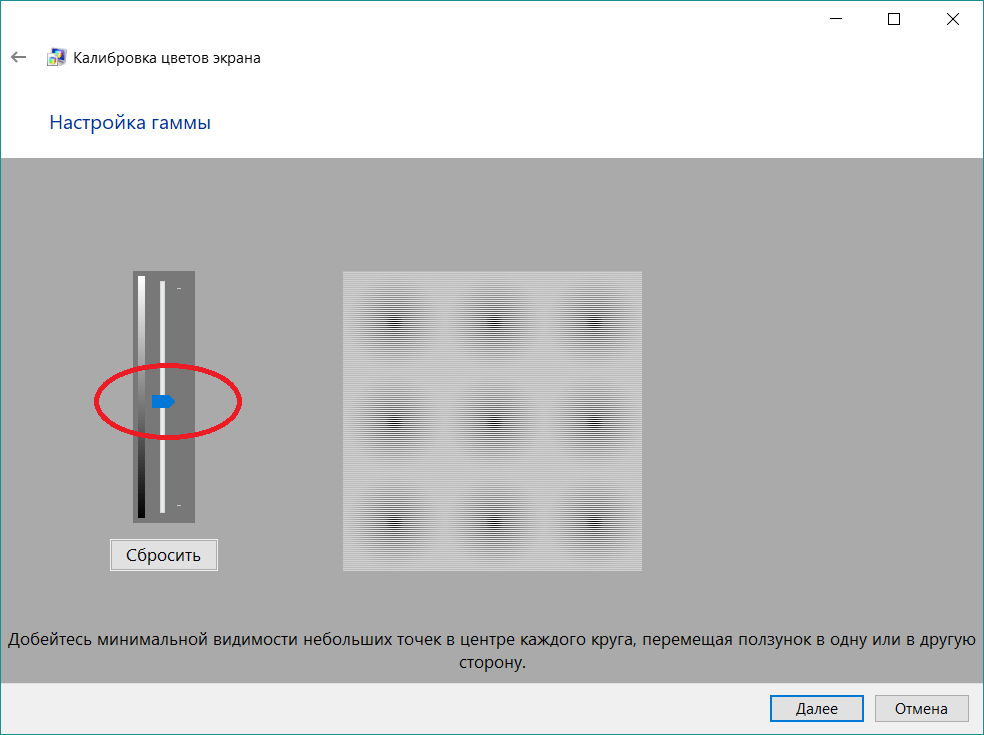
- If you do not like the setting, use the button Reset.
- The next step is to adjust the brightness and contrast. If you do not need to configure these settings, click Skip brightness and contrast settings.

- At this stage, it will be necessary to use the image controls directly on the monitor itself. Each manufacturer has a menu and control buttons made in its own way. How to change the brightness and contrast of your monitor should be indicated in the instructions for the screen - refer to it for help, or google it. At this step, Windows will only show sample images for accurate calibration.

- Click Further and start experimenting.

- Adjusting the contrast will help you set the values to correctly display the brightness of the highlights. Again, follow the on-screen prompts and reference images, and then adjust the image in the menu the monitor itself.

- The next step is to adjust the color balance. Here, calibration is already done by the system (although almost every monitor in the menu has the ability to change the color balance - try playing around with these parameters too.

- You need to make sure that the large bars on the screen remain as gray as possible. If you notice impurities of other colors, eliminate them with the red, green or blue sliders.

- At the final stage, you can compare the color settings you created with the previous preset. To do this, click on Previous calibration. Button Current calibration will display the settings you created.

- To save your new settings, click Ready. Button Cancel will return everything to its original state.
How to set up clear type
Also note the point Run the setup tool clear typeafter clicking "Finish". With it, you can adjust the quality of fonts on the screen. We recommend that you spend another three minutes in order to fine-tune the monitor as accurately as possible.

In these two screenshots above, you can see the difference between enabled (top) and disabled (bottom) ClearType technology. It is unlikely that someone will want to turn it off voluntarily, but someone will definitely need a more precise setting.

If you want to set up ClearType without screen calibration, then you can do it in the following ways:
After that, configure the fonts as described above. Spend a few minutes fine-tuning your screens. The result of the work will be a more pleasing to the eye picture, which will have an extremely positive effect on your experience of using your device.


