Please make sure the firmware matches your tablet, otherwise you may damage your device. Basically, the problems that exist after installing the update are the result of user carelessness.
Don't forget to back up your data before upgrading as all storage devices including internal microSD memory card or flash card, will be formatted during the update, lost data cannot be recovered.
Do not press the reset button during the firmware update and try not to do anything on the computer, be patient, it will only take about 2 minutes.
Make sure that your tablet is sufficiently charged, the charge level should be at least 40%.
Please strictly follow the sequence indicated in the instructions.
1. Driver installation
If you are installing an update on a tablet for the first time, then most likely when you put the tablet into update mode, the system will require you to install a driver. How to do this correctly will be discussed below. If you have installed the driver, then feel free to proceed to the item Update the tablet.
1.1) First you need to download the program Rockchip_Batch_Tool_v1.6, with which the tablet will be updated. Save it, for example, to drive C and unpack the archive. Run the program (file RKBatchTool.exe), you should see this:
1.2) Connect the included tablet to the computer using a USB cable, you will see a pink indicator in the program:
1.3) Switch the tablet to update mode using the “Switch” button:
1.4) Go to START, right click on "Computer" and select "Manage":
1.5) Select “Device Manager” in order, then right click on “Unknown Device” and select “Update Drivers…”:
1.6) Then select "Search for drivers on this computer":
1.7) Specify the path to the drivers that are in the folder with the Rockchip Batch Tool v1.6 program, click next:
1.8) In the window that appears, click "Install":
1.9) The driver is installed, close the window:
2. Update tablet firmware
2.1) Run the program Rockchip_Batch_Tool_v1.6 and connect the included tablet to the computer. The program will signal with a pink indicator that the device is connected, then select the update file for your tablet:
2.2) Switch the tablet to update mode using the “Switch” button. The indicator from pink will change to green, if the green indicator does not light up, then the drivers are not installed. How to install them, see the instructions at the beginning:
2.3) Then click “Update”, the indicator will change from green to yellow, the update process will take about 2 minutes:
2.4) The program will report a successful firmware update and send the tablet to reboot:
2.5) Now you can disconnect the tablet from the computer. Wait for the tablet to complete the setup (on average it takes 3-4 minutes).
Source http://pipo.by/support/download/update-instructions/
Our Site continues to tell you how to flash Android devices. Today we'll talk about how to flash devices based on RockChip Batch Tools.
In this article, you will learn how to properly flash various Android tablets and smartphones running on the RockChip chip using the RockChip Batch Tools utility program.
What is needed for the firmware?
1. Computer or laptop (OS Windows XP - 8)
3. Installed drivers
3. Previously downloaded firmware
4. Original and undamaged MicroUSB cable
Instructions for firmware using RockChip Batch Tools
Driver installation
If you already have the driver installed, you can skip this manual and scroll down. Install drivers only once.
1. Unzip the archive RockChipBacthTool_Rus.V1.7_Usb_driver.zip where do you find the folder with the drivers Rockusb Driver
2. Turn off the device and connect it to the computer,
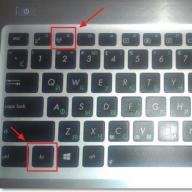
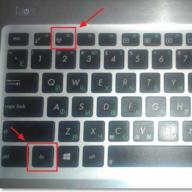
3. Hold down the Volume Up + Hold down the On Button and hold the two buttons at once.
4. After a message appears that the driver is searching, release the buttons

If it doesn't, enable USB debugging and open the RockChip Batch Tools program and click the toggle button
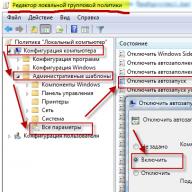
5. Go to the Device Manager menu

6. Find "Unknown device"

7. Right click on it and select update driver

8. Select install from computer (search for drivers on this computer)

9. Specify a folder with drivers
10. Agree to install drivers

Device Firmware
1. If you have a memory card installed, remove it for the duration of the firmware
2. Connect device to PC
3. Launch RockChip Batch Tools
4. At the top of the program, press the select button and select the file format img
5. Switch to firmware mode.
a) Hold down the Volume Up + Hold down the Power Button and hold both buttons at once.
If you are one of those who are looking for detailed instructions and want to flash an Android tablet from a well-known and relatively inexpensive GOCLEVER brand, then I wrote this article especially for you. The TAB R74 model has already been discontinued, but if you want to flash the Chinese tablet GOCLEVER or any other company of our friends from East Asia using this instruction, then you should not forget that after flashing you will automatically lose the warranty.
You probably already understood that as an example I will be flashing the GOCLEVER TAB R74 model, which combines price and quality quite well, despite the fact that it was assembled by Chinese craftsmen. The GOCLEVER TAB R74 Internet tablet has modest technical characteristics and contains an internal one and does not badly cope with the tasks assigned to it. So why flash a tablet if the hardware performance does not improve. Yes, it will not get better in hardware, but the software will improve, which will help remove a number of limitations and significantly affect the performance of the tablet as a whole.
In general, flashing a tablet is worth it in case of urgent need and with justified risk. For example, after the firmware, the speed and battery life of the tablet will increase, the screen sensitivity will improve, access to the administrator account (Root) will open without using third-party applications ...
In general, it is advisable to do this only when there is a need for it, and not a "sporting" interest. Of course, gaining experience is also necessary, but keep in mind that if you flash the tablet with the wrong firmware or during the process the tablet turns off due to a lack of power (the battery is dead), and it is not connected to the electricity network, then you risk being left without a device at all .
First of all, you need to download the firmware itself and the Rockchips RK Batch Tool program to flash the tablet through a computer. In general, it is advisable to download the firmware for any device from the official website of the manufacturer in order to be sure of its contents, otherwise you never know what changes "craftsmen" can make there. From the links below you can download the stable version of the Rockchips RK Batch Tool, which I myself use and the verified firmware I took from the official GOCLEVER website for the TAB R74 model.
Through the program RockChip RK Batch Tool you can flash tablets, MID devices manufactured by Explay, Ritmix, ONDA, Teclast, Texet and other Fuzhou Rockchips based chips ( RK2818, RK2808A, RK2918, RK3066) running Android OS. In order to avoid losing the device due to the fault of the firmware, I recommend using your own version from the official developer for each tablet or MID device model.
As I wrote above, I will be flashing the GOCLEVER TAB R74 model with a new firmware I took from the official website of the developers in which there are a number of significant changes. You can download the Rockchips RK Batch Tool program and firmware from the direct links below. If you need to flash an Android tablet of another model that runs on one of the above processors, then find and download the firmware designed for it. It is no longer on the official website of the company, but I previously downloaded this firmware and will gladly share it with you.
- Download program - Rockchips RK Batch
- Download firmware - GoClever TAB R74
The quality of the photos in the article leaves much to be desired, but I think this will not prevent you from understanding the essence and meaning of the publication.
So, let's start ... You need to turn off the tablet and connect it to the charger, and use the USB cable to connect it to the computer. To flash a GoClever tablet or any other tablet through a computer, it is better to use the USB cable as short as possible. This is not my whim, but the recommendations of experienced people.
Attention!!!


Now, to get into the firmware mode, you need to hold down and hold the volume down "-" and press the RESET button (with a needle, paper clip). If this combination does not open access to the firmware mode, try holding down the volume down key "-" and pressing the ON / OFF button (near the volume).
But as a rule, this combination is used to create screenshots on the tablet. In general, each tablet model may have its own combinations for entering the firmware mode. By the way, some manufacturers use the volume “+” and ON / OFF key combinations to enter Recovery mode.


If you do everything right, you will receive a message from Windows in the form of a sound signal and search for drivers.
But if something goes wrong, you will receive a message in the form of an image of an android lying on its back with an open hatch on its belly from which an exclamation mark is shown in a red triangle.


This is Recovery mode and you got into it because you pressed the wrong key combination to enter flashing mode. Each model may have its own reason for the occurrence of this mode. Press the Reset button and try again to enter the firmware mode.
Recovery (recovery)- standard or as it is also called stock recovery (stock recovery) is designed to update the firmware of an android device (tablet, smartphone ...) using a portable microSD flash card ( details on how to select an SD card) and factory reset. There are also modified versions of the standard recovery created by enthusiasts, which have expanded the standard functions and added the ability to install non-manufacturer firmware.
So, if everything went well and Windows started searching (the installation wizard window opened) for drivers, and nothing is displayed on the tablet screen, then you did everything right. If the driver is not found, then enter the device manager and for an unknown device (in my case it is RK29 Device), specify the folder with the drivers for your version of Windows OS from the folder with the Rockchips RK Batch Tool program.
If after installing the driver you get error number 10 (no digital signature), then in "Hardware Update Wizard" uncheck the box "Only compatible devices" and click Next.


So, the driver is installed. Run the downloaded program for firmware Rockchips RK Batch Tool (rkbatchtool.exe). In the FW Path field, you need to specify the path to the firmware file (img file format). In the block Connected Devices one of the numbers (indicating the computer's USB port) should turn green. If the number turns pink, then update the device driver through the "Switch" button.


If everything was done correctly and the USB port number turned green, then you can safely press the Upgrade button and the firmware process will begin. The firmware process will take about 5-7 minutes.
Attention!!! During flashing, do not disconnect the device from the computer and do not disconnect the USB cable during the flashing process. Such actions can lead to the irretrievable loss of the device.


At the end of the firmware process, the tablet will reboot and your device will start a new life ... After the firmware, you can get root rights on the tablet (monitoring root rights through the Superuser program), increase performance and battery life, as well as improve screen sensitivity, GPU acceleration for video playback, Added Google Play Service...


As you can see, it is not difficult to flash an android tablet at first glance, but before you start flashing your device well and think more than once: do you need such an update. After all, it happens that new versions are still “raw” and need to be improved, and your risk associated with device firmware will not be justified.
Everything that you will do with the tablet - you do it at your own peril and risk, and if your tablet does not show signs of life after your actions on it - I'm not to blame.
At the end of the article, I suggest you watch a thematic video on the firmware of the PIPO M9 tablet through the RockChip RK Batch Tool program.
RockChip RK Batch Tool- program for flashing tablets, MID-devices manufactured Explay, Ritmix, ONDA, Teclast, Texet and others based on chips Fuzhou Rockchips(RK2818, RK2808A, RK2918, RK3066) running Android OS.
Version: 1.4 -1.7
License: Freeware
Type of: Windows 2000/XP/XP 64-bit/Vista/Vista 64-bit/7/7 64-bit
The RockChip RK Batch Tool flasher works fine only under Windows XP/Vista. In Windows 7 it works if you boot the computer via F8 and select "boot the operating system without drivers", although in Win 7 it can start without any problems..
Instructions for the flash driver:
1) Run the file RKbatchtool.exe

2) In the window that appears FW path write the path to the firmware file (this is an img file).

3) Connect OFF(and always charged!!!) tablet computer to the USB port of the computer by holding the button "Volume minus". The system will prompt you to select drivers that can be selected in the folder DRIVER or RockusbDriver from the archive. After installing the drivers, one of the numbers indicating the number of the USB port on the computer will turn green. If nothing happens after installing the drivers, reconnect the device while holding the key "Volume minus".

4) Now click UPGRADE to start the firmware and wait a few minutes.

5) Sometimes with frequent flashing of the tablet with software from different manufacturers, a situation arises - at one moment after the firmware, the tablet may not boot, but hangs on the screen with the inscription - format cash or on the splash screen with the logo of the author of the firmware. Don't worry, just click restore to run the firmware again and wait a few minutes.

RockChip Batch Tool is a small tool from developer FuZhou designed to install new firmware from IMG images for portable devices (mostly tablets) based on the RockChip chip. Basically, these chips are used in devices from the following manufacturers: Ritmix, Texet, Teclast, ONDA and Explay. Simply put, these are budget-class devices, mainly produced under Russian brands, but at the same time manufactured in China. To perform the firmware, you will need a USB cable and, in some cases, additional drivers.
Working with the program
RockChip Batch Tool is quite easy to operate. To install a software update, you need to connect a portable device to a computer, as well as prepare a firmware file in IMG format (can be found on thematic forums). Please note that when working with the tablet, it must be turned off. Otherwise, you risk getting a "brick". Next, you need to specify the path to the image in the FW path column. After performing these operations, the indicator under the number "1" on the bottom panel should turn green. If this does not happen, then once again make sure that all the necessary drivers are installed on the PC.
If you have achieved a green indicator, then you can safely press the "Update" button and wait until the firmware process is completed. It usually lasts a few minutes and requires you to restart your device several times. In general, even despite the general ease of use, RockChip Batch Tool is not recommended for beginners.
Technical features
Of the positive aspects of this tool, it is worth noting the fact that it is fully translated into Russian. In addition, the program does not require installation on a computer (it works in portable mode) and is completely free. But among the shortcomings, we can single out the presence of compatibility problems with new versions of Windows.
Key features
- installation of firmware for many models of devices with a RockChip chip;
- the need to connect the device via a USB cable;
- quite simple and clear interface;
- work only exclusively with images in IMG format;
- compatibility issues with the latest versions of Windows.