It is unlikely that you, as a webmaster, will be satisfied with the standard parameters of the downloaded template. Surely you will want to change some elements of the layout, change its structure, edit the design style and much more. Setting up a template is the basics that any website builder should know. Everyone started with this once, and you should learn too. After reading this article, you will know how to change a Joomla template, how easy it is to do it, and how to quickly edit a layout.
How to install a template on a website
First you need to figure out how to install a theme on a resource. This is a basic action that you should be able to carry out even with your eyes closed. Installing a template in Joomla is a very simple skill that is a sin not to master.
First, you need to download the template file to your computer disk. Usually, they distribute zipped layout files in directories, and if you find zip or tar.gz, that's good. The Joomla theme engine is renowned for being very easy to manage. In just a matter of minutes you can change the skin of the site by changing it into a different template.
To change the theme of the resource, you need to go to the "Extension Manager". Next, you have to click "Download the package file" and find the template archive on your computer. After downloading, click on the button to activate the installation of the layout - the theme will gradually begin to be installed. Or if you did not download the file to your computer, you can enter the URL in a special field and the engine will download and install the template on the site itself.
Another option for installing a template, which is not used as often as the previous one, is to upload the unpacked template directly to the hosting using an FTP manager. The main thing in this business is not to be mistaken with the folder where you send the template distributions. If placed in the wrong directive, then the layout will not appear in the template manager, and may even disrupt the work of some components of the site. You need to find the templates folder and inside it create a directory for this template. Then go to the admin panel in the "Extensions Manager" and click on "Search" - the engine will find the template you downloaded on the hosting.
How to edit the appearance of a template in Joomla
After installing the site template, you can move on to the most interesting - you have to edit it to fit your needs.
Setting up the layout is an interesting activity that will definitely pull you into yourself, you will see!
But first, you need to figure out what's what, and this guide will help you with that.
The fact is that Joomle templates consist of a block system, however, like layouts of many other engines. It's convenient and easy to learn, and you need to figure it out. Sometimes layout customization is available directly from the admin area. This is rare and mostly only if you have installed a paid layout on your site. Otherwise, you have to deal directly with the template code. Do not be afraid of this, as already mentioned - modern layouts have a simple block system. To edit an element, you just need to find the corresponding block in the code of the entire layout.
Fortunately, you don't have to manually search for the required elements in the template. Layout customization will be much easier if you use a dedicated browser. The word "special" means a browser with which you can view the code of the page as a whole and individual elements. An example of such a browser is Google Chrome. To see where a specific element is located in the code, you just need to hover the mouse over it, right-click and select "View element code". After that, the browser will open the selected part of the code, and you can see the block you need.
Further, in order to change the block settings, you need to edit it using a special editor. To do this, you can install the popular Notepad ++, or use the standard features of your operating system, for example, the legendary Notepad. You will need to load all the code for the external design of the template into notepad. Then press Ctrl + F - "Search" will turn on. Find the part of the code that the browser showed you when you clicked on the element code. And then correct the data you need.
If you don’t understand what needs to be edited, then you’ll have to devote a few evenings to reading dedicated articles on writing CSS. Or watch videos on the Internet - there are enough of them now. The main thing that you must understand is which tag is responsible for what. Some of the components are easy to comprehend if you know basic English. For example, the same color is referred to in CSS as color. This is not difficult to reach with your own conclusions.
By editing the CSS, you can change most of the elements on the site, from the logo to its width. You can even change the background image. To do this, you will need to add a new image to the images folder, and also write the path to it on the hosting in the code.
In addition, the various extensions that you install on the site will be of great benefit. What your resource will be depends on the set of plugins, modules and components. With the help of CSS, you can change only basic settings, but you will not be able to add new functionality to the site. But with a component you can change the main part of the page, and with modules you can add functional blocks for different purposes. And plugins will improve the performance of the site itself, as well as allow you to insert all sorts of functions right in the middle of the content.
All you have to do is define what your site should be like, and then find the right tools to make it happen!
Today I will talk about how to make a WordPress site look unique, for which we just need to redesign the WordPress template.
You've probably noticed that the appearance of many of the sites found on the Internet is implemented using free WordPress templates, which does not add to the reputation of the resource.
Moreover, you can often find sites on the pages of which external links to third-party resources posted by the creators of free templates are posted.
Of course, ideally, you need to use paid templates, but for this you need to invest money.
If you don’t want to spend money on a WordPress theme, if you have a young site, for example, and you don’t have the skills to create templates, then it would be most logical to redo the existing WordPress template.
So, in order to remake a WordPress template and turn it in some way into a unique one, we need to find a free template we like.
In the vastness of the Internet, it will not be difficult to find a lot of free templates, so problems should not arise at this stage.
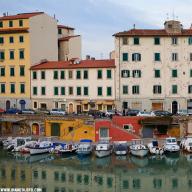
For this article, I picked up a template that looked like this:
The characteristics of the original template were as follows: a template for WordPress 3.7.1, up to 3 blocks with any widgets are placed above the footer, there is a logo (PSD) that can be easily edited. The search form is located on the same line along with the main menu.
The action plan for changing the template is as follows:
- change the appearance of the template header (header);
- change the appearance of the template footer (footer);
- change the content of the sidebar;
- clean template files from unnecessary external links, including encoded ones;
- debug the functionality of the template and return all functions that were available before the template was changed (VK comment form, up arrow, social media buttons, etc.).
This is a quick roadmap for redesigning a WordPress template. Now in more detail.
So, let's move on to a more detailed consideration of each of the above points.
To change the appearance of the template header, we will need to find the folder in the directory with the original theme images, in which, in turn, find the image files used in the header of the template. It will not be difficult to do this, in my case these are the following two pictures:

I must say that the case with the template I have chosen for editing is private, and it is not necessary that the appearance of the header should be made up of exactly two pictures. We will not dwell on this, there is nothing complicated here.
And in general, in this article I am considering the issue of changing the WordPress template so to speak "with little blood", that is, with minimal alterations, so that it is clear to beginners. It is for this reason that the size of the image used in the header will remain the same.
So, now if, using a graphics editor, for example, Photoshop, we combine these two images, then we get the following:

I hope my train of thought is clear? If not entirely, then let me explain: we need to estimate the size of the required image, which we will create in the future ourselves for the original appearance of our site, because in my case it is this image that plays a decisive role in the design of the selected template.
So, having connected the images, we determine the size of the required image, and also using the guides in Photoshop we indicate the position on the canvas of the characteristic elements of the template's functionality: the field on which the menu buttons are located, and so on. I got the following result:

Now, for those who have a little Photoshop skills, it will not be difficult to divide the image into two parts proportional to the original images, and then save them under the names of the original template pictures in the format jpg or png... The result of my actions is below:


Next, we drop these files into the directory images the reworked theme (if you perform all actions with files on the hosting, you can use an FTP client to access them, as described in). We look at the result - everything should work like clockwork. Ready!
I also replaced the logo located in the header of the template with my own:


And instead of a phrase any content insert the necessary information that you want to display in the footer of your site. In my case, the code is as follows:
The background color in the footer, on which the specified text will be displayed, can be changed as follows: since we have id the above container div bears the name footer, then in the file css-styles style.css you need to find the lines responsible for assigning styles for it (I give an example from my template):
| 1 2 3 4 5 6 7 8 9 | #footer (background: none repeat scroll 0 0 # 2E4263; color: #FFFFFF; font-size: 12px; margin: 0 auto; padding: 10px 10px 0; text-align: center; width: 950px;) |
#footer (background: none repeat scroll 0 0 # 2E4263; color: #FFFFFF; font-size: 12px; margin: 0 auto; padding: 10px 10px 0; text-align: center; width: 950px;)
And register the desired color palette code in the field background.
With such simple actions on the template files, I changed the appearance of the header and footer of my site.
Changing the content of the sidebar is quite simple: you just need to in the section Appearance → Widgets WordPress admin panels enable or disable the corresponding widgets, as well as customize them. Everything is at your discretion, there is nothing complicated. I will only add that the order in which the categories are displayed in the sidebar can be changed using a special plugin, which is described in my site.
About how to remove unnecessary external links (including encoded ones) from the template, I wrote in, read this information, since when you change any of the free WordPress templates> the significance of this procedure in the future development of your resource is difficult to overestimate.
Finally, you need to check the performance of each function of your resource, for which simply “walk” through different pages and links of your site and evaluate how this or that function works.
It will also not be superfluous to check how your resource is displayed in various Internet browsers.
And of course, it is necessary to return to their place all the functions lost due to the change in the template, for example, such as:
After completing all the above procedures for reworking the WordPress template, you will create a unique design of your site that will delight you and, of course, visitors, which will undoubtedly have a positive effect on the promotion and promotion of your resource.
That's all, good luck to you!
Every Word document is associated with a template. If you are using a custom template for the current document, but forgot which one, then Word makes it very easy to find out. And just as easily you can change the template associated with the current document.
Comment: The illustrations for this article are from Word 2013.
To define or change the template associated with the current document, you need the tab Developer(Developer). Turn on the display of this tab on the Ribbon and open it.

In chapter Templates(Templates) click Document Template(Document Template).

A dialog box will open Templates and add-ons(Templates and Add-ins). In field Document Template(Document template) contains the name of the template (or path to the template file) associated with the current document. To change the template, click Join(Attach).

In the dialog box Attaching a template(Attach Template) will automatically open the default folder for custom templates. Select a template in this folder, or navigate to a different location to select a different template. Then press Open(Open).

Now in the field Document Template(Document template) shows the full path to the template file. If you want document styles to be automatically updated when you close this dialog box, check the box next to Automatically update styles(Automatically update document styles). Click on OK to save your changes and close the dialog box.

The content of the document will change to match the new template. Styles, custom toolbars, macros (if a custom template was created and saved with a .dotm) saved in the template are now available in your current document.
Comment: Attaching a template to a document does not add text or images from that template to it. This only happens when you create a new file from the template.

When you close Word, you will most likely be presented with a dialog box like the image below. This is a warning that the styles in the template associated with the document have changed. Click on Save(Save) to save changes, Do not save(Don’t Save) if you don’t want to save your changes, or Cancellation(Cancel) to return to editing the document and not close Word.

Comment: This dialog box may appear even when you have not made any changes to the template. If you don't want to change the template, just click Do not save(Don’t Save).
You can also use this procedure to detach a template from a document. To do this, simply attach the template to the document Normal instead of the existing one. Remember that every document must have a template associated with it.
Modifying and editing a template is like modifying and editing a regular document. The only difference is that you need to open a template, not a document. The difference is small, but significant, because the template is not a document after all.
- Select a team File> New.
The task pane will appear on the screen Document creation.
- Select a template from the list or click on the link On my computer to open the template from your hard drive.
In fact, you do not open the template, but create a new document based on it. You are not using the template itself, but a link to it.
- Make changes.
The template is edited in the same way as any other document. Just remember that you are dealing with a template, not a "real" document. Any changes to styles or text will cause the template to change, and then will be saved to disk as the same template.
- Save the edited template by choosing the command File> Save As.
- Give the template a new name and leave the original template unchanged.
- Select from the dropdown File type meaning Document Template.
- Click on the button Save.
Note
Changes you make to a template will not affect documents previously created using that template. However, they will be reflected in documents that you create after changing the template.
The mystery of saving template files to the hard drive
It is often easier to modify an existing template, as described in this chapter, than to find the required [template on your computer's hard drive. Do not think that I am exaggerating, but the places in which Word saves document templates are not at all easy to find. The location of the templates is not a secret, but the place itself was chosen, to put it mildly, poorly. In Windows XP, the Documents and Settings folder is used as the repository for all user data. In this folder, you will find the Application Data folder, where many applications store user-specific data. You should look for templates in this way: find the Microsoft folder, and in it the folder Templates... I doubt that without outside help Susanin would have been able to find this place.
Each theme has a number of settings that can be changed from the CMS control panel. A variety of parameters from template to template can change, but almost every theme allows you to customize the logo, background, fonts, sidebars, title, description of the site from the admin panel.
Despite this, the site owner may want to change some little things that the control panel does not allow to edit. In this case, you can hire a webmaster, but if you don't have money or you have time, you can easily figure out the template and make the necessary edits yourself.
An engine theme consists of many files. Knowing which part of the site each of them is responsible for, you can easily edit the design of the CMS template "for yourself".
The theme files contain HTML, PHP and CSS code. There is a separate reference for HTML / CSS on the site, and knowledge of PHP is not required to form the design in principle.
So, any WordPress template has the following files.
1. index.php... The file forms the main page of the site and calls other skin files.
2. header.php... Creates the top, "header" of the site - usually it contains the logo, name, description of the web resource, as well as a horizontal menu. HTML container is also in this file.
3. footer.php... Contains the code for the footer of the site, its "footer".
4. style.css... Cascading Style Sheets file. Since it is usually large enough style.css well commented. Unfortunately, most often in English, but basic knowledge will be enough to understand which part of the code is responsible for the design of which elements. Read more about CSS here.
This is a must-have core of a WordPress template, but there are usually many more theme files and these are the most common ones.
1. single.php- a separate post.
2. page.php- page.
3. sidebar.php- side panel / panels.
4. archive.php- archives of articles.
5. search.php- search results page.
6. comments.php- output of comments.
7. 404.php- error page with code 404 (File not found).
8. function.php- a file containing the theme's functions. You can add your own PHP scripts to it.
Of course, templates usually contain many more files than described above, but they usually do not need to be edited. In addition, you can find out about the purpose of each file from its name and comments inside.
Editing templates is often required to fix or add something small. Below are some common situations.
Add menu
The menu can be placed not only in the places set by the theme (this is done through widgets), but also in any other part of the site or even on a specific page.
To insert the menu anywhere, add the line:
directly into the page code where you want to place it. The line will work if there is only one custom menu on the site. If there are several, add a line like this to the code:
"Menu_1")); ?>
where instead of Menu_1 you need to enter the name of your menu.
Change 404 page
If the link points to a page or file that does not exist, WordPress takes the user to a 404 error page (File not found). The file is responsible for it 404.php stored in the active theme folder. Often, English text is displayed on the screen, and the desire of the owner of a Russian-language site to translate it into their native language is quite understandable.
To change the content of the page, open the file in the editor 404.php, find the lines with the text that is displayed in the browser and change them (the displayed text is most often enclosed in quotes). For example, in one of the standard themes (twentyfourteen) you will be interested in the following code:
Replace the text in quotes (not where twentyfourteen, but another) with your own and you will get a modified 404 page.
Register copyright
At the bottom of the site, it is customary to write service information, in particular, the years of work of the resource and copyright. In the overwhelming majority of cases, your "label" in the file footer.php are left by the authors of the themes, and the publishers, of course, want to replace this information with their own.
For the "legs" of the site, as we know, the file stored in the root of the active theme is responsible footer.php, and you should look for the code responsible for the copyright in it.
For example, the flat-white theme hides auxiliary information in the following lines of this file:
"title =" (! LANG:"> ">
Russify the text
Often WordPress templates are not fully translated or not translated at all. Knowing the file structure of the theme and the fact that the text shown to the user (if it is not a variable) in the code is always enclosed in quotes, it is easy to find and translate the desired fragment on your own, and you do not have to search for a word manually - for this you can use the automatic search, which is present in each code editor.
For example, in the flat-white template, you immediately want to Russify at least two inscriptions: "READ MORE" and "Leave a Comment", as they can be seen on the main page.

The file is responsible for the main page index.php located in the root of the theme directory, therefore, you need to edit it. But there is no inscription text in it, so you need to understand the code to find out where they are stored. In our case, the file is responsible for the information under the posts on the main page template-parts / content.php connected by string
If you go to it and in the code
text Leave a Comment replaced by