In Photoshop, there are three ways to change (increase or decrease) the size of the brush.
Method 1 - Context Menu
To bring up the Brush context menu, right-click on the image area. A small context menu of the tool will appear, in which the first field is responsible for the size of the brush. In addition, in this horse you can adjust the hardness of the brush (affects how much the edges will be shaded), and also choose the shape of the brush (round, square, artistic, and others).
This method has at least two significant advantages:
- the ability to adjust to a certain size, say, if the diameter is needed exactly 25 pixels. To do this, you only need to enter the required value in the numeric field:
- pre-set the most frequently used brush sizes, so that later you can only select them from the list.
Method 2 - Resize using hotkeys
Hotkeys are a pre-configured combination, when pressed, the program issues the programmed action. By default, Photoshop has the following hotkeys for brush sizes (for an English keyboard layout):
- the [key to decrease the size of the brush;
- key] to increase the brush size.
Hotkeys have always been a technique for quickly performing a certain operation, so if you get used to these combinations or customize them for yourself, then the brush will be very convenient to use, thanks to the quick resizing.
Method 3 - Holding Alt Button
If you press and hold the Alt key, a cursor will appear. This is a quick call to this tool, without selecting it on the panel. That is, when you release the key, the eyedropper disappears and your current instrument remains active.
But! If you press and hold Alt, and at the same time hold down the right mouse button, then moving the mouse to the right will increase the size of the brush, and moving to the left, accordingly, will decrease it.
By the way, the default circle is red. But even this can be customized to your taste. Please select Editing - Settings - Cursors, section View Brush - Color... Pick a new color.
Those who drew in SAI know that it is very conveniently implemented there change brush size in the process of work, without taking the cursor off the canvas. Photoshop without a similar function, as well as for some other functions, is inferior in drawing to SAI.
Recently I found out that there is a similar resizing in Photoshop, although it has not yet been implemented in CS2. With versions CS4 and CS5everything is good.
Description
Holding Alt on the keyboard and clicking the right mouse button, you can change the size of the brush by moving the mouse to the right and left. This is applicable if you have a mouse. Everything is the same with the tablet, except for a small feature.
Customization and use
While holding the pen in hand, there is no way to press the right mouse button - therefore, as a rule, and by default, the actions of the buttons on the tablet pen are set to the events of the left and right mouse buttons.
Holding Alt, just bring the pen to the tablet without touching it, and click the desired button on it to enter the resize mode. In case you touch the surface, then Photoshop will work like an eyedropper and take the color into the set.
Change buttons
In tablet settings can set event pressing the right key to the required button.
02.09.2016 27.01.2018
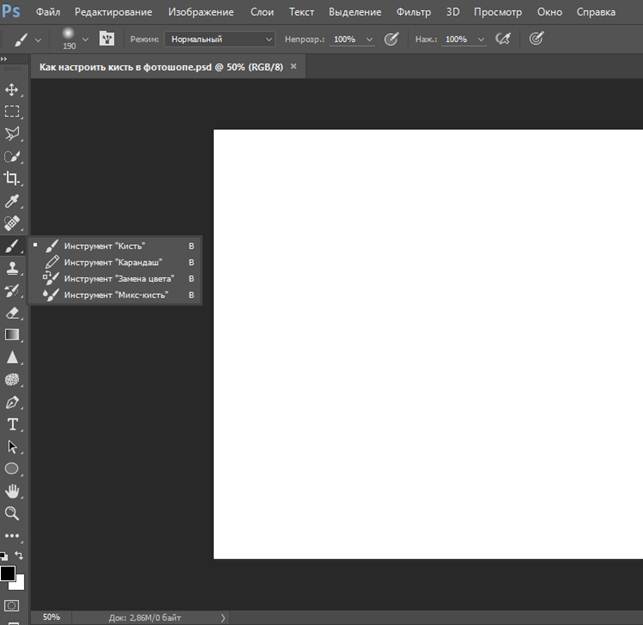
Let's get acquainted, in my opinion, with one of the most important and frequently used tools in Photoshop - the brush, and find out how you can customize it for more convenient work. The brush can be used not only for its intended purpose - in the Brush tool (Brush), the range of its uses is huge - brushes can be used as tools such as Eraser Tool, Burn Tool, Dodge Tool, Smudge Tool, Mixer Brush Tool, Sponge Tool ), Blur Tool), SharpenTool) and a few more . Also the brush can be used on layer mask and in selection mode Quick Mask. We'll look at the brush settings with an example. brush tool, but you must remember that all settings will work even if you choose a brush as any of the above tools.
Well, let's get started. Create a new document in Photoshop 1000x1000 pixels, File-Create (File— New). Size is absolutely not important, you can create a document of any size.
I want to make a small digression and show what I meant when I said that the brush can be selected as other tools. We activate any of the tools listed above, for example, Mix brush (MixerBrush Tool). Tool shortcut key B, to open a drop-down list with subgroup tools, press keyShift and click on the tool group.

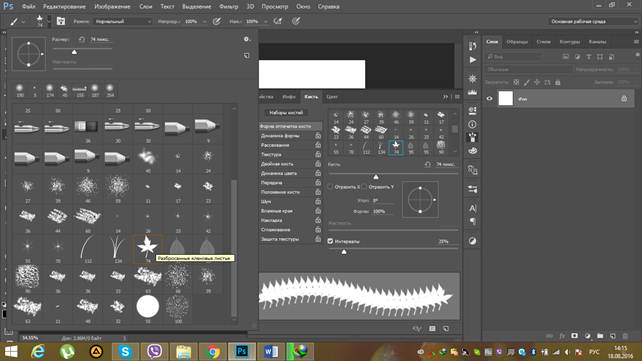
In the top settings panel mix brush tool, there is a brush selection icon in the left corner, the location of the icon is identical for all tools.
After clicking on this icon, a drop-down menu will open where you can select the desired brush:

By clicking on this "gear", you can replace the brushes, load new ones (downloaded from the Internet or standard for Photoshop):

This action will also be relevant when applied to all tools using a brush and, in particular, to the very the Brush tool. Back to tool Brush and its settings. Tool shortcut key B, to select a tool from a subgroup, hold down keyShift and click on the active subgroup of tools, or make a long click with the mouse button on the active subgroup.
For example, I chose the very first brush from the standard set set in Photoshop by default, soft round... Throughout this tutorial, we'll be swapping out the brushes to get a better look at how to customize the brush in Photoshop.

Brushprint shape
There are three ways to call the brush settings menu: click on the icon (see screen), go to the menu Window-Brush (Window-Brush) or press keyF5.

A window with the main brush settings will open, in which you can change:

1. Brush size (point size);
2. Angle and shape of the brush (turn the wheel with an arrow to select these parameters or enter numerical values, you can also "flatten" the wheel - this will change the shape of the brush);
3. Hardness of the brush;
4. Brush spacing. The value of the intervals determines how far the brush prints will lie from one another.
Let's select a brush with a leaf and see how its print will change as the spacing changes. Since the brush has already been set up earlier, first uncheck all the checkboxes in the brush settings panel.

The brushprint preview shows how the brush will look when the spacing is set to 25% :

Let's increase the intervals to 100% :

After changing the size (point) of the brush, this icon with an arrow will become active, clicking on it you can restore the original size of the brush.

Shape dynamics
This tab contains settings for changing the shape of the brush.

Size jitter changes the size of each brushprint, in the drop-down control list, you can select the condition with which the size will change:
Off (Off) - the size will change in a random order
Fade - the size will smoothly decrease for the number of steps that are displayed in the window that appears when this condition is selected:

The remaining three conditions only work when using a graphics tablet:
Pen pressure - the size will change depending on the pressure on the tablet pen.
Pen tilt) - the size will fluctuate depending on the tilt of the tablet pen.
Stylus Wheel - here one tablet is not enough to adjust the size, you also need to have a special airbrush pen for the tablet.
If you do not have a pen tablet and choose one of these three options, a triangle icon with an exclamation mark inside will appear to indicate that this feature is not available.
The conditions under which the parameters of the brush will change will be encountered more than once in other tabs with brush settings, but we will not focus on them - firstly, they are identical (using the pressure of the pen, the size or opacity will change, for example) , and secondly, their name immediately makes it clear on what action this or that condition depends.

Minimum Diameter -using this parameter, you can adjust the percentage to which the brush will be reduced in size.
Angle Jitter -changes the angle of inclination of the brush print. As in wobble, there are conditions for adjustment.
Roundness Jitter- each stroke changes its shape, as when applied warp tools. For additional settings, use the parameter Minimum Roundness- it allows you to adjust how much the shape will be distorted. Also, as in the previous parameters, you can configure changes in the form from some conditions.
ReflectX fluctuations (FlipX Jitter)- reflects individual brush impressions horizontally, respectively, Reflect Flip Y Jitter - reflects vertically.
Scattering
Scatter brush strokes randomly across the layer. Used to draw stars, leaves, etc.
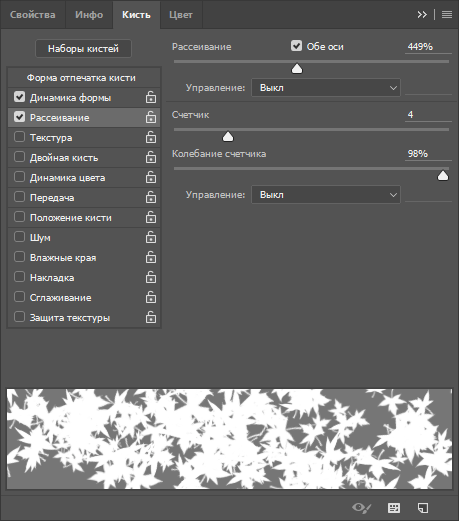
With the scattering value 250-350% or more brushes will be scattered along the line drawn by the mouse across the canvas.
Parameter checkbox Both Axeswill allow you to make an offset of prints along both axes, if it is inactive, then the offset occurs only vertically.
Counter (Count) - allows you to adjust the number of scattered prints. The higher the counter values, the more brush impressions will be scattered.
Count Jitter) - allows you to make the spreading uneven.
Texture
When enabled, a texture is added to the brush.
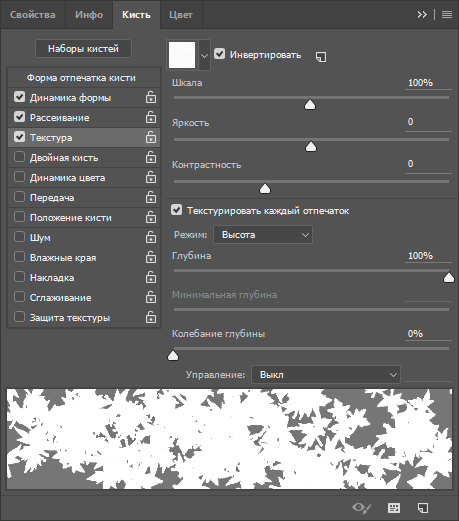
You can select a texture by clicking on the icon:

This is what a black brush stroke looks like without texture (above) and with the Ant Farm texture added from the standard set of patterns (textures):


Scale- allows you to change the scale of the texture pattern.
Parameters Brightness and Contrast allow you to adjust the brightness and contrast of the texture.
Checking a parameter Texture Texture Each Tip opens additional settings:
Mode - changes the texture blending mode, the modes are similar to the layer blending modes.
Depth- adjusts the clarity of the appearance of the texture.
Depth fluctuations (Depth Jitter)- allows you to change the intensity of the previous parameter.
Dual Brush
Lets you get an impression of two brushes at the same time, while the second brush is subtracted from the first. The second brush can be selected from the brush library in the preferences window.
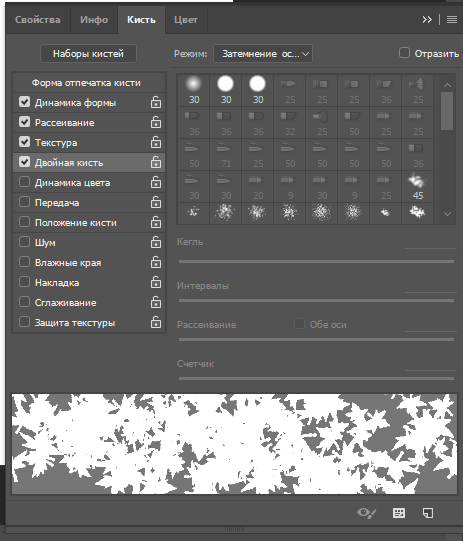
In the settings, you can select the subtraction mode (the modes are similar to the blend modes of layers), as well as adjust the settings already familiar to us - size, spacing, dispersion and counter.
Here are some figures of an indefinite shape, if you add a flattened brush to the brush with leaves and play with the settings:
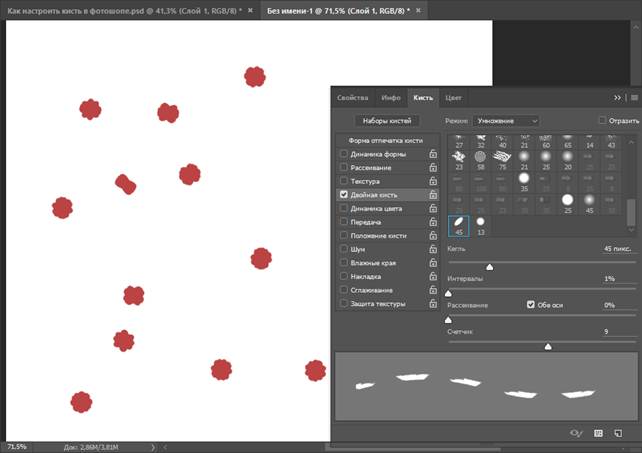
Color Dynamics
Allows you to randomly change the color and opacity of each brush print.

For the function to work, you must first set the foreground and background colors in toolbars.
We'll turn off some of the settings, and we'll change some to get a better look at how this setting works. I changed the foreground color to red, background color - on yellow.


Let's move the mouse across the canvas from left to right and this is what we get:

With active parameter Apply for the tip color changes will be applied on each print while drawing the line continuously as we did above. If the parameter is disabled, to change the color, you will have to click with the mouse for each element, in our case a leaf, which makes the work much more difficult and takes more time, but you will be able to control the position of the brush.
Fluctuating foreground and background, hue, saturation, brightness and clarity can be adjusted to your liking. There are no clear rules, everything is taken by trial, in the preview window of the brush you can see how it will paint.
Transfer
In earlier versions of the Photoshop program, the parameter is named Other Dynamics. This parameter controls the opacity and the amount of ink in the brush prints.

Let's add such settings to the parameters from the previous step in the tab Transmission:

Move the mouse from left to right again. Here's what happened:

Brushprints changed opacity and ink amount unevenly.
Hand position ( Brush position )
A new parameter added to Photoshop not long ago. Allows you to control the tilt and position of the brush, simulating effects similar to drawing with the pen of a graphics tablet.
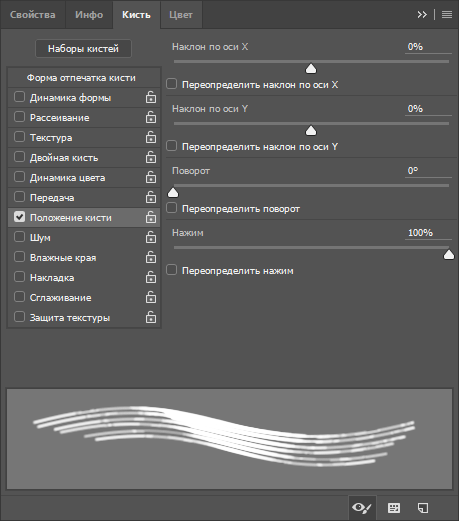
Used for custom standard brushes recently added to Photoshop:

Other brush parameters without additional settings:
Noise - adds noise to brush strokes.
Wet Edges - Gives the effect of a watercolor painting by accumulating paint along the stroke.
Airbrush- Simulates airbrush painting thanks to pressure sensitivity. Compliant parameter Airbrush on the top toolbar of the Brush tool.
Smoothing - makes brush strokes smooth, soft, used when drawing with a pen on a graphics tablet.
Protect Texture - allows you to give the same scale and pattern to all texture brushes.
During the lesson, you probably paid attention to the "locks" for each brush parameter?

By default, the locks are not closed, which means that you can change the brush settings. If you select a different brush, the settings will automatically disappear and the new brush will have the default settings. To save the brush with the settings that you applied, "close" the locks (by clicking on them) and click on this icon:

A window will appear in which you can name the new brush and select whether to keep the brush size:
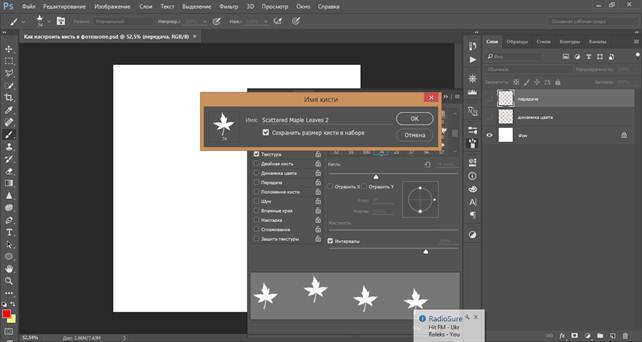
The brush will appear in palette of brushes the most recent, you can select it and use it at any time, without spending time again on setting.


A window for managing brush sets will open:
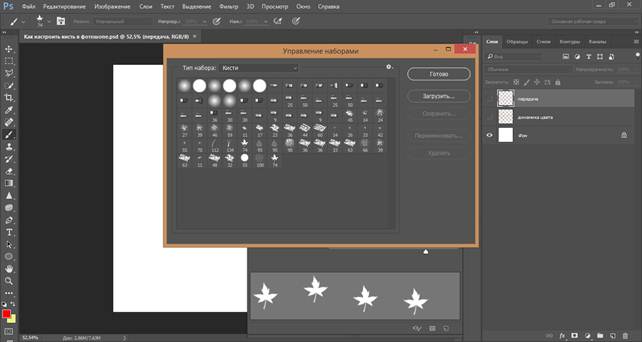
In it, select the desired brush or several brushes that need to be saved (several brushes can be selected using keysCrtl, as in a normal Windows explorer), then click on save button:

Name your brush or set and save to your computer.

Now you have learned how to set up a brush in Photoshop. I hope the lesson was useful to you, but after reading the dry letters I urge you not to be afraid to experiment and move the sliders yourself, change the settings and paint with a brush - this way the material will fix much faster. Success and inspiration!


