Hello.
Almost every user sooner or later is faced with reinstalling Windows (viruses, system errors, buying a new disk, switching to new hardware, etc.). Before installing Windows - the hard drive must be formatted (modern Windows 7, 8, 10 OS offer to do this right during the installation process, but sometimes this method does not work ...).
In this article, I will show you how to format a hard drive in the classic way through BIOS (when installing Windows), and alternatively, using an emergency flash drive.
1) How to create an installation (bootable) USB flash drive with Windows 7, 8, 10
In most cases, the HDD hard drive (and SSD too) is easily and quickly formatted during the Windows installation phase (you just need to go to the advanced options during installation, it will be shown below in the article). With this I propose to start this article.
In general, you can create both a bootable USB flash drive and a bootable DVD (for example). But since recently DVD drives are rapidly losing popularity (in some PCs they are not at all, and in laptops, some put another disk instead of them), then I will focus on the flash drive ...
What you need to create a bootable USB drive:
- bootable ISO image of the desired Windows OS ( where can I get it, explain, probably not necessary? 🙂);
- the bootable USB flash drive itself, at least 4-8 GB (depends on the OS you want to write to it);
- program Rufus (off. site) with which you can easily and quickly write an image to a USB flash drive.
The process of creating a bootable USB drive:
- start the Rufus utility and insert the flash drive into the USB port;
- then in Rufus select the connected USB flash drive;
- specify the partition scheme (in most cases it is recommended to set MBR for computers with BIOS or UEFI. What is the difference between MBR and GPT, you can find out here:);
- then select the file system (NTFS is recommended);
- the next important point is choosing an ISO image from the OS (specify the image that you want to burn);
- in fact, the last step is to start recording, the "Start" button (see the screenshot below, all the settings are indicated there).
Parameters for creating a bootable USB flash drive in Rufus.
After 5-10 minutes (if everything is done correctly, the flash drive is working and no errors occurred) the bootable USB flash drive will be ready. You can move on ...
2) How to configure BIOS to boot from a USB flash drive
In order for the computer to "see" the USB flash drive inserted into the USB port and be able to boot from it, it is necessary to correctly configure the BIOS (BIOS or UEFI). Despite the fact that everything in Bios is in English, it is not so difficult to set it up. Let's go in order.
1. To set the appropriate settings in BIOS - it is impossible to enter it first. Depending on the manufacturer of your device, the login buttons may vary. Most often, after turning on the computer (laptop), you need to press the button several times DEL (or F2). In some cases, the button is written directly on the monitor at the first boot screen. Below is a link to an article that will help you enter Bios.

How to enter BIOS (buttons and instructions for different device manufacturers) -
2. Depending on the version of BIOS, the settings can be very different (and there is no universal recipe, unfortunately, how to configure BIOS to boot from a USB flash drive).
But generally speaking, the settings are very similar for different manufacturers. Need to:
- find the Boot section (in some cases Advanced);
- first turn off Secure Boot (if you created a USB flash drive as described in the previous step);
- then configure the boot priority (for example, in Dell laptops, this is all done in the Boot section): put USB Strorage Device in the first place (i.e. bootable USB device, see the screenshot below);
- then press the F10 button to save the settings and restart the laptop.

Configuring BIOS to boot from a USB flash drive (using a Dell laptop as an example).
For those who have a slightly different Bios from the one shown above, I suggest the following article:
- setting up BIOS for booting from flash drives:
3) How to format a hard drive with Windows Installer
If you correctly recorded the bootable USB flash drive and configured BIOS, then after restarting the computer, the Windows welcome window will appear (which always pops up before starting the installation, as in the screenshot below). When you see such a window, just click next.
Starting Windows 7 Installation
Then, when you reach the installation type selection window (screenshot below), then select the option complete installation (i.e. with setting additional parameters).
Further, in fact, you can format the disk. The screenshot below shows an unformatted disk with no partitions on it yet. With it, everything is simple: you need to click the "Create" button, and then continue the installation.
If you want to format the disk: just select the desired partition, then click the "Format" button ( Attention! The operation will destroy all data on the hard drive).
Note. If you have a large hard drive, for example 500 GB or more, it is recommended to create 2 (or more) partitions on it. One partition for Windows and all programs that you install (50-150 GB is recommended), the rest of the disk space for another partition (s) - for files and documents. Thus, it is much easier to restore the system's performance in case of, for example, Windows refusal to boot - you can simply reinstall the OS on the system disk (and files and documents will remain intact, since they will be on other partitions).
In general, if your disk is being formatted through the Windows installer, then the task of the article is completed, and below will be a method of what to do if you cannot format the disk ...
4) Formatting the disk via
AOMEI Partition Assistant Standard Edition
Program for working with drives with IDE, SATA and SCSI, USB interfaces. It is a free analogue of the popular Partition Magic and Acronis Disk Director programs. The program allows you to create, delete, merge (without losing data) and format hard disk partitions. In addition, the program can create a bootable emergency flash drive (or CD / DVD disk), booting from which, you can also create partitions and format the disk (i.e. it will be very helpful in cases where the main OS is not loaded). All major Windows operating systems are supported: XP, Vista, 7, 8, 10.
Creating a bootable USB drive in AOMEI Partition Assistant Standard Edition
The whole process is very simple and straightforward (especially since the program supports the Russian language in full).
Usually, it is recommended to format the hard disk before using any computer equipment. This procedure must be followed by every PC owner. Due to the special quality and volume inherent in today's hard drives, they can be freely used throughout the entire period of use, without resorting to additional reformatting.
Why formatting is required
In some cases and over the course of a certain period of time, it is necessary to format the hard disk (hard disk), as this makes it easy to update it. Due to the fact that the Windows operating system sometimes clogs up, that is, it contains irrelevant, old and not used files on the disk, formatting will be very useful. It will help get rid of files that take up some amount of memory space and can have a negative effect on the productivity of the system.
For their convenience, PC owners periodically install and remove the applications they need from their computer. As a result, a file dump arises and grows intensively, provoking serious problems: each application, becoming part of the OS, affects the configuration of the entire environment. The solution to format the hard disk drive (hard disk) after certain time intervals and reinstall the operating system will help to effectively solve this problem in the most optimal way.
Despite the radical nature of this method, it is the most effective, because not only useless files are destroyed, but also malicious programs and viruses. For this reason, it is recommended that before formatting the hard disk, overwrite the main data on some other media so as not to lose it.
It should be noted that during formatting, service marks are created on the hard disk sectors, which are necessary to search for data and work correctly with them (reading, writing, deleting). In addition to this procedure, during formatting, service information is created for the file system. Due to the fact that unallocated disks are useless for use, formatting acts as a first-priority operation to prepare a new “raw” disk for successful work.
Thus, to reduce the risk of losing important data in the indefinite future, formatting will help to achieve:
- guaranteed quick cleaning of the hard drive;
- effective detection of the presence of bad blocks (bad sectors of the disk);
- high-quality monitoring of all kinds of defective areas.
Formatting Quick or Simple: Process Analysis
The user has two types of formatting according to the capabilities of Windows OS - fast (Quick Format) or normal (Format). The uninitiated user will see the difference in them only in the time spent on the execution of each of these processes. But besides the visible factor, there is a more significant difference.
Fast formatting is a special method of disk cleaning that allows you to create a file table without overwriting it, as well as deleting information on the hard disk. Fast formatting is faster than normal formatting in time. As such, quick formatting only resets the file table: important data can be recovered - it is not destroyed. This method is appropriate when the user is sure that there are no damaged segments and the hard drive has not been previously formatted.
Relying on the usual formatting, the PC owner always completely empties the disk from files and checks it for the likelihood of incorrect, damaged segments. This is exactly the verification time and stretches, affecting the total duration of the entire process.
We have discussed high-level formatting above, but practice shows that understanding the term low-level formatting is no less popular. When performing such an operation, special markings are applied to the disk plane, which are necessary for the standard operation of the drive. It also allows not only to save data and have open access to it, but also to ensure the correct operation of the drive's internal circuits, in addition to hiding the existing mechanical surface flaws.
Is the data recoverable after formatting
Low-level formatting does not provide for the ability to restore previous information.
High-level formatting, in turn, gives significant chances to partially recover the erased data. This is explained by the fact that at the time of formatting, new logical structures appear with selective rewriting of data.
Formatting options: a hands-on tour
It’s better to format your hard drive yourself if you go from theory to practice. Let's take a look at several methods, moving from the simplest and most straightforward to the most complex.
Formatting options:
- The simplest formatting technique: by opening “My Computer”, right-clicking on the required formatting type, in the menu that appears, select “Format” and the “Start” button.

- A special way in Windows: Open "Start" and follow the "Control Panel" to the file "Administrative Tools", select "Computer Management", and then "Disk Management". We find the required disk and for formatting we perform the operations presented in a simple technique.
Important: There may be slight differences in the path depending on the version of Windows.
- Command line: by pressing "WIN + R" and in the pop-up window, writing CMD followed by pressing ENTER, open the command line.

- We register there: fоrmat d: or format c: to start the process relative to the D: \\ or C: \\ drive. After entering, by pressing ENTER you will see on the display: “ATTENTION, ALL DATA ON THE REMOVABLE DISK C: WILL BE DESTROYED! Start formatting? "
 When ready to delete data, select Y and press ENTER.
 - When there is a removable media with an operating system installation file. Those who have an installation disc and are familiar with installing Windows probably know when is the best time to format discs. Perhaps this approach is used by few people only for formatting. However, it is very convenient if, after the procedure, the user is going to reinstall Windows.
User question
Hello.
I want to completely delete all content on the disk and then reinstall the system. I have two drives ("C:" and "D:") - I was able to format one, but the problem with the "C:" drive. Can you tell me how you can format the system hard drive (on which Windows 8 is installed)?
Good day to all!
In general, on today's modern system, starting disk formatting is not a difficult operation, I would even say simple (not what it was 20 years ago). Perhaps, questions arise only when Windows does not see the disk, errors appear during formatting, or when you try to format the system disk (as in your case).
In the article below I will analyze several formatting methods - depending on your tasks and the specific problem, select the one you need. So...
Important : After formatting the drive, all information on it will be deleted! Make a copy of the necessary files from the disk to third-party media in advance.
From under Windows
Via My Computer
Probably the classic and easiest way to format a disk is to go to "My Computer" (or "This Computer", depending on the version of your OS), find the desired disk partition in it. Then select this section, right-click on it - and in the context menu select the required (i.e. formatting, see screenshot below).
Note: if the "My Computer" icon is not on the desktop, and you do not know how to open it, press the button combination WIN + E - the explorer will open: on the left in the menu, select the link to "My computer / This computer".

Format disk // This computer // Windows 10
- file system: FAT 32, NTFS, exFAT, etc. In most cases, the best option for a hard disk is to use NTFS;
- allocation unit size: 4096 bytes (the best option);
- volume label: disk name, you can enter any (I recommend using the Latin alphabet, because some programs do not read the Russian font correctly).

In general, the default settings are usually suitable for most users - you can immediately click the "Start" button. In a few minutes you will get a "blank" disk ...
Through disk management
In those cases when you went to "My Computer" - and it simply does not show your connected disk (this often happens with new disks that have not been formatted) - then you need to use either special utilities or use the "Disk Management" tool built into Windows.
To open Disk Management, you need:
- press a combination of buttons WIN + Rto open the Run window;
- enter command diskmgmt.msc and press Enter. The Disk Management application should open.
Next, you will see not only all connected disks, flash drives, memory cards, etc., but also which partitions were created on them - i.e. the whole structure. Select the desired section, and right-click on it - in the context menu, click on the item "Format..." (see red arrows on the screenshot below).


Through the command line
In cases where the explorer freezes (for example), also in case of various kinds of errors, you can try to format the disk through the command line.
First you need to open it as an administrator. For this:

format G: / FS: NTFS / q
G: - the letter of the formatted disk (specify carefully!);
/ FS: NTFS - select a file system;
/ q - fast formatting.

Basically, the disk needs to be formatted.
In Windows 10, by the way, a small "error" may appear - the system will ask you to specify the volume label for the disk, and then write that "An invalid disk label is specified" (although you seem to have indicated everything correctly, the example below).

In this case, do the following ...
First, open the drive you want to format in a command line, for example, a drive G: (see screenshot below).

Command VOL - look at the volume label
Next, enter the formatting command again, and in the disk label field - the label that we recognized in the previous step (in my case - Windows 8). Next, you will be warned that all data will be destroyed during formatting (agree by entering y and pressing Enter ).
In the next step, you will be prompted to enter a volume label - now you can specify any name (32 characters). You can simply leave the field blank by pressing Enter. Actually, that's it - the disk will be formatted (screen below).

With the help of specials. utilities
The best programs and utilities to work with your hard drive:
Now there are hundreds of different programs and utilities for working with hard drives. Operations such as formatting, splitting, defragmentation, and so on can be done in more convenient programs than those built into Windows. The link to the article with the best of them is given above.
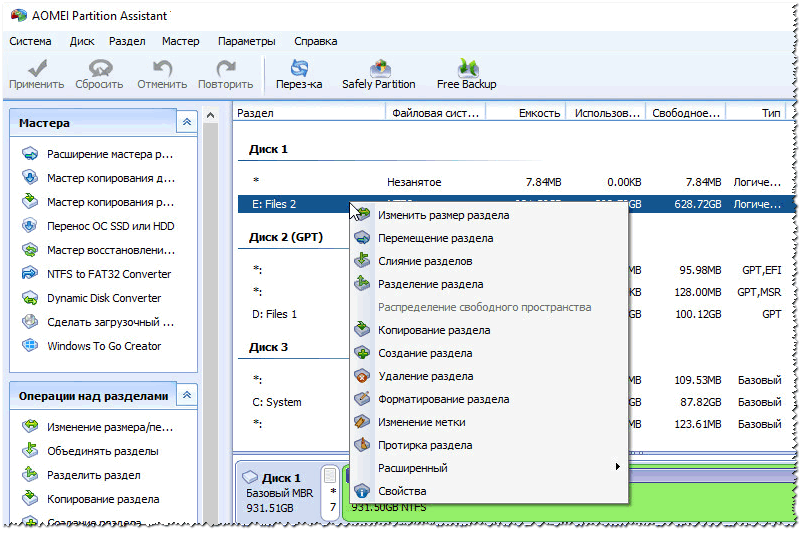
In my opinion, one of those that deserves attention is AOMEI Partition Assistant.
AOMEI Partition Assistant
It allows you to quickly, safely, and easily carry out the most necessary operations with disk drives:
- resize their partitions (including formatting);
- move partitions;
- merge sections;
- format drives;
- change labels and more!
What else is captivating, the program has many different step-by-step wizards - they will help solve the problem even for those users who have just recently got acquainted with a PC. Well, for example, you can convert the FAT 32 file system to NTFS without losing data, transfer Windows from your hard drive to a newfangled SSD, etc.
Via BIOS
(for formatting system partitions, for example, on which Windows is installed)
If you want to format the partition on which Windows is installed, then you simply cannot do it. The bottom line is that you need to boot from another media - for example, from another hard disk (on which Windows is installed) or from a bootable USB flash drive, and then format your disk.
Naturally, you need to prepare such media in advance (for example, an installation USB flash drive with Windows) - since after formatting the system partition of the drive, Windows will no longer boot from it (do not install it again yet. Cluttered explained, but in general terms, I think it's clear ☻).
Using a Windows installation stick
The easiest way to format a system disk partition is to use a Windows installation flash drive. You can find out how to create and prepare it (if you do not have it) from my previous articles (I give links below).
Utilities for creating bootable USB drives with Windows -
Create a bootable Windows 10 USB stick -
Creating a bootable USB drive for installing Windows XP, 7, 8, 10 (UEFI and Legacy) -
The easiest way to boot from a USB flash drive is to use a special boot menu - BOOT MENU, which can be called immediately after turning on the computer / laptop (or by changing the boot priority in the BIOS). In order not to repeat myself here, I will give a couple of links to detailed articles about this.
Hot keys for entering the BIOS menu, Boot Menu, recovery from a hidden partition -
How to configure BIOS to boot from USB stick or disk (CD / DVD / USB) -
Further, having booted from the installation flash drive, you need to go to the selection of the partition for installing Windows. In this step, you can format both the entire disk as a whole (delete all partitions and recreate them as well), or individual partitions.

If there are difficulties, and you do not know how to get to this step when installing Windows, I recommend that you read this article:
With the help of specials. programs
Take the same AOMEI Partition Assistant that I recommended using when working from under Windows, just above in the article. She has in her arsenal an excellent tool for creating a special emergency flash drive from which you can boot when your system has flown (or it is not installed on the disk at all).
I have an article on my blog about programs for working with hard drives: (including about AOMEI Partition Assistant).
To create such a USB flash drive, you need to run on your working PC in the program "Master / Make Bootable CD Master".


To boot from such a flash drive - use too Boot Menu, links to instructions are given above in the article, in the previous step. When you boot from the emergency flash drive, the menu and the program will be similar to the one that works from under Windows. Also click on the required disk and perform the required operation (screenshot below).

AOMEI Partition Assistant - partition formatting
That's all, for the addition of a separate merci.
There are times when we need to format the hard drive via Bios. This may be needed immediately after purchasing a new hard drive, when installing or reinstalling an operating system, or as a virus-fighting tool. In this article, I will tell you how to format a disk through a BIOS, introduce the reader to various methods of this formatting, and also describe programs for formatting through a BIOS that will help us with this.
If you want to know how to enter BIOS, we have collected everything for each device for you.
Usually, the need for clearing through BIOS arises in a situation where full access to the appropriate Windows OS toolkit is impossible, and everything must be done from scratch. I'll make a reservation right away that the companies that developed the existing BIOS versions - Award Software (AwardBios), American Megatrends (AmiBios), Phoenix Technologies (PhoenixBIOS) and others did not include a tool for formatting the hard drive in their bios versions, while access to the hard drive in the BIOS available by default.

Consequently, "formatting the hard drive through the BIOS" is possible only conditionally, in this algorithm it acts only as a logistic link, allowing the user to use it to perform the necessary operations to format the hard drive.
I'll make a reservation right away that formatting (especially complete) completely deletes all information on the disk being formatted, so if you have something valuable there, then before formatting it, it is better to copy it to a USB flash drive, another hard disk, send it to the cloud, and so on.
Supporting toolkit
To format, we need a program that will help format the hard drive. Such a program is usually included in the boot disk (flash drive) along with the operating system installer, it is also included in the system recovery disk programs (Live CD), in addition, it can be separately or on a disk.
Using the command line
After you have decided to format the hard disk, you can select the auxiliary toolkit. The easiest option is to use a regular Windows boot disk, which almost every user has. To use its capabilities, we need to run it through the BIOS.
- To do this, we restart the computer (if it was turned off, turn it on), and immediately after the start, quickly press the button responsible for entering the BIOS several times - usually this is the "Delete" key, but there are also variations with the F8, F12, Ctrl + F2 keys and Escape.
- After entering the BIOS, go to the Boot tab, select the "Boot Device Priority" item in it and press "Enter".
- Install our CDROM or DVDROM as the main boot device (in the first place), click on F10 and save our changes by clicking "OK".
- The computer will start to boot and the message "Press any key to boot from CD or DVD" will appear in front of you. Press any key.
- On the language selection screen, press Shift + F10, which will give you access to the command line. If you are a Windows 8 user, then follow the path select language - diagnostics - advanced features - command line.
- In the command line, type the following command (instead of C, you can put down another partition of your hard disk - D, E, etc.):
format / FS: NTFS С: / q - fast format in NTFS system
format / FS: FAT32 С: / q - fast format in FAT32
It can be written even easier, for example: format c: / q
Click "OK" and wait for the end of the formatting process.

Using the capabilities of Windows Installer
We can also use the built-in capabilities of the Windows Installer to format the hard drive through BIOS (new version). We also run through the BIOS as in the previous case, only in the language selection menu of the Windows installer, click "Next". Then we select "Full installation", select the disk for formatting (click on it), then click "Disk Setup" and there we select the "Format" item.
Formatting from a USB flash drive
As a bootable tool with Windows installation, you can use a flash drive that contains the Windows installation. In this case, the flash drive itself must be made bootable using special programs (for example, UltraISO). Although sometimes just copying the Windows installer onto a USB flash drive and launching it from the BIOS is enough. Do not forget to make the flash drive the first bootable device in the BIOS as shown above (sometimes in the menu item "Hard Disk Drive, you need to specify the flash drive as the first, and CD (DVD) as the second).
We use the program Acronis Disk Director Suite
This program is usually included in the complex LiveCD and other assemblies of Windows, and is an auxiliary utility for working with a hard drive. After starting the application, select the hard drive you need to format, right-click on it, in the menu that appears, click on "Format", select the type of file system and confirm the operation by clicking "Run". After the end of the operation, we reboot.
Visually, the methodology of this program can be viewed in the video:
Paragon hard disk mananger
An alternative to the previous one, a program with good functionality and good work experience. The algorithm for working with it is similar to the previous program - select the disk - right mouse button - Format Partition - select the file system - Format. After completion, we reboot as usual.
DBAN
You can also use the free DBAN tool that easily cleans and formats your hard drive. To use its functionality, this program must be made bootable from a USB flash drive, the appropriate software will help us with this (for example, Universal USB Loader).
How it looks visually shown in the video:
Conclusion
As we can see, the formatting of the hard disk through BIOS is carried out using auxiliary tools in the form of a boot disk or flash drive, on which the Windows OS installer is installed. The capabilities of the latter make it easy to install, both using the command line and using the Windows installer itself. At the same time, there is always an alternative in the form of various auxiliary programs included in various LiveCD assemblies, these tools are quite enough for easily and quickly formatting the hard disk we need.
First, let's figure out what a computer hard drive is and why you need it. You can find more details in our special article on the computer hard drive and the history of its origin. For now, let's give a simple definition.
So, a hard disk (hard, hard drive, HDD or screw) is a computer storage device, on which information is written, stored and deleted using read / write heads as needed.
It is logical that the question immediately arises: how is information stored on a hard disk and how is it structured there? Therefore, in order to understand how to format a hard drive, you must first familiarize yourself with the concept itself.
In short, formatting a hard disk refers to the process of partitioning any storage devices. These can be hard disks, flash drives, floppy disks, and optical disks.
The process itself is usually divided into 3 stages:
- low-level formatting
Produced at the plant using special equipment. The so-called servo marks are applied to the surface of the disc. They are needed for further positioning of the HDD readheads. The new out of the box hard drive is low formatted.
- dividing the entire HDD memory area into logical partitions or disks
Creation of the familiar to everyone drives C, D, E, etc.
- high-level formatting

After creating a logical partition (disk), it must be formatted. Those. select a file system, create a file table with system information. The entire disk space is divided into clusters of a given size. The default is 4KB.
By definition, a cluster is the minimum amount of information allocated for storing data. For example, if you have a file of 10 Bytes, then a whole cluster will still be allocated for it, i.e. 4.000 Bytes.
In turn, there are two types of high-level formatting:
- swift
Only the file table is updated. All recorded files remain in their places. But since the file table is new, the operating system "thinks" that the partition is empty and starts writing new information over the old one.
- complete
During full formatting, not only the file table is deleted, but the entire partition is checked: unreadable clusters are "discarded" and the operating system will no longer write information to it. This process can take several hours.
Due to the fact that even with full formatting the information is not deleted from the hard disk, the data can be restored in whole or in part.
Ways to format the hard drive
When might we need to format a hard drive or partition? It can be buying a new HDD, reinstalling the OS, or simply getting rid of viruses and unnecessary information quickly and reliably. Let's consider several simple and convenient ways that allow you to do this yourself, without going to urgent computer repair.
We use the tools of the Windows operating system
As an example, we will show how to format a hard drive in windows 7 (in other operating systems, the steps will be similar).
- We open "My Computer". And right-click on the desired (or unnecessary) section.
- In the drop-down menu, select the item "Format"