Как обычно и происходит с паролями, вы можете потерять, забыть пароль, уволить единственного сотрудника который его знал и многое другое. Что же делать если это был root пароль на VMware ESX Server? Каким образом можно его сбросить? Читайте статью дальше и вы узнаете что можно сделать.
1. Перезагрузите VMware ESX Server
Если вы не знаете пароль root на ваш VMware ESX Server, и у вас нет паролей на эквивалентные руту учетные записи, тогда первое что вам необходимо сделать - перезагрузить VMware ESX Server.
2. Нажмите"a" для модификации загрузки ядра
Как только появиться меню GRUB, нажмите "a" для модификации загрузки:
3. Входим в single user mode
В конце строки с аргументами ядра введите "single" и нажмите Enter:

4. Меняем пароль
Теперь мы можем изменить пароль root с помощью команды passwd:

Вам необходимо дважды ввести новый пароль.
5. Перезагрузите ESX Server
После изменения пароля перезагрузите сервер для возвращения в multi-user mode.

Добрый день!. В прошлой статье я вам подробно описал установку и настройку VMware ESXI 6.5 , где один из моих подписчиков попросил меня осветить вопрос, помогающий восстановить забытый пароль root от хоста . В сегодняшней заметке я подробно опишу механизм позволяющий сбросить пароль ESXI 6.5 , для старых версий или более новых, все будет так же актуально. Уверен, что если вы хоть и помните все пароли, знать такую функциональность полезно, никогда не знаешь, где это может пригодиться.
Описание задачи
В каких случаях у вас может не быть пароля от root на вашем гипервизоре VMware ESXI:
- Вы пришли в новую компанию, где вам прежний ответственный сотрудник не передал паролей. Это может быть по ряду причин, очень частые случаи, когда людей увольняют и им, это конечно же не нравится, в следствии чего они уходят, прихватив с собой все пароли и не сообщив их руководству, вы как новичок будите козлом отпущения, так как теперь за это ответственны вы.
- Банально, но вы его утеряли или забыли пароль, очень частая история, когда установили ESXI-хост, настроили его и ввели в эксплуатацию. Крутятся там виртуальные машины и не мешают вам, а пароль в веб-интерфейс вообще может быть запомненным в браузер или сервер вообще управляется, через vCenter 6.5.
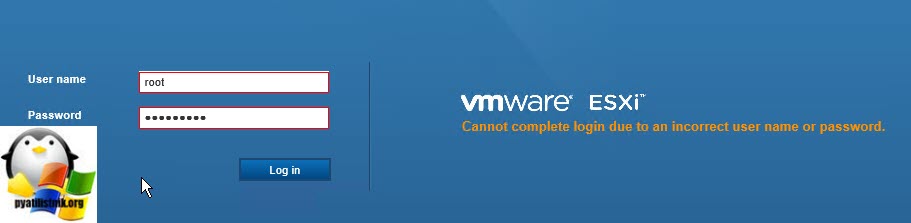
Вот так вот выглядит проблема с авторизацией на ESXI хост, когда не получается указать верные данные.
Вот так, это выглядит в консоли:


Cannot complete login due to an incorrect user name or password
Методы сброса и восстановления пароля VMware ESXI

Сбрасываем пароль root в VMware ESXI 6.5, через Live-CD
Про первый метод, смысла не вижу повторять материал, все можете прочитать по ссылке выше, давайте разбирать с вами второй метод, с загрузычныс CD и флешки на его основе.
Первым делом вы должны скачать себе любой из любимых вашему сердцу LIVE-CD, я использую обычно Slax так как он маленький, Ubuntu, Kali Linux или Fedora-Workstation-Live-x86_64, но список огромен.
Вот вам полезный ресурс, который объединил в себе список всех Live-CD различных разработчиков https://livecdlist.com/

Далее вам необходимо загрузить ваш ESXI-хост с данного Live диска, если у вас есть на ваших серверах порты управления (IDRAC , IMM , IPMI , ILO), то там есть возможность в виртуальной консоли смонтировать ISO-образ, если же на сервере портов управления с активными лицензиями на монтирование нет, то ваш путь это загрузочная флешка Rufus .

Изменение пароля root через LIVE-CD CentOS
Когда загрузочный носитель подключен к серверу, то перезагружаем ваш ESXI хост. Я приведу пример с LIVE-CD CentOS.
Мой загрузочный LIVE-CD CentOS выдает вот такое приветственное меню, у других дисков будет свое. Выбираете режим "Troubleshooting".


В момент загрузки у вас появится мастер быстрой настройки, на первом шаге которого нужно выбрать язык внутри операционной системы, я оставлю английский. Жмем "Next"


При желании вы можете подключиться к вашим онлайн ресурсам, через популярные сервисы, типа Google или Microsoft.

Все готово, нажимаем "Start using CentOS Linux".

У вас появится вот такой рабочий стол.

В самом верху нажимаем кнопку "Application" и в открывшемся окне выбираем иконку терминала "Terminal".

У вас откроется окно командной строки, по умолчанию вы будите там с правами обычного пользователя, чтобы повысить себе права до уровня администратора, введите команду:

Теперь вам необходимо получить список разделов, которые видит ваша система, для этого есть команду:

На выходе вы получите список ваших разделов в виде списка устройств с именем /dev/sda и списка по номерам, где вы будите видеть их размер и тип файловой систему, FAT16 может называться Microsoft basis.
Если у вас GPT разметка, то вы можете воспользоваться утилитой parted.
Пишем parted и нажимаем Enter, в итоге вы войдете в интерфейс утилиты, далее для вывода списка введите /dev/ print
Model: VMware, VMware Virtual S (scsi)
Disk /dev/sda: 75.2GB
Sector size (logical/physical): 512B/512B
Partition Table: gpt
Disk Flags:
Number Start End Size File system Name Flags
1 32.8kB 3146kB 3113kB fat16 boot
5 4211kB 265MB 261MB fat16
6 266MB 527MB 261MB fat16
7 528MB 643MB 114MB
8 644MB 943MB 299MB fat16
9 944MB 75.2GB 74.2GB

Как видите тут вывод уже более информативный и партиции отображаются с правильной разметкой.
Теперь как понять какой раздел из /dev/sda нам нужен. Для этого я вам напомню из каких разделов состоит диск на котором установлен VMware ESXI 6.5 или другой. Вот так вот схематически выглядит схема разделов на том диске, где у вас установлен VMware ESXI.

- Раздел system boot, это главный загрузочный раздел
- Раздел bootbank , тут располагается сам образ дистрибутива Vmware ESXI, который при загрузке попадает в оперативную память сервера
- Раздел altbootbank, это запасной раздел, дублирующий bootbank, на случай выхода его из строя, некая отказоустойчивость, например, при обновлении, данный раздел помогает восстановить и сделать откат ESXI -хоста.
- vmkDiagnostic, тут у вас будут располагаться дампы системы, на случай пурпурных экранов смерти (purple screen)
- Раздел store , необходим для хранения пакетов VMware Tools
- scratch, логи VMware ESXI если у вас раздел более 5 гигабайт, то он создастся и на нем будут располагаться -хоста
Логично предположить, что нас с вами будет интересовать область bootbank, она приблизительно будет весить 260-261 мегабайт. Обычно, это первый из двух разделов, в моем случае, это /dev/sda5 . Я буду монтировать именно его. Для того, чтобы смонтировать неактивный диск (раздел) в Linux, существует команда mount.
Пишем в терминале команду mount /dev/sda5 /mnt
И посмотрите его содержимое с помощью команды ls, нам нужно удостовериться, что есть файл state.tgz

Теперь нам нужно скопировать данный файл в какой-нибудь каталог, там распаковать его, внести изменения и вернуть на место. Делаем вот, что:
Переходим в каталог tmp, через команду cd /tmp
Командой tar xzf /mnt/state.tgz производим извлечение архива в каталог /tmp
Если посмотреть содержимое каталога /tmp, то вы обнаружите файл local.tgz

Теперь нам необходимо распаковать файл local.tgz, для этого выполняем команду:
tar -xzf local.tgz
после чего выполним показ содержимого директории, через команду ls. Видим, что появился каталог etc, переходим в него командой cd /tmp/etc/ и делаем там листинг ls. Находим там файл shadow, это то что нам нужно.

Для редактирования конфигурационного файла shadow, в котором хранится хэш-пароля от root пользователя, мы воспользуемся текстовым редактором vi. Введите vi shadow .
В открывшемся редакторе наш пароль от ESXI хоста находится в первой строке, между первым и вторым двоеточием, я его выделил на картинке. Для того, чтобы произвести сброс пароля ESXI хоста, нужно этот хэш удалить. Для редактирования файла shadow нажмите кнопку Insert на клавиатуре.

Когда вы удалили хэш-пароля, то нажимаем ESC и для сохранения файла вводим:wq
Теперь когда мы обновили файл shadow и убрали в нем пароль root, нам необходимо перепаковать state.tgz и подложить его за место нового.
Переходим на один каталог вверх cd ..
Переименуем и переместим (state.tg) mv /mnt/state.tgz /mnt/state.tgz.bakup
Удалим (local.tgz) rm local.tgz
собираем файл (local.tgz) tar czf local.tgz etc
собираем файл (state.tgz) tar czf state.tgz local.tgz
Перемещаем файл (state.tgz) mv state.tgz /mnt/
Отмантируем раздел и перезагрузим хост umount /tmp

После перезагрузки VMware ESXI 6.5 хоста, вы спокойно залогинитесь с пустым паролем root, обязательно задайте новый пароль, либо в меню "System Customization"

Либо в веб-интерфейсе

В Vmware ESXI 5.5 вы можете увидеть предупреждение

Изменение пароля root через графический интерфейс
Если вы не любите терминальные команды, то большинство LIVE-CD имеют графический интерфейс, в LIVE-CD CentOS для сброса пароля root, делаем следующее. На рабочем столе находим кнопку "Home"

Переходим в пункт "Other Location" и среди списка разделов найдите ваш VMware ESXi 6.5, у меня это /dev/sda5, щелкаем по нему и он у вас будет смонтирован.

На рабочем столе у вас появится значок смонтированного раздела.

Для поиска файла state.tgz, можно воспользоваться формой поиска.

Напомню, что именно с помощью файла state.tgz, вы сможете изменить пароль от ESXI хоста.

Копируем файл state.tgz, например в папку Downloads.

Произведем извлечение содержимого архива state.tgz в папку Downloads, делается это через контекстное меню и пункт "Extract Here".

У нас появится файл local.tgz, распакуем и его.

Открываем файлик shadow, для обнуления пароля у root пользователя на ESXI хосте.

Удаляем хэш-пароля он находится в первой строке между первым и вторым двоеточием (:)

Удаляем его и приводим вот к такому виду.

Сохраняем изменения в файле shadow.

Переходим на один уровень выше, в папку Downloads. Удалите из папки файл local.tgz и щелкаем правым кликом по папке etc и запаковываем ее, через пункт "Compress".

Задаем имя архиву local.tgz


Через кнопку +, добавляем в пустой архив state.tgz, наш новый архив local.tgz.

Выбираем новый local.tgz и нажимаем Add.

В итоге получилось вот так.

Заменяем старый state.tgz в примантированном разделе /dev/sda5 с заменой, после чего перезагружаем ваш сервер и проверяем, что у вас стал пустым пароль от VMware ESXI 6.5 хоста.

Изменение пароля root через vCenter Server
Расскажу еще, о специфическом методе, который позволит вам изменить пароль root на VMware ESXI хостах. Производится он на вашем vCenter сервер, за счет применения профилей Host Profile. Поскольку использовать мы будем профили хоста, предполагается, что ваш хост (ы) ESXi подключены, и доступны на сервере vCenter и лицензированы с помощью vSphere Enterprise Plus. Это возможно только потому, что пользователь vpxa на каждом хосте ESXi, добавлен, когда хост ESXi подключен к серверу vCenter, и имеет привилегии root.
Щелкните правой кнопкой мыши любой хост, выберите Host Profile-Create Profile from Host.

Указываем имя Host Profile.

Завершаем создание Host Profile

Переходим на вкладку "Home" и открываем значок Host Profiles.

Щелкаем правым кликом и выбираем Edit Profile.

Выберите пункт Security Configuration и перейдите в Administrator password, задайте нужный вам пароль для root.


Отметьте пункт "Security Configuration".

Применяем наш Host Profile, для этого переведите ваш хост в режим обслуживания (Maintenance Mode)


Выбираем "Password_Reset Host Profile".

Чтобы применить нажмите "Apply Profile".

У вас хост перезагрузиться и к нему будет применен новый пароль от root. Данный метод, хорош тем, что может производить сброс пароля ESXI на большом количестве хостов..

List of VMware Default Usernames and Passwords
Here is a comprehensive list of default username and passwords for most of the VMware products. If you"re like me, you tend to get alot of these confused. If I left any off, please let me know in the comments.
password: 123456
default ADM management console password is 123456 and the CLI password is ChangeMe
password: vmware
password: Supplied during OVA deployment
vCenter Log Insight
https:// log_insight-host/
password: password specified during initial configuration
password: vmware
password: vmware
For vSphere 5.1 = Windows default username: admin@System-Domain
For vSphere 5.1 = Linux (Virtual Appliance) default username: root@System-Domain
password: specified during installation
Adding AD authentication to VMware SSO 5.1
For vSphere 5.5 = default username: [email protected]
Appliance Configuration:
change the root password of the appliance Linux user. Otherwise, the first time when you try to log in to the appliance Web console, you will be prompted to change the password.
Orchestrator Configuration:
username: vmware
Orchestrator Client:
username: vcoadmin
password: vcoadmin
Web Operator
username: vcoadmin
password: vcoadmin
vCenter Orchestrator for Windows:
username: vmware
vCenter Orchestrator for vCloud Automation Center (built-in):
username: vmware
vCloud Automation Center Identity Appliance
vCloud Automation Center vCAC Appliance
password: password supplied during appliance deployment
username: [email protected]
password: SSO password configured during deployment
vCloud Automation Center built-in vCenter Orchestrator
:
username: vmware
password: vmware (after initial logon, this password is changed)
username: [email protected] (or the SSO admin username)
password: specified password for the SSO admin during vCAC-Identity deployment
password: vmware
password: vmware
username: administrator
password: specified during wizard setup
vCloud Director Appliance
password: Default0
OracleXEDatabase
username: vcloud
password: VCloud
vCloud Networking and Security
password: default
password: default
VMware Site Recovery Manager :
username: vCenter admin username
password: vCenter admin password
vShield Manager
password: default
password: default
root: specified during deployment
password: specified during deplyent
darwin_user password: specified during deployment
admin: specified during deployment
password: specified during OVA deployment
username: created during wizard
password: created during qizard
vFabric Hyperic vApp
password: hqadmin
username: windows credentials
password: windows credentials
vSphere Data Protection Appliance
https:// :8543/vdp-configure/
password: changeme
password: You configured the root password during the OVF deployment of the vSphere Replication appliance
Zimbra Appliance Administration Console
username: vmware
password: configured during wizard setup
VMware offers many appliances for their products. Unfortunately they are not all created equally. The installation and configuration procedures differ for most appliances and also the default usernames and passwords are different throughout the range of appliances. So here is a list of default usernames and passwords. For as far as I know them, if you miss one please let me know and I will add it to this list.
Appliance name (all versions unless specified differently) user password
vCenter Server Appliance root vmware
vSphere Data Protection root changeme
vSphere Management Assistant vi-admin vmware
vCenter Operations Manager Appliance administrative user for UI-login admin admin
vCenter Operations Manager Appliance root user root vmware
vShield Manager admin default
vSphere Replication root <*>
vCloud Director 5.5 root / guest <*>
vCloud Connector (server and node) admin vmware
Horizon Workspace root / admin <*>
vCenter Orchestrator Appliance Configuration vmware <*>
<*> for some appliances you configure the password during the OVA or OVF deployment.
Passwords are the things people tend to forget. Well, ESXi root passwords are not an exception either! Without the root password, you lose control over your hosts, so it’s good to know how to reset it. Well, resetting an ESXi host password is the thing I gonna talk about in this article.
Want to know why I wrote this article? I want to help other VMware admins. You see, when things like that happen, the first thing you do you look through some official documentation, right? Unfortunately, the only thing VMware advices to reset passwords is re-installing the OS. No fun! What if I don’t want to (or cannot) do that? In this article, I’m looking for a better way to reset the password.
For this article, I use ESXi 6.7.0, 8169922, but everything I write here works good for ESXi 6.x or 5.x versions. Some methods to reset the passwords may be pretty risky. So, don’t blame me in case you mess things up.
Some theoretical findings
After thinking through some cases of how you guys lose passwords, I realized that these two scenarios are pretty common: you forgot the password, but you still can access the hosts via vCenter, and you lost the standalone host password from the standalone ESXi host and there’s no way to access it.
Well, the last one looks really tough. But, I’ll teach you today how to restore the password in both cases.
Changing the pass with vCenter
Let’s start with some bright scenario: you forgot the ESXi root password but there’s vCenter installed. I’d say that’s a pretty common issue. Admins manage the host through vCenter, but one day, they lose the password. Fortunately, that’s not a big deal to restore the password.
First, let’s look at how to change the password via the flash vCenter Webclient. Note that things I write here do not work in the html one! Also note that you need your ESXi edition to be not lower than Enterprise Plus.
In order to reset the password, you need to extract, edit, and upload Host Profile. Here’s how you do that.
Go to vCenter, and extract the host profile exactly how I do in the screenshot below.
While extracting, specify the host name and add some description if needed.

Check the entered information and press Finish .

In vCenter, navigate to the Home tab and go to Host Profiles there.

Right-click the Host Profile and edit its settings.

There, you can specify the new name and description if needed.

Once you are done with changing Name and host description, go to the Edit host profile tab itself. Actually, you can change a bunch of settings there, but let’s stick to the initial plan and change only root password, ok? To accomplish this task, type the new password and confirm it in the self-titled fields.

Congratulations, you have changed the password! Let’s add the the host to the cluster now and apply the settings.

In the Attach/Detach Hosts and Clusters menu, select the host where you have changed the password. At this point, I’d like to mention that you can apply the changes to multiple hosts.

Right after adding the host, you can play around with the network settings, if you need it. Well, you can just click Finish to have the settings applied.

Next, you need to put the node in the maintenance mode, otherwise you won’t be able to apply any settings at all!

Confirm putting the selected host (or hosts, whatever) in maintenance mode. Note that you need to migrate your VMs unless you can shut down them for a while. In my case, there are no mission critical VMs on the host, so I’ve just powered them off beforehand.

Now, go back to the Objects tab and, finally, implement the host settings. Right-click the Host Profile and press Remediate .

Select the required host.

Verify all the settings and check whether you can apply the changes at all. Press Finish .

After the host reboots, exit the maintenance mode.

Now, let’s check whether the password reset has run smoothly. For that purpose, log in at the ESXi node via the Web Console, or the terminal using the new password.
Resetting the root password using Active Directory and vCenter
You can also change the password in vCenter using the Active Directory. You see, if you can add the ESXi host to the domain, you are able to use the domain credentials to access the node and reset the root password. Here’s how you do that.
Go to the AD Users and Computers on the domain controller and create a new workgroup – ESX Admins. Make sure to use exactly that name for the workgroup. Add to that group a new user which you will use later to reset the password. Well, it actually can be any user, but I decided to create a new one – TestUser.

Add the host with the forgotten password to the domain.

Next, try logging in the ESXi host with the TestUser credentials. Here’s how you are to specify the user name: or Domain\User.

Once you log in the host, go to the Security & users tab to reset the root password.

From now on, you can use the new root password! Don’t forget to leave from the domain if you do not need the host to be in the domain anymore.

To apply the changes, reboot the host.
Note that changing the password with vCenter is pretty easy, but VMware does not recommend it for some reason after all.
Resetting root password on the standalone ESXi hosts
Now, as we know how to reset the password with vCenter, let’s look at some tough cases. Let’s say, you don’t have vCenter installed on the host. Once again, I do not want to re-install the server OS as VMware says. Seriously, that’s not fun! Let’s look at something more interesting instead. Well, let’s say, what about changing the password right on the node itself?
Before I start, I’d like to mention that you won’t be able to trick ESXi security and change the root password on the node without shutting it down. This means that you, like it or not, do need to shut down each VM from the inside! If you screw things up, you won’t be able to start VMs without ESXi re-installation.
Also, you need the boot the CD image. I used Ubuntu GNOME in this article. Find out how to create a boot CD and download Ubuntu GNOME . You also need Rufus to write the boot CD image on the flash drive.

So, you need to boot from the flash disk, mount the required ESXi datastore, unpack the archive, and edit the file with passwords. Next, you upload the file back into the initial directory, and, after rebooting the host, you can access the it without the password.
Editing the “shadow” file
What’s “shadow” is?
For safety concerns, ESXi keeps passwords encrypted in some file… whatever, here’s how you still can reset the password. According to some unofficial sources, this file is called “shadow”. You can find it in one of those booting volumes in the /etc directory. Before the host boots, /etc is in the local.tgz archive. Here’s the path: /etc => local.tgz => state.tgz. You can find it in one of those booting volumes in the /etc directory. Before the host boots, /etc is in the local.tgz archive. Here’s the path: state.tgz => local.tgz => /etc.
Here’s how the disk is formatted in ESXi 6.0 or higher:
| Volume name | What it is for? | Volume size in my case |
| /dev/sda1 | Starts the system | 4 MB |
| /dev/sda2: /scratch: | System volume that is created while installing ESXi on the over-5 GB disk. | 4 GB |
| /dev/sda3: VMFS datastore: | Represents all the remaining disk space | |
| /dev/sda5: /bootbank: | The ESXi image | 250 MB |
| /dev/sda6: /altrbootbank: | The older system version image. You’ll see it as an empty volume if you have never updated the system | 250 MB |
| /dev/sda7: vmkDiagnostic (the first volume) | Keeps the core dump | 110 MB |
| /dev/sda8: /store | VMware Tools image | 286 MB |
| /dev/sda9: vmkDiagnostic (the second volume) | Keeps all the information connected with vSAN diagnostics. You can observe this volume only in over-8 GB datastores | 2.5 GB |
Among of all those volumes, we need only the /bootbank one as it keeps the ESXi archive. In this way, “shadow” should be somewhere there.
Chasing the “shadow”
So, let’s boot the host from the flash disk first and start the terminal.
Run the following cmdlet to acquire root privileges:
# sudo su
See through the disk names and find the one you need.
# fdisk –l | grep /dev/sda

Well, it seems that we need that 250 MB /dev/sda5 directory. Create the mnt directory.
# mkdir /mnt/sda5
Create the directory for the temporary files now.
# mkdir /temp
And, mount the /dev/sda5 directory using the cmdlet below.
# mount /dev/sda5 /mnt/sda5
Now, look for that state.tgz archive I was talking above.
# ls -l /mnt/sda5/state.tgz
Extract both state.tgz and local.tgz . Here are the commands you can use for that purpose:
Once you are done with unpacking, get rid of those old archives with the cmdlet below:
# rm /temp/*.tgz
Now, you are ready to do some magic with “shadow”. Open the file, edit it, and close it. As simple as it! To double-check the changes, open the file one more time.
# vi /temp/etc/shadow
Actually, here’s how “shadow” looks like inside. See, it contains all users’ passwords.

To reset the password, just delete everything between the double colons. Remember, everything is encrypted? That’s why passwords look that weird.

# vi /temp/etc/shadow
Next, go to the work directory.
# cd /temp
Now, add the “shadow” back to the archive.
# tar -czf local.tgz etc
Move the new archive to the initial directory.
# mv state.tgz /mnt/sda5/
Unmount the /sda5 disk with the cmdlet below:
# umount /mnt/sda5
And, eventually reboot the host.
# reboot
Well, to make the stuff I’ve just written above more reader-friendly, here’re all commands you need to deploy step-by-step.

Well, you are almost there. Reboot the server now, and try accessing the host without any password. Well, check out what I’ve got.

Now, select Configure Password , and type a new password in the self-titled field.

Ok, this time, please write the root password, or just try no to forget it!
Replace one “shadow” with another
There’s another way to reset the ESXi root password using “shadow”. Actually, that’s nothing more than a variation of the method I described above.
So, another thing you can do to reset the ESXi password is just using another host “shadow” file! Yes, you can just copy the “shadow” file from another ESXi host with the known root password to the one more flash disk. To get the file with passwords from another host, you need WinSCP. The utility is available . The nice thing is that you can retrieve that file from the host with the known ESXi root password without even shutting it down.

Next, call the terminal with the Ubuntu GNOME and reset the password.
Update user privileges to root first. You can run the following command for that purpose:
# sudo su
Now, let’s see what you have on the disk.
# fdisk –l | grep sd
Create two temporary volumes afterward.
# mkdir /mnt/sda5
# mkdir /mnt/sdb1
Mount the ESXi disk and flash disk where the “shadow” resides using the following cmdlet.
# mount /dev/sda5 /mnt/sda5
# mount /dev/sdb1 /mnt/sdb1
Now, create the temporary volume for further work with archives.
# mkdir /temp
Create the volume where you are going to keep the state.tgz copy just in case something goes wrong.
# mkdir /mnt/sdb1/save
Find the necessary file in the archive.
# ls -l /mnt/sda5/state.tgz
Copy the archive.
# cp /mnt/sda5/state.tgz /mnt/sdb1/save
Run the following command to double-check whether the file has been copied:
# ls -l /mnt/sdb1/save
Extract state.tgz using the cmdlet below:
# tar -xf /mnt/sda5/state.tgz –C /temp/
Find the temp file.
# ls –l /temp
Extract local.tgz.
# tar -xf /temp/local.tgz –C /temp/
Make sure that you extracted the /etc directory.
# ls –l /temp

Now, delete the local.tgz volume to ensure that it won’t be included into the new archive by accident.
# rm /temp/local.tgz
Find “shadow” in the /etc directory.
# ls -l /temp/etc
Replace the original “shadow” with the one from the host with known root password. Type the following cmdlet:
# cp /mnt/sdb1/shadow /temp/etc

Now, deploy the following command to open the file and look through the saved credentials.
# vi /temp/etc/shadow
If you do not want some users to access the host, go ahead and just remove them from the listing! Here, I removed Test from the users that can access the host. Wait, why did I delete only Test? At this point, I’d like to warn you against deleting any users you are not familiar with. In my case, all users except Test are system ones. If you delete any of those guys, you may destabilize the OS!

Here’s how the “shadow”: file looks like once the unnecessary user.

Check whether all changes have been applied.
# vi /temp/etc/shadow
Type the following line to navigate to the /temp directory.
# cd /temp
Archive the /etc directory.
# tar -czf local.tgz etc
Check whether archiving has run smoothly.
# ls -l /temp/
Now, create the state.tgz volume.
# tar -czf state.tgz local.tgz
Again, check whether the volume has been created.
# ls -l /temp/
Move the archive to the working ESXi directory.
# mv state.tgz /mnt/sda5/
Check the result one more time.
# ls -l /mnt/sda5/
Unmount the sda5 directory.
# umount /mnt/sda5
Eventually, reboot the host.
# reboot
Enjoy! If everything is done right, you can access the host with the known password. Well, to make everything more or less convenient here’s the entire set of commands I used for this method.

If the host starts acting weird after reboot, there’s still a copy of the initial state.tgz. Well, it should be. You can mount both /sda5 and /sdb1 and retrieve the original state.tgz using the following cmdlet… and try again!
# cp /mnt/sdb1/save/state.tgz /mnt/sda5/
Conclusion
Today, I discussed four ways to reset an ESXi host root password. The first method is the easiest one and works wonderful if you have vCenter installed. If there’s no vCenter, you still can reset the password, but the thing is that the last two methods described here are a bit risky. Especially, you should be really careful with the last one. If any of system users is deleted, you gonna screw up the OS. So, be smart and don’t delete users you don’t recognize.
30/05/2011fdisk -l (смотрим подходящие FAT16 разделы, где у нас размещен загрузчик)
ls -l /mnt/sda5/ (основной, при загрузке монтируется как /bootbank)
ls -l /mnt/sda6/ (резервный, при загрузке монтируется как /altbootbank)
В случае чистой установки ESXi, картина будет такова:

Нас интересует файл state.tgz - там все, что нам нужно. Если у вас ESXi Embedded то нужен файл local.tgz (который в первом случае находится внутри state.tgz ).
Распаковываем сначала state.tgz , а потом local.tgz командами gzip и tar во временную директорию. Далее заходим в ней в папку /etc и открываем в ней файл shadow командой:
vi shadow

У вас откроется что-то вроде того:

Теперь посмотрите на картинку ниже, мы удаляем хэш пароля из этого файла:

То есть убираем все то, что между двумя двоеточиями. Выходим из файла, сохранившись.
Теперь все это упаковываем назад, для чего во временной папке (туда надо подняться из /etc) выполняем такую команду (апдейтим архив изменившейся папкой):
tar -czvf local.tgz etc
Если вы используете ESXi Embedded - кладете файл local.tgz на место, откуда брали. Если обычный ESXi - снова апдейтим архив:
tar -czvf state.tgz local.tgz
И также копируем туда, где он лежит:

Перезагружаем сервер и уже загружаемся в VMware ESXi. Видим такую картинку:
Это значит - все получилось. Теперь можем заходить в консоль под пользователем root с пустым паролем. Вот такой незамысловатый способ сброса пароля на хосте VMware ESXi.
Please enable JavaScript to view the