“Don't use the goto statement”- this is what the teachers at the academy told us, and indeed, this operator turns the code into a complete mess. The PHP developers solved the problem radically - it simply doesn’t exist in PHP3 and PHP4. What were they initially motivated by? Maybe they wanted to instill in all of us the correct programming style? Well, we can say that they completely succeeded - we are all already accustomed, that is, we have completely lost the habit of this operator, maybe it’s for the best, because at one time I had to come up with a logical construction that fully compensated for this most unfortunate goto.
I don’t know how it is for anyone, but for me, I especially often had a desire to use goto when creating an html form handler, when a lot of data is sent from the user to the server, which the php script must check step by step. This process, as a rule, takes place in several stages: printing the form itself, checking the received data, preliminary display, and, for example, saving. Moreover, some stages may be repeated: if the data verification did not go well, we move on to printing the form, or if the preliminary display does not suit the user, he can return to entering data. In short, some pieces of code can be used multiple times. Using functions in these conditions is also not very convenient - there are a lot of input and output variables, the function must perform too complex actions, it generally turns out clumsily and the readability of the code drops sharply.
And I came up with this design.
do ( switch ($action) ( default: break ; case "PRINT_FORM" : Printing the main form break ; case "CHECK_FORM" : Checking the correctness of the data break ; case "PREVIEW_FORM" : Preview break ; case "SAVE_FORM" : Saving data break ; ) while (true) ; |
Here's the basic multiple selection operator switch trapped in an endless loop do-while– this way we group the necessary actions in sections case: break; and we can move unlimitedly from one section to another. In section default: It’s convenient to do a preliminary analysis of the data, for example, if there is no input data then $action = 'PRINT_FORM' print the form if available, for example $_POST ['submit'] then we send the received data for processing $action = 'CHECK_FORM'. Transfer of control between switch blocks occurs by changing a variable $action, well, exit the loop using break 2; or exit;
For example, in the print block of the main form you can safely put break 2; because the output of the form assumes the end of the script.
The design is very flexible and readable. But there is one drawback - if the data is processed incorrectly, you can end up in an endless loop and the script freezes - it’s unpleasant to have to wait for as long as 30 seconds.
Let's set a limit on the number of operator cycles do-while, 20 is enough. Now if we pumped something up, the script will wind 20 revolutions, stop and issue an emergency stop warning.
It is very convenient to debug such a construction - just after the operator swith print out the $action variable and we will get the complete sequence of block execution.
DO ( // at the beginning of each loop we print the name // of the executed section, very convenient for debugging echo $action." "; SWITCH ($action) ( default: break; case "PRINT_FORM": /* print the main form */ break; case "CHECK_FORM": /* check the data is correct */ break; case "PREVIEW_FORM": /* preview */ break ; case "SAVE_FORM": /* save data */ break )// end switch ) WHILE ((($i++)< 20) or die("Принудительный останов цикла"));
DO ( // at the beginning of each loop we print the name // executed section is very convenient for debugging echo $action . " " ;< / strong > SWITCH ($action) ( default: break ; case "PRINT_FORM" : print the main form break ; |
RxGroovy has several Do variants.
- Javadoc:
- Javadoc:

- Javadoc:
The doOnRequest operator (new in RxGroovy 1.1) registers an Action which will be called whenever an observer requests additional items from the resulting Observable. That Action receives as its parameter the number of items that the observer is requesting.
- Javadoc:
- Javadoc:
- Javadoc:
- Javadoc:
- Javadoc:
before
- Javadoc:
after the resulting Observable terminates, whether normally or with an error.
Sample Code
def numbers = Observable.from(); numbers.finallyDo(( println("Finally"); )).subscribe(( println(it); ), // onNext ( println("Error: " + it.getMessage()); ), // onError ( println ("Sequence complete" ) // onCompleted);
1 2 3 4 5 Sequence complete Finally
- Javadoc:
RxJava has several Do variants.
The doOnEach operator allows you to establish a callback that the resulting Observable will call each time it emits an item. You can pass this callback either in the form of an Action that takes an onNext variety of Notification as its sole parameter, or you can pass in an Observer whose onNext method will be called as if it had subscribed to the Observable.
- Javadoc:
- Javadoc:
The doOnNext operator is much like doOnEach(Action1) except that the Action that you pass it as a parameter does not accept a Notification but instead simply accepts the emitted item.
Sample Code
Observable.just(1, 2, 3).doOnNext(new Action1
Next: 1 Error: Item exceeds maximum value
- Javadoc:
The doOnRequest operator (new in RxJava 1.1) registers an Action which will be called whenever an observer requests additional items from the resulting Observable. That Action receives as its parameter the number of items that the observer is requesting.
- Javadoc:
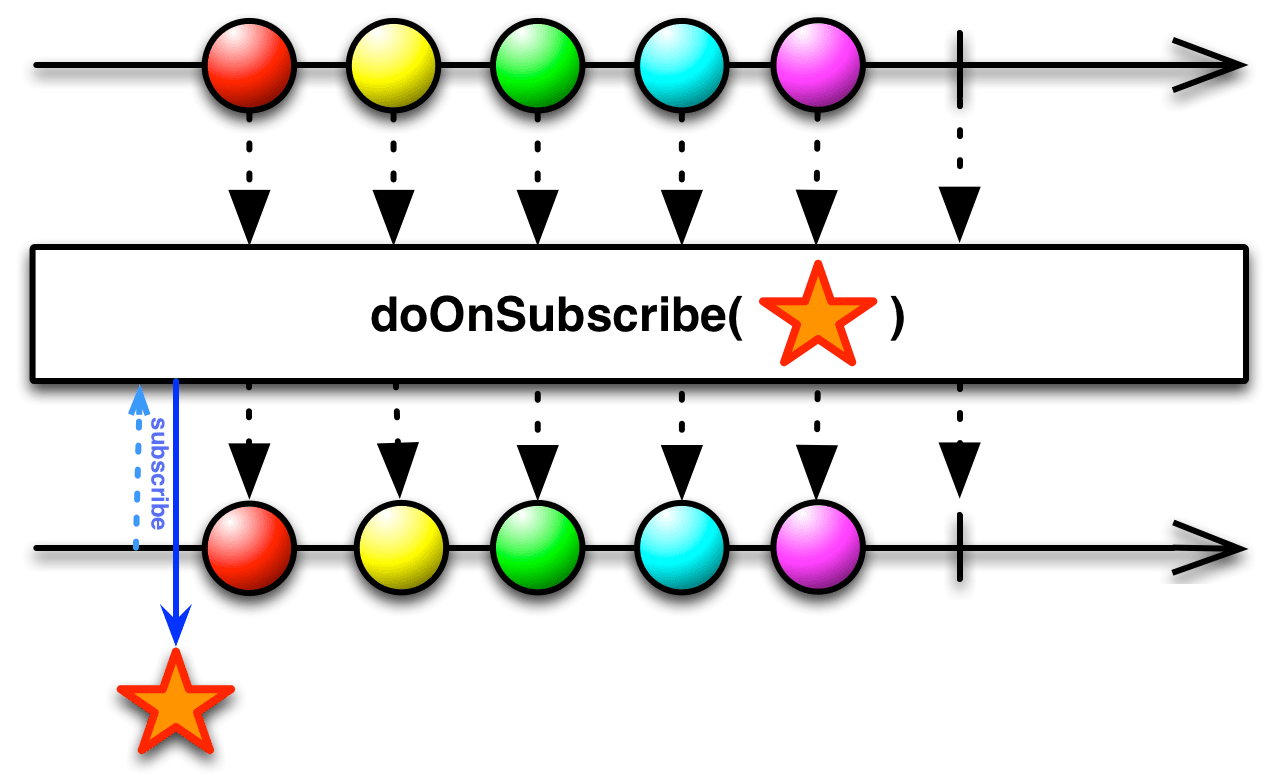
The doOnSubscribe operator registers an Action which will be called whenever an observer subscribes to the resulting Observable.
- Javadoc:
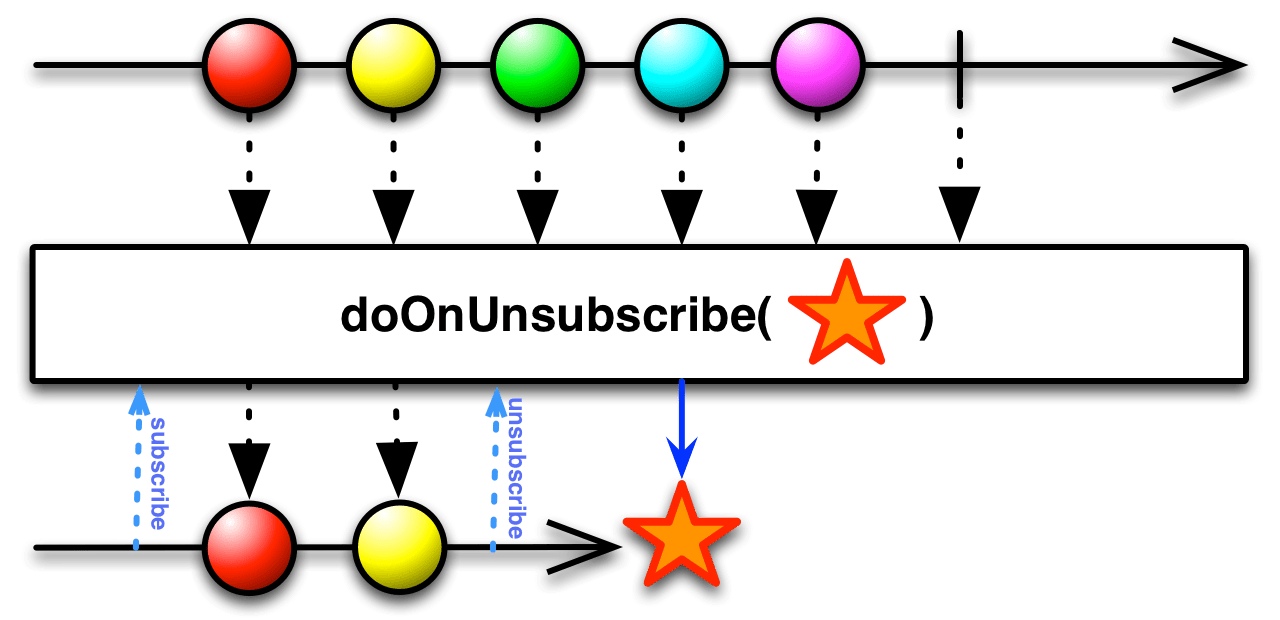
The doOnUnsubscribe operator registers an Action which will be called whenever an observer unsubscribes from the resulting Observable.
- Javadoc:
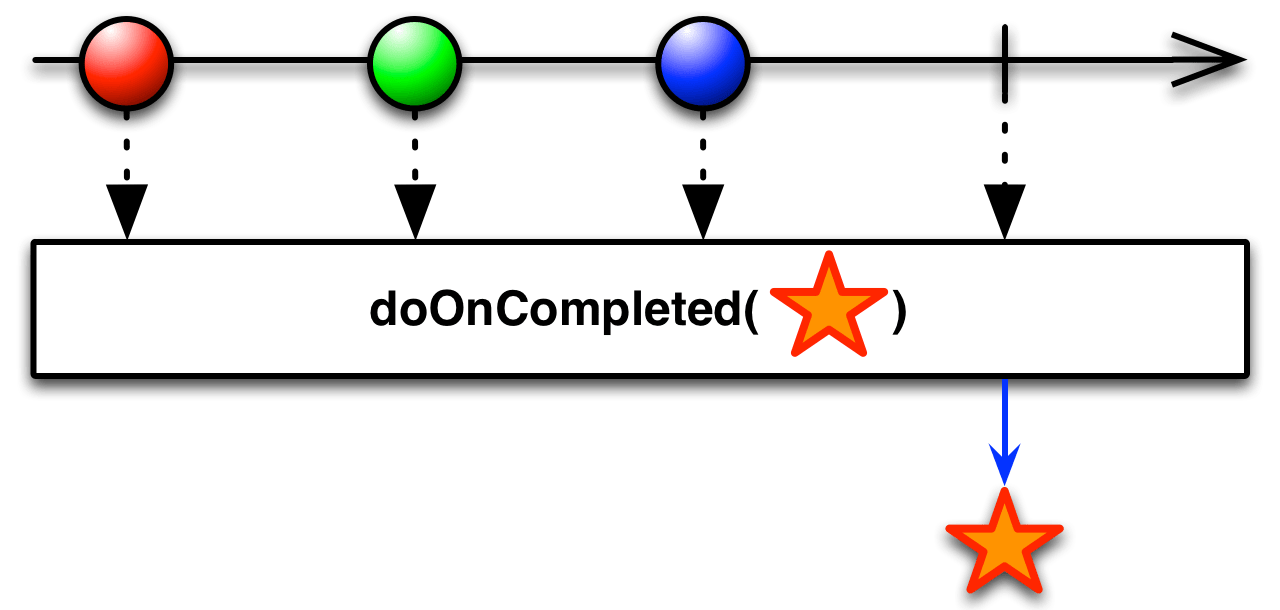
The doOnCompleted operator registers an Action which will be called if the resulting Observable terminates normally, calling onCompleted .
- Javadoc:
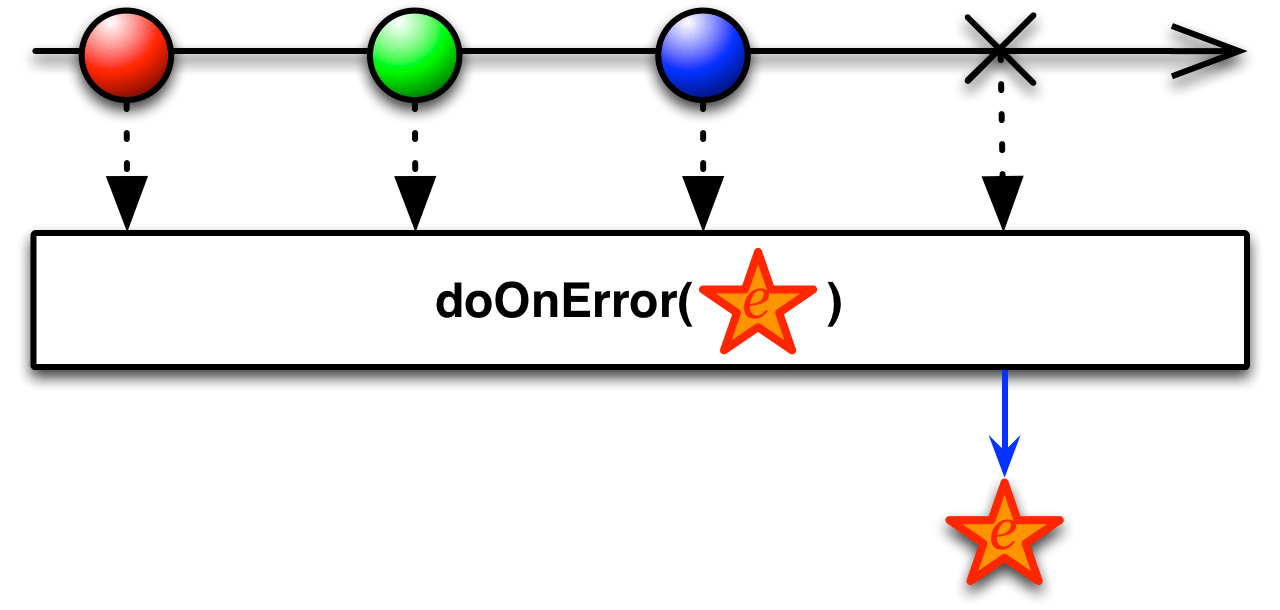
The doOnError operator registers an Action which will be called if the resulting Observable terminates abnormally, calling onError . This Action will be passed the Throwable representing the error.
- Javadoc:
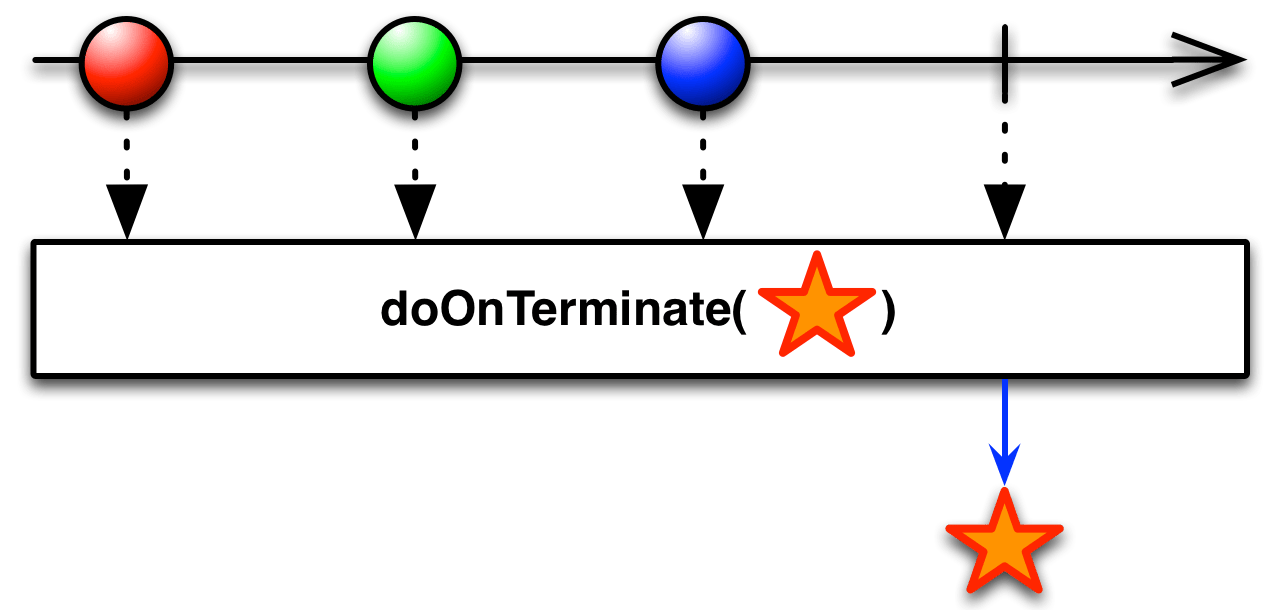
The doOnTerminate operator registers an Action which will be called just before the resulting Observable terminates, whether normally or with an error.
- Javadoc:
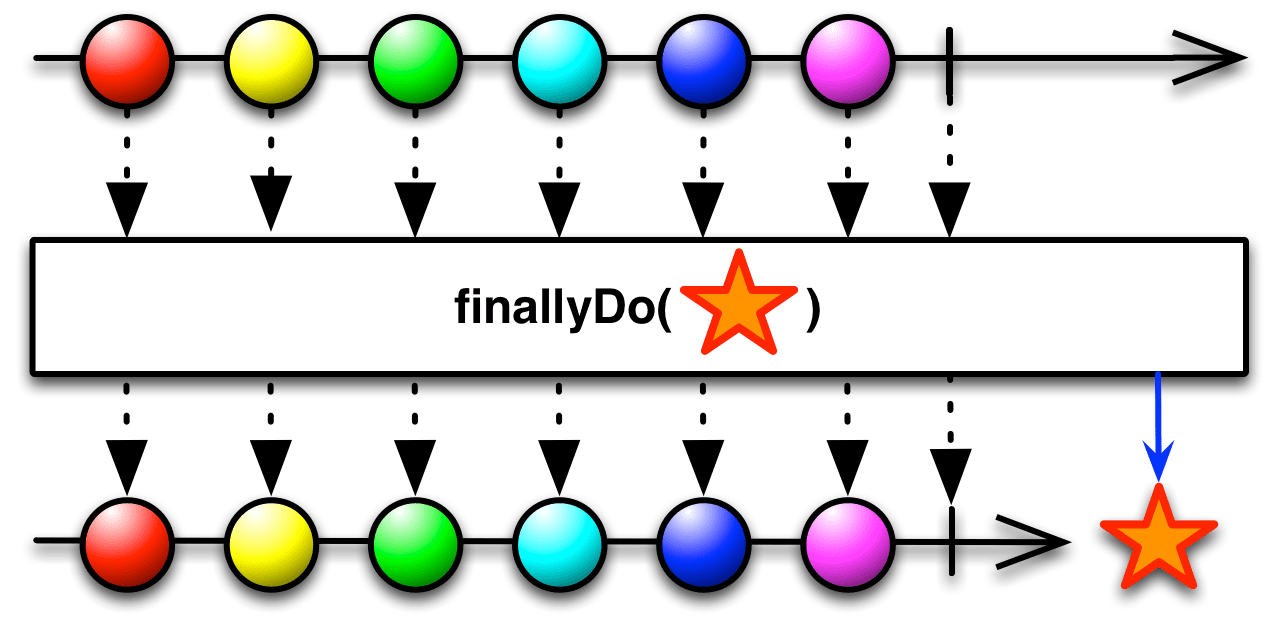
finallyDo is deprecated since RxJava 1.1.1, in favor of doAfterTerminate with the same behavior.
The finallyDo operator registers an Action which will be called just after the resulting Observable terminates, whether normally or with an error.
- Javadoc:
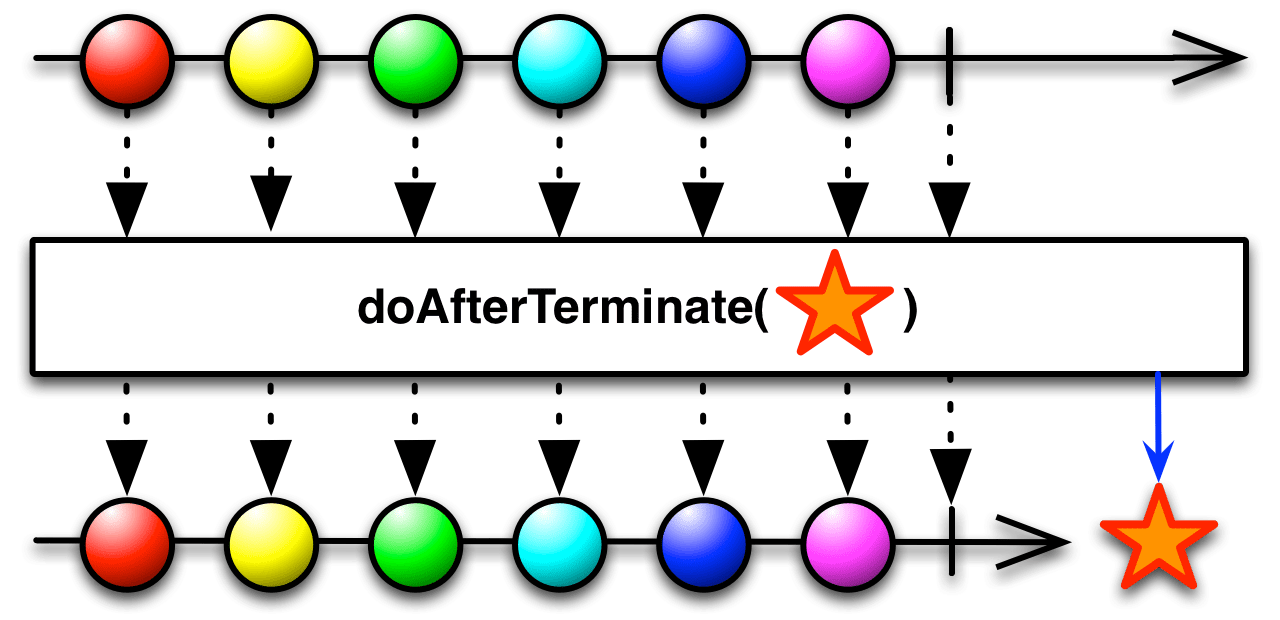
The doAfterTerminate operator registers an Action which will be called just after the resulting Observable terminates, whether normally or with an error.
- Javadoc:
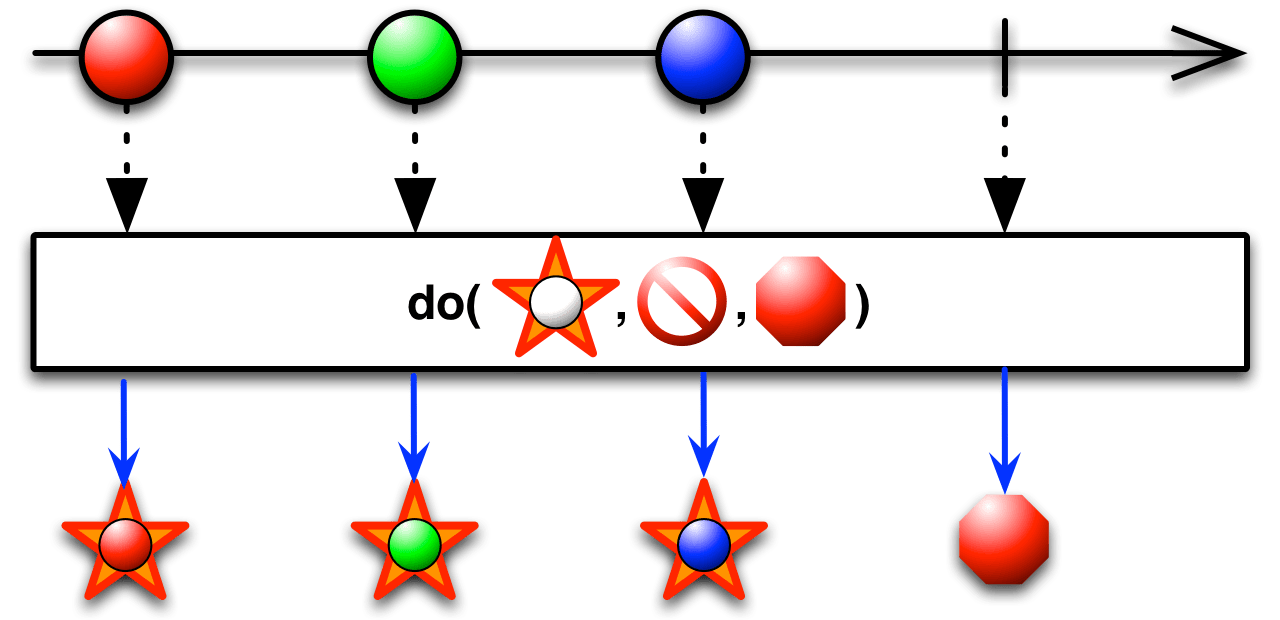
RxJS implements the basic Do operator as do or tap (two names for the same operator). You have two choices for how to use this operator:
- You can pass it an Observer, in which case do / tap will call that Observer’s methods as though that Observer had subscribed to the resulting Observable.
- You can pass in a set of 1-3 individual functions (onNext , onError , and onCompleted) that do / tap will call along with the similarly-named functions of any of its observers.
Sample Code
/* Using an observer */ var observer = Rx.Observer.create(function (x) ( console.log("Do Next: %s", x); ), function (err) ( console.log("Do Error : %s", err); ), function () ( console.log("Do Completed"); )); var source = Rx.Observable.range(0, 3) .do(observer); var subscription = source.subscribe(function (x) ( console.log("Next: %s", x); ), function (err) ( console.log("Error: %s", err); ), function () ( console.log("Completed"); ));
/* Using a function */ var source = Rx.Observable.range(0, 3) .do(function (x) ( console.log("Do Next:", x); ), function (err) ( console. log("Do Error:", err); ), function () ( console.log("Do Completed"); )); var subscription = source.subscribe(function (x) ( console.log("Next: %s", x); ), function (err) ( console.log("Error: %s", err); ), function () ( console.log("Completed"); ));
Do Next: 0 Next: 0 Do Next: 1 Next: 1 Do Next: 2 Next: 2 Do Completed Completed
RxJS also implements doOnNext or tapOnNext (two names for the same operator). It is a specialized form of Do that responds only to the onNext case, by calling a callback function you provide as a parameter. You may also optionally pass a second parameter that will be the “ this ” object from the point of view of your callback function when it executes.
Sample Code
var source = Rx.Observable.range(0, 3) .doOnNext(function () ( this.log("Do Next: %s", x); ), console); var subscription = source.subscribe(function (x) ( console.log("Next: %s", x); ), function (err) ( console.log("Error: %s", err); ), function () ( console.log("Completed"); ));
Do Next: 0 Next: 0 Do Next: 1 Next: 1 Do Next: 2 Next: 2 Completed
RxJS also implements doOnError or tapOnError (two names for the same operator). It is a specialized form of Do that responds only to the onError case, by calling a callback function you provide as a parameter. You may also optionally pass a second parameter that will be the “ this ” object from the point of view of your callback function when it executes.
Sample Code
var source = Rx.Observable.throw(new Error()); .doOnError(function (err) ( this.log("Do Error: %s", err); ), console); var subscription = source.subscribe(function (x) ( console.log("Next: %s", x); ), function (err) ( console.log("Error: %s", err); ), function () ( console.log("Completed"); ));
Do Error: Error Error: Error
RxJS also implements doOnCompleted or tapOnCompleted (two names for the same operator). It is a specialized form of Do that responds only to the onCompleted case, by calling a callback function you provide as a parameter. You may also optionally pass a second parameter that will be the “ this ” object from the point of view of your callback function when it executes.
Sample Code
var source = Rx.Observable.range(0, 3) .doOnCompleted(function () ( this.log("Do Completed"); ), console); var subscription = source.subscribe(function (x) ( console.log("Next: %s", x); ), function (err) ( console.log("Error: %s", err); ), function () ( console.log("Completed"); ));
Next: 0 Next: 1 Next: 2 Do Completed Completed
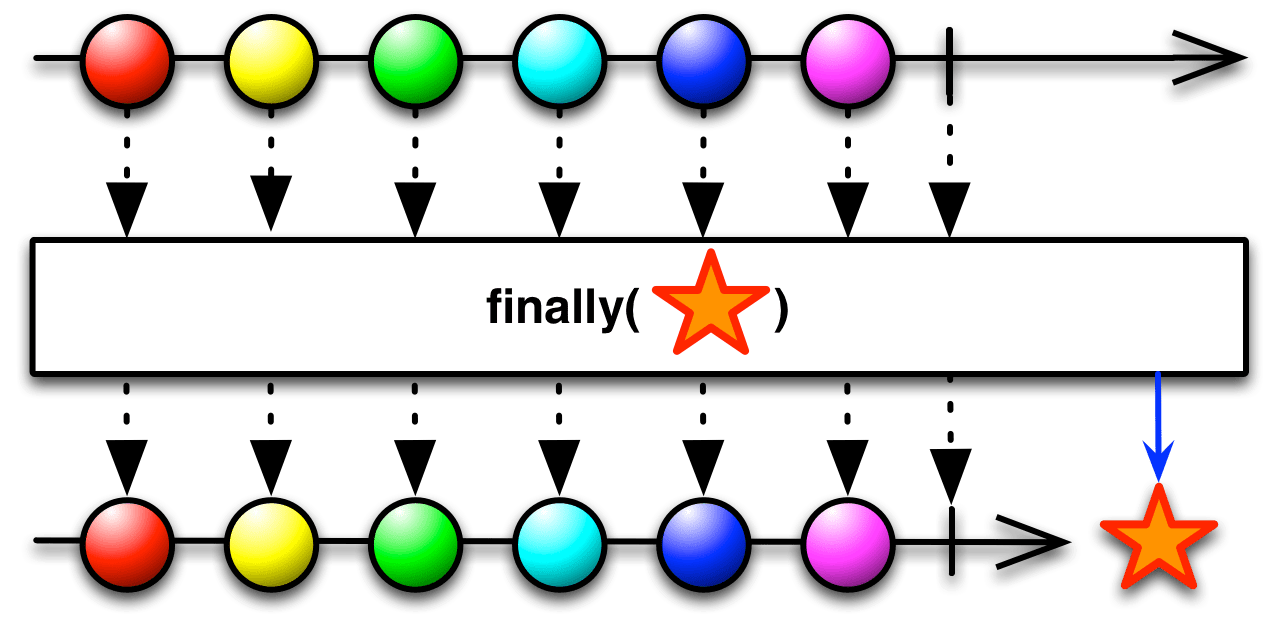
RxJS also implements a finally operator. It takes a function that will be called after the resulting Observable terminates, whether normally (onCompleted) or abnormally (onError).
Sample Code
var source = Rx.Observable.throw(new Error()) .finally(function () ( console.log("Finally"); )); var subscription = source.subscribe(function (x) ( console.log("Next: " + x); ), function (err) ( console.log("Error: " + err);), function () ( console .log("Completed");
Error: Error Finally
do / tap , doOnNext / tapOnNext , doOnError / tapOnError , doOnCompleted / tapOnCompleted , and finally are found in each of the following distributions:
- rx.js
- rx.all.js
- rx.all.compat.js
- rx.compat.js
- rx.lite.js
- rx.lite.compat.js
RxPHP implements this operator as do .
Invokes an action for each element in the observable sequence and invokes an action upon graceful or exceptional termination of the observable sequence. This method can be used for debugging, logging, etc. of query behavior by intercepting the message stream to run arbitrary actions for messages on the pipeline. When using do, it is important to note that the Observer may receive additional events after a stream has completed or errored (such as when using a repeat or resubscribing). If you are using an Observable that extends the AbstractObservable, you will not receive these events. For this special case, use the DoObserver. doOnNext, doOnError, and doOnCompleted uses the DoObserver internally and will receive these additional events.
Sample Code
//from https://github.com/ReactiveX/RxPHP/blob/master/demo/do/do.php $source = \Rx\Observable::range(0, 3) ->do(function ($x) ( echo "Do Next:", $x, PHP_EOL; ), function (Throwable $err) ( echo "Do Error:", $err->getMessage(), PHP_EOL; ), function () ( echo "Do Completed" , PHP_EOL; )); $subscription = $source->subscribe($stdoutObserver);
Do Next:0 Next value: 0 Do Next:1 Next value: 1 Do Next:2 Next value: 2 Do Completed Complete!
RxPHP also has an operator doOnError .
Sample Code
//from https://github.com/ReactiveX/RxPHP/blob/master/demo/do/doOnError.php $source = \Rx\Observable::error(new Exception("Oops")) ->doOnError(function (Throwable $err) ( echo "Do Error:", $err->getMessage(), PHP_EOL; )); $subscription = $source->subscribe($stdoutObserver);
Do Error:Oops Exception:Oops
RxPHP also has an operator doOnCompleted .
Sample Code
//from https://github.com/ReactiveX/RxPHP/blob/master/demo/do/doOnCompleted.php $source = \Rx\Observable::empty() ->doOnCompleted(function () ( echo "Do Completed ", PHP_EOL; )); $subscription = $source->subscribe($stdoutObserver);
Do Completed Complete!
RxPHP also has an operator finally .
Will call a specified function when the source terminates on complete or error.
Sample Code
//from https://github.com/ReactiveX/RxPHP/blob/master/demo/finally/finally.php Rx\Observable::range(1, 3) ->finally(function() ( echo "Finally\n "; )) ->subscribe($stdoutObserver);
Next value: 1 Next value: 2 Next value: 3 Complete! Finally
//from https://github.com/ReactiveX/RxPHP/blob/master/demo/finally/finally-error.php Rx\Observable::range(1, 3) ->map(function($value) ( if ($value == 2) ( throw new \Exception("error"); ) return $value )) ->finally(function() ( echo "Finally\n"; )) ->subscribe($stdoutObserver);
Next value: 1 Exception: error Finally
Attaches the specified PHP function to the specified hook. The specified function will fire at the moment of the event, which in turn is triggered using do_action() .
The hook to which the function hooks is created (initialized) using the do_action() function.
Actions, unlike filters (add_filter()), are needed to perform some action at the right time, while filters transmit and receive back data, which is then used.
Unofficially: filters are the same events, they work exactly the same and they can be used as events (instead of add_filter() you can use the add_action() function and vice versa). For example, you can return the received data without changing it, but in addition perform some operation (for example, writing to a database). True, this is needed very rarely. All the places where it is necessary to intervene in the engine code, the developers try to foresee and insert an event into this place.
✈ 1 time = 0.000018s = very fast| 50000 times = 0.07s = speed of light| PHP 7.0.8, WP 4.7
There are no hooks.
Returns
Always true.
Usage
add_action($tag, $function_to_add, $priority, $accepted_args); $tag (string) (required) The name of the action to which we will attach the function. $function_to_add (string/closure) (required) The name of the function that should be called when the action fires, i.e. a function that we attach to a hook. The function passing format is usually a string, . $priority (number) Function execution priority. If more functions are “attached” to the same hook, then the priority will be determined by the sequence of their execution. A smaller number means it is executed earlier, i.e. 10 will be executed before 20.Default: 10$accepted_args (number) The number of arguments the function takes. Of course the action must pass this number of arguments.
Default: 1
Examples
#1 Regular hook
We will send a letter to friends when a new post is published:
Add_action("publish_post", "email_friends"); function email_friends($post_ID)( $friends = " [email protected], [email protected]"; wp_mail($friends, "sally"s blog updated", "I just put something on my blog: http://blog.example.com"); return $post_ID; )
Similarly, you can register this hook via add_filter():
Add_filter("publish_post", "email_friends");
#2 Getting an argument
do_action() passes an argument to the function and it can be used. In the previous example it was the post ID, but we didn't use it, so we didn't need it. Now, an example of how to use the passed argument:
Add_action("comment_id_not_found", "echo_comment_id", 10, 1); function echo_comment_id($comment_ID)( echo "I just received ". $comment_ID; )
#3 Anonymous function
You can pass an anonymous function as a callback function, for example:
Add_action("wp_head", function())( echo "something"; ));
Such anonymous functions do not work with PHP accelerators.
#4 Adding an event from a PHP class
If you need to use a PHP class method for an event, then in the second argument, instead of the function name, you need to specify an array, where the first argument is the name of the class (for a static method) or an instance of the class (for a public method), and the second is the name of the method of this class.
The class instance is in the $this variable:
// Connecting a class method outside the class add_action("wp_head", array("My_Class", "my_static_method")); class My_Class ( public function __construct() ( // Connecting a class method inside the class add_action("save_post", array($this, "my_public_method")); add_action("save_post", array(__CLASS__, "my_static_method")); ) public function my_public_method($post_id) ( // function code ) static function my_static_method($post_id) ( // function code ) )
Notes
To find out how many arguments an action passes, find it in the code and look. For example, here 2 arguments are passed:
Do_action("save_post", $post_ID, $post);
and for such a hook, the hook code will look like this:
Add_action("save_post", "my_save_post", 10, 2);
and the function will have 2 arguments:
Function my_save_post($post_ID, $post)( // function code here)
Creates an event (a hook for an arbitrary function). In order for a function to work at the time of an event, it must be connected to this event using the add_action() function.
In addition to events, WP also has filters, the principle of operation is the same. The only difference is that the filter must return the resulting variable, i.e. it filters (modifies) the data, and the event allows you to run a custom function when the event fires. Filters are launched using the apply_filters() function
✈ 1 time = 0.00007s = very fast| 50000 times = 0.03s = speed of light
There are no hooks.
Returns
Returns nothing.
Usage
do_action($tag, $arg_a, $arg_b, ...); $tag (string) (required) The name of the hook to create. $arg_a The value of the argument that will be passed.$arg_b (string/array/number/object/boolean) The meaning of one more argument...
Default: argument does not exist$arg_с (string/array/number/object/boolean) You can pass an infinite number of arguments to a function...
Examples
#1. Usage example
This function can be used in plugins, themes, etc. when you need to inject yourself into the code execution process from somewhere else. For example, we installed a “hook” (do_action) in the plugin, and we will “catch” to it from the functions.php file at the moment when our “hook” is triggered.
Let's say we used this code in the plugin:
Now we can do some action at the moment the do_action function is triggered, and at the same time we can describe our action, for example, from the functions.php file, placing the following code in it:
Function do_my_hook($a, $b)( // if the passed variable $a is true, // then, for example, delete post 10 if($a===true) wp_delete_post(10); // and then just display the variable to the screen echo "
".$b; // will display the value of the second variable ) // Register the hook via // add_action($tag, $function_to_add, $priority, $accepted_args); add_action("my_hook", "do_my_hook", 10, 2);
Actions differ from filters in that the data passed by the action is not returned back to the function and is not used there in the future, but is simply passed for use in the hook function.
Code do action: wp-includes/plugin.php WP 5.2.2
do_action($args); array_pop($wp_current_filter); )We have created the foundation for a future plugin that will be recognized by the WordPress system. Today we will directly change the basic functionality of the system.
A system of “hooks”, “events” (actions) and filters (filters) will help us with this. These three concepts are the basis of every WordPress plugin.
Hooks
There are two types of hooks in WordPress:
- Action hook: marks a place in the code that performs a certain action, for example, it is necessary to enter some data and save it in the database.
- Filter hook: marks a filter that will change some value (variable), so that in the future the code will use the modified value.
Actions
Working with events (actions)
The general logic for managing events in WordPress is simple:
- Mark the place where the action should be performed using an action hook with the necessary parameters.
- Create a function that will perform the desired actions using the parameters passed by the hook.
- Register an event that will be executed when the hook fires, with a specific priority.
- When WordPress loads a page and finds a hook, the system will execute all functions that are registered to that hook.
To accomplish the first point, the system provides the ‘do_action’ function:
Do_action($tag, $arg_1, $arg_2, ... , $arg_n);
It takes the following arguments: $tag – the name of the “hook”, $arg_1, $arg_2, ..., $arg_n – parameters with which the function will be called. There can be any number of arguments, or 0.
The system itself has many hooks already defined:
Do_action("init");
This is a very simple example with no additional arguments. This hook is triggered when most of the system is already configured and it’s time to create your own objects, categories, posts, etc.
Do_action("save_post", $post_id, $post);
In this example, the hook is triggered when a post is saved with two arguments post_id - the identifier of the post and post - the post itself.
Creating hooks is available to any developer to create their own plugin (or theme). Thanks to this, we have a powerful tool for controlling the behavior of the system.
Do_action("my_truly_custom_hook");
Once we have created the hook and written the function, we need to register the function using “add_action”
Add_action($tag, $function_to_add, $priority, $accepted_args_number);
The 'add_action' function takes two required parameters: $tag: the name of the corresponding hook and $function_to_add: the name of the function to be called. The other two parameters are optional: $priority: an integer variable that determines the order in which the function is executed (default is 10), $accepted_args_number: the number of arguments the function accepts (default is 1).
Let's look at an example to understand the whole process. Let's say we want to add a small notice at the bottom of our website. We can use the 'wp_footer' hook for this because it is a required part of the code that every theme uses.
Function msp_helloworld_footer_notice())( echo "
In this example, we created a function that simply renders the markup for the alert and registered it with 'wp_footer'. Once we add this code to our plugin file (see previous) we will see the result on the page:
WordPress Plugin Alert
Working with filters
Filters work in the same way as events. But filters don't just execute a specific piece of code, they change the values passed to them by the hook. This means that each filter has an associated value (variable) that it operates on.
The filter function will take this value and transform it for further use. Filter hooks are slightly different from action hooks.
Apply_filters($tag, $value_to_filter, $arg_1, $arg_2, ... , $arg_n);
The 'apply_filter' function creates a filter hook called $tag and a required parameter $value_to_filter (this can be empty, but must be declared). The remaining optional arguments work the same as for events.
Filter_function($value_to_filter, $arg_1, $arg_2, ... , $arg_n)( //filter return $value_to_filter; //value must be returned)
This is the "skeleton" of the filter, which demonstrates that the filter should:
- accept at least 1 argument;
- return modified value.
The 'add_filter' function registers a function with the name contained in $function_to_add for the $tag hook. The remaining arguments - $priority and $accepted_args - work the same as for event hooks.
Let's look at an example: a common task for a plugin is to add something to the end of a post. If we take a closer look at the 'the_content' function, which is used to display the contents of a post, we will find the following hook:
$content = apply_filters("the_content", $content);
Using it we can easily add something to the end of the post.
Function msp_helloworld_post_footer($content) ( $content .= "
"; return $content; ) add_filter("the_content", "msp_helloworld_post_footer", 100);Note that we use a large number for priority to ensure that all standard filters are executed before executing 'msp_helloworld_post_footer'. After including the code in our plugin we will see the result:

How to find a hook
Now we understand that in order to perform certain actions, we need to know about existing hooks.
The WordPress Codex provides lists of hooks for filters and Action Reference and Filter Reference events.
Additional actions with hooks
Just like adding, a hook can be removed using similar syntax.
You can delete events like this:
Remove_action($tag, $function_to_remove, $priority, $accepted_args); remove_all_actions($tag, $priority);
As you might have guessed, 'remove_action' removes a specific event registered for a given hook (the priority and number of arguments must be specified correctly, as was specified during registration), and 'remove_all_actions' helps remove all events registered for a hook (if priority is omitted, the function will delete all events).
Filters can be deleted in the same way:
Remove_filter($tag, $function_to_remove, $priority, $accepted_args); remove_all_filters($tag, $priority);
The WordPress plugin API also provides functions to check if a function is registered for a given hook:
Has_action($tag, $function_to_check); has_filter($tag, $function_to_check);
Both functions check whether the given function is registered for the hook and return true if successful, otherwise flase. Inside the function we have the ability to check that the hook called it:
If("hook_to_check_name" === current_filter())()
Despite the name 'current_filter' works not only with filters but also with events.
Non-trivial example
Let's revive the “skeleton” of our plugin, which we prepared in the last lesson.
Let’s fill the ‘core.php’ file (the main part of our plugin, which contains the bulk of the functions) with code that solves a problem that may actually arise during work. To solve this we will use actions and filters.
Let your WordPress site accept posts from different authors from guests, but does not allow you to create accounts. This means that the user who published the post and the real author are different people and we need to make sure that the author is indicated in the post. We can do this using taxonomy.
Let's create our own taxonomy to process the author's name and short biography. We will be able to use the author's name as other taxonomy terms (tags, for example) in the post. Code:
/** register filters and events **/ function msp_helloworld_init())( add_action("init", "msp_helloworld_taxonomies"); add_filter("the_content", "msp_helloworld_author_block_filter"); add_filter("post_class", "msp_helloworld_post_class"); ) add_action ("plugins_loaded", "msp_helloworld_init"); /** taxonomy **/ function msp_helloworld_taxonomies())( $args = array("labels" => array("name" => "Guest authors", "singular_name" => "Guest author"), "show_in_nav_menus" => false); register_taxonomy("gauthor", array("post"), $args ) /** author block markup **/ function msp_helloworld_author_block())( global $post; $author_terms = wp_get_object_terms($post->ID, "gauthor"); if(empty($author_terms)) return; $name = stripslashes($author_terms->name); $url = esc_url(get_term_link($author_terms)); $desc = wp_filter_post_kses($author_terms->description) ; $out = "
"; return $out; ) /** add markup to the end of the post **/ function msp_helloworld_author_block_filter($content)( if(is_single()) $content .= msp_helloworld_author_block(); return $content; ) /** add CSS class to post **/ function msp_helloworld_post_class($post_class)( global $post; $author_terms = wp_get_object_terms($post->ID, "gauthor"); if(!empty($author_terms))( $post_class = "gauthor"; ) return $post_class)As you can see, we've created a function to register our own taxonomy and bound it to the 'init' hook. Next, we created a template responsible for displaying the author block using the WordPress function ‘wp_get_object_terms’. Then we inserted a block with information about the author at the end of the post using the ‘the_content’ filter. And finally, we added our own CSS class. Result: