The HDDScan program is designed to test drives with SATA, IDE, SCSI, USB, FireWire (IEEE 1394) interfaces. Allows you to read SMART parameters for some external drives (USB, FireWire), view information about defects in SCSI drives, contains a built-in disk temperature monitor, allows you to manage additional drive operation parameters such as AAM, APM, PM and, of course, check the disk for reading and writing surface.
Working with the program
We will consider the application of the program using the example of testing the SAMSUNG HM502JX drive - this is a 2.5 ”drive with a USB 2.0 interface and a JM20329 USB controller. And so, our disk is connected to the computer. We start HDDScan, in the Select Drive list, select our drive.
When you press the SMART button under the disk selection window, the program reads the S.M.A.R.T. from disk. Let's look at him.

At first glance, SMART is normal - there are only two threatened parameters: 199 UDMA CRC Errosr (interface transmission errors) and 197 Current Pending Error Count (the number of candidate sectors for reassignment), and parameter 005 Reallocation Sector Count (the number of reassigned sectors) is 0. On this is worth paying special attention to, why - we will clarify further.
It's time to check the surface of the disk. When you click on the round button with the image of a disk, a menu appears with tests and additional features of the program.

Let's go over the menu items briefly.
- Surface test - disk surface tests
- S.M.A.R.T. – reads a smart report, seen in the illustration above
- S.M.A.R.T. offline tests - launching tests built into the drive; contains sub-items Short, Extended, Conveyance
- Temperature monitor - reads the disk temperature
- Features - allows you to manage additional disk parameters such as power consumption time, noise level, we will consider this item later
- Identity info - displays information about the supported ATA standard parameters
- Skin selection - allows you to change the appearance of the program
- Build command line - allows you to create a command line to run the program in the background and set the required parameters for the selected drive
- About - information about the program

We select Surface test, a window for selecting surface tests appears.
- Start LBA - start address of the test
- End LBA - the end address of the test, if you need to check only part of the disk surface
- Block size - the number of sectors written or read at a time, can be 256, 16384 or 65536 sectors
- Verify - check the sector without reading data from it
- Read - check the sector with reading its contents
- Erase - writing data blocks filled with sector number (erases user data completely)
- Butterfly read - reads blocks in pairs: one from the beginning, one from the end of the test area - block 0, block n, block 1, block n-1, etc.

It displays the name of the test, the device being tested, the start time of the test, the estimated end time, and the status of the test. Double clicking on the line with the test brings up additional information about the progress and results of the test.

The Map tab displays the reading time of the current block of sectors in milliseconds. The set checkbox disable map dynamic update disables real-time map updates. Dynamic map display may adversely affect the accuracy of block response time measurements on computers with a weak processor. Unreadable sectors are marked in blue. Here, at the beginning of the test, three bad blocks were already found, although, as we remember, there are no reassigned sectors in the smart, there are only candidates. Those. if you start only from S.M.A.R.T. data, without checking the surface, you can conclude that the disk is healthy, which in this case will be incorrect and may lead to inaccessibility of information on the disk.
The Report tab contains information about the current test, addresses of bad blocks and blocks with a read time of more than 50ms.

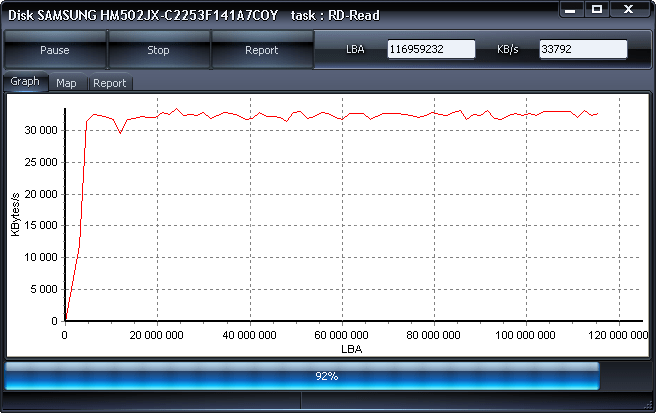
The Graph tab contains a graph of reading speed versus block address.
SMART offline tests allows you to run the following tests:
- short - scans a small part of the surface, sectors in the pending-list (candidates for replacement), the main nodes of the disk. Lasts about one to two minutes
- extended - checks the main nodes and completely scans the surface, can last from half an hour to several hours depending on the capacity of the disk
- conveyance - checks the main nodes and logs of the drive, which may indicate incorrect operation of the drive.

Temperature monitor - shows a window with the temperature of the disk being tested. The temperature is also displayed in the system tray.

Features looks like this.
- Automatic acoustic management - allows you to adjust the noise level of the drive due to the speed of head positioning, reducing the speed reduces noise, but slightly reduces performance; 0 - maximum speed, 254 - minimum
- Advanced power management - allows you to reduce the speed of disk rotation or completely stop it when there are no accesses, thereby reducing power consumption
- Power management - disk stop timer in the absence of accesses, set in seconds, after this time the platters stop and spin up again when the disk is accessed
- Spindown / spinup - forced stop / spin up of the disk.

Unlike Victoria, HDDScan cannot hide bad sectors (bad blocks).
Each user knows and will definitely get into such situations when something breaks down in the computer, works incorrectly or does not work well. There is nothing more annoying than badly thinking technology, which now and then freezes or, for unknown reasons, controls itself. Of course, all parts can break, but the mechanical parts that are still preserved in modern computers are especially susceptible to destruction. One of them is the hard drive.
In this review, not only theory will be considered. The authors had a failed disk at hand, the operating system of which loaded for about 20 minutes. It was decided to fix this and quite successfully!
What can go wrong
In order to prevent damage and repair the hard drive in time, or at least save the necessary information, you need to regularly monitor the status. To do this, it is recommended to carefully monitor the "health" of your computer. Here are the points to pay close attention to:
- watch out for errors. Technology, like humans, is prone to error. There was one incident with the hard drive - it's okay, but if errors appear constantly, you need to urgently contact the wizard.
- friction or beat. Since reading is done using the head, there is a chance that it will move and begin to spoil the main disk with information. If you hear a suspicious knock in the system unit, this may well mean that there is a problem with the hard drive.
- analyze work. If your computer did not save the file, or if a recently saved document suddenly disappeared, you need to go to the wizard. If the computer's long-term memory is not working well, the hard drive is to blame.
- recognition. The computer did not see the disk? Bad, most likely, this is a problem with the disk, and not with the software, although this may be the case. Try to put the part in another system unit. If it works - everything is in order.
- failures. Are you trying to upload a document, but the technician stubbornly refuses to do so? Problems with loading long-term memory files are taken from breakdowns of the same part.
- long loading. If you open every photo for half an hour, you can’t delete a light text document, then this is also a hard drive problem.
It is not necessary to sit at the system unit all the time the computer is running and listen to how the problematic part “does” there. It is enough just to periodically listen and carefully monitor the state of the entire computer, then everything will be in order.
How to Check Your Hard Drive for TOC Errors
In general, if your hard drive is fine and doesn't need emergency help, you can run a proactive error check. This will speed up your computer and save your nerves. Let's look at the algorithm of this useful procedure under the Windows 7 operating system.
- in order for the computer not only to find problems, but also to fix them, you need to check the box “Automatically fix system errors”.
- if you want to try to repair the physical structure of the disk itself, you need to select the "Scan for and repair bad sectors" option. Please note that this procedure will take a lot of time.
- any doubts? Select both options and perform maintenance.
Another little tip. If you decide to “treat” a disk that is a system drive for a computer, do it immediately before turning it off.
In order for any technique to work well, and it was easy for you to manage it, you need to monitor and care for it. Especially when it comes to a device that is much more complicated than a stove and it is sometimes quite difficult to figure it out on your own. Carry out preventive work, and if necessary, call the wizard and then with your computer, and, therefore, everything will be fine with your data.
HDD Regenerator
This program is best downloaded from the portal (softportal.com). We launch the installer.
If you leave a check mark in the last window, the program will start immediately. Let's not delay and let's get started.

And what is that Full Version menu? It turns out that the program is paid, and our compatriot requires $ 90 for a key. In addition, when removed, it behaves worse than a virus. Requires a restart of the operating system and takes a long time to think.


R.tester
- Right-click on any logical drive that you want to check.
- In the menu that opens, click on the "Properties" line.
- At the top of the properties window, click LMB on the "Service" tab.
- Click on the "Perform verification" button.
- Here, put both checkboxes in the checkboxes and click on the inscription "Start".

If the selected partition is not a system partition, the disk error check will start immediately. If you want to check the C: drive, the OS will display a notification that the operation cannot be performed at this time. Do not consider this behavior of the OS as a failure. Since all system data resides on the partition, it cannot be disabled while Windows is running.
Just click on the "schedule check" button and restart your computer. After turning on the PC, checking the disk for errors will begin even before the operating system loads.
Command line

To run the chkdsk utility from the command line, follow these steps.
- Right-click on the desktop and select "Create Shortcut" from the context menu.
- In the window that appears, you will be prompted to select an executable file, but the easiest way is to simply enter "cmd" in the input line and click "OK".
- Now right-click on the shortcut you just created and select the "Run as Administrator" line. A command prompt will open.
- Type: chkdsk [partition letter]: /f /r.
As with starting from a graphical shell, checking the disk for errors will notify you that the program cannot be executed if you specify a system partition. At the same time, the question will appear on the screen: "Do you want to execute the task after restarting the PC?" Press the Y key to say yes, or N if you don't want to check the HDD.
If the OS won't boot
If Windows refuses to start due to a file system problem, a hard drive error check can be run from the Recovery Console. Open the BIOS by pressing the DEL key on the computer's initial boot screen. Set as the boot device (First Boot Device) the laser disc drive. Insert the Windows installer disc.

After booting from the DVD, a language selection window will open. At the bottom of it will be located the item "System Restore". Remember that if errors occur on the HDD, it makes no sense to roll back to earlier restore points, overwriting data can lead to even more problems.
In a window that offers a choice of recovery options, click on the "Command Prompt" button. The syntax of the command remains unchanged - chkdsk [drive letter]: /f /r. In this case, the disk check will start immediately without rebooting.
Third party software
If the chkdsk utility did not lead to a positive result, and critical errors due to the HDD continue to occur, you should perform a more thorough check using. Hard drive manufacturers themselves produce special tools for testing their equipment. In addition to this software, you can use the Victoria and MHDD applications.
Be prudent! Checking the disk for errors by a third-party application should be performed only after creating backups of all important data. Moreover, you need to save copies of the data in external storage.
Let's make an explanation. "Bad sectors" are areas of the disk from which data cannot be read. Their very appearance is a bad sign, but acceptable, but a constant increase in their number indicates that the disk is most likely no longer a “tenant”. It is necessary to think about replacing it, and not to delay the decision for a long time.
So, the chkdsk program will check the disk, the check time depends on the size of the disk and the number of files on it. The system drive will only be checked after a reboot. You will have to be patient and wait for the work to be completed. When finished, a report will be displayed.
If you cannot log in, you will need to use the recovery tools and run the program from there.
Standard Windows check
Another way to check a disk is to use the check built into the OS. For this you need:


If the selected hard drive is used by any program, then to check it is necessary to stop its work. Click the "Disable" button and the test will continue. The scan time depends on the size of the disk and its fullness.
To check the system partition in this way, the system will display a message that testing will continue after the reboot. Agree with this, after restarting the computer, wait for the scan to finish.
With all due respect to Microsoft, only third-party programs can provide detailed information about disk health. If you need laptop repair, in Lyubertsy there is a good workshop where they can check your hard drive as well. Moreover, they will do this using third-party programs, which we will discuss later.
Ashampoo HDD Control 2
This program is paid, but a free trial period will give you the opportunity to check the drive. The program is multifunctional, with its help you can perform many actions with the disk, including defragmentation, disk cleaning, etc. Now we are interested in the "Testing" and surface check modes.
To start the check you need:

To determine the state of the disk surface, you need to go to the "Control" tab and click on the "Surface Test" section.

The progress of testing can be observed in the window that opens. To indicate the state of the disk surface, color marking is used:
- Blue - the sector is not checked.
- Green - no errors.
- Red - bad sector.
If the disk is large, the check may take a long time.
HDDScan
A popular program for getting information about a disk, checking it and fixing errors. To start testing you need:

To view the status of the disk, go to the "Map" tab, where all information about the surface of the disk will be located. Sectors are marked with squares of different colors. They mean:

Victoria
Perhaps the most popular utility for determining the health of a hard drive. It can be run both from Windows and from bootable media, if it is not possible to start the operating system. Consider working with a program launched from Windows.
After launching, in the main program window you will see several tabs, the most important of them are:

In order to start the test, you must click the "Start" button and wait for the end of the work. First of all, you need to pay attention to the column of multi-colored rectangles with numbers next to them. Color-coded information about the speed of reading from disk sectors is displayed. Ideally, the values should be near rectangles with different shades of gray.

The numbers next to the green or orange rectangles show the number of sectors for which you have to spend more time reading. The red rectangle shows that there are sectors on the disk, information from which can be read, but this requires a lot of time.
Most likely, these "red" sectors are candidates for bad ones. You should remember their number, and after some time re-scan. An increase in their number indicates degradation of the disk surface. Moreover, areas that are marked in blue may soon appear.
You can try to restore these "broken" sectors. To do this, you need to set the "Remap" mode and start the scan again. If possible, the program will restore these areas of the disk. If the "blue" blocks remain, you should think about replacing the hard drive.
Each user knows and will definitely get into such situations when something breaks down in the computer, works incorrectly or does not work well. There is nothing more annoying than a bad-thinking...
If you encounter errors in applications or the operation of the operating system (especially in tasks related to writing or reading information on the disk), then there is a good chance that the disk has various annoying errors. They can occur due to improper shutdown (system crash or sudden power outage), physical damage to the drive (shocks, drops, vibrations, and so on), improper operation, or too long a period of use. In this case, it is recommended to check the disk for errors. The test may not fix the problem itself, but it will help you navigate the diagnosis of the problem and move in the right direction in an attempt to return your computer to working condition.
Note: All actions in this manual are performed on behalf of the Administrator. If your account does not have the appropriate rights, you will need a password from the Administrator profile.
How to Check a Disk for Errors in Windows 10 via Command Prompt
You need to run the utility chkdsk. It can check the disk for errors and fix them if necessary. The same procedure starts automatically with Windows if the system itself determines the problems with the partition. You can initiate a check manually if necessary.
note: team chkdsk only supports drives formatted in NTFS or FAT32 format. ReFS does not need to be checked at all, since this file system has its own integrity check mechanisms.
Pay attention again: If the system is currently using a disk that is being tested, it will not be possible to correct errors. In this case, Windows will prompt you to schedule an automatic fix after the next reboot.
If Windows has detected errors, but cannot fix them in any way, try using the offline check disk command. In this case, the system disables other programs from accessing the disk and tries to fix its work. After the procedure is completed, the disk is activated again and applications will be able to read and write information to it. To check offline on the command line, you need to use the command chkdskX:/f/OfflineScanAndFix. In this case X: is the disk to check.
To display additional arguments for chkdsk(additional actions), enter chkdsk /? . Command Prompt will display a list of available commands.
How to do disk diagnostics in Windows 10
Another option is to use the storage diagnostic utility. At a command prompt run as Administrator, enter the following command:
stordiag.exe -collectEtw -checkfsconsistency -out X:\XXXX.
Instead of X:\XXXX enter the location where the system will save the scan results. Please note that after this command, Windows will check all connected drives, so the process may take a little longer. Just be patient and wait for the message about the successful completion of the drive diagnostics.
I must say that this method only collects information about the status and is unlikely to help the average user fix problems with the disk. However, for a specialist, the collected information can provide a lot of useful information. The diagnostic utility collects information about the results of the scan chkdsk and any errors found, registry files associated with drives, and the Windows Event Viewer log.
How to Check Hard Drive Errors Through PowerShell
The more modern PowerShell utility uses a separate command to run a disk error check.

When checking the disk for errors, you may need a command that will disable the communication of the drive with applications (“offline” mode), due to which programs will not be able to write information to it. The team is responsible for this process. Repair-Volume-DriveLetterC-OfflineScanAndFix. Again, instead of With you must put the letter of the drive you need.
Check disk for errors in Windows 10 through File Explorer
If Command Prompt and PowerShell don't work for you, there's an easier way to check the drive for errors. Windows Explorer already has all the necessary mechanisms built in with a friendly user interface.

How to check the disk for errors through the Control Panel
The classic Windows Control Panel will for a long time contain options and tools that are not found in the more modern Settings app. Checking the status of the disk is one of those.

If, after checking and correcting errors, you continue to observe problems with your computer, then it makes sense to think about troubleshooting elsewhere, or try to replace the media with another one.
This beginner's guide will show you step by step how to check your hard drive for errors and bad sectors in Windows 7, 8.1 and Windows 10 through the command line or explorer interface. Additional tools for checking HDD and SSD that are present in the OS are also described. Installation of any additional programs is not required.
The easiest way to check HDD in Windows is to use File Explorer. In it, right-click on the desired hard drive, select "Properties", and then open the "Tools" tab and click "Check". In Windows 8.1 and Windows 10, you will most likely see a message that this drive is not currently required to be verified. However, you can force it to run.

In Windows 7, there is an additional option to enable checking and repairing bad sectors by checking the appropriate boxes. You can still find the verification report in the Windows Application Event Viewer.
You can check the hard drive for errors not only using the command line, but also in Windows PowerShell.
In order to do this procedure, run PowerShell as an administrator (you can start typing PowerShell in the search on the Windows 10 taskbar or in the Start menu of previous OSes, then right-click on the found item and select "Run as administrator" .
In Windows PowerShell, use the following variants of the Repair-Volume command to check the hard disk partition:

If you see the NoErrorsFound message as a result of running the command, it means that no errors were found on the disk.
Additional options for checking disk in Windows 10
In addition to the options listed above, you can use some additional tools built into the OS. In Windows 10 and 8, disk maintenance, including checking and defragmenting them, occurs automatically according to a schedule, at a time when you are not using your computer or laptop.
To view information about whether any disk problems were found, go to "Control Panel" (you can do this by right-clicking on Start and selecting the desired context menu item) - "Security and Maintenance Center". Open the "Maintenance" section and in the "Disk Status" item you will see the information received as a result of the last automatic check.

Another feature that appeared in Windows 10 is the Storage Diagnostic Tool. To use the utility, run a command prompt as an administrator, then use the following command:
Stordiag.exe -collectEtw -checkfsconsistency -out path_to_report_save_folder
The command will take some time to complete (it may seem that the process is hung), and all connected drives will be checked.

And when the command completes, the problem report will be saved to the location you specified.

The report includes separate files containing:
- chkdsk check information and error information collected by fsutil in text files.
- Windows 10 registry files containing all current registry values related to attached drives.
- Windows Event Viewer log files (events are collected within 30 seconds when using the collectEtw switch in the disk diagnostics command).
For an ordinary user, the collected data may not be of interest, but in some cases it may be useful for diagnosing drive problems by a system administrator or other specialist.
If you have any problems during the verification or need advice, write in the comments, and I, in turn, will try to help you.
Comments (113) to Checking the hard drive for errors in Windows
05/21/2017 at 08:14
06/29/2017 at 10:12 am
07/27/2017 at 08:36
09/23/2017 at 08:04
11/01/2017 at 00:56
01.11.2017 at 11:44
01.11.2017 at 11:17
- If chkdsk (command line diagnostics) was used to scan, it automatically tries to fix system problems.
- If the use of this utility turned out to be unsuccessful, it is worth trying to treat it with third-party utilities that provide for the possibility of replacing the address of an unreadable server with a backup one. Such utilities include Victoria, MHDD, HDDScan. Using this method is dangerous because during the correction of errors, the user may lose the information stored on the hard drive. And if the hard drive is in poor condition, then it can completely fail. Therefore, before launching utilities for scanning and treating a hard drive, it is necessary to save all important information on a third-party resource.
05/20/2017 at 13:56
06/12/2017 at 20:02
06/29/2017 at 09:32
07/27/2017 at 08:03
08/19/2017 at 17:01
09/17/2017 at 21:25
hater23566325
09/22/2017 at 19:35
01.11.2017 at 11:09
If the computer (laptop) starts to “freeze”, work slowly, the OS does not work correctly, the Windows 10 hard drive error may be to blame. There are several ways to check the hard drive - starting with standard operating system tools, and ending with special utilities, special programs.
How to Check Your Hard Drive for Windows 10 Errors
The easiest way to check a hard drive for Windows 10 errors, available to novice users, is through the Properties tab. It is done like this:

You can check the status of the hard disk through command line. For this:

Sometimes, to determine the error of the hard drive, it is necessary to check when using third-party programs. Before scanning, it is recommended to save all important information in a safe place, for example, on external media. One of the most popular utilities for checking a hard drive is Victoria. It performs a comprehensive scan of the hard drive, identifying all damaged areas and operating errors.
If problems in the operation of the equipment are caused by mechanical damage to the hard drive, you need to change it to a new hard drive. If the scan showed software errors, there are several ways to fix them:
Programs after scanning highlight bad sectors of the hard drive. Depending on the site, they are indicated by crosses or other graphic symbols. If there are a lot of highlighted areas, this indicates that the hard drive is in critical condition and it makes no sense to restore it.
Programs for fixing hard drive errors
There are many utilities designed to find and fix hard drive errors. But the most popular among them are:

Timely diagnosis of hard drive errors is one way to extend its life. But if the user does not have experience in using special programs, it is better to entrust this task to specialists.