How to set up a wifi router
A router is a network device designed to create a wireless network between various devices: desktop and laptop computers, smartphones, tablets, etc. In addition, it can be used as an Ethernet router and wireless access point.
Setting up a WiFi router is possible both to access the global network and to work via an internal network. Our instructions will help you set up most router models, but we still recommend checking the instructions for details.
How to set up Wi-Fi at home?
To set up the Internet and internal network through a router, you need: the router itself, a computer with a working network card, an Internet connection provided by the provider, and a network cable with a “direct” crimp.
Typically, a router interface has one external port (WAN) and four internal ports (LAN). The external port is intended for connecting to the Internet, and the internal ports are for connecting computers to the internal network.
How to connect a WiFi router to a computer?
The first thing you need to do is connect the router to your computer.
- Connect the router and PC using a network cable.
- If the connection is successful, you will see the new connection in the list of network connections on your computer. Right-click on it and select “Properties”. You will see a window for editing the properties of your connection.
- In properties, select the item called “Internet Protocol (TCP/IP)” and click the “Properties” button.
- In the window that opens, select “Use the following IP address” to set the IP address settings manually.
- Enter the following information in the fields:
- IP address: 192.168.0.2 (or 192.168.1.2) - local IP address of the computer.
- Subnet mask: 255.255.255.0
- Default gateway: 192.168.0.1 (or 192.168.1.1) - local IP address assigned to the WiFi router.
- DNS: 192.168.0.1 (or 192.168.1.1)
Note! The router manufacturer may have specified other settings, in which case you should use them.
ping 192.168.x.1
How to set up a WiFi router?
If the IP address is pinged, then it is specified correctly, and you can proceed to the next step - setting up the router using the web interface. In most cases, the router manual will provide information on how to access the settings management interface. If such information is missing, try entering the following address into the browser address bar: http://192.168.x.1.
On the page that opens, you will see a request to enter your username and password in the appropriate fields. This data should also be indicated in the instructions (or on the panel of the router itself). If you do not find your login and password, try entering the combination “admin” - “admin” or entering the login “admin” and leaving the password blank. For most routers, one of these options will work.
When you log in, the administration panel becomes available. The next step is setting up a Wi-Fi network.
How to set up Wi-Fi
How to properly configure a WiFi router? In the settings, select the WiFi section (it may be called “wireless”). Then create a new or select the current user profile and enter the following data in the settings:
- SSID: network name
- Channel:auto
- Wireless Mode: auto
- Authentication Method: WPA-PSK
- WEP Encrypting:TKIP
- WPA Pre-Shared Key: enter the password to access the network
All settings not listed above can be left as default.
Now restart the router via the web interface and you can start setting up Wi-Fi on mobile devices: smartphone, laptop, and so on.
How to set up WiFi to connect to other devices?
Go to the wireless connection settings and manually enter the IP address, subnet mask and gateway. They must have the following values:
- Mask: 255.255.255.0
- Default gateway: 192.168.(0/1).1
- The IP address should be selected from the free range (192.168.1/0-255)
Save your settings. Then specify authentication using WPA-PSK and TKIP and WEP encryption in the authorization settings. Now all that remains to connect is to enter the network password.
If you need to “distribute” the Internet over an internal network, connect the network cable from your provider to the external port located on the router. After this, you need to specify the login and password provided to you by your provider in the settings.
Now you know how to set up a Wi-Fi access point yourself.
As noted above, settings may differ in different router models, so be sure to read the instructions for the device before starting setup. It is quite possible that when setting up a modern router model you will have to spend much less time and effort.
The number of smart gadgets used in our homes is growing every year. Therefore, having a good and stable WiFi network in every room becomes not a whim, but a vital necessity.
With its help, you can easily connect all devices into a common local network with Internet access.
The article will examine step by step and in detail all the stages of connecting a wi-fi router, starting from choosing the installation location, laying wires and installing Internet sockets - where, how and in what way it is best to do this.
And ending directly with setting up the Internet connection and network on the computer. Plus, we’ll touch on the issue of finding possible problems and malfunctions.
How to connect
 Let's start with tools and materials. If you install the router directly next to the computer, then the factory patch cord included in the kit will be enough for you to connect.
Then you can skip this stage of installation work and proceed directly to the settings below.
But when the WiFi router is mounted in the hallway on the wall, for good distribution of the Internet throughout the apartment or house, then you will have to purchase some materials:

Utp5e or utp6 is used, the so-called twisted pair.

You can take single or double, depending on the number of gadgets.


- directly the Wi-Fi router itself
Installation location of the Wi-Fi router
First of all, choose the correct location for the router. The speed and quality of the signal in remote rooms will largely depend on this.
Those who, in addition to the switchboard, also install a low-current shield, usually place it next to it. In this case, there will be less hassle with connecting and pulling wires. 
It is into the low-current panel that the cable from the Internet provider is inserted from the entrance of the house.
For those who do not have such a shield, choose a place in the corridor on the wall in the upper part. The higher the signal, the better the signal. 
At the same time, do not forget that there are places where it is strictly forbidden to install a wifi router:
- near devices operating at frequencies of 2.4 and 5 GHz (microwaves, cordless phones)
By the way, the 2.4 GHz frequency range is in turn divided into 13 channels. 
This is done so that several different gadgets do not interfere with each other when working.
At the same time, it is not at all a fact that you will be able to find a completely empty channel, not occupied by neighbors. You will have to look for the most free one in order to avoid future connection breaks and improve the quality of communication.
- directly opposite a mirror or cabinet with glass doors
- in a deep niche with a metal door
This also applies to low-current shields. Some people place the router in it, along with the rest of the weak point. For example, video surveillance. 
Be careful and pay attention to the material from which the shield is made. 
Connecting a UTP cable and installing Internet sockets
You can connect it either directly to the router or make a separate outlet for it. Thanks to such an outlet, your router will not be tied to one place, and the design of your apartment will look much nicer. Compare a neat outlet with a lonely wire sticking out of the wall. 
To avoid confusion, label this cable as WAN. 
From this place where the WAN cable ends, stretch four-pair UTP cables into the rooms where Internet sockets will be installed for all your other gadgets. 
Number these wires as LAN1-LAN2-LAN3, etc. 
Of course, the router itself, hanging from the ceiling, needs to be somehow connected to power. To do this, you do not need to pull a separate 220V cable directly from the switchboard. Make a connection from the nearest distribution box of the socket group. 
Stretch the VVGnG-Ls 3*1.5 cable from the junction box to the installation location of the future 220V outlet near the router. 
Having completed the installation of all the wires, we proceed to installing accessories - electrical sockets, Internet sockets and connectors. First of all, you need to connect an Internet power cable from your provider signed as WAN. 
Remove the outer insulation from it by 2 or 3 cm, and separate the multi-colored veins on the sides separately from each other. 
The correct connection can be seen on the body of the outlet itself. Place the wires inside and snap the lid on. 
All that remains to be done is to secure the Internet socket in the socket box and cover it with a decorative frame. All other computer sockets near the router itself and in all rooms are made using exactly the same scheme.
In this seemingly simple matter, you can initially make a bunch of mistakes, due to which you will never be able to set up your network. You will tinker with the settings, reflash the drivers, and the problem will turn out to be an incorrectly mounted socket.
How to avoid such mistakes is discussed in detail in the article below. Be sure to check it out, especially if you have network problems. 
Each outlet on the sockets is labeled, and the router itself is fixed on the wall. 
You can, of course, purchase them ready-made, but they do not always come in the required length. It’s better to measure the size yourself, strip the wire on both sides and carefully arrange the wires in a row according to the T568B diagram:
- white- orange
- orange
- white- green
- blue
- white- blue
- green
- white- brown
- brown


After this, carefully insert the wires into the RJ connector until they stop and crimp the ends of the cable with a crimper. You do the same with the rest of the patch cords for other devices. 
All that remains is to connect the router itself with cables. Find the blue connector on the back panel with the inscription WAN and connect it with a patch cord to the Internet power outlet from the provider. 
Some manufacturers may have connectors of the same color, so be careful not to mix them up. In this case, be guided by the WAN name. By inserting the provider's Ethernet cable into the LAN connector, you will not have Internet access. 
Also note that on older models, where the Internet is distributed over a telephone line, this connector is in RJ-11 format. These routers have a built-in DSL modem. They are intended for those providers who provide ADSL connections.
But this technology is already considered obsolete, and such modems are not so in demand, although they are used.
Yellow output connectors – LAN1,2,3 are intended for connecting wired Internet. Connect Internet sockets in all rooms through them. 
And then to them, your smart stationary gadgets - TV, set-top boxes, etc. 
Plug the power supply into a 220V socket and supply voltage to the WiFi router. 
Don't forget to switch the corresponding lever or Wi-Fi button to the ON position. 
Otherwise, the device will work for you like a regular cable router, without creating a wireless network. If your router is not new, or it was set up when checked in a store, then you need to reset all old settings to default. This is done by long pressing (several seconds) on the Reset button. 
You have completed the physical connection of the router itself, all that remains is to configure it correctly on the computer.
Setting up a router on a computer
Insert the patch cord from LAN1 into the appropriate connector on the computer. When connected, two indicator lights should light up. 
If a disc is included, insert it and run the installation wizard. 
In it, select your country, city and provider from the drop-down list. 
All settings from this provider are already built into the router. This assistant will automatically detect the type of WAN connection available.
If your service provider is not on the list, you will need to choose the connection type yourself. To find out, read the contract or call technical support.
The most common is a dynamic IP, where the address is registered automatically. 
When the disk is missing, enter the default address in the browser line, which is indicated on the back of the router. 
Enter your username and password. They are also indicated on the sticker.
Or simply dial the universal addresses 192.168.0.1 or 192.168.1.1. After that, also enter the password and name (admin). 
After completing this, you will be taken to the main page of all settings. We will consider the settings using the example of a router from TP-Link.
The first tab “status” provides general information on all device parameters. Including the state of the Internet signal connection. 
“Operating mode” – in this window you can change the main operating modes of the router’s wireless module to the “access point” or “WiFi signal amplifier” mode. A detailed description of these modes is given at the side. 
Now you can go directly to setting up your Internet connection.
When selecting “quick settings”, click automatic detection of connection type and click next. This process is very fast and configures the local network. 
To configure the Internet itself, select the “Network” tab and then the WAN subsection. 
In the window that opens, call up a list of available connections. The default is dynamic IP.
If your provider uses exactly this type, then essentially you do not need to make any settings in this subsection. The router itself will work to obtain an IP address, subnet mask, etc. 
The next type is “Static IP”. This type of connection is the exact opposite of the first, since all network parameters will have to be entered manually. Your provider should provide you with all the necessary information. 
L2TP point - this type of connection is one of the types of VPN connections. Therefore, to connect, you must enter a lot of identification data.
Login, password, server IP address. Be careful with the latter, since both dynamic and static addresses can be used, which of course increases the amount of information entered during setup. 
Next “PPTP connection”. The setup is similar to the previous L2TP. 
The last tab is “BigPond Cable”. This is a very rare compound and there is no point in considering it within the scope of this article. 
Let's take a closer look at the third type - PPPoE. Very often it is used by the Internet provider Rostelecom. Here you need to enter your login and password, which are specified in the Internet services agreement. 
It is advisable to leave all other data unchanged. After that, click “connect” and “save”.
This completes the manual Internet connection settings. Now you can open any Internet page to check.
Sometimes a bad connection can be caused by an old firmware version. To check the software is up to date, return to the “status” tab and remember or write down the software data indicated at the top. 
After that, in the search engine, enter the version of your device with the control phrase “official website”. Select the required link and check the hardware version. 
In the screenshot this is V5. Go down and click on the “firmware” tab. It compares the latest available version with the one installed on your router. 
As you can see in this case, no update is required.
Setting up the router's wireless mode
Now let's take a closer look at the wireless mode. To do this, select the appropriate menu item on the left and the “Basic settings” subsection. 
In this window you can change the standard network name to your own.
The mode and channel width change if any of your wireless communication devices have problems connecting to this WiFi router. In other cases, it is better to leave these parameters as default.
Thus, your router has changed the network name. However, the password remained the same, which came from the factory. Therefore, find your network with a new name and click connect. 
Next, enter your previous security key. The new network is connected. Return to the settings menu. 
The next subsection is WPS. 
In this window, you can enable or disable the WPS function, which allows you to quickly and password-free connect devices by pressing the corresponding button on the router case. 
“Wireless protection” - this page allows you to make the network open or change the version, encryption type, and most importantly the Wi-Fi network password. 
Since you changed the network key, you need to reconnect, but with a new password. To do this, you must first “forget” the old password in the wireless network settings menu.
Then reconnect and enter new data. 
This completes the basic settings of the router.
Connection errors or why WiFi doesn't work
 What to do if you have gone through all the stages of settings, but there is no Internet. Or one day, after a long successful operation, your WiFi network suddenly disappeared, or devices stopped seeing it and connecting normally.
Where to start looking for the cause, and how to solve it? There are many reasons and methods; we will list only some of the most common ones. 
The first, simplest, but nevertheless effective and working method, which helps in many cases, is a simple reboot of the router or computer.
When WiFi disappears on only one device, but is available on others, then look for the problem first of all on this device.
For example, there is no Internet on the laptop, but the TV and phone work fine. For many people, the error is hidden in the power supply of the wifi adapter. Go to the following path: device manager - your network adapter - properties.


Select the "Power Management" tab and uncheck the "Allow the computer to turn off this device to save energy" checkbox.


If there is no network on all devices, then the reason is in the router. To find the problem, find out whether WiFi itself works at all? To do this, you need to make it open.
Go to the router settings address 192.168.0.1 in the wireless network section and then remove encryption by setting the value to “open system” or “disabled” depending on your model. 
Also open the network SSID.
If Wi-Fi appears, then the reason is encryption. You can try other signal encryption methods, there are several of them.
Another reason could be the WPA key length. If there are too many characters, the router stops working.
Using the enumeration method with a gradual increase by one, you can select the maximum length.
Firmware update
If the problem is not with encryption or key length, then try resetting the settings to factory settings and going through the connection procedure again.
When this does not help, it is worth updating the firmware. On the manufacturer's website, look for the latest current version, download it and update the file.
Computer problems
If the reason for the performance of the router is not the router, but the computer itself, then in the device manager, check the properties of the network adapter for the WiFi network. When the device works normally, there is a problem in the software.


And when an error clearly appears, update the driver. 
How to determine that the problem is in the software? This can be done using recovery checkpoints. Restore the system from the last automatically created point and return Windows to a few days ago when the network was functional. 
If everything goes well, then the problem is definitely on the side of the operating system, or some other programs in Windows related to the Wi-Fi network.
Authentication Error
If you receive this error, the first thing you need to do is check your password. If you doubt its correctness and want to find out whether you are entering the right characters, you need to go to the router settings.
Again 192.168.0.1 - security settings - encryption key.
When connecting your device to WiFi, enter it in the login field again. If nothing has changed, you may have to reinstall the drivers on the network card or network adapter.
Other causes of the malfunction not listed above can be found in the video:
Modern people cannot imagine their life without the Internet. We work, communicate, play, study, have fun on the global network and it is no longer possible to do without all this. Meanwhile, recently more and more attention has been paid to Internet speed. Fortunately, slow Internet is a thing of the past and now we can afford to travel across the World Wide Web at high speeds. Many regions have been in the coverage area for a long time 3G and 4G, which allows you to use wireless Internet at fairly high speeds. However, no matter how hard mobile operators try, they have not yet been able to achieve the speeds that wired Internet can provide, and therefore the questions still remain relevant - how to connect a router and how to configure the router .
Home WiFi router offers a lot of advantages and more and more people are deciding to purchase it. We have prepared detailed instructions for those who want to know how to connect router and configure it. Let us immediately note that there is nothing difficult in installing, connecting and configuring a WiFi router (another name for a router). You just need to be patient and follow the instructions below. Of course, today many companies offer router installation and configuration, but you will have to pay for this work. If you are not ready to spend additional money, then this article will be very useful for you.
Before we tell you how to set up a router, it should be said that the setup procedure may differ depending on the specific model of WiFi router, and therefore we have prepared several more articles with a detailed description of the installation and configuration of the most popular routers. Here we will look at the main points. As the article progresses, links to more detailed instructions will be posted. So, let's assume that you already have a WiFi router and all you have to do is install and configure it.
Where is the best place to place a WiFi router in an apartment?
Before installing a router in an apartment, you need to decide on the most optimal location for its location. The coverage area of your WiFi network depends on the correct location of your home wireless router. Particular attention to this point should be given to those who live in a fairly large apartment or house. Router manufacturers indicate the maximum signal range in the instructions, but you should not count on these numbers. The fact is that a lot depends on the material from which the walls of the apartment are made. Moreover, do not forget about all kinds of interference, for example, an ordinary aquarium or cabinet can reduce the coverage area.
Many people are convinced that the optimal placement WiFi router is the table on which the computer or the system unit itself is located. We do not recommend that you choose this location because the signal quality and coverage will be much worse than the WiFi router's specifications allow. It is preferable to place the router approximately in the middle of the apartment and as high as possible. If you live in a one-story house, then the WiFi router should be placed approximately as in the picture below:

For a two-story house, the following router location would be optimal:

We noted above that installing the device next to the computer is not the best option, but we did not explain why. The fact is that other sources of electromagnetic interference worsen the performance of the wireless router, therefore, you need to place the router away from such sources, which include not only a PC, but also a microwave oven, cordless phone, etc.
How to install a router

Everything is clear with the location of the WiFi router; besides, if you have a small apartment, there will be no problems with the coverage area, the main thing is to place the device away from sources of electromagnetic waves. Now let's find out how to install the router. If the process of setting up and connecting a router involves certain differences depending on the specific device model, then the installation will be standard in almost all cases. In principle, the main thing in installing a router is to correctly determine the location of the device, but we have already dealt with this.
Open the box with the router, take it out and connect it to the power supply. The lights on the front side of the WiFi router should light up; if this does not happen, then there are some problems with the device and to solve them you need to contact the store where the router was purchased. On the back of the WiFi router you will find several ports. However, we will examine this point in more detail in the next section. We believe everything is clear on how to install the router. We will not teach you how to use the tool necessary to secure the device, but the connection process is worth considering.
How to connect a router to a computer
WiFi routers may differ depending on the specific model, but they have a lot in common. Below we will look at the functionality and process of connecting a regular WiFi router. Modern routers have at least four LAN ports through which the connection to the computer is made. Also, any router must have a WAN port intended for connecting a cable from the provider.

Speaking about how to connect a router to a computer, it should be said that this procedure is extremely simple and any PC user can handle it. To connect correctly, you need to do the following:
- Correctly crimp the twisted pair (network cable), if necessary;
- Connect the WiFi router to the power supply;
- Connect the network cables (provider cable and cable to the computer);
- Set up the network (detailed setup instructions below). The connection diagram of the router to the computer is shown in the picture:

Let's look at how to connect a router to a computer if the WiFi router is already connected to another PC, that is, you need to add another device to your home network, for example, a laptop.
We connect one end of the cable to LAN connector of the WiFi router, and the other into the connector of the PC network card. After connecting the cable, a network access icon should appear on your computer monitor.

If the corresponding icon does not appear, then most likely the problem is that the network card is disabled. Another reason for the missing network connection icon is the lack of necessary drivers. Let's go to “Control Panel\Network and Internet\Network Connections” and check the visibility of our network card. If you see a network card and it is simply disabled, then you need to enable it. To do this, right-click on it and select "Turn on". If the network card is not displayed, you need to install the appropriate drivers. To do this, you will need a disk, which should be included with the router. If there is no such disk, download the necessary drivers from the Internet.
Speaking about how to connect a router to a computer, it should be said that another situation is possible when, after connecting the PC to the WiFi router, the corresponding icon appears, but with an exclamation mark, that is, there is no way to connect to the Internet.
This problem can most likely be resolved by configuring the network card. Through the control panel, go to network connections, then in properties select the item and press the button "Properties". Selecting items "Obtain an IP address automatically" And "Obtain DNS server address automatically", after which we save all the settings. After this, the WiFi router should automatically configure itself to distribute IP addresses. However, sometimes the Internet does not work even after these steps. In this case, you need to check the cable or the router itself for serviceability. So, we hope everything is clear with the connection, now let's find out how to configure the router.
How to set up a router
As has been mentioned many times, the router setup process may vary depending on the model you purchased. However, despite the huge variety of models and manufacturers, all wifi routers perform the same function, and therefore they are characterized by similar functionality and configuration tools.
Of course, the appearance of the router configuration interface (the web page on which the router settings are made) is unique for each manufacturer, and therefore we have prepared several separate articles dedicated to configuring the most popular routers today.
So, take a look at the model of your wifi router and then check out the list of articles below with instructions for setting up various routers, if your device is on this list, follow the link. (If you don’t know how to get to the settings page, read this article to the end).
Router d-link dir-300: Wireless router 802.11g DIR-300. The DIR-300 is based on the 802.11g standard, but is also backward compatible with the 802.11b standard, ensuring compatibility with a wide range of wireless devices. contains four Ethernet ports. Thanks to D-Link Quick Router Setup Wizard(To the Quick Router Installation Wizard), network setup can be completed in a matter of minutes. supports the system Wi-Fi Protected Setup™ (WPS), which simplifies wireless network and security setup.
Router d-link dir-615: Supported Wi-Fi standards: 802.11b/g/n (draft)
Network interfaces: 4 LAN 10/100Base-T ports, 1 WAN 10/100Base-T port. WAN connection types: Static IP, Dynamic IP, PPPoE, L2TP, PPTP, DualAccess PPPoE, DualAccess PPTP.
Zyxel Keenetic router: Adapted to work in the networks of leading Russian providers. Internet speed via PPTP and L2TP - up to 55 Mbit/s, via PPPoE and IPoE - up to 70 Mbit/s. Torrent download speed is up to 5 MB/s with a number of sessions of about 500. Link Duo technology for simultaneous work on the Internet via PPTP/L2TP/PPPoE and with regional network server resources. Supports IEEE 802.1X standard for Internet access.
tp-link router: The vast majority of Tp-Link routers run on firmware that is as similar to each other as two peas in a pod. The only significant difference is the different software languages in the “default” version for a particular model.
Asus router: High-speed wireless 4-port router. Configuring Asus routers fundamentally differ in configuration by only two firmware versions, let's look at both of them.
Rostelecom router: There are several types of routers from Rostelecom, we will look at setting up the following: Rostelecom universal routers - Sagemcom f@st 2804 v5, v7 and v7 rev.1, Sagemcom f@st 3804, QTech RT-A1W4L1USBn and Startnet AR800.
The above articles contain detailed instructions for setting up wifi routers of certain models and manufacturers, but this manual does not end there. It is not enough to know how to configure the router directly in the configuration interface. You will also have to configure the network card settings. In addition, many of you will find it useful to know the IP addresses of the device on the local network. All these points are also included in this article.
Configuring network card parameters
Before attempting to log into the router interface, you must configure the network card correctly. To do this we go to "Network connections" by pressing a key combination Win+R and enter the command ncpa.cpl.

Click "OK". The Network Connections window will open. Right-click on the one through which the router is connected to the computer:
Next, select the item "Properties" and in the window that opens "Local Area Connection Properties" double-click on the component with the left mouse button "Internet Protocol Version 4 (TCP/IPv4)". Don't forget to check the boxes to automatically obtain IP addresses and DNS addresses.

In the vast majority of cases, a wifi router has an active DHCP server looking into the local network, which will issue an IP address to your computer. You can view it at "Connection status" by pressing the button Intelligence .
So, we hope everything is clear with the configuration of the network card parameters, now let's move on to the final section of today's article.
IP address of the device on the local network
After connecting the router to your computer, you will need to go to the router configuration interface to complete the setup. This is done by entering the web interface address in the address bar. Each router has an IP address on the local network, most often it is 192.168.1.1 . however, other options are possible, for example, devices from D-Link and NetGear have an address 192.168.0.1 , and routers TrendNet - 192.168.10.1. So, if you have a router, for example, D-Link, then you need to enter the following into the address bar of your browser URL: http://192.168.0.1. After this, a page with a form for entering a user name and password to access the web interface will appear on the monitor. Typically, the username and password have the same meaning - admin. Although exceptions are possible. The router's IP address, username and password are often indicated on a sticker located on the bottom cover of the device.

If you can’t log into the web interface, first of all you need to check whether your computer receives an IP address from the device’s DHCP server. It also makes sense to try to register the IP address manually in the protocol settings TCP/IP. After that, try pinging the router. This procedure is performed as follows: open the command line and enter - ping 192.168.1.1.
I guess we'll end here. Now you know how to connect a router and how to configure the router. Don’t forget that links to articles with more detailed instructions for setting up routers from various manufacturers are posted above.
Wireless Internet is gaining more and more popularity and this process can no longer be stopped. To have wireless Internet or a Wi-Fi access point at home. I tried to describe in detail the process of connecting a Wi-Fi router with photographs and videos.
In fact, there is nothing complicated here, but you will need a little care and, perhaps, the phone number of your Internet provider. The whole process can be divided into three stages: physical connection, setting up a router and setting up a computer or laptop.
Connecting the router to the computer
After you have taken the router out of the box, you need to connect it to your computer. By default, I will mean that you have a regular wired Internet.


Enter the router settings
After turning on the router, it needs time to boot and get itself in order. At this time, the lights on the front panel may light up and go out, wait 1 minute. We need to go to the administrative interface of the router and configure it. This is done through any browser, such as Internet Explorer, Google Chrome or Opera. To log into the “admin panel” of the router you need to write in the address bar:
192.168.1.1
login: admin
password: admin

A small note: the address 192.168.1.1 is used in most routers. If you receive a “Page not found” or “Page cannot open” error, then try using a different address, for example: 192.168.0.1
If there is an ambush here, then you need to find out the correct address, for example from the sticker on the back of the device:

If it’s not there, then you need to look at the instructions, which may be on the included disk, or search the Internet from your phone. The same applies to the login (username) and password (password), i.e. not everyone has admin/admin. If the device is used, then maybe someone changed the default settings. In this case it is necessary. To do this, you need to find the “Reset” hole on the router and press the button inside with a match.
Network cable is not connected
Let’s say the login address and login/password are known, but you still can’t log into the admin panel due to a network error. Then you need to check the network card settings in Windows 7/10. Let's go “Start -> Control Panel -> Network and Internet -> Network and Sharing Center”. There on the left we find “Change adapter settings”. The “Local Area Connection” connection should NOT be in the “Network cable not connected” status:

If this is so, then most likely this is the problem, i.e. The cable is not connected, is connected in the wrong place or is faulty.
Also, the status should not be “Disabled”. If this is the case, then right-click on the icon and select “Enable”.
Incorrect TCP/IP settings
If you still can’t log into the admin panel, then right-click on the connection icon and select “Properties”, and there we find “Internet Protocol version 4 (TCP / IPv4)” and double-click on it. In the protocol properties, you need to check that the “Obtain an IP address automatically” and “Obtain DNS server address automatically” checkboxes are checked. Click “OK” twice. Now wait 10 seconds and you can check.

I hope this was sorted out and I was able to log in to the admin panel of the router without any problems.
Quickly setting up a Wi-Fi connection on a router
It's more complicated here, because... All routers are different and the interface may vary greatly. Yes, and Internet settings among providers can also differ dramatically. If you have a TP-Link router or another with the ability to quickly set up, then you are in luck, everything can end very quickly. Find the “Quick Setup” item in the menu on the left or top and follow the instructions of the wizard:
On the first screen just click “Next”

I have a 3G router, so I'm prompted to select my preferred connection type: 3G or cable. I don't have a 3G modem so I select "WAN only"


If you don’t know what to choose, then try automatic mode. The router itself will try to determine the type of connection. If he succeeds, the wizard will move on to the next configuration step. But you may need to enter your login and password (in case of PPPoE connection)

or network settings (in case of “Static IP” connection type)

The provider should have given you all this information; look carefully in the contract. If the technician is unable to determine the connection automatically, then he will have to call the provider and ask, or try at random, there seem to be not many options
At the next step, the wizard prompts us to enable the Wi-Fi module:

- “Wireless Radio” - this is Wi-Fi, must be in the “Enabled” position
- In the “Wireless Network Name” field, enter any name of the point in English
- Parameters: “Channel”, “Mode”, “Channel Width”, “Max Tx Rate” set as in the screenshot or leave it as default.
- , safety. Don't leave Wi-Fi without a password! Not only will everyone around you use your Internet and download the channel, it will be such a huge, huge hole in your security! Virtually anyone will be able to access all of your personal data. Set the switch to WPA/WPA2 and enter a complex password.
A small digression: when everything works, if it turns out that the Internet is too slow or if there are problems, then try selecting “Channel” not “Auto”, but some number from 1 to 13 and saving the settings. You can go through all the numbers to find the right one. The fact is that now there is a lot of wifi equipment around, and each device needs its own channel to work. As a result, devices operating on the same channel interfere with each other.
It’s good if you don’t have the cheapest router and it can operate at a frequency of 5 MHz. In this case, there will be a corresponding option to select a frequency of 2.4 or 5 MHz. There are much fewer devices operating at this frequency, and therefore the likelihood that someone will interfere is reduced significantly.
Manual setting
Well, if there was no automatic setup, then you will have to go through the items manually. We find a section something like “Network” and there is an item with the word “WAN”:

There should be similar settings items. Here everything is the same as for automatic setup, only we ourselves must select the type of Internet connection and enter the login/password.
- “Secondary Connection” leave “Disabled” or “Dynamic IP”, this is only needed to access the provider’s internal network.
- “Connection Mode” set to “Connect Automatically” so that the router connects to the Internet automatically after each reboot.
If the provider requires you to specify the IP address and DNS server, then this can be done in the Advanced settings, but usually this is not necessary:

But, for example, I have a provider with problematic DNS servers and I register the Google server: 8.8.4.4 , which always works! How does a problematic DNS server manifest itself? This is when not a single site or website, but Skype or torrents work without problems! However, if you install the server on Google, then the internal sites of some providers may not open, for example, such as account replenishment and statistics.
It is here, in the manual settings, that you can specify the connection type - VPN, if you have one. To do this, select “L2TP”, enter the name/password and VPN server address (provided by the provider). If an IP address, mask, gateway and DNS are provided, then select “Static IP” and enter all the data. Don't forget to check the automatic connection box at the bottom.

That’s it, save the settings and look for the “Wireless Settings” menu section:
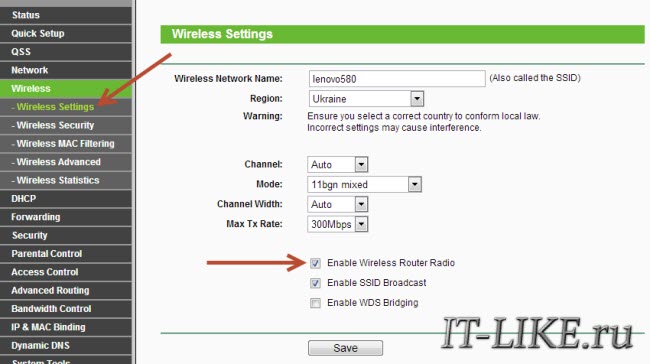
All settings have been described above. For Wi-Fi to work, the checkbox must be checked. "Enable Wireless Router Radio".
Next point, here we enable encryption, that is, we set up security as already mentioned above:

Setting up the router is complete! I advise you to save all parameters from the menu "System Tools -> Backup & Restore". Button “Backup” - saves, “Restore” - restores from a saved file. This will be useful in case everything suddenly goes to hell and all settings are lost. You can easily restore them from a file
Oh yes, I almost forgot, change the default password for logging into the admin area. This is done in the section “System tools -> Password”.
How to connect a laptop to WiFi
In Windows 8/10, you need to click on the icon at the bottom of the screen:

A panel will appear on the right where you need to select the desired wireless network. Remember when we gave the name of the network in English? This is where you need to find it. If this is a public institution and you don’t know which network to connect to, then choose any one with a higher signal level. When you hover over a network, a hint appears whether a password is required or not. If, when you hover, you see something like WPA/WPA2, this means that you need a password to connect to the Wi-Fi network.

You can leave the “Connect automatically” checkbox. Next, the system will connect to the router and ask for the Wi-Fi password that we set earlier. If your device supports QSS technology, then you don’t have to enter a password, but simply press the button on the router labeled “QSS”. In this case, the password will be filled in without our participation!

When the system asks about file sharing, I advise you to select “No, do not enable sharing” if you do not know why it is needed:

I made a short video tutorial on how to do this:
In Windows 7, everything is the same, only the icon and the window with found networks look “Semerovsky”

Here you also find the desired connection, click on it and voila.
No Wi-Fi icon or not connecting
First, check whether the wireless module is turned on using the switch on the laptop body. Many Asus, Toshiba, Sony and Acer models have this switch. On some laptops, wifi can be activated using hot buttons, for example “Fn+F2” (look for the antenna icon on the F1-F12 buttons). In any case, the method works through the “Network Control Center”, the same way when we “turned on” the network interface to connect to the router via wire.
In more severe cases, please study.
I hope everything worked out for you! Most likely, questions will arise regarding setting up the router, because... The interface and parameter names are different for everyone. To receive an answer in the comments, immediately send a link to a screenshot of the window.