Instructions on how to deal with a bunch of wires from the audio system 5.1 and correctly connect it to your computer.
What do you need:
- actually, audio system 5.1
- sound card with support 5.1
- 3 cables "Red and White Tulips - Jack 3.5mm"
Step number 1:
As you know, 5 and 1 is the number of audio channels for which there is a beep. That is why there are at our disposal, roughly speaking, 6 columns: Subwoofer ( Subwoofer. - denotes SW) - the main giant of our system, low-frequency column for creating bass; Two front speakers (they are called FrontLeft (left) and frontright (right), and referred to FL and FR (see photo)); Two rear (called either REARLEFT (left) and rearright (right), or Surroundleft / SurroundRight (RL / RR or SL / SR, respectively) and another central column (center - denotes Cen).
Knowing all this, you can proceed to the process itself ...

Step number 2:
Now your task is to connect all these 6 channels (2 fronts, 2 rear and subwoofer + center) in the connectors of your sound card. It is easy to guess that connecting 6 pairwise combined channels at the output we must receive only 3. And these the most 3 outputs should look like this way as shown in the photo ...

Step number 3:
That is, the process of connecting is:
- Two "tulips" connected to the front columns, must go to the green sound card socket
- Two "tulips" connected to the rear speakers must go (usually) into the black socket of the sound card
- Two "tulips" connected to the subwoofer and the center must go (usually) to orange nest
ATTENTION! Pairing tulips should be inserted in the "Audio Input 5.1" section, because in the "Audio Output" section (sometimes this section is not named in any way) single tulips are inserted, running out of the columns themselves! Only in this way you can achieve true volumetric 5.1 sound.

Step number 4:
Now that all wires are connected by the necessary connectors, you can only go to the control panel, select the Sound section (or first equipment and sound), then the speakers and click the "Configure" button. Here you choose the item "Volume Sound 5.1", click Next and - Voila!

Tips and warnings:
- Remember: Any multichannel audio (sound in the film or multichannel music) will scatter on 6 of your columns only provided that the record is calculated on such a sound! The rest of the sound on your columns will sound like a simple stereo.
- All necessary cables should already be included in the set of columns, but if, for example, "Tulips - Jack" was not found, you will have to buy them in the store
Call or directly on the site! Our experts will gladly help you.
After purchasing acoustics with the support of the 5.1-channel sound mode, collided with a number of problems. Simply put, in Windows 10, the mode 5.1 did not work, only 2 worked out of five columns, and then in compatibility mode. At first, he believed that this was all Google Chrome (which himself manages sound), but no, it was necessary to know one feature when setting up. In continuation, the detailed instructions for setting up 5.1 of the sound on Windows 10.
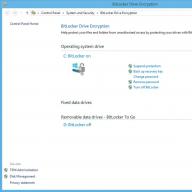
First you need to check which sound card is installed on the PC. To do this, go to "Device Manager" and find the item "Sound, Game and Video Defense" (this can be done by clicking the right key along the "Start" button, the "Dispatcher" will be the fifth above). If a sound card of any other manufacturer, except Via Audio, we skip the next item.

If the VIA AUDIO sound card is made, then you must install the driver driver before setting, "Via HD Audio V 11.11.00" (download can be downloaded). However, the VIA programmers have something soapy and prescribed the wrong way to the built-in mixer, so after downloading the archive with the drivers simply unpack any folder. After you need to go to the Device Manager, then in the "Properties" of the built-in sound card to find the "Driver" tab and click on the "Update Driver" button. Next, "perform the search for drivers on this computer." Then select the folder with unpacked drivers from VIA. Upon completion of the successful installation, reboot PC.

To configure 5.1, the sound on Windows needs to go to the "Playback Devices" tab (right click on the volume icon in the Windows tray). Next, we allocate the speakers and click on the "Settings" button in the lower left corner. Further, and this is very important, it is necessary to select the mode 7.1 of the sound! After that, click "Next" and remove the daw with the "side pair" of the speakers. Then you just crush the "Next-Next" and leave the settings window. Sound 5.1 activated, congratulations.


You also need to configure virtual surround sound mode so that you do not play 2 speakers when playing files with stereo sound, and all 5. To do this, go to the "Properties" section (button in the lower right corner). There is a "Enhancements" tab, where there is a list of different modes, we are interested in the "Enable Speaker Fill" mode - put the box on the contrary. On this sound setting is complete.
Many connoisseurs of music and high-quality sound prefer to listen to compositions and viewing high quality films to use an acoustic system 5.1. This kind of acoustics in essence consists of six channels to which their columns are connected - subwoofer (low-frequency column), two frontal columns (left and right), central front column and a pair of rear speakers (also left and right). On how to connect 5.1 format columns to the computer, let's talk below.
Assembly and installation of an acoustic system 5.1
Subwoofer is traditionally installed on the floor and there is an amplifier with a power supply to which all other components of the system are connected. But there are exceptions when the receiver is executed separately, and all acoustics are connected to it. Conclusions for connecting each column are marked. To refer to the front speakers, the FR (frontal right) and FL (front left), Cen (central), RR (rear right) and RL (rear left) are used to indicate the front speakers. If the subwoofer is passive, that is, it does not have an amplifier in its composition, it also connects to the receiver itself, on which there is an appropriate SW marking. In accordance with this labeling at the first stage, you must connect all the columns and arrange them in the appropriate order in the room.

Connecting columns to a computer
To connect an acoustic system 5.1 to a computer, it is necessary that the sound card can be installed on it, which allows you to reproduce the sound in 5.1. This can be both integrated into the motherboard and separately installed in the PCI connector sound card.

Connecting the system 5.1 is carried out by three pairs of cables having on one side Mini Jack to connect directly to the computer, and on the other hand, "Tulips" (AUDIO INPUT) is connected to the receiver inputs. It should be paid to the fact that connectors of the type "Tulip" with the Audio Output and column marking (FR, FL, etc.) are also used to connect the columns to the receiver (subwoor). You can not stick in these connectors from a computer!

The correct connection of the computer's audio outputs to the desired receiver inputs will allow you to quickly configure the system and enjoy high-quality sound. So, the front channel (front speakers) must be connected to the green socket, the rear channel (rear speakers) is usually connected to the black socket, and the subwoofer and the central speaker canal in the orange socket. To make it guaranteed to do everything without errors, it should be carefully examined to study the manual to your motherboard or sound card, where it must be specified which of the nests is responsible for a particular channel.
Sound setting 5.1 in Windows 7/10
After all cables are connected, go to adjusting acoustics 5.1 in the Windows 7 or 10 operating system itself. Open the "Control Panel" and go to the "Sound" section. Here, go to the Playback tab, where to select "Speakers" in the list.

Next, click the "Configure" button at the bottom and in the window that opens, select "Volume Sound 5.1". At this stage, you can check the correctness of the connection of the speakers by clicking on this or that speaker and checking the correspondence of the column scheme. If necessary, check the correctness of the columns and sound outputs from the computer. Complete the sound setting 5.1, passing to the steps to the end.

As a rule, no more action from you is required, the only thing that should also be paid to how to pay attention is to the switch mode switch at the receiver (subwoofer). In many models, in addition to 5.1, there are other modes of operation, such as stereo and in the presence of digital input - SPDIF. When the above method is connected, the switch must be set to position 5.1. If your sound card does not support the five-channel sound, you can play the usual stereo sound on the system 5.1, simply by moving the corresponding switch to the desired position. Of course, in this case, you will not be able to enjoy the truly five-channel sound. The same applies to the audio files themselves, which are written as stereo. Even when using sound card 5.1, they will sound like stereo, only on 5 pair of columns.
Correct arrangement of acoustic systems in the room
This article opens up the cycle of materials telling about the most exciting issues that, one way or another, occur during the selection and installation of the home theater. Today we will talk about the possible options for the arrangement of acoustic systems in the room. Of course, the typical situations with domestic small-sized rooms will also be considered.
How everything should be ideally
It is no secret that to build a serious home theater, following all the rules, you can only if there are two things: desire and big money :-)
Ideally, a special premises are given for the home theater. Particularly wealthy connoisseurs of cinema often build a room specifically under the home theater. The geometry of the room in this case is calculated specifically under a specific audio system, which will be installed indoors. Yes, and the acoustic optimization of the room is carried out very serious. But in this case, the area of \u200b\u200bthe room often rolls over a hundred square meters, and the cost of equipment and work can be estimated in many dozens or even hundreds of thousands of dollars. That is why such projects in our time are not so much as you might think. More often if there is a sufficient amount of money, a separate room is allocated (usually 30-80 m²) under the home theater, and the cost of equipment and work does not exceed several tens of thousands of dollars.
But most people do not have such serious financial opportunities, and to allocate a special room for this event it is often unrealistic, so build the theater is in one of the living rooms of its apartment. Today's article will be interested in this category of people.
But first of all, you must tell about the starting point. That is, how the speakers of the home theater should be located in the room if you follow all the rules. Immediately make a reservation that it will not go about the installation of the subwoofer in this article, since the location of the subwoofer in the room is a personal torment of each cinema. The fact is that the sound of the subwoofer strongly depends on the acoustics of the room, from the location in the room of the interior items and, in fact, from the location of the subwoofer itself and the listener. And there is a huge number of possible combinations, even part of which is simply unrealistic. And by this, I can offer two methods solving the problem of installing a subwoofer:
1. Include any musical composition with a clear and expressive bass (say, this in which the acoustic double bass will sound) and start experimenting: put a subwoofer to any room location, sit on a predetermined place of listening to the home theater system and listen. If the bass is clear, clean and not buzzing, if you do not hear "porridge" and "roar", namely the doublebas, then you can leave a subwoofer on the place and rejoice that the experiment is so good and quickly ended. If the bass does not suit you - continue to try to put a subwoofer on other points of the room and listen to the result. It is possible that you have to make a small permutation of furniture in the room ....
2. The second option is called "Nasty". It is easier, more efficient and take less time. But remember that the bass in the test musical composition is free to be as long as possible in time and monotonous by sound, because you will have ... crawl around the room. So, put a subwoofer to the place where you intend to sit while watching movies. Turn on the test track and start the nearest to crawl around the room. Unfortunately, crawl will have on all fours so that the head is at an altitude of about 30-40 cm. From the floor. It is not very convenient, but nothing to do. The purpose of this event is to find the place in the room, where the bass of the working subwoofer will be the most comfortable and correct. There and put a subwoofer.
If you imagine that all speakers are completely the same, the room acoustics is also ideal and there is a free space, then put the columns, looking at this scheme. In this case, the model of the system is described for the operation of the complex according to Scheme 5.1 (five channels, one subwoofer). It is with this arrangement of the AC and a multichannel soundtracks for movies in modern studios are being reduced:
The center and front pair are located on the virtual circle line, the radius of which is the distance from the listener to the central speaker, and the center of the circle is the head of the listener. The distance from the listener to each of the front axles and the central speaker is equal. The distance between the front speakers is equal to the distance from the listener to each of the speakers. The rear channels are located on the same distance from the listener (also on the virtual circle) at an angle of about 110 ° to the "Listener - Screen" axis.

In this case, all possible inaccuracies associated with the artificial delay introduced to compensate for the sound with an incorrect arrangement of the AU in space, and the influence of the room acoustics on all ACs is also equalized. In the theory, all channels are absolutely equivalent both in volume and by sound performance, which we need in the present home theater.
In practice, many inaccuracies in the selection and placement of the AU can be compensated by an AV receiver electronics or AV processor.
The following scheme shows the ideal placement of the AC in the home theater operating with 7.1 sound.
In this case, the rear speakers are not 2, and 4 - two of them are located strictly on the sides of the listener, and the other two are rear.

So, if possible, the situation and the situation, when arranged the AU in the home theater, you need to focus on these two accommodation schemes (for 5.1 systems and for 7.1 systems), for they are reference. Just do not forget about - this is a very important detail when building a home theater. And treat it is seriously serious, since the bad acoustics of the room with the ease "kill" the sound of even the most expensive and competently selected complex.
How it looks in practice
If you try to build 5.1 home theater according to the reference scheme, then it will look like this:

If you have a desire to build a cinema not only for two or three people, but to watch the entire family or with friends, then the most logical decision will simply put a few extra chairs. However, and here there are their pitfalls. For example, it is not worth posting all sitting.

The fact is that the listeners sitting on the edges will be out of the zone of a balanced sound field (green area in the figure), because there will be a clear imbalance of the theater channels: the nearest rear speaker will literally "hammer" in the ear (no, no The name Dolby Digital did not go from this), and the most remote from the front column sitting in the extreme chair will almost not be heard. In view of which, the effect of presence in the thick of events will completely disappear, and there will be no pleasure from viewing.
You can place all correctly by putting a sofa and chairs as follows:

If the room in which the home theater is installed, has an area of \u200b\u200babout 25-30 m², then one pair of rear speakers will not be able to embrace all sitting (and placing more than 5-6 people in such a room) - in this case it is extremely desirable to install the second pair rear (as in the scheme). That is, it will turn out that each pair of rear speakers works for a certain zone (in this case, for one row of sitting people) - this is exactly what happens in large cinemas: a plurality of the rear channels are installed in the hall so that each sitting does not felt the channel imbalance in System.
Well, if your listening room has an area of \u200b\u200b40 m² and more, then create a correct sound field for all sitting (up to 10 people according to the scheme "3 rows of 3 hours") can be one pair of sufficiently powerful speakers, because the speakers will be located on a decent removal From sitting, which means their sound will have time to spread more widely.
If you try to build a home theater 7.1 according to a reference scheme, then the system will look like this:

Again, in case of desire to equip the theater for 5-6 people, you can use an additional pair of side speakers of the surround sound (a pair of rear spells will be in any case one). If the room is quite large, then you can use the reference scheme for placement for 7.1 systems (drawing above). And more: in the case of constructing 7.1 systems according to a diagram with two pairs of the side speech surrounding sound (as in the figure below), it is necessary to move the first pair of surround sound speakers, relative to the first row of sitting, and orient the dynamics of these side speakers to the first row (as in the diagram below), otherwise the audience of the second row will hear the sound of the side AU of the first row, that is, the rear speakers of the first row will be for those who sit in the second row, and, therefore, it will stop being rear - it will not be very good, since many effects will be reproduced Not entirely correct.

If the room is not too big
In very small rooms the most common scheme with the location of the TV at the same wall, and the sofa is the opposite, strictly opposite. And this is the most logic scheme from the point of view of the reference. However, many people are trying to squeeze into an even pair of chairs in the area of \u200b\u200beffective voicing, such as in the picture:

No, dear, do not do it. The reason is the same: sitting in the extreme chairs will not be in the "green zone" (therefore there will be no pleasure from viewing), and even the rear speakers will be blown up with themselves. So the most correct is this placement scheme, if we are talking about a room of 10-20 m²

"I want it so much!" or "otherwise it does not work"
Very often there is a situation where the home theater is trying to put on a diagonal scheme. And I must tell you, dear readers, that this is a very unsuccessful idea.
Often, many bring the room plan and say: " i will have a system to stand like this - it has already been decided».

And then follows the second question: " where to hang the rear speakers, so that all sitting was comfortable?" Answer - it's impossible.
With this listeners, it is possible to create a correct sound field for one person sitting in an angular chair. Just when trying to hang the rear speakers widely, in order to cover all sitting, the situation is when the rear speakers will be in front for sitting in the corner chair, and the sofa sitting on the sofa will still hear noticeable channel imbalances. So the "Theater for one person" remains

At the same time, it is extremely desirable to disseminate the front speakers a little to the parties, in order to comply with the principle of the equilateral triangle (see the reference scheme).
If you wish, instead of the chair, you can put a sofa - in this case, two or three can enjoy the film, but then the rear speakers will have to hang a little wider. The main thing is not to permit: Remember that it is desirable to observe an angle of 110 ° for rear speakers (see reference scheme).
But the examples are completely incorrect Placement of the AU complex. I think it is not necessary to explain the reason - just look at the reference scheme.


Understanding questions
Which height should be hung out the rear speakers?
Since the speakers often have different characteristics of the orientation, it is not worth measuring each degree or centimeter. Build an angle of 30-40 ° with a vertex at the listening point, where the head of the listener's head is taken for zero height. Try to follow the reference schemes as accurately as possible (for systems 5.1 and for systems 7.1). It turns out that the rear speakers will hang above the head of the listener (about 0.6-1.5 meters depending on the distance of the rear speaker to the listener).
The picture shows recommendations for placing wall-mounted rear speakers in 5.1 system. In the complex 7.1, the height of the AC is determined in the same way, and the placement in the horizontal plane is according to the scheme.

If the rear speakers in the system are not located on the wall, and they will stand on the floor, then you should not worry hard. Although it is better when the rear speakers are "shells", because in this case it is possible to use quite high stands (1-1.5 meters - depending on the distance from the listener to the AC) or even hang these speakers on the wall (there are many brackets for this).
And how to hang dipole rear speakers?
As for the height, everything remains unchanged here, and as for the location, usually the manufacturer's recommendation is given to each model of such columns. If you describe in general terms, then such columns are striking strictly on the sides of the listeners, but taking into account that there are some space and walls behind the backs of the students (the sofa is at least 1.5-2 meters from the back wall and on the same - from each of the side), since for the correct operation of such speakers, it is necessary to ensure correct reflection of the sound waves of these speakers from the walls. In this regard, dipoles are more demanding than ordinary unidirectional AU.
Does it make sense to build a 7.1-system in a small room with an area of \u200b\u200b10-15 m²?
There is no particular point in this, because the surround sound speakers will be quite close from the head of the listener, which means it is easily localized for rumor, which is not right. And in the case of the sofa, the theater 7.1 is not possible to the wall at all. So it is better to build 5.1, but with the mind.
How can you retreat from the reference scheme?
As for the options for the arrangement of the AC, this is already described above. You can only make one addition: if the home theater is built in a relatively large room with a settlement of several (more than 3) people, then central and front-alone speakers are better to place in one line. If we talk about the distance from the listeners to the rear speakers, it is extremely desirable to observe at least symmetry. That is, the distance to the left and right speakers should be equal to ideally. But if it is not so, or if there are still some small deviations from the reference scheme (especially in terms of distance), it is not worth alarming, because in modern AV receivers and processors there are many settings for compensation for not correct placement of the AU in Pretty wide limits.
"My designer divered under the components of the home theater and the speakers the following places in the room: here, here and here"
Let's start with the main thing: what does the interior designer relating to the installation of home theaters? True - no. Therefore, the worst thing when the designer, based on his artistic ideas, is trying to leave a place for components and the system columns is not on the principle of "so it should be", but according to the principle "it looks so harmonious." It should warn that in another empty room it is necessary to plan in advance where and how the components and columns of the home theater will be located, and then, taking into account this, you already think about the rest of the situation in the room, otherwise it may not work out the theater, and not understand what. So, a designer in this situation can be tactfully asked not to climb not in your affairs. If you yourself are not ready to make a room project with the theater plan, then it is better to invite home theaters installer, which can discuss with the designer all aspects of future installation - will also in the room beautifully, and the system will be installed correctly.
To be continued…
Surely, almost every user wants the sound reproducible by his computer, as high as possible. If you are from their number, then, most likely, thought about how it can be improved. The most effective solution, of course, will be the purchase of better equipment, such as a good audio system, an additional sound card and everything in this spirit.
However, you can do without it, because there are many programs designed to configure and improve computer sound quality. This material will feature the most effective of them.
The most popular driver package to configure the built-in RealTek sound cards. Provides basic capabilities to set the sound.

Unlike competitors, it provides the correct sound card operation and has only the most necessary functions.
Volume2.
A small program that is replaced by a standard Windows volume control. In addition to standard features, has several additional functions.

With the smallest among other programs, the functionality, Volume2 aims to only increase the convenience of tuning the volume and perfectly copes with it.
FXsound Enhancer.
FXsound Enhancer has a small set of simple, but effective tools to improve sound. They allow real-time to raise sound quality.

This program allows you to adjust the individual sound parameters, such as, for example, an increase in clarity and amplification of low-frequency sounds. However, its free version has several trimmed possibilities.
Viper4windows
This program has huge features to set the sound. With proper ability, almost professional sound quality can be achieved.
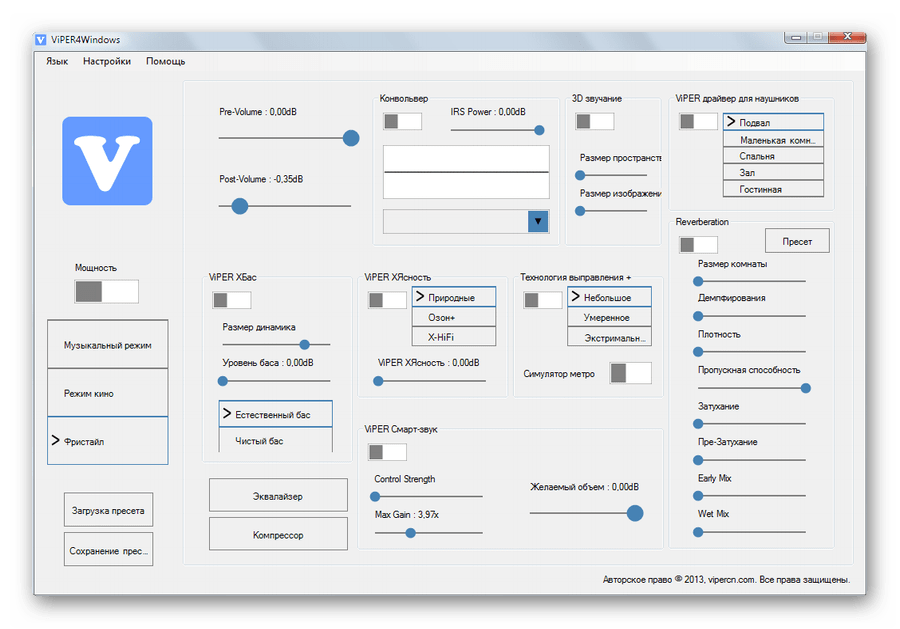
Viper4Windows includes all the same functions as FxSound Enhancer, and, in general, has the greatest set of tools to change the parameters of the sound among its competitors, but also requires some knowledge to obtain a qualitative result.
All program presented above to change the sound parameters have the necessary functions to improve sound. You can only choose the most appropriate for yourself.