Everyone knows that a standard computer keyboard has a little more
hundreds of keys, which means it cannot display all those characters that
are used by humans in everyday life. But not everyone knows that
besides typing the characters that we see on
your keyboard, Windows has the ability to use other characters as well. For example:

But
despite the fact that these (and many other) symbols are not on
keyboard, we can very easily use them when typing our
texts. Let's try it ...
Let's say the simplest option - we type text in Notepad ( Start - All Programs - Accessories - Notepad) and we need to insert a copyright symbol into the text:

In order to do this, we need to open the so-called Character tablethat exists in the Windows operating system. It is very easy to do this: Start - All Programs - Accessories - Utilities - Symbol Table.
Before us will open a table of symbols in Unicode, in which we need to find the symbol we need:

After that, you need to click this symbol with the left mouse button, then press the button Choose and the button Copy:

This will copy the selected symbol to the clipboard.

After that, the symbol we need will appear in the text:

As you can see, there is nothing difficult about it! This is the most simple and straightforward (on
my opinion) the way, although you can slightly change the order of actions and
enter characters without opening Character table... To do this, you just need to know a certain key combination.
The fact is that in Windows very many characters are assigned a unique code, which is entered using the key Alt.
For example, to enter the same copyright symbol, you must press the key combination Alt + 0169, i.e. press (and hold) the key Altand then press the number keys 0
, 1
, 6
and 9
.
Keep in mind that when the key is pressed Alt
numbers on the main field of the keyboard can be blocked, and therefore, for
enter numbers, you can use an additional keyboard field
(after enabling it with the key NumLock
You can see which key combination corresponds to the selected symbol in the lower right corner Symbol tables:

If you use some symbols constantly, then I
I recommend creating a memo for yourself (a table with a description is often
codes used) and print it on a printer. For example, this:

But keep in mind that not every symbol from the table has a similar
combination and therefore some characters must be entered as described above
way.
To make it easier for yourself to find the desired symbol in the table,
you can use additional parameters and view
symbols by groups.
To do this, put a tick Extra options and then select the desired options in the fields Character set and Grouping... For example, in this figure you can see how you can display only numeric characters:

Or, for example, you can display only the "Cyrillic" Windows encoding convenient for us:

Well, in conclusion, I would like to note that some programs have a built-in ability to insert special characters.
For example, from the Word menu, you can choose Insert - Symbol (photo from Word 2010):

This greatly speeds up the work when typing, because there is no need to resort to the Windows symbol table.

04.07.2016 27.01.2018
In this tutorial, you will learn how to create flat flat social media icons.
What you will be creating:
We will start creating flat icons with the background, then add effects to the icons to give them originality, then draw long shadows. To repeat this tutorial, you will need Photoshop CS3 or later.
Resources:
- Font 1 - http://fontawesome.io/cheatsheet/
- Font 2 - http://fontawesome.io/
Step 1
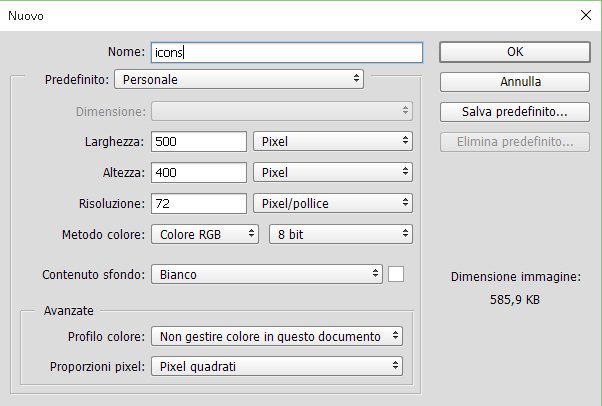
Create a new file (Ctrl + N) size 500 × 400 pixels.
Create a new group (CTRL + G) and name it "Background".

Step 2
Fill in the background color # e7e9ea through the Bucket Tool.
Step 3
To add more effects to the background, we'll add a gradient. Click on the icon Adjustment Layer and select Gradient (Gradient), use the following settings:

Layer Blend Mode Soft Light (Soft Light) | Opacity: 25%
Step 4
Create a new group and name it "symbols".

Step 5
Before we get started, we need to customize the menu Rulers and Grids (Rulers and Grids)... Go to the menu Ruler View (View- Rulers) and View-Show-Grids (View— Show— Grids) ... Here are my settings for Lineeks and Grids (they can be opened by going to Edit-Preference:

To create Guide line, you just need to click and drag it from the ruler. To create a vertical guide, drag from the vertical ruler and vice versa. This is how I split the canvas (each icon is 50 × 50 pixels and the distance between each icon 25 ppi):

Step 6
In this tutorial we are working with font Awesome, you can add custom icons for your site. Typically, this is done by placing a CSS font on your site, but since we're working with Photoshop we need to copy each icon you want to use from the cheat sheet. Go to the page, select the icon you would like to draw. I have used icons for the following (social networks) sites: Twitter; facebook; Tumblr; Google+; Instagram; YouTube; Twitch; Dropbox; Deviantart; Pinterest; Skype; Feed.
Step 7
Once you've found the icon you'd like to use, copy it ( Select it then right click-Copy)

Then go back to Photoshop and select the Text tool (Text Tool) on the toolbar. Change the font settings as shown in the picture:

Now paste in the icon you just copied. ( Right Click-Paste)

Step 8
Repeat the previous step until you have inserted all the icons that you would like to use.
Step 9
Create a new group and rename it “icon bg”, place the group below the “symbols” group.

Step 10
Create a new layer and place it in the group created in the previous step. I renamed the layer to "icon bg".

Step 11
Using the tool Rounded Rectangle (Rectangular Circle Shape Tool) (located in the toolbar below the Text Tool) I created an icon background,
Here are all the colors I used:
Twitter: # 6bd1f4;
Facebook: # 5a93cb;
Tumblr: # 3c6a9c;
Google +: # e44940;
Instagram: # 9bd29d;
Youtube: # f4504c;
Twitch: # a96db6;
Dropbox: # 81d5ed;
Deviantart: # 6e8e61;
Pinterest: # f25f5f;
Skype: # 67d5f4;
Feed: # e9951d;

You can use these colors, or you can use colors at your discretion - this way the work will acquire originality.
If you don't like how rounded rectangles look, you can choose a different shape, such as a square or a circle. To make a perfect circle or square, remember to hold sHIFT key at the time of their creation.

Step 12
If you are happy with the result at this stage, you can move on, but if you want to give liveliness to the icons, let's continue to improve. Let's start with layer style Shadow (Drop Shadow). Open the "symbols" group, select one of the icons and click the icon Fx-Shadow (Fx-Drop Shadow)

Step 13
Repeat the previous step with the rest of the icons. To make your job much easier, click right click on the layer -Copy style while standing (-Copy Layer Style)... Then select the rest of the icon layers, click right click-Paste Layer Style (-Paste Layer Style).
Step 14
Now let's add an inner shadow to the background of each icon. Open the group "icons bg", select the layer with the icon, click on the icon Fx-Inner Shadow (Fx-Inner Shadow) ... Use the following parameters:

Step 15
Create a new layer and name it “Gloss Effect”. Change your foreground color to # ffffff; and with the help the Rectangular Marquee Tool create some rectangles, half the size of the icons (approximately 50 × 25 pixels). Do this for all icons.

Then change blending mode on Soft light (Soft Ligh),reduce opacity layer to 20% , and fill (Fill) before 80% .

Step 16
Turn off the visibility of the "Gloss Effect" layer. Create a new layer and name it "Long Shadow". This step is a bit tricky compared to the rest of the effects. Place a new layer below the "Gloss Effect" layer.

Step 17
Take the Polygonal Lasso Tool and start creating a rectangular shadow touching the edge of the icon on the bottom right side only, then draw a diagonal line until it reaches the bottom right edge of the icon's background, draw a straight line until it reaches the center of the background, then connect the lines. In the image, you can see more clearly how to draw a long shadow.

Step 18
Last step! Reduce opacity layer with shadow to 10% and fill (Fill) before 0% .

Now Click on the Fx icon and select Overlay colors (Color Overlay)... Use the following parameters:

Now select Overlay gradient (Gradient Overlay) and use these settings:

Final results:


Very often they ask the question of how, being in Windows (whether in Word, Notepad or Photoshop - it doesn't matter) insert specials. symbols?
For the uninitiated, I will explain just in case: special. Symbols are a variety of icons and symbols, such as copyright (©), or powers (5²), or fractions (¼). All these are special characters.
So that's it. Let's say you want to put the fraction ¼. How can this be done? And this is done very simply!
How to insert a special character in Photoshop or any other program
And so, to begin with, let's look at: what kind of symbols and special symbols exist in general. To do this, open the symbol table.
It is located here: Start -\u003e All Programs -\u003e Accessories -\u003e System Tools -\u003e Symbol Table
The following window opens in front of you: In which you can see various symbols. Select the symbol that interests you and in the lower right corner (we have it marked with a blue circle) a keyboard shortcut will appear to insert this symbol.
At the moment, the copyright symbol © is selected and, accordingly, to insert it, you need to do the following: Press the Alt key and hold it on the numeric keypad (the one with the arrows, see the picture below), type the number 0169, then release alt. That's all!

Remember that non-standard fonts may not support special characters. Also in the special characters viewer you can view which Fonts - which characters are supported. To do this, just select the font you want at the top of the window!
 For most users of the Word application, this issue is very easy to solve. In the Word text editor, click "Insert" -\u003e "Symbol"... A window will drop out where you can select symbols... When you click the "Insert" button, they will automatically appear in the main text editor field.
The toolbar is usually the most used panel. This panel appears on the left side of the screen when you start Photoshop. At any time when working with the program, a tool is selected. To make it easier to work with the palette, I have compiled a list of basic tools in Russian and English. You can also read in detail about how each instrument works and how they are formed into groups.
List of instruments in Russian and English
It is often necessary to quickly translate the terms of the toolbar into Russian. Here I have brought together the Russian and English names of the toolbar commands. A hotkey is also indicated, with which you can activate the tool. 
The small black triangle in the lower right corner of the tool icon indicates that there is a tool submenu. If you hover the cursor over a tool, a tooltip appears with the name of the tool and its function key on the keyboard. 
All tools on the tool palette can logically be combined into five large groups. These are the "Selection", "Crop", "Retouch", "Colorize", "Draw and Text" groups. Let's take a closer look at each group. This is a set of tools for the CS3 version of Photoshop.
1. Group of tools "Selection" (Selection tools)
This group contains tools for selecting areas of various shapes, moving the selected area, quickly and accurately selecting areas of irregular shape.
The Marquee toolset is used to select rectangular, oval, single-row and single-column areas.
The Move tool moves selections, layers, and guides.
The Lasso toolset is used to create hand-drawn, polygonal (straight-edged) and magnetic (anchored) marquee selections.
The Quick Selection tool lets you quickly “paint” a selection with an adjustable round brush tip.
The Magic Wand tool selects similarly colored areas.
2. Group of tools "Crop" (Crop and slice tools)
Here are the tools for cropping an image and creating fragments.
The Crop tool will crop images.
The Slice tool creates slices.
The Slice Select tool selects slices.
3. Group of tools "Retouching" (Retouching tools)
With these tools, you can remove defects in the image, Erase and restore the image, adjust the sharpness and blur, hue and saturation.
The Spot Healing Brush tool removes spots and objects.
Tool "Healing Brush" (Healing Brush) removes defects in an image by painting over them with swatches or patterns.
The Patch tool removes defects in a selected area of \u200b\u200ban image using a swatch or pattern.
The Red Eye tool removes red highlights caused by flash photography.
The Clone Stamp tool draws with a sample image.
Use the Pattern Stamp tool to paint using a portion of an image as a pattern.
The Eraser tool erases pixels and restores parts of the image to the state of the last save. More details about the Eraser tool can be found in the post ““.
The Background Eraser tool erases areas of the image to transparency by dragging.
The Magic Eraser tool erases solidly colored areas of an image to transparency with one click.
Tool "Blur" (Blur) softens the sharp edges of the image.
The Sharpen tool sharpens the soft edges of the image.
The Smudge tool smudges data in the image.
The Dodge tool brightens areas of the image.
Tool "Dimmer" (Burn) darkens areas of the image.
The Sponge tool changes the saturation of an area.
4. Group of tools "Painting" (Painting tools)
Here you can find all kinds of tools for coloring, replacing colors, stylizing images.
Tool "Brush" (Brush) applies brush strokes. More details about the Brush tool can be found in the post "".
Tool "Pencil" (Pencil) draws lines with sharp edges.
The Color Replacement tool replaces the selected color with a different one.
The History Brush tool draws a copy of the selected state or snapshot in the current image window.
The Art History brush draws stylized strokes that mimic various art styles using a selected state or snapshot.
The Gradient tools create straight, radial, tapered, mirror, and diamond transitions between colors.
The Paint Bucket tool fills similarly colored areas with a foreground color.
5. Group of tools "Drawing" and "Text" (Drawing and type tools)
This group contains tools for outline selection, typing text, creating arbitrary shapes.
The Path selection tool selects shapes or segments by displaying anchor points, direction lines, and direction points.
The Type tool creates text on an image. More details about tools for working with text can be found in the post ““.
The Type mask tool creates selection areas in the form of text.
The Pen toolset lets you draw paths with smooth edges.
The Shape toolset and the Line tool draw shapes and lines on a regular or shape layer.
The Custom Shape tool creates custom shapes selected from a list of custom shapes.
what will happen in the end
In this tutorial, we will create a set of icons in Photoshop. The icon set must have the same background and theme. For training, we will create icons with the sun, snowflake and RSS icon. Let's start.
1. Preparing the work area
Step 1
Let's start by creating a new 350 px by 350 px document. Click in the white square next to the setting Background content (Background Contents) to select a new background color for the stage.
Step 2
In the dialog box Color palette (Color Picker) select a gray background color of the stage (# e0e0e2).

Step 3
It is always good when the work is structured from the very beginning. Create a group of layers and name it "The sun"(Sun). All the layers related to the creation of the sun icon will be placed there.

2. Create the base
Step 1
With a tool "Rounded Rectangle"(Rounded Rectangle Tool) draw a rectangle with dimensions 83 px × 64 px and set the radius to 8 px. For a more accurate result, use the panel Properties(Properties). Here you can simply enter the exact dimensions.

Step 2
Hold Shift and then draw another rounded rectangle. This new shape will be added to the previous one. Set its size to 36 px x 36 px with a radius of 3 px.

Step 3
Press ctrl + T to transform the shape, and then click and drag outside the bounding box to rotate it 45 °.

Step 4
Make sure the shape is in the center of the previous rectangle. In CC 2014, you can check the position of a shape by dragging it and snapping to the guide in the center of the previous shape.

Step 5
Press Enter to save the result. You may find that a confirmation dialog informs you that the shape will turn into a regular outline. This means that you will no longer be able to edit it using the Properties panel. Just click "Yes"(Yes).

Step 6
Place the shape as shown in the picture below.

Here is the result at 100% scale.

Step 7
Draw a similar shape on top of the previous one, which is 1 px smaller. You can do this by duplicating the shape and then changing its points or simply creating a new shape.

Step 8
Set the color to # 57adf8.

Step 9
Double click on the shape and then apply Outline (Stroke) and Gradient overlay (Gradient Overlay) using the following settings.

Use the following color arrangement for the gradient. To open the gradient editor and change the gradient settings, click on the gradient preview.

Step 10
Decrease the level fill (Fill) up to 11%. The content of the layer will be transparent and will remain unchanged.

Here is the result.

3. Shadow
Step 1
Create a new layer under the base. Activate the tool "Brush" (Brush Tool) (B) and then draw a shadow under the icon.

Step 2
Still using the tool "Brush" (Brush Tool) (B), add a stronger shadow just below the tip of the icon.

Step 3
Press CTRL and click the smaller thumbnail to select the smaller shape. Create a new layer and use white over the selected area. Make sure to use a soft brush Rigidity (Hardness) -0%.

Step 4
When done, deselect (Ctrl + D) and zoom out opacity(Opacity) layer.


Step 5
Create a new layer and select the smaller icon base again. Fill the selection with a white to black gradient. Change blend mode(Blend Mode) layer on Overlapping (Overlay) and then shrink it opacity (Opacity).


Step 6
Add another layer. Make a large elliptical selection at the bottom of the icon and then Ctrl-click on the base layer to cross it. Fill the selection with a white to black gradient. Change mixing mode (Blend Mode) layer on "Screen" Screen and shrink it opacity (Opacity).


This is what the result looks like at 100% scale.

Step 7
Hold down Ctrl and click on the base layer thumbnail. Create a new layer on top, then select Editing\u003e Stroke (Edit\u003e Stroke). Set the color to light blue and width (Width) 1 px.

Below you can see the difference before and after adding a stroke inside the icon.


Step 8
Add a mask to the stroke layer. Fill it with black to hide all the outlines. Draw some white lines to show them. Thus, now we have selected the edge of the icon.

In the image below, you can see the edge selection in detail.

Step 9
Add an adjustment layer Color balance (Color Balance) above the icon. We use it to change the background color.

To make our layers easier to manage, let's change the layer name to Color change (color changer).

Step 10
Fill the adjustment layer mask with black. Select the base of the icon and then fill it with white. Thus, the adjustment layer only affects the icon. Drag the sliders to change the color.


Step 11
Duplicate all layers of the icon base and change the parameters in the adjustment layer Color balance (Color Balance) separately.

4. Add icons to icons
Step 1
For our first icon, we'll add a sun icon. Start by drawing a yellow circle.

Step 2
Apply layer styles Inner shadow(Inner Shadow) and Inner glow(Inner Glow) using the following settings. Use the color # 7b6708 and set both blending modes Multiplication(Multiply).


Step 3
Use a lighter yellow in the center of the sun.


Step 4
Add a brighter yellow ellipse to the top of the sun.


Step 5
Draw a thin, light shape on the upper right side of the sun to make it stand out. Remove excess with a soft eraser for a natural look.


Step 6

Step 7
Select both vector shapes and then duplicate them: Ctrl + C and then Ctrl + V. Rotate the new shapes 45 °.

Step 8
Continue duplicating and rotating the shapes until we have enough rays.

Step 9
Apply Inner shadow (Inner Shadow) with color # b48f0b and External glow (Outer Glow) with color # f9dc7e.


Step 10
Hide the sun by clicking the eye icon next to the layer. Draw more yellow triangles as shown below.

Add a circular shape to the center of the triangles and set the path mode Subtract the front figure (Subtract).

We're done, so let's bring back the flare and the shapes of the sun.


Step 12
To get a realistic sun, we need to draw a blurry yellow round shape behind the sun. You can do it by hand using a soft brush, or draw a circle first and then soften it using a filter Gaussian blur (Gaussian Blur).


