From the author: Greetings to you, dear friend. At each stage of the site creation, using CMS Joomla, especially if edits are made to the source files, new items are created or some complex components are configured - you should always create backup copies, and you need to do it as often as possible. Since the mistakes made or incorrect settings or action can lead to a disruption of working capacity, both some elements and the entire site as a whole. And the search and elimination of errors can delay indefinitely. Therefore, in this article we will talk about how to make a backup of the site on Joomla, and consider the most popular reservation tool - Akeeba Backup Joomla 3.
To begin with, I would like to clarify that the backup or backup of the Joomla site can be created in two ways - in manual and automatically. Accordingly, let's consider each method separately.
Manual way to create a backup
Creating a backup of the Joomla site manually provides for the formation of the archive of the engine file structure, for subsequent storage. As well as reserving the database used, that is, creating a database dump. Now in order.
To begin with, open the directory with the installed CMS, select all files and folders and create an archive that, later, you must copy to the backup storage directory. Of course, the archive can not be created, but simply copy the Joomla file structure, but the archives significantly save space on the hard disk, and more convenient to maintain, rather than a catalog with a huge number of files.


Now you need to create a backup copy of the database, to do this, open the PHPMYADMIN tool and select the database that is used by the Joomla engine.

After that, on the screen, you will see a list of tables that are necessary for CMS operation, respectively, you need to create a copy of each of them. To do this, go to the "Export" tab.


After that, we save the proposed file with the extension.sql to the backup storage directory. This file is a copy of the database tables.

Creating a backup of the engine using the Akeba Backup extension
Automatic method, backup creation (Joomla Backup), provides for the use of various extensions, to create a copy, both file structure and database tables. At the same time, often the expansion data offers its own method for restoring the site from a previously created backup, which is easy enough to use and resembles the standard Joomla installation. So let's create a Joomla backup using one of the most popular Joomla Akeeba Backup extensions.
You can download this component from the official site, after that install the component using the Joomla extension manager. When you first start the component, you must pre-configure the component.
Modern trends and approaches in web development
Learn a rapid growth algorithm from scratch in the website building

To do this, use the setup wizard.

As soon as the setup is completed, you can proceed to backup the Joomla engine.

To start creating a backup, click on the "Start backup" button. The following page opens.

Please note that before starting to create a copy, if necessary, you can select the profile of the settings, as in the AKEEBA Backup component, all settings are attached to specific profiles. Next, specify a brief description, comment to the archive, and finally, click the "Start backup" button.

After the process is completed, a message and a link to the backup manager page will be displayed.

The backup manager is used to manage previously created archives.

At the same time, the Joomla backup represents one single file that is located about the address directory of the Joomla / Administrator / Components / COM_AKEEBA / BACKUBUP.

So, we have created a backup site using the Akeba Backup component, now if necessary, you can restore the site from the created copy. I have everything on this. Total good and successful coding !!!
Modern trends and approaches in web development
Learn a rapid growth algorithm from scratch in the website building
Hello, friends! In this lesson for Joomla 2.5, let's talk about backing up the site. There is no need to talk about the importance of backup or backup (backup) of the site. Yes, I always recommend creating, configure and fill the original content on the local server. But here we are ready for the site and we released it to the "free swimming" on the expanses of the Internet. But here it lies and "storm" in the form of hackers, and "catastrophe" with an unsuccessful installation of the component, and other "weather occlusion". We can save only a backup of the site that would quickly and easily restore the performance of the site.
On many hosting, the service backup service is provided by default and is included in the cost of host it. I use hosting from E-Planet and there this service is of course there. However, for the consistency of his calm, I additionally make a backup with Akeba Backup for Joomla. You can download Akeba Backup from the developer site. There are two versions of Akeba Backup - free and paid professional. We will be free enough. Also here you can download Akeba Backup crack. Component and Russifier downloaded and now let's look at the installation.
Installing Akeba Backup for Joomla
Installing the Akeba Backup component is carried out standard. Go to B. and through Overview Choose a zip archive of our expansion. Click the button Download and install And our component is installed.

If you click on the link specified by the arrow, you can proceed to download language packs, including Russian, for this component. But we downloaded it in advance. Therefore, go to Extensions - Extension Manager - Installation and through Overview Choose a zip archive of the Russian language pack and install it.
This is the installation of Akeba Backup for Joomla completed. As you can see everything standard and usually. No pitfalls.
Configure Akeba Backup for Joomla
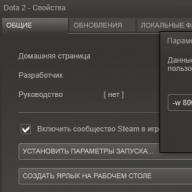
To configure Akeba Backup for Joomla go to Components - Akeba Backup

And below compulsory data. You can put the checkboxes in the licensing checkboxes and click the button Apply.

You can simply click on the button Take the required data and apply your preferences. And then the checkboxes in checkboxes will be automatically and go to the next stage.
At this stage launches Wizard Settings And the server test passes.

At the end of the test, we are offered to start backup or go to subtle settings. Let's not hurry with copying, but proceed to setting up Akeba Backup.

We are opening panel Setting. We read what is written at the beginning and then consider everything in order.


Folder to save backup copies - Akeba Backup Where does the archives save? In this default, Akeba Backup saves the archives to the following directory Your site - Administrator - Components - COM_AKEEBA - Backup. Leave as it is.
Logging level - This parameter determines how detailed the backup process will be logged. You must leave the default.
Name file backup - Everything is clear here and no additional clarification is required.
Type of backup - What kind of backup you want to create a component Akeba Backup. Two options:
Copying the entire site;
Only the main site database (SQL server).
Let's put here to copy the entire site, and in another profile we will copy only the database.
Use frames (iFrames) instead of AJAX technology - Leave as it is.
Use a database for storing time information - And here we do not put a tick.

Here we will be interested in only one parameter.
Engine archiving - Here you can save in two formats. It is quite a rare JPA format and a regular zip. Here let's stop in more detail.
JPA format - As stated on the developer's website, and on the forums, the benefits of it is that it squeezes stronger, i.e. The archive file is less, and it is compressed faster. However, it requires a special AKEEBA Extract Wizard program that can be downloaded on the official website. It will be described in more detail below.
Zip format - This is the closest format. It can be used at normal Internet speed and sufficient volumes of hard drives on the computer. Since the volume of hard drives of the hosting is limited, then of course you need to save all copies on your computer and is better not on the disk C:, and with the hosting to delete them.
- Settings leave as it is.

Let's summarize. Backup is the most important part of the site saving. Bacup will be in demand in the following cases:
- To transfer the site to Denver for the test, any extension, without affecting the main site. I recommend testing all additional extensions on the local server. Since the problems with the unavailability of your main site will negatively affect its positions in the issuance of search engines.
- Loading the finished site from the local server to hosting. After installing the site, its settings, the installation of the necessary extensions and filling the site the initial material is easy to transfer it to hosting.
- For the safety of your site. If the site was hacked and infected with disgust, then it can be easily restored from the moment when it has not yet been infected and of course eliminate vulnerabilities in his blog.
I hope I managed to completely disclose the question.
How to make a backup of the site and how to restore the site from the backup will tell you in the following articles. Subscribe to news to always be aware of events.
Good luck to you in your endeavors!
Hello, friends! So I decided to write another note dedicated to CMS Joomla. In this article, I will tell you how to easily and quickly create a backup of the site on Joomla 3 and transfer from the local server to hosting.
There are several ways to create backup copies. (I used it for a long time) is to create a site file archive and database dump in a SQL file. This method is not very convenient. I chose the most simplified option using expansion called Akeeba Backup.. What really pleases me that the component can be downloaded from the developer's website for free.
Structure of the article
Akeba Backup - Installation
Swing the utility and unpack the archive. In this archive, there are many files, but we are only interested in two files - the unpacking script itself kickstart.php. and Russian localization file rU-RU.KickStart.ini.. We download the following files to the root directory of your site:
- kickstart.php.
- rU-RU.KickStart.ini.
- site archive in JPA format

We close this window and go to the second step. In the second step, I don't need to touch anything in principle. Just press "To begin" and that's it.

After the operation of the unpacking will be completed, we will get the following notice.

Now click on the button "Run the installer" And the Script Script website will open in the new tab. Well, then you already know what to do. After the site is restored in the open tab of the unpacker click on the button "Clear"By deleting the KickStart.php and RU-RU.KickStart.ini files.

After deletion, we will see two buttons offering us to go to the site management panel or to the main page of the site.
That's all right. Here is such a useful component. In this article, we reviewed the process of creating a backup site on Joomla 3. If something is incomprehensible, ask questions in the comments will always be happy to help. So far, to new meetings !!!
Backing up and restoring the site on Joomla is done very easily. This article will tell about the Akeba Backup extension, which is backup of the Joomla site. In the second part of the article I will tell you how to restore the site from the backup.
Despite the fact that the hosting provider can backup of the site, situations may occur when a copy of the site can be unavailable to you or contain not all necessary data. Therefore, be sure to take care of creating a backup site yourself. For these purposes, you can use a very convenient Akeba Backup tool. The free version of this extension is enough to perform backup and restore the Joomla site.
After reading this article, you will learn to backup and restore your site on Joomla.
To install the extension "Akeba Backup", to create a backup of the Joomla site, we will use the "Install from JED" or UPLOAD PACKAAD FILE. The first method is preferable, since it is the easiest. If the Joomla version is less than 3.2, then this functionality is not available and will have to be used in the second way. This article will describe two methods of installation, and you can use anyone to choose from.
Install from JED - allows you to set an extension via the Internet. Select an extension to install from the directory provided.
To set the extension, go to the Extension menu-\u003e Expansion Manager-\u003e Install. On the page that opens will be the extension directory. Find the "Akeba Backup" extension in this catalog and double-click the installation page.

The expansion description page opens. This page will be the installation button. Click this button to start the download and installation procedure.

Before starting the installation, you need to confirm the operation. At this stage, you can still refuse to install. To confirm the installation, click the Install button (Installation)

After the installation is complete, a message appears on the page. The message will be viewed as in the figure or similar to the default site installed by default.

Upload Package File - Install, pre-downloaded extension.
To download the expansion "Akeba backup" go to the developer's website. And we find the link to the "Akeba Backup" extension link on the main page or on the same page, you need to select "Download" in the top menu.

Turning to the extension description page, download it to your computer.

After loading the expansion. Return to the Joomla admin panel and select the Extensions Manager in the Extension Manager in the Upper Extension menu. Go to the Upload Package File tab. Next, select the file downloaded to the computer. And run it loading and installing.

Backup Joomla.
After installing the extension, it is necessary to start it, for the primary setting. To do this, select Components-\u003e Akeba Backup in the Components menu.

After switching to the specified menu item, the setup wizard opens when you first start. Click on the setup wizard start button.

After clicking on the configuration button, automatic configuration will start. It should be waiting for its completion. After completing the setting, it will be proposed to make data backup. We agree with the offer and make a copy of the Joomla website.

Go to the backup page.

After switching to the backup page, confirm the backup.

After starting backup. We wait for its completion. Once the backup will end the message will be issued. Next, you can go to the control panel "Akeeba Backup".

If you press "Manage Backups" in the previous step or a similar function in the MANAGE Backups backup control panel, a list of backups made backups will open.

About the need for backup is told in the article Practice Protection of the site on Joomla 3. In a paid extension "AKEEBA Backup" there is an opportunity to fully automate backup site and place backups in cloud storage facilities, which significantly increases the security of the site. Also automated the restoration of the site from the backup.
Restoration of the site from the backup.
To restore a site from the backup copy, you need to download an additional file package "Akeba kikstart" from the developer.

Selecting the specified file archive, go to the download page.

After loading, you will need four files from the archive:
jQuery.min.js.
json2.min.js.
Kickstart.php.
RU-RU.KickStart.ini.
Now copy the extracted files to the site directory root. There I will copy the backup file of the site, made by Akeba Backup. All necessary, to restore the site, files are prepared and placed in the right place.

Now create an empty MYSQL database. If the MYSQL server already has a base, then this step can be skipped.
Information
For example, the site will restore on the local server. I will use OpenServer, it was told about it in the article Installing a local Web server - OpenServer. If you want to practice restore the site on a real hosting, you can register for free hosting and make these actions in "Combat conditions".
Restoring the site on the local server using the NTFS file system (MS Windows) file system may occur in the code. This may be caused by the difference in the rights of access to files. Some extensions may not work correctly with the file system.
Open PHPMYADMIN on the local server. I remind you that for example, I will use OpenServer if you use another software package for a Web server, then the actions will be exactly the same, only the elements of the service management interface will differ.

After launching PHPMYAdmin opens the main application page. Go to the section "Databases" and create an empty database. To do this, in the "Create Database" field, enter your name of the database and click on the "Create" button. After creating the base, it appears in the database list. On this preparatory work ended.

If you restore the database on the local server, then the creation of the database can be skipped. If the base is restored on the hosting provider server, then you create a database based on the hosting parameters.
To start the recovery of the site, type the address of the site in the browser address line and the name of the "kikstart.php" file is named.

After launching the "kikstart.php" file, information text will appear. Carefully read the whole text. These recommendations will be useful to you if after recovery, the site will not work correctly.

By clicking the "ESC" button, the first setting page opens. In most cases, on this page, you do not need to make additional settings. If you renue your database in your script, then make the appropriate settings. After all the settings are made, you click on the start button.

The process of extracting files from the archive is launched.

After extracting files from the archive, the installer startup window appears. Click the start of the Installer button and go to the next step.

After starting the installer, the information page will be displayed. On this page you can watch the current Web Server Settings. You can compare the PHP version that was when creating a backup site and the PHP version that is used by the current Web server. After watching the information page, go to the "Restoring of the Main Web site database". Click the "Next" button.

On the "Recovery of the Main Web Site Database" page, you need to enter the MYSQL database, username and password. The remaining settings can be left unchanged. On this settings necessary to restore the database are made. Run the database recovery process, click the Next button.

We are waiting for the completion of the database recovery process ...

After the base is restored, an informational message on the end of the database recovery will appear on the screen. Click on the next step button.

The final stage of the site recovery. Check and if necessary, edit the fields in the "Site Settings" section. In the "Thin Settings of the Directory", check the ways to system directory directors of temporary files and logs. In the "Super Administrator Settings" section, select the administrator and enter the password. Basically, all fields are filled, by default, values \u200b\u200bfrom the backup and they are not required to change. Click the next button.

The latest page with information on the completion of the restoration of the Web site opens. Go to the site restore page and click on the Clear button.


On this site restoration is completed.

Go to the main page of the site and check its performance.

If after the restoration of the site, it has not earned, then check the settings in the file.htaccess or directive in the php.ini file. In most cases, the restoration of the site passes normally and no additional action is required.
I hope that the article was useful to you and you learned something new.
- The error "JFTP :: CHMOD: BAD RESPONSE" in the administrative part of Akeba Backup.
After you configured Akeba Backup, you can move directly to the creation of the archive. To do this, simply click On the main page of the component (drawing below).

You will appear page where you can set additional options and the comment to the archive (Figure below).

This is directly backup Joomla 3 (drawing below).

After the Joomla backup is created, you can go to the component control panel or view the operations log (Figure below).

I note that in the case when you launched an archiving yourself from the administrative part of the site, then information on actions is stored in the magazine "Admins". If archiving has been running automatically on a schedule, for example, with CRON, then information about the actions is stored in the Site magazine. The Recovery Point Magazine stores operations on operations that relate to the recovery points created during the installation of extensions and \\ or the CMS itself. I will note that you may not have one or more magazines. Depending on what functions of Joomla Akeeba Backup you do not use.
Enable data in archive
For such purposes are tools and . For all tool options (Figure below) There are tips in Russian.

And for the tool (Figure below) and the prompts are not particularly needed. Just find the directory you need and click Apply.

Extract data from the archive
In the same way as you can enable data into the archive, you can exclude them. To do this, on the main page of Joomla Akeeba Backup in the area "Extract Data from Archive" have five tools:
Tool (Figure below) Allows you to mark which files and \\ or folders do not need to be included in the site archive.

Similarly, on the database, the tool works (Figure below).

If you want to exclude all files, folders and database tables from the archive, which belong to a specific component, module, plugin, language or pattern, then for these purposes the tool is the tool (Figure below). Just click on the icon corresponding to the desired item in the column condition.

In my opinion, the most interesting is the tool (Figure below). It allows you to exclude files and / or folders with defined names (names of the name) or extensions. For example, as a result of the application of the Webo Site Speedup download speed optimization component, my site is stored in compressed state (* .gz format files) scripts and style sheets. Also Webo Site Speedup allows you to minimize style sheets and script files, but before that it creates their backups (* .backup format files). And attachments to articles that are organized using the Attachments component, I consider too large for the room to the archive (* .zip format files). In this connection, I wrote three rules of exception:
They indicate that * .gz format files, * .backup and * .zip will not be included in the archive.

The tool works similarly (Figure below). But it allows you to cut Joomla backup due to unnecessary database tables.

In chapter (Figure below) You can find all site archives created using Akeeba Backup Joomla 3. You can delete them, download to a local computer, import the previously created archives on your local computer or you can run the site recovery procedure. A bit more details of the recovery procedure will be considered in the article "Overview of Akeba Backup Professional. Joomla backup.

On the second tab (Figure below) You can find all the previously created recovery points and return to them if necessary.

For Joomla 2.5, file management looks likewise (Figure below).

In the event of an error in the work of Joomla Akeeba Backup, you can use the magazine inspector and how to eliminate errors (from English. Akeeba Log Inspection and Cause Elimination) - Option Debugger Alice. (Figure below). Please note that in the case of a large magazine, its analysis can adversely affect the performance of your server. Start this operation only if necessary.

Select the log to analyze and start the analysis simply by clicking on the button. Analyze the Journal. After that, the component will give you the report (Figure below) in which you can find information on the possible causes of problems and how to eliminate them.

Site Master Master
If you have conceived to transfer your site from one server to another, then using the tool Master of Moving Site This procedure will be faster. Consider the steps of the master. On the first, if you did not earlier, you will be offered to create a new archiving profile or use the existing (Figure below).

In my opinion, preferably option Create a new profile by resetting all its default settings.. This will allow the component to configure the backup Joomla 3 as it is necessary.
In the second step, you will need to specify the access parameters for the new server to which you want to transfer the site.

Pay your attention when you use the RSFirewall component on your site, you may have problems. RSFirewall can block the work wizard joomla akeeba backup. To eliminate this error, it is enough to temporarily disable an active RSFirewall scanner or RSFirewall system plugin! Active Scanner.
If everything is specified correctly, then in the third step you can start moving the site.
If you want to configure Joomla 3 backup, I strongly recommend familiarizing yourself with the tool (Figure below).

For those who have the iSpmanager panel on the hosting, in section Instruments You can create a new task in the subsection Planner (cron.) (Figure below).

I note that to configure the scheduler, you may need to contact the technical support of your hosting provider.
Frequently asked Questions
Consider the most interesting, in my opinion, answers to frequently asked questions (source).
How do you work recovery and how to disable them
Joomla Akeba Backup, starting with version 3.3.A1, equipped with a "System Point Recovery" function (from English System Restore Points, briefly SRP). Starting from version 3.3.B1, you are asked about the need to enable this feature after installation and \\ or component updates.
The system recovery point is a mechanism that allows you to create a copy of the expansion (any) before it is updated. This is achieved by replacing the standard component installation method ( Expansion Manager) on the "Akeba Backup extension manager". This procedure is especially useful in that you do not need to take care of creating a full backup of the site before the update. The Akeba Backup component will make the necessary actions automatically. In the event that a third-party expansion update must be refused to roll back, you can always do it with Akeba Backup. Under third-party expansion, you should understand any extension (component, plugin, module, pattern, localization), except Akeba Backup.
But sometimes there may be problems with the Akeba Backup extension manager. For example, if there is not enough disk space on the server. Or some components may not be installed and \\ or updated via the Akeba Backup extension manager. An error may occur "403 - no found".
You can disable the "System Point Recovery" function forever or only for a specific case of installation \\ third-party expansion updates.
- If you need to temporarily disable the "Akeba Backup extension manager", go to the Joomla Extensions Manager, Menu Extensionsand click the link