We offer you several ways to get root rights to Xperia Z1, Xperia Z1 Compact, Z Ultra.
Root rights to Sony Xperia Z1, Xperia Z1 Compact, Z Ultra
Method 1 (Adnroid 4.3 - 4.4.2)To root a Sony Xperia Z1 with Adnroid 4.3 - 4.4.2 KitKat, enable on your smartphone the ability to install applications from unknown sources, make sure that Sony drivers are installed on your PC, including.
1. Connect Sony Xperia Z1 or Xperia Z1 Compact, Z Ultra to PC using USB cable.
2. Download to your PC and unzip.
3. Double click to run install.bat, the command line will open, your smartphone will be detected and you will only need to follow the instructions in the window cmd.


4. Finally, the Towelroot application should be launched on the Z1 screen and you will need to click on the button in it make it ra1n.
5. After 15-20 sec. The Xperia Z1 will automatically restart.


6. Window cmd will close. Disconnect your smartphone from your PC.
7. Install the application on Z1 or.
8. All, root-rights to Sony Xperia Z1 received. You can check their availability using the application.
Method 2 (Before Android 4.2.2)
To start getting root on Xperia Z1, you need:
1. Charge the battery at least 50%, in order to avoid disconnecting the smartphone during rooting.
2. Enable the ability to install applications from unknown sources in the smartphone settings.
3. Download and install the application on Z1.

Getting root on Sony Xperia Z1, Xperia Z1 Compact, Z Ultra:
1. Launch Towelroot.
2. Press the make it ra1n button and wait for the Z1 to restart.
3. Install or and reboot the smartphone.
4. Root rights to Z1 received!
Method 3 (up to 4.2.2)
For him you need:
1. Install on your computer.
2. Charge your smartphone (for the same reason as for the first method).
3. Enable in the smartphone settings.
4. USB cable from Z1.
5. Disable antivirus software on your PC.
Root Xperia Z1:
1. Connect your smartphone with a USB cable to your PC and launch Kingo Root.
2. Press the ROOT button.
3. Root rights to Sony Xperia Z1 received! (The same root program can be deleted).
Method 4 (up to 4.2.2)
Training:
1. Install the program on the PC.
2. Charge the Z1 battery.
3. Switch on on Z1.
4. Prepare USB cable and disable anti-virus software on your PC.
How to root a Sony Xperia Z1:
1. Connect your phone to PC and launch Vroot.
2. Wait until the program detects your device and press the big green ROOT button.

3. In a few minutes, the root of the rights will be received.
4. To confirm the root in the pop-up window, press the right button.

If you don't like hieroglyphs), then the Chinese application KingRoot for administering root rights can be replaced with the usual SuperSu:
1. Install
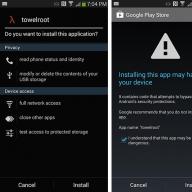
Now, in order to "root" most of the smartphones of the Sony Ixperia line, even with a closed bootloader, you will not have to suffer for a long time and rack your brains, performing complex actions guided by complex manuals. All thanks to the programmer, developer and white hacker with the nickname Geohot, who created a single and simple tool to get the rights root onSonyXperiaZ1, Z1 Compact, M, Z, ZL, SP, M2, T, TXwith Adnroid 4.3 and 4.4.2 KitKat. There is no need to unlock the bootloader, and the process is fast and safe. To do this, you need to use the Towelroot utility and the executable apk file. The whole process of obtaining root user rights takes 30 seconds! And so, let's go.
All actions you perform at a howl of fear and risk, however, there is not a single feedback that something went wrong and led to the incorrect operation of the smartphone.
Step-by-step instructions on how to quickly and safely get ROOT rights Sony Xperia Z1, Z1 Compact, M, Z, ZL, SP, M2, T, TX
Towelroot instruction manual for Sony Ixperia modelsZ1, Z1 Compact andZ Ultra
1. Enable USB debugging on your smartphone by going to Settings - Developer options - USB debugging (). Also allow the installation of applications from unknown sources in the security settings.
2. Make sure that the drivers for your device are installed on the PC, including ADB - download the universal ADB driver.
3. Connect your phone to your computer using USB.
4. Download the archive with the application and unpack it to any convenient place - link or Ya.Disk. In the folder you will see another folder called “files” and the file install.bat
5. Now download the executable file tr.apk - link (to download, click on the lambda) or Ya.Disk. The antivirus program may swear at this file, but you still ignore the warning and download it.
6. Open the folder that we received after unzipping in step 4, open the “files” folder and drag the just downloaded “tr.apk” file into it.

7. Return to the main directory of the folder and double-click to run install.bat, which will launch the command line window. Your smartphone will be detected, you only need to follow the instructions that will appear in the cmd window.


8. Periodically look at the phone screen, because the Towelroot application is supposed to start on it and in it you need to press the only button with the inscription “make it ra1n”, after that, after about 15 seconds, the smartphone will reboot.


9. The command line window on the PC will close, and you can disconnect your phone from USB, and after loading, enjoy the presence of root rights, and you can check them using the Root Checker program (Google Play) and be sure to install the SuperSU application (
Finally, there is an easy and efficient way to root Sony Xperia with Android 5.0 Lollipop and KitKat 4.4, while it is suitable for devices with both unlocked and locked bootloader. I emphasize right away that you are solely responsible for all actions - the site administration cannot guarantee that everything will work out. Although this method is actually as simple and safe as possible if you follow the instructions below.
In this way, you can root Sony Xperia Z3, Z2, Z1, Z3 Compact, Z1 Compact. At the time of obtaining root rights for Xperia Z, ZR, ZL, Z Ultra, T2 Ultra, there were failures in this way when the reboot looped on the smartphone. This is fixed by the firmware using FlashTool -. If you're ready then let's get started.
Below is a complete instruction for obtaining root on Sony Ixperia with screenshots and links to download all the necessary files.
2. The software you need:
- latest version of KingRoot - Link
- the latest version of XZDualRecovery for your model: download the archive with the ending “RELEASE.installer.zip” for version 2.8.21 - Link or “RELEASE.combined.zip” for version 2.8.25 - Link
- Archive with SuperSU - Link (you can also download later from Google Play or use the root manager from KingRoot)
We dump the KingRoot APK file and the SuperSU archive into the device memory, and download the XZDualRecovery to a convenient place on the PC and unzip it.
3. Install the KingRoot application on your smartphone or tablet. Important: the device must have an Internet connection, otherwise the program will transfer you to the phone settings, hinting at the need to connect! If, during installation, a warning appears that the program bypasses the Android system, then put a check mark and click the "Install anyway" button.
4. After installation, launch this program and press the large button labeled “Root”. If you see the warning window again, then just check the box again and press the install button. We wait until everything that is needed is installed and proceed to the next stage.


After the end of the process, just exit KingRoot and do not try to reboot the device, because this is not all that needs to be done to get root.
Important: it is possible that when obtaining the rights, the process will not go through completely and the smartphone will reboot. Here it is necessary to start the application again after turning on the phone and repeat the whole process. If the application throws an error, then just close it and restart it. This happens rarely and from the second or third time everything goes well.
5. Now we have the KingUser program, launch it and click Root authorization.


6. After that, expand the ADB Program tab and activate it in the list that appears by clicking on Allow.


Congratulations - you have already received root-rights. You can take further actions if you also want to install Dual Recovery, and with its help the SuperSU file, which, by the way, can also be installed through Google Play. If you do not want this, you can proceed to reading other interesting and useful articles on our website by closing this instruction, because root is already there 🙂
Installing Dual Recovery (CWM and TWRP) on a Sony Xperia with root rights
7. Once again, I remind you that USB debugging must be activated in the smartphone. We connect the smartphone to the PC using USB, open the folder obtained from the previously downloaded and unpacked XZDualRecovery archive for your model and run the install.bat file, after which a blackened system window will appear. In it, you need to enter the number 1 and press Enter. Then we look at the smartphone screen, there should appear a request for permission - we confirm.


8. Various inscriptions will start running in the window and inscriptions periodically appear that to continue the process you need to press any key on the keyboard, which is what you actually do. After the last click, the window will close and the smartphone will reboot.


9. The reboot will take place in the recovery mode (CWM Recovery). 
10. Now, from the recovery menu, you need to install the SuperSU archive previously loaded into the device's memory. For those who do not know how to do this, I will explain. To move up and down between items in CWM Recovery, use the add and volume down buttons, and press the power button to confirm the action.
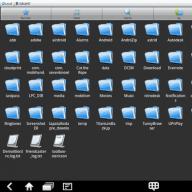
Go to: “install zip” - “choose zip from / sdcard” - “0 /” - here we select the folder into which you dropped the SuperSU archive - select “BETA-SuperSU-v-2.49” - “YES”. The installation process will begin, which ends with the inscription “install from sdcard complete” at the bottom.
Now we need to reboot the device, for which we select “GO Back” - “Reboot system now” - “Yes - Fix root”.
11. Your smartphone or tablet will reboot and after starting, you will have full root Sony Xperia. After that, you can uninstall KingRoot and enjoy your rooted device. Below I have checked the super user rights through SD Maid app.
In contact with
The line products of Sony Xperia are all of exquisiteness, as Xperia Z, Xperia ZL, Xperia Z1 and else. They all lead you to experience a new standard of excellence, both in design and practical use, especially the recently released Xperia Z1, which is truly a masterpiece crafted into the most elegant package ever. By rooting it, you will certainly get the superuser permission so that to make the fullest of its hardware set and enjoy the most of its digital entertainment. (PC Version) will offer you an easy and fast way to do it.
IMPORTANT: DO NOT ROOT FOR THE SAKE OF ROOTING IT BEFORE YOU ARE FULLY AWARE OF WHAT IS ROOTING AND WHAT CONSEQUENCES WILL ROOTING YOUR ANDROID MAY CAUSE.
Root Sony Xperia Z1 LTE (C6903) via KingoRoot APK without PC
IMPORTANT It is suggested that you try first. It is more convenient to use for no need of connecting to a computer.
- Allow installation of apps from unknown sources on your Sony C6903.
- Free download on your Sony C6903.
- Install and launch KingoRoot.
- Tick \u200b\u200b"One Click Root" on the main interface.
- Wait a few minutes and the result will display soon.
- If failed, please try a few more times to improve success rates.
- If still failed, refer to KingoRoot Android PC Version, which has a higher success rate.
Settings\u003e Security\u003e Unknown Sources
For more detailed tutorial, please click
Root Sony Xperia Z1 LTE (C6903) via KingoRoot Android
Before the rooting process takes its course, you need to prepare:
- Device you want to root: Sony Xperia Z1 (C6903)
- The USB cable. It is highly recommended that you use the stock one.
- PC with KingoRoot Android installed. Click here to download free.
- Fully aware of everything on.
After full preparations, follow the steps below.
KingoRoot on Windows
KingoRoot Android on Windows has the highest success rate. It supports almost any Android device and version.
Outdated ways
Method number 2
1. Reset the T owelroot application to your smartphone and install. If such a window appears, allow and continue
2. Find the T owelroot icon in the menu and launch the application
3. Press the button make it ra1nand wait for the smartphone to reboot  4. Install SuperSu app from Google Play app store
 5. Reboot the Sony Xperia Z1 smartphone
6. Root rights received!
Method number 3
1. Connect your Sony Xperia Z1 smartphone to your PC
2. Run the Kingo Root program
3. Press the button in ROOT

4. Root rights are installed on the smartphone!
Method number 4
1. Start Vroot
2. Wait until the program detects your Android
3. Press the green "Root" button

4. After a couple of minutes, Root rights are received
5 To provide the application root,in the pop-up window, press the right button

6. If you do not like Chinese characters, then you should consider replacing the application Kingrooton SuperSu
Replacing the Chinese Root Administrator Program with SuperSu
1. Install the SuperSU application from the Google Play app store
2. Install the ES file manager application from the Google Play application store
3. Configure and provide ES root rights
5. Go to es manager along the way / data / app
6. Rename the file eu.chainfire.supersu.apk -\u003e Superuser.apk (case is important)
7. Move the Superuser.akp file to / system / appagreeing to replace

8. Sony Xperia Z1 reboot
9. Launch SuperSu application
10.and agree to update the su binary

5. Restart Android!
Method number 5
1. Connect Sony to computer
2. Run the program ADB RUN and go to Run Script
3. An explorer window will open and move the contents of the archive into it  then you can close the window
4. Press the "Enter" button and start the process of obtaining root
5. While getting root Sony Xperia Z1, do not disconnect from the PC!
6. Sony Xperia reboot once after the message
you can disconnect from the computer, Root rights are obtained!
Method number 6
1. Archive Z1-lockeddualrecovery-xxxxxx-.installer.zip unzip
2. Connect Sony Xperia Z1 to computer
3. Run the console program to run temporary Recovery through a file install.bat 
4. In the console program, select point 3 « Installation on unrooted ROM using the TowelRoot method»
5. After a while, the smartphone will reboot into Recovery mode
Method number 7
1. Connect your smartphone to your computer
2. Run the program newroot
3. Select the item "Check this to root your phone" 
4. Confirm all settings on the smartphone