Applying patterns in Adobe Photoshopis a necessary creative process to add various interesting elements to the design.
Patterns are easy to use, but they can significantly affect the perception of your compositions and complement them harmoniously. In this tutorial Photoshop you will learn how to create, use and manipulate patterns in practice.
Samples of patterns in Photoshop are necessary for their repeated use in subsequent works. Applying templates dramatically speeds up your workflow by giving complex objects the texture of the selected pattern. You save a lot of time and add some flavor to your work.
You can create your own patterns, use the patterns included in the program and install patterns downloaded from various Internet resources. In this tutorial, we'll cover the following sections:
1. Overview of patterns in the program with the function "Set management" (Preset Manager).
2. Three different ways to apply patterns in Photoshop.
3. How to create your own pattern.
4. Create and apply a linear diagonal pattern in practice.
5. Installing the Photoshop pattern in the program library.
6. Creating a library of patterns.
Exploring the patterns of the program with the "Set Management" function (Preset Manager).
You can find the default patterns of the program through the "Set Management" function. Access to the sets is carried out through the top menu of the program in the Edit-Manage Sets tab (Edit\u003e Preset Manager)... By default, the Control window (Preset Manager) displays a palette of brushes (Brushes).
In the dialog box that opens, find the "Set Type" option (Preset Type) and click on the down arrow. From the drop-down menu, select the "Patterns" option (Patterns) and you will see the set that appears by default.

These are not all patterns in the program. In order to see them all, you need to go to the library sets. A pattern library is a collection of 1 or more patterns having the PAT file extension.
To load program library templates Photoshopclick the arrow on the right in the Manage Sets window. In the drop-down submenu you will see a list of sets of different patterns.

Select any set from the list and click on it. After that, a dialog box will appear where you will be asked whether to replace the current patterns with the selected ones.

Click the "Add" option (Append)if you don't want to change the previous patterns, but just want to add the currently selected ones.

Applying patterns in Photoshop.
Now that the selected set of patterns is loaded, let's see how to put it into practice. There are several ways to use patterns, and we'll cover each one.
Overlay pattern using the "Fill" (Fill) command.
The easiest way to overlay a pattern is to fill the selection with it. For example, activate the Rectangular Selection tool and select an area of \u200b\u200bany size on the canvas. Then, go to the menu Edit-Run Fill (Edit\u003e Fill (Shift + F5)) and in the fill dialog in the "Use" option (Use) specify the parameter Regular / Pattern (Pattern).

Pattern fill allows you to use the Custom Pattern option (Custom Pattern)... Click on the parameter arrow and call up the submenu with pattern libraries by clicking on the arrow on the right. After selecting the desired set or pattern, click on it and click OK to fill your selection with it.
An important advantage of overlaying a pattern using the Fill method is that this pattern can be used on a separate layer without affecting other layers of the document.
Pattern overlay in Layer Styles.
If you want to apply a pattern to any selected layer, double-click on the layer's thumbnail to open the Layer Styles window (Layer Style)... Almost at the very bottom, find the "Pattern Overlay" option (Pattern Overlay) and activate it. The options dialog box will open, where you can, just as in the previous example, select the desired pattern and apply it to the layer.

This method requires you to be more flexible in its use: you can hide, show, adjust and delete the layer pattern without affecting the layer itself.
Tip: To adjust the position of the pattern on the canvas, in the Pattern Overlay option, activate the View (Preview), and then place the mouse cursor on the canvas and, while holding it down, move your pattern in the main program window in any direction.
Painting with a pattern using the Paint Bucket tools (Paint Bucket Tool) and "Patterned stamp" (Pattern Stamp Tool).
If you want to apply a pattern by painting over the canvas, use the Paint Bucket and Pattern Stamp tools. Activate them and set them to apply patterns, not colors in the top bar of the program.

Using the drawing tools when overlaying a pattern is useful if you are not applying the pattern regularly. This gives you more control over the process, especially with a graphics tablet.
But painting with a pattern will take much longer than applying a pattern using the Fill command or Layer Styles.
Take a look at a pivot table of the advantages and disadvantages of different ways of patterning.
Create your own pattern in Photoshop.
Creating your own pattern is a simple process. Keep in mind that the pattern you create should consist of rectangular shapes only. If you want to use a circle, the program will treat this shape as a rectangle.

Use the Rectangular Selection tool to create a pattern (Rectangular Marquee Tool (M)) and select the area you want to place in the pattern. Then go to the Edit-Define Pattern tab (Edit\u003e Define Pattern)to define the selection as a pattern and give it a name in the dialog box.

Tip: Many people prefer to create a pattern for their work outside of the working document. This is good practice. Creating a New Document (Ctrl + N) for your pattern, you thereby concentrate on this work, without being distracted by anything else.
Create and apply a diagonal line pattern.
Let's try one of my favorite patterns in Photoshop: the diagonal pattern that was applied to the Design Instruct website.

Create a new document (Ctrl + N) at Photoshop size 600x600 px and resolution 72 px / inch with white background.

Activating the Horizontal Text tool (Horizontal Text Tool (T)) and write the phrase Design Instruct at the top of the canvas. Choose a dark color for text (#000000) to see our work clearly. In this variant, the font Helvetica Neue Medium is used in size 30 pt, but you can choose any other font of the program (for example, Arial).

Now let's move on to creating a pattern for our main document. We will draw it in a separate document. Photoshop... Create a new document (Ctrl + N) size 3x3 px and resolution 72 px / inch. Background color Transparent (Transparent).
When you save the pattern in the program later, the default white background color will be selected.

Since the canvas is quite small, we will enlarge it with the tool Zoom Tool (Z) (magnifier) I enlarged the canvas to 3200% of the main size, which is the maximum magnification.

Now we will draw white diagonal lines from the top left corner to the bottom right. To do this, activate the Pencil tool. (Pencil Tool (B)).

Set the foreground color (Foreground) on white (#ffffff) and set the pencil size to 1 px with hardness (Hardness) 100%. Make sure the Opacity options (Opacity) and Press (Flow) equal to 100%.

In my example, I specifically switched to a different color so that you can clearly see the whole process of creating the pattern. Hold Shift and click with the Pencil (Pencil Tool) in the upper left corner of the canvas, and then in the lower right. It turned out an even diagonal connection of squares.


This is how the resulting pattern should look like for you (I switched to the original white):

After creating the diagonal line, go to Selection - All (Select\u003e All (Ctrl + A))to select the entire canvas.

Now go to the Edit-Define Pattern tab (Edit\u003e Define Pattern) and in the dialog box give a name to your line, i.e. enter any name for your pattern. Then click OK.

Now close the pattern document (you don't need to save it) and return to your original working document.
Let's apply our completed pattern to the document in the three ways described above.
Fill command.
Create a new layer above the text layer (Ctrl + Shift + N)... Select the text by holding Ctrl and clicking on the thumbnail of this layer.

Go to Edit-Run Fill (Shift + F5)... In the dialog box, in the Use (Use) choose Pattern (Pattern), and in the Custom pattern option (Custom Shape) we find our drawn pattern with diagonal lines.

Click OK to apply the pattern using the Fill command.

The good thing about this technique is that the pattern fill is on a separate layer, which allows you to add different layer styles to the pattern without affecting the text layer below it. Let's try to do this. Decrease the opacity (Opacity) layer with a pattern up to 80%.

Tip: It is good practice to use the pattern on a separate layer from the object. But to make the object move along the canvas with the pattern applied to it, use the Link Layers function (Link Layers)... The icon for this function is in the shape of a paperclip and is located at the bottom of the layers panel. Select the required layers ( Ctrl + click on the layer thumbnail) and click on the paperclip icon, or right-click on the selected layers and select the option - Link layers.
Applying a diagonal pattern in Layer Styles.
Now hide the top layer with the pattern (the eye opposite the layer icon) or delete it by dragging the layer onto the trash can icon at the bottom of the layers panel.

Double click on the text layer to bring up the Layer Styles window (Layer Style) and select the Pattern Overlay option (Pattern Overlay)... In the parameter window, click on the arrow with the pattern and select your created diagonal pattern from the set. Turn on the Preview feature (Preview)to control the pattern overlay process and, if necessary, change anything.


Here is a quick explanation of the Pattern Overlay window options (Pattern Overlay):

1. Changing the blend mode in the pattern (Multiply, Overlap, Color Dodge, etc.)
2. Controlling the opacity of the pattern. The lower the opacity level, the more transparent the pattern.

3. Pattern window. Opening it, you can choose any pattern to overlay on the object.

4. Create a new name for this pattern.
By clicking on the pattern window and then on the arrow on the right, you can select a function from the drop-down menu - Save pattern (Save Pattern)and save it under a different name in the set. If you made any changes to the pattern (scale, blending mode or opacity), then they will also be saved along with the selected swatch.
5. Scale (Scale)adjusts the scale and resolution of the pattern.

6. Link to layer (Link with Layer)
When this option is activated, the pattern will move along the canvas with the object associated with it. This option is already activated by default.
Apply a pattern with the Pattern Stamp tool (Pattern Stamp Tool (S)).
Now let's try to use our diagonal pattern in our work using the "Pattern Stamp". This tool is similar in style to using the Brush (Brush Tool (B)), only we draw not with color, but with a pattern on the canvas.
First, hide the "Pattern Overlay" layer effect on the text layer, or delete it by right-clicking on the layer row and choosing the option - Clear Layer Styles.


In the top settings menu, click on the pattern palette window and find our diagonal pattern. Activate it and adjust additional parameters: stamp brush size, opacity or pressure.

On a New Layer (Ctrl + Shift + N)start painting over the text with a pattern. You can see that I only used the stamp in some places in the text and changed the opacity. (Opacity) tool for a unique effect.
Unlike the previous two pattern blending methods (Fills and Layer Styles), this technique is a little more complex and requires some skill.

Setting patterns in Photoshop.
If you want to use patterns downloaded from other sites, then loading them into the program is quite simple. Go to Edit-Manage Sets (Edit\u003e Preset Manager) and in the dialog box click on the "Download" function (Load)on right. Remember that your downloaded pattern must have the PAT extension for the program to install it. In the download window that opens, specify the location of your pattern file and click "Download".


Typically, patterns are installed by the program into a folder along this path: Adobe Photoshop\u003e Presets\u003e Patterns.
Here are some free resources you can use when looking for the patterns you want:
Creating a library of patterns.
To create pattern templates in the program library, go to the Edit-Manage Sets tab (Edit\u003e Preset Manager)... Select the swatches you want to add to the library from the list by holding Ctrl and clicking on the desired patterns, highlighting them. Then click the "Save" button (Save Set)... Save a set of selected patterns anywhere on your computer.

This file can now be installed on other computers as well. Good luck in mastering the program!
In this tutorial, I will show you how to create a displacement effect for portraits. You will learn how to create your own displacement maps and distort images the way you like, as well as use brushes to create one interesting effect. Let's get started.
Final result:
Step 1
Create a new 700 * 700 px document and fill it with white. Open the texture image and drag it into our newly created document using the tool Moving (Move Tool) (V).

Step 2
Create an adjustment layer Curves (Curves) to darken our background texture. To do this, go to Layers - New Adjustment Layer - Curves (Layer\u003e New Adjustment Layer\u003e Curves).

Step 3

On this layer mask, use a soft black brush to bring out the highlights in the middle area of \u200b\u200bthe image.

Step 4
Create a new adjustment layer Color Balance (Color Balance) and change the settings in the tabs Mid tone (Midtones) and Sveta (Highlights).


Step 5
Open the image of the man. Separate it from the background using the Tool Straight lasso (Polygonal Lasso Tool) (L), well, or whatever tool you know better.
Now convert the selected man layer to Smart object (Smart Object). Duplicate this layer and then go to Filter - Design - Crystallization (Filter\u003e Pixelate\u003e Crystallize).

At the moment we have this result, and we will use it in the future as our first custom displacement map. Save this file in .PSD format and name it "offset 1" (“Displace 1”) or whatever you like.

Step 6
Move the original image of the man (the image without the Crystallization filter) onto our dark background. Duplicate this layer three times and number them in the order from 1 to 4 as the names of the layers.

Disable the duplicated layers for a while (2,3,4). Add a mask to layer 1. Using different paint brushes, mask the edges of the man's image.


Step 7
Turn on layer 2. Scale the man and rotate it as shown below:


Add a mask to this layer and use some brush strokes to achieve the same result as shown below.

Step 8
Turn on layer 3 and enlarge the man a bit using Free Transform (Ctrl + T):


Use a layer mask and paint brushes to get the result like in the screenshots below.

Step 9
We will now create a new custom displacement map. Open the abstracted image. Use a tool Frame (Crop Tool (C)) to select only the abstraction we need, and delete the rest:

Save this file in .PSD format and name it "offset 2" (“Displace 2”).
Step 10
Now let's go back to our main file and turn on layer 4, move the man to the left and make it a little bigger:

Apply filter Bias (Displace) to our file "offset 2" (“Displace 2”) with the settings as shown below.

Add a mask to this layer and use some paint brushes to mask out the man. Create a subtle grungy effect for the man's face, body and background:

Step 11
Duplicate this layer and move the man up and to the right (no layer mask)

Now add a mask to this layer and try experimenting with brush strokes.

Step 12
Duplicate this layer again and flip it horizontally Edit - Transform - Flip Horizontally (Edit\u003e Transform\u003e Flip Horizontal)


Step 13
Create a new layer and set the foreground color to black. Use a brush stroke and paint on the layer as shown in the below screenshot:

Hold down the Ctrl key and click on the thumbnail of this layer to load its selection:

Next, select layer 3, right-click on the selection and in the drop-down menu select Copy to a new layer (Layer via Copy). Now we have a selection on a new transparent layer. Move this layer in the layers palette above all existing ones.

Step 14
Move this part over the man's head and reduce the size of this part.

Achieve a similar look at the bottom with brushes.

Step 15
Apply this same technique to enhance the grunge and decay effects.

Step 16
Select all layers with the image of the man and those that were processed with brushes. Press the key combination Ctrl + G to group them and change the mode for that group from Skip (Pass Through) on Normal(Normal) 100%. Next create an adjustment layer. Hue / Saturation (Hue / Saturation) inside this group to slightly desaturate the image of the man and the created effect:

Step 17
Now let's create an adjustment layer Color balance(Color Balance), and adjust the settings Medium tones(Midtones):

Step 18

On this layer mask use a soft black brush to make the light visible in the face area.

Step 19
Now turn off the background layers (white background and texture layer). Press the keyboard shortcut Ctrl + Shift + Alt + E to merge together all the visible layers (meaning the group of layers with the image of a man) into one new layer. Name this layer "Effect 1" (“Effect 1”).

Turn on the background layers. On a layer "Effect 1" (“Effect 1”) using the tool Lasso (Lasso Tool), select a small section of the cheek:

Right click on this layer and select Copy to new layer (Layer via Copy). To make this part more visible and create a flaking effect, create a new layer below the existing one, but above the layer. "Effect 1" (“Effect 1”). Use a soft black brush with a level opacity(Opacity) about 40% to draw a shadow under it.

Step 20
Use the same method to create even more exfoliating areas on your face.

Step 21
Group the layer "Effect 1" (“Effect 1”) and all the layers on which we reproduced the peeling effect. Merge the layers of this group together in the same way as we did in step 19. Enlarge the result as shown in the screenshot below:

Step 22
Apply an adjustment layer Channel mixing (Channel Mixer) and put it in Clipping Mask mode. Change the red channel settings (value: -67)

Step 23
Change the color by applying an adjustment layer Hue / Saturation (Hue / Saturation):

Step 24
Go back to the effect layer and use a layer mask with brush strokes to remove the part covering the man in the image and leave the effect only visible around him.

Step 25
We will now create even more custom displacement maps. Create a new document in Photoshop with a transparent background. Use a tool Rectangular area (Rectangular Marquee Tool) to create some rectangular selections and fill them with black:


Then, we apply Filter - Distortion - Wave (Filter\u003e Distort\u003e Wave)

"offset 3"(“Displace 3).
Step 26
Create another document in Photoshop. Create a new layer and press D to set the default foreground and background colors (i.e. black and white respectively). Next, go to Filters - Rendering - Clouds(Filter\u003e Render\u003e Clouds)

Then, go to Filters - Rendering - Fibers(Filter\u003e Render\u003e Fiber)

Now let's apply the filter Crystallization (Crystallize)

Save this file in .PSD format and name it "offset 4"(“Displace 4”).
Step 27
Add a layer with the original man on top of all layers. Duplicate this layer twice. Hide these two duplicated layers. Rename the layers in numerical order from 1 to 3.

On layer 1, paint with brush strokes to partially cover the body.

Step 28
Turn on layer 2 and apply a filter Bias (Displace) using file "offset 3"(“Displace 3).

Add a mask to this layer and use brush strokes to render the effect around the man, especially his face.

Step 29
Make layer 3 visible. Apply filter Bias (Displace) using file "offset 4"(“Displace 4”).
Step 31
Create a separate group for all layers created in steps 27 to 30. Press the keyboard shortcut Ctrl + Shift + Alt + E to merge all these layers into one. Use a brush to mask the image so that it looks like the screenshots below:


Step 32

Step 33
Now, create an adjustment layer Color balance(Color Balance) and change the settings Medium tones(Midtones):

Step 34
Using an adjustment layer Curves(Curves) and lower the brightness:

Step 35
Next, create an adjustment layer. Gradient map(Gradient Map) on top of all layers and select the following colors for the gradient # 64649f and # 85f982. Now, change the mode for this layer to Soft light(Soft Light) 100%.

Step 36
How to create an adjustment layer Photo filter(Photo Filter) and select the color # ec8a00:

Step 37

Step 38
How to create an adjustment layer Curves (Curves) and increase the brightness level:

On this layer mask, use a soft black brush to mask out the edges and keep the shadow there, and make sure the light is focused on the man's face.

Step 39
Create a new layer and using a soft brush with color # 020b2d paint over the man's ear.
Change the mode for this layer to Linear Dodge(Linear Dodge) 100%:

Step 40
Create a new layer, change the brush color to # 8df0f6 and paint over the ear area again. For this layer, select the mode Overlapping (Overlay) 100%.

Your image is finally ready! If you've successfully completed all the steps, you've most likely acquired some really useful skills along the way!
One of the new filters in the latest version of Adobe Photoshop is the Displace Filter, which will help us push the brick wall apart like a curtain. This technique is quite simple, so the lesson will not take you more than 30 minutes, after which you will get the following image:
Step 1. Launch Adobe Photoshop CS5 and create a new 2560 x 1440 px document (Ctrl + N). Then download the brick wall image from this link and add it to the document created earlier.
Step 2. Now we need to import into our document the image of the girl opening the curtains, which you can download from this link.
Step 3. Now, select the Pen Tool or the Lasso Tool, and select the white areas in the image with the girl. Next in the main menu, go to Select - Refine Edges (Selection - Refine edge). In the settings window that appears, activate the Smart Radius option, then in the same settings window select the Refine Edges Tool and walk it along the border of the selection in order to make it as high quality as possible. Now in the main menu go to Layer - Layer Mask - Hide Selection (Layers - Layer mask - Hide selection).
Step 5. Once the curtains are selected, place the brick wall layer above the girl's layer.
Step 6. Then inverse the existing selection (Chift + Ctrl + I) and in the program menu go to Layer - Layer Mask - Hide Selection (Layers - Layer mask - Hide selection). A brick wall should now appear in place of the curtains.
Step 7. Duplicate the girl's layer (Ctrl + J) and place it above the brick wall layer. Now you need to delete the girl's image from the duplicate layer. There are several ways to do this: edit the layer mask by masking the girl or using the Eraser Tool. After the girl on the top layer is removed, in the main menu go to Image - Adjustment - Desaturate (Image - Correction - Desaturate), and then go to Image - Adjustment - Levels (Image - Correction - Levels) and play a little with the settings to get the result, as close as possible to the image on the screen:
Step 8. Change the blending mode of the top layer with curtains to Overlay (Overlapping). If you want to make a more expressive and darker version, duplicate the curtains layer again.
Step 9. Open the image of the girl with curtains again (Ctrl + O). Then go to the main menu Image - Adjustment - Desaturate (Image - Correction - Desaturate), after desaturating the image, go to Image - Adjustment - Levels (Image - Correction - Levels) and achieve the effect of a saturated black and white image, as shown in the picture below. Save the resulting file in psd format.
Step 10. Select the brick wall layer. Then in the main menu go to Filter - Distort - Displace (Filter - Distortion - Offset) and set the same settings as in the screen (Scale horizontal - 10, Scale vertical - 30, Stretch (Stretch to Fit), Repeat boundary pixels ( Repeat Edge Pixels)), click the OK button and in the dialog box that appears, select the image that was saved in PSD format in the previous step.
Step 11. Select the top layer, then go to the main program menu Layer - New Adjustment Layer - Gradient Map (Layer - New adjustment layer- Gradient map). In the settings window, select a gradient transition from black to white and click the OK button. As a result of this, an adjustment layer should appear, the blending mode of which must be changed to Soft Light (Soft light).
Step 12. Make sure that you have selected the top layer, then in the main menu go to Layer - New Adjustment Layer - Photo Filter (Layer - New Adjustment Layer - Photo Filter). In the settings that appear, select the orange color, set the Density value to 60% and activate the option Save the glow.
Step 13. Let's add another adjustment layer, for this in the main menu go to Layer - New Adjustment Layer - Hue / Saturation (Layer - New adjustment layer - Hue / Saturation) and set the following settings: Saturation -20 and Brightness +5
Step 14. After all these steps, you should get something like this.
Step 15. Download the landscape image from this link, and then open it in Photoshop. Drag the landscape image onto your working document and position the landscape layer above the background layer. You should get the following result:
Step 16. Now let's do some minor color correction of the landscape, for this in the main menu go to Image - Adjustment - Hue / Saturation (Image - Correction - Hue / Saturation) and set the following settings: Hue -35 and Saturation -50.
Step 17. Create a new layer and place it on top of the rest of the layers. Using the Paint Bucket Tool (Fill), fill this layer with black. Then using the Brush Tool (Brush) with a hardness of 0%, leave in the center a large print of white. Change the blending mode for this layer to Multiply (Multiplication).
Step 18. Create a layer that combines all existing layers by pressing Ctrl + Alt + Shift + E. As a result, you should have a new layer on top of all the others. Now this layer should be added a slight blur, for this in the main menu go to Filter - Blur - Gaussian Blur (Filter - Blur - Gaussian blur) and set the Radius value to 10. Change the Blending Mode of this layer to Screen and set its Opacity to 60%.
Here's what you should end up with:
Lesson original located .
Bend, Distort, and Warp in Photoshop
Sofya Skrylina, teacher of information technologies, Saint Petersburg
You can deform fragments and objects in Photoshop both using the commands of the Edit menu and using filters. Most of the filters used for warping belong to the Distort group, and in addition, the three filters - Lens Correction, Liquify, and Perspective Correction - are set apart. All these tools will be discussed in this article. It should also be noted that Photoshop offers a special tool for warping text, which we will also look at.
Menu commands Editing
If you expand the menu Editing (Edit) and then select the submenu Transformation (Transform), you will be presented with a list of commands that allow you to transform a fragment of the image. Let's list them: Scaling (Scale), Turn (Rotate), Incline (Skew), Distortion (Distort), Perspective (Perspective) and Deformation (Warp). However, these commands can be accessed much faster through Free Transform mode, which is entered by pressing Ctrl + T (on Mac OS - Command + T), and exiting from it by pressing Enter (on Mac OS - Return). Use the techniques below to enable a command:
- To scale a fragment, move the mouse pointer over one of the markers of the emerging transformation frame and drag the mouse with the button pressed. The Shift key allows you to maintain the proportions of the fragment, and the Alt key scales from the center.
- If you move the mouse pointer to any vertex of the transformation frame, it will take the form of a curved arrow, the movement of which leads to the rotation of the fragment. Before you rotate the fragment, you can shift the center of rotation - for this, you need to move the central marker of the frame to the required place. So, in fig. 1 rotation is carried out relative to the upper left vertex of the transformation frame. The Shift key allows you to rotate by an angle multiple of 15 °.
To skew, move the middle or corner handle of the transform frame border while holding down the two keys - Ctrl and Alt (on Mac OS - Command and Option).


To add a perspective effect in Free Transform mode, drag the top or bottom corner handle by pressing Shift + Alt + Ctrl (on Mac OS, Shift + Option + Command) - Fig. 2.
Activate command Distortion (Distort) from the free transform mode allows the Ctrl key (in Mac OS - Command) - fig. 3.

Fragment deformation
As a result of the choice of the command Editing (Edit) -\u003e Transformation (Transform) -\u003e Deformation (Warp) a mesh is applied to the fragment, editing of which is performed by changing the position of nodes and the angle of inclination of the guides (Fig. 4).
Press Enter (Return on Mac OS) to apply the changes and exit this command.

Content-Aware Scale
Content-Aware Scale allows you to resize an image or portion of an image without affecting people, buildings, animals, etc. With normal scaling (command Free transformation - Free Transform), all pixels are treated the same, and when scaling for content, the background and background pixels are mainly affected. Moreover, this scaling allows you to protect the selection or areas containing colors close to skin tones from transformation. So, in fig. five and shows the original image of a cow, and Fig. five b - the result of normal scaling. As you can see, there was a flattening of the cow image along with the background - the choice of the team was unsuccessful.
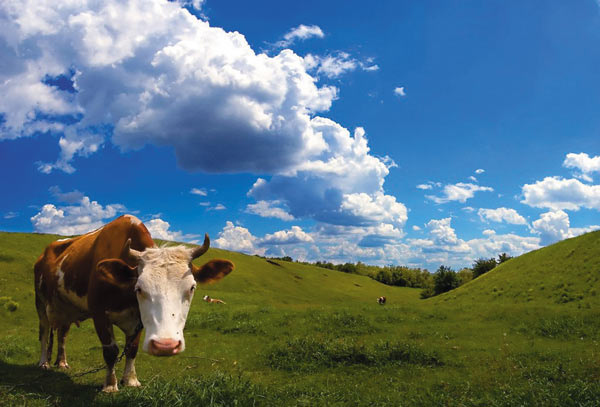


Figure: 5. Original photo of the cow (s); the result of using the Free Transform command (b); the result of using the Scale with content command without preliminary tool settings (c); result of using the command Scale with content with protection of the selection (d)
In fig. five at and r the result of using the command is presented Content-Aware Scale (Content-aware scaling). In fig. five at the command was executed without preliminary settings, and in Fig. five r the cow image has been protected from scaling.
To protect a fragment, you need to create a selection, save it in the alpha channel, and then, before scaling, on the tool's properties panel, select the name of the alpha channel from the list Protect (Protect) - fig. 6.
To protect against scaling pixels that are close to skin tones, use the human button on the property bar. The result of this button action is shown in Fig. 7 b.
Puppet warp
Puppet Warp mode was introduced in Photoshop CS5. This amazing tool allows you to deform certain parts of an image without affecting other parts of it. In the mode of puppet deformation, a mesh is superimposed on the object, editing of which leads to deformation of the fragment. But, unlike the team Deformation (Warp), the puppet warp transforms the object not using nodes and mesh guides, but using pins.
Pins are indicated by bold yellow dots that can be moved and rotated relative to them. Moreover, pins perform a double role: protection of a fragment of the image and, conversely, its deformation. For deformation, active pins are used, which are marked with a black dot in the center, and inactive pins are used to lock part of the image in place.
Let's look at the basic actions with pins:
1. Adding a pin is done by a simple mouse click in the puppet deformation mode.
Note. To enter this mode, run the command Editing (Edit) -\u003e Puppet Warp (Puppet Warp), to exit the mode - press the Enter key (in Mac OS - Return) or the button on the property bar.
2. Clicking on the created pin selects it, as a result of which a black dot appears in its center.
Note. To select multiple pins, click on them while holding down the Shift key.
3. To move a pin, first select it and then drag it while holding down the mouse button (Fig. 8).

4. To rotate the mesh around a pin, activate the pin and then do one of the following:
- to rotate manually, move the mouse pointer over the pin while holding down the Alt key (Option on Mac OS). When a circle with a curved arrow appears, drag the mouse while holding down the button (Fig. 9);
- to rotate the mesh by a given angle, you need to on the property bar from the list Turn (Rotate) select item Auto (Auto), and enter the required value in the adjacent field.
5. If part of the grid overlaps, you can change its position - for this, use two buttons Depth (Pin Depth) found on the property bar.
6. To remove the pin, use any of the following methods:
In addition to working with pins, you can adjust the elasticity, frequency, and coverage of the mesh on the property bar. It is also possible to display it or disable it:
- parameter Mode (Mode) - defines the elasticity of the mesh. In most cases, the value is used Normal (Normal) - fig. ten;
- parameter Frequency (Density) - is responsible for the distance between mesh nodes, the value is mainly applied Normal (Normal);
- parameter Expansion (Expansion) - is responsible for the coverage area of \u200b\u200bthe mesh: the larger this value, the larger the outer edge of the mesh (Fig. 11). The default is 2 pixels;
- checkbox Grid (Show Mesh) - displays or removes the mesh.
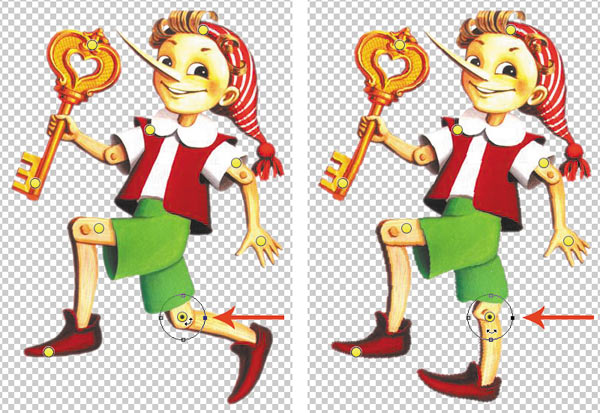
With the help of a puppet deformation, you can easily rotate an arm or a leg (Fig. 12 and), bend a straight line into a circle or into some number, for example, into an eight or nine (Fig. 12 b).
Puppet warps can be applied to layers, vector shapes, text, layer masks, and vector masks. If it is necessary to deform an object, it must first be placed on a new layer.


Figure: 12. Examples of using puppet deformation: a - we stand on the bridge, b - we bend the St. George ribbon into a nine
Group filters Distortion
Almost all group filters Distortion (Distort) produces geometric distortions, creating three-dimensional or other shape-shifting effects. Let's name some of them:
- Diffused glow(Diffuse Glow) - gives the image a color with a glow and noise;
- Ocean waves (Ocean Ripple), Ripples (Ripple) and Wave (Wave) - used to simulate ripples and water waves;
- Twisting (Twirl) and Zigzag (Zig Zag) - used to create circles on the water or the effect of swirling (Fig. 13);
- Bias (Displace) - deforms the image based on the displacement map, which is an alpha channel saved in PSD format;
- Glass (Glass) - creates the impression that there is glass over the image, the pattern and structure of which are adjusted in this filter;
- Curvature (Shear) - allows you to bend the image along the curve that is drawn in the preview area. In some cases, this filter can be replaced with the command Editing (Edit) -\u003e Deformation (Wrap).
Only three filters from this group can be applied using the filter gallery: Diffused glow (Diffuse Glow), Glass (Glass) and Ocean waves (Ocean Ripple).


Figure: 13. Examples of using the ZigZag filter from the Distort group: a - for drawing circles on the water, b - for curling the edges of the frame
Lens Correction
Filter Lens Correction (Lens Correction) is for correcting the defects created by the lens when shooting. It can be barrel and pincushion distortion,
vignetting or chromatic aberration.
Filter (Filter) -\u003e Lens Correction (Lens Correction).
In the preview area, you can overlay a grid on the image by clicking Moving the grid (Move Grid) - it is enabled by default. With its help, the results of the correction are easily tracked. Also the filter has tools Arm (Hand) and Scale (Zoom) to scroll and zoom the image. Correction can be done with two tools:
Adjustments for chromatic aberration, vignetting and perspective take place in the tab Customized (Custom) using the corresponding sliders.
In fig. 14 is an example of how to correct barrel distortion when shooting a book cover at very close range.


Figure: 14. Examples of using the Lens Correction filter to correct barrel distortion: a - the original image, b - the result of the correction
Correcting perspective
Filter Correcting perspective(Vanishing Point) is used to correct perspective planes in an image, such as side walls of buildings, floors, roofs, or any other rectangular objects. In this filter, you should construct planes that coincide with the planes of the image, and then start editing them: drawing, cloning, pasting textures from the clipboard or transforming. All elements added to the image are automatically scaled and transformed in accordance with the constructed perspective planes, so the result of the correction looks very realistic.


Figure: 15. Examples of using the Correction of perspective filter for applying texture and inscription to the box: a - original images of the box and two textures, b - the result of correction


In fig. 15 shows the original image of the box and the result of applying texture to all the edges of the parallelepiped, as a result of which the wrapping effect is obtained. As you can see from the picture, the congratulation text is also applied to the box and is oriented in accordance with the side edges.
The filter dialog box is opened with the command Filter (Filter) -\u003e Correcting perspective (Vanishing Point), on the left side of which are the filter tools. Let's look at the tools used to create the above effect.
Tool Create plane (Create Plane) creates a plane along the four corner nodes. After specifying four vertices, the perspective plane becomes active, and the bounding box and mesh are displayed, which are usually indicated in blue (Figure 16 and).
If errors occur when placing corner nodes, the plane becomes invalid and the bounding box and grid lines change to yellow or red. In this case, the nodes should be moved until the lines turn blue. You can also delete the unsuccessful plane with the Backspace key (in Mac OS - Delete) and recreate the plane.
After creating a plane, the tool becomes active Edit plane (Edit Plane), which allows you to edit the position of the nodes, the angle of inclination of the plane. The position of the node is changed by simply dragging the mouse, and the slider is used to rotate the plane Angle (Angle) in tool parameters Edit plane (Edit Plane) or the Alt key (Option on Mac OS). If you move the mouse pointer over the middle handle of the frame edge while holding down the Alt key (on Mac OS - Option), the pointer changes to a curved arrow. Moving the mouse will rotate the plane.
If you need to create a new plane, re-select the tool Create plane (Create Plane) and define four vertices of the future face. To create connected planes, after creating the first plane (mother), Ctrl-drag the middle node of the desired frame edge (on Mac OS - Command). As a result, a daughter plane will appear (Fig. 16 b). If the plane being created goes to the side and does not coincide with the face of the image, change its slope angle.
Note. It is not possible to edit the corner nodes of the parent and child planes!
After the perspective planes have been created and their nodes have been edited, you can start applying the texture. Therefore, you need to leave the filter window for a while, confirming all your changes with the Ok button. In fig. sixteen at five created planes are presented, which will later be used to apply the texture.
It is better to place the texture for each face on a separate layer to make it easier to edit the result later. In our case, we have two pairs of connected planes (side edges of the lid and the box itself) and one plane located on the top edge of the lid. Therefore, we need three new layers.
You need to copy the texture image to the clipboard, select an empty layer in the palette Layers (Layers) and open filter dialog Correcting perspective (Vanishing Point) and then select with the tool Region (Marquee) the desired plane and paste a fragment from the clipboard. When you move the mouse pointer, the texture will automatically fit into the plane. After applying a texture to each face, remember to exit the filter dialog with changes applied, otherwise all textures will be on the same layer. In fig. 17 shows the result of applying textures to the edges of the box, as well as the palette Layers (Layers).


To position the text on the side surface of the box, you need to create a text layer in the current or new document, copy it to the clipboard, and then paste it in the filter window on the previously selected plane.
Filter Plastic
Filter Plastic (Liquify) allows you to distort individual areas of the image: shift, move, rotate, reflect, make pixels bulging and wrinkling. It is used for creating caricatures, retouching and correcting photographs, as well as performing artistic effects.
The filter dialog is invoked by the command Filter (Filter) -\u003e Plastic (Liquify). All tools are located on the left side of the window, and their settings are made on the right side.
In fig. 18 shows an example of using the filter Plastic (Liquify) to create a puppet effect.
Eyes enlargement performed with the instrument Bloating (Bloat). To treat each eye it is necessary to use a fairly large brush, the size of which should exceed the size of the eye (Fig. 19).

It is better to set the brush speed rather low - in the example, a value of 30 was used. You should perform several clicks with the mouse in different places of the eye, while maintaining its rounded shape.
Tools were used to shrink the mouth Shrinking (Pucker) and Deformation (Forward). The wrinkle is applied to the corners of the mouth, with a few mouse clicks in each of them. To further narrow the mouth, it is necessary to move the corners of the mouth towards each other with a tool Deformation (Forward) - fig. 20.

The same tools were used to narrow the nose as used to reduce the mouth. In the process, you may need to reduce the brush size for more detailed processing. To sharpen the chin, the tool was applied Deformation (Forward).
At the end of the effect, the proteins, pupil and iris were processed with instruments Dimmer (Burn) and Clarifier (Dodge), and also color corrected the image in the dialog box Hue / Saturation (Hue / Saturation).
In addition to creating caricatures, these tools are often used to correct photographs. So, in fig. 21 shows an example of correcting a portrait of a man.


Figure: 22. The process of correcting a portrait with the Deformation tool: a - reduction of the earlobe; b - pulling up the lower lip
Tool Deformation (Forward) the following snippets were processed:
- earlobes - to reduce them and press them to the head (Fig. 22 and);
- lower lip - to change its shape (Fig. 22 b).
Tool Shrinking (Pucker) other snippets have been processed:
Besides the correction filter Plastic can be used to create various artistic effects. In fig. 24 shows the result of processing lily petals with a tool Twisting (Twirl). By default, rotation is clockwise; to rotate in the opposite direction, hold down the Alt key (Option on Mac OS). The stamens and pistil are processed with the tool Bloating (Bloat).
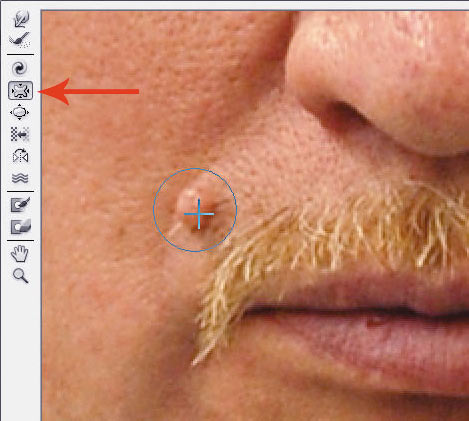
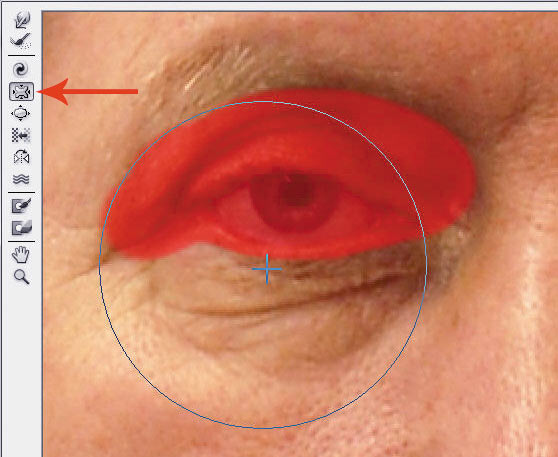
Figure: 23. The process of correcting a portrait with the Wrinkle tool: a - reducing the mole; b - reduction of bags under the eyes, the protected area is indicated in red

Warp text
For curving the text, a special function is used, which is called by clicking on the button Deformed text (Warp Text) located on the tool properties panel Horizontal text (Horizontal Type). The convenience of the function is that it does not rasterize the text, allowing you to edit it after deformation. Moreover, all settings are saved and can be changed as many times as you like.
In the instrument settings, you can select a distortion style and set the amount of the effect vertically and horizontally. So, in fig. 25 style was used to warp the text The flag (Flag).

We have considered not all Photoshop tools for performing various kinds of deformations. Behind the scenes, there are many tools of the 3D group. But the above examples show that the possibilities of Photoshop are really very diverse.