The free bitmap graphics editor Gimp (The GNU Image Manipulation Program) is an affordable alternative to commercial Photoshop. It can be used to create logos and edit photos, retouch, colorize and convert to many formats. Gimp can open and edit, with some restrictions, Photoshop's .psd files. If you do not have the opportunity to purchase Photoshop or another commercial graphics editor, then gimp in this case will be a good completely free and fairly functional replacement. The following will show you how to install gimp on a Windows computer.
We enter the site and start downloading |
||
|
To start downloading the installer, go to www.gimp.org/downloads and click on the Download gimp link to download. |
||
|
The browser will ask you to confirm the need to download this file. We confirm by clicking on the Continue button. |
 |
|
|
The process of downloading the installation file takes some time, you need to wait. |
 |
|
|
After the installation file is downloaded, you can run it. To do this, click on the icon with the downloaded file. |
 |
|
|
Windows asks to confirm the launch of the program. Confirm by clicking on the Run button. |
 |
|
|
The User Control Center also asks for confirmation to allow the gimp installer to make changes on the computer. Confirm by clicking on the Yes button. |
 |
|
|
The gimp installation manager will start. As always, it is recommended to close all running applications and click on the Next button. |
 |
|
|
Naturally, we agree with the terms of the license agreement and click on the Next button. |
 |
|
|
For quick installation, click on the button Install now... Those who wish to make more precise settings can click on the Customize button. |
 |
|
|
The installation process is quick and does not take long. |
 |
GIMP 2.8 is designed for amateur and professional processing of images of average complexity: photo correction, Internet graphics, design work, etc. The program is distributed free of charge, is undemanding to computer resources and has a decent set of functions.
It is the closest to the products of the commercial segment and is fundamentally improved from version to version.
Capabilities
Most good graphics editors are not cheap and require a license. This path is literally ruinous for small organizations or individuals who have a need or desire to work with photographs, design, and just draw. Basic Point has absolutely insignificant functionality, and so a worthy tool cannot be considered. Another thing is GIMP 2.8, which combines free distribution and a decent set of features:
- Various tools for processing existing digital images, including intelligent solutions such as perspective correction, retouching, "healing" brush, various thematic filters, etc. It is quite easy to perform such operations as improving detail, eliminating visual defects and distortion.
- Ability to process several drawings at once according to a given template. For example, for photographs, this allows you to buy a lot of time on typical formatting that does not require human attention.
- Multi-format. The problem of previous versions is solved - the program allows working with the extensions JPEG, PNG, GIF, TIFF. Previously, an exclusively original format was available, which made life much more difficult.
- Customizing the interface for a specific person and his tasks.
- The ability to automate a certain sequence of actions for a number of pictures. Having set the algorithm, it is allowed to apply it as needed.
- Using a complex structure consisting of layers, each of which is edited independently of the others.

Accessibility is an important advantage. You can download the program in Russian on many reliable sites that promote software.
Pros and cons
The strengths of GIMP 2.8 include:
- Ability to work both with raster graphics and in a certain amount, with vector graphics.
- Simple and intuitive interface. It is made in the traditions of the leaders of specialized paid software and pleases with thoughtfulness and ergonomics.
- Russification. This is a great time-saver in your work, when you do not need to remember English terms or look for an infrequent team.
- Quite sophisticated built-in filters and image processing methods.
- Small size.
- Compatible with all popular operating systems. 32 bit and 64 bit are allowed.
- The presence of additional modules that are not in the basic version. But they can be easily installed as needed.

Technically, there are not many disadvantages:
- He does not pull on a full-fledged replacement of Photoshop, and if it is supposed to work as deeply as possible with graphics, then problems may arise.
- Limited applicability in printing due to the low supported color depth per channel.
In case of doubt, you can always install the program and test it, independently deciding whether to use it.
Conclusion
If professional paid software turns out to be too expensive, and you don't want to resort to pirated versions, you can always download GIMP 2.8 for free in Russian.

After installing the GIMP program on your computer, we will have a lot of drawing tools, tools for retouching, and various effects.
The GIMP is a free graphics editor with an impressive arsenal of tools and effects. Supports working with layers and processing GIF animation.
To install GIMP on your computer, first download the installation file from the official website (downloading will start when you click on the orange button with the inscription "Download GIMP 2.8.18 directly"). GIMP is free software, so it is absolutely free.
Double click to run the downloaded file gimp-2.8.18-setup.exe... The installation start window will appear with a choice of language. We choose Russian and click OK.
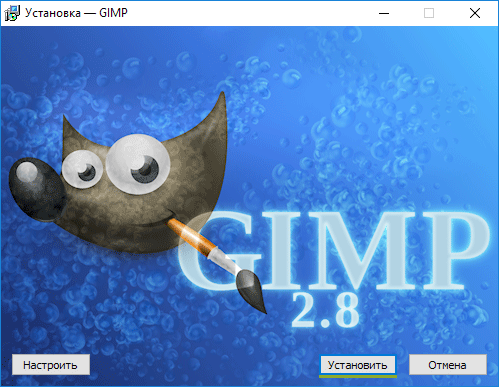
A window will open Installation - GIMP... Push the button Install if we want to leave the default settings.
IMPORTANT:
If you do not need the default settings, click the button Settings... Here you can choose:
- The folder in which to install the program (by default C: \\ Program Files \\ GIMP 2),
- Select components to install,
- Select file associations,
- Create additional icons on the desktop and in the quick launch bar.
The GIMP installation will begin. Wait for it to end.

Wait until the installation is complete and in the window that appears, click the button To complete.

That's all! The GIMP graphics editor is installed on your computer.
You can start the program by clicking on the corresponding shortcut with the talisman on the desktop. A launch window will open.

When you start the program for the first time, you will need to wait a little, as the search for data files will start.
Wilbert is the GIMP mascot and was designed by Tuomas "tigert" Kuosmanen.
In this article you will learn about where and how you can download latest versions of the free graphics editor Gimpand also how to do installation GIMP in all popular operating systems (Windows, Linux, Mac OS).
Gimp (GNU Image Manipulation Program) is a free and free raster graphics editor for creating and editing 2D images. It has many built-in tools and tools for the full work of 2d artists, designers and photographers: creating graphic elements and logos, scaling, cropping and color correction of photos, painting with brushes and tablet support, combining images using layers, many blending modes and various layer masks , converting images to various formats, as well as support for third-party plugins and filters that greatly expand the functionality of GIMP. The program is distributed under the free GNU GPL license.
Downloading the latest versions of GIMP
On the official site of the GIMP project (http://www.gimp.org/) you can find installation packages for distributions only Linux OS (including for Ubuntu / Kubuntu), and for other operating systems, the developers provide the source codes of the program. Most Linux distributions already have GIMP preinstalled and easily updated / installed from the default connected repositories.
At the beginning of 2011, the last stable branch of the application is GIMP 2.6.X... In the downloads section (http://www.gimp.org/downloads/) GIMP version 2.6.11 is available, as well as test builds of the new 2.7 branch, the release of which is promised by the developers by the spring of this year. Major and long-awaited innovations GIMP 2.7 - this is a single-window interface mode, grouping layers into folders, accelerating and optimizing rendering of many tools, and many other improvements. I myself have tried using both branches of the GMP and I can say that version 2.7 is already quite usable and stable.
Not deprived of attention and the platform Mac OS, for which there are own assemblies of GMP. You can download GIMP 2.6.11 from the following link: http://gimp.lisanet.de/Website/Download.html
A test build of GIMP 2.7.1 for Mac OS users is unfortunately not yet available.
Russian interface language in GIMP
Any version of GIMP initially has interface russification and excellent localization. If you want to change the language of the program or it was determined incorrectly, then you need to start GIMP and go to the main menu item “ Edit” -> “Options“. In the window that appears, select the tab “ Interface"And in the list" Tongue”Set the required localization of the interface.
Installing and running GIMP
Installing GIMP is pretty straightforward for any platform.
IN Linux stable versions of GIMP are available natively in the standard repositories for all distributions and can be installed using the Package Manager (for example, KPackageKit, which is available in Kubuntu) and through the terminal. In Ubuntu / Kubuntu, just enter the command in the terminal:
sudo apt-get install gimp
To install test builds of version 2.7, you can connect the repository (ppa: matthaeus123 / mrw-gimp-svn) by entering in the terminal:
sudo add-apt-repository ppa: matthaeus123 / mrw-gimp-svn
And then update the list of applications, uninstall the old version of GIMP and install GIMP 2.7 by entering the following commands in the terminal:
sudo apt-get update
sudo apt-get remove gimp
sudo apt-get install gimp
To start GIMP, you need to call it from the application launcher (tab “ Applications"-\u003e section" Graphic arts“).
GIMP 2.7.1 appearance in Kubuntu
Installing GIMP in Windows is carried out in the standard way: run the installation file and follow the instructions of the installation wizard. After installing the program, a shortcut to launch and an item in the "Start" menu will be created on the desktop.
To install GIMP on Mac OS you should run the installation package. For the program to work, you will also need to install Apple's X11 environment into the system.
The article materials are available under license:
Today in a note we will analyze the process with you gIMP installation on the Windows operating system, and we will also talk about what kind of program it is and where you can download it.
GIMP - what is this program?
Gimp (abbreviation for GNU Image Manipulation Program) Is a free program for creating and editing images. GIMP is a very powerful tool, which is why many people compare it to Photoshop ( GIMP is some kind of free Photoshop alternative).
The first issues of the program appeared in 1995. The GIMP was initially developed for UNIX-like operating systems, but later versions for the Windows operating system also appeared. Today, the GIMP graphics editor is very popular among both Windows and Linux users, even many Linux distributions include GIMP ( those. you don't even need to install it).
GIMP was originally developed by Spencer Kimball and Peter Mattis. At the moment, a lot of developers have already contributed to the development of the project ( if anyone is interested, you can familiarize yourself with the full list of developers on the authors page of the official website).
GIMP is available for both 32-bit systems and 64. GIMP supports many languages, including Russian, which is very good.
The main features of GIMP include:
- Drawing, including a set of tools such as: brush, pencil, spray and others;
- Transform: rotation, scaling, curvature and reflection;
- Layers, channels, filters;
- Selection tools such as rectangular, elliptical, free selection, " magic wand»And other highlighting;
- Color correction tools;
- Supports formats: GIF, JPEG, PNG, XPM, TIFF, TGA, MPEG, PS, PDF, PCX, BMP and others;
- And also many other useful features and functions.
Official site of the project - www.gimp.org
Where can I download GIMP?
You only need to download software on the Internet from the official sites, so we will download the GIMP from the official site. To do this, go to the download page here it is - https://www.gimp.org/downloads/
Then we choose the download method using the browser or via torrent, I, in this case, choose the method using the browser, so I click on the following link.

Description of installing GIMP on Windows
We will consider the process of installing the GIMP program using the example of the Windows 8.1 operating system, in exactly the same way it can be installed on Windows 7 or 10.
Step 1
Run the downloaded installer file. On the first window, we are immediately offered to choose a language, and by default it will already be selected correctly. Click " OK».

Step 2
Further, for automatic installation, you can immediately click the button " Install”, In which case the installer will perform the entire installation of GIMP automatically, and you don't even need to do anything else. But if you want to customize some of the installation parameters, for example, change the default installation directory or change the set of installed components, then click the " Tune". We, for a more detailed understanding, let's select the manual installation and click the button " Tune».

Step 3
First, we agree with the terms of the license agreement, click " Further».

Step 4

Step 5
Then if you do not need a complete set of components, you can choose “ Compact" or " Selective"Installation, I'll leave it as default, click" Further».

Step 6
In the next step, you can select the file types that will be associated with the GIMP program, click " Further».

Step 7
If you want the installer to create a shortcut to launch GIMP on the desktop or in the quick launch bar, then check the corresponding boxes, click “ Further».

Step 8
Everything is ready for installation, check the parameters and click " Install».

The installation has started.

Step 9
Installation is complete, press the button " To complete».

We launch the program using a shortcut on the desktop or from the Start menu ( the first launch of the program may take some time).

That's all for me, good luck!