Making a collage isn't just about combining multiple photos into one. The correct collage shows the skill of the author, and also demonstrates his ability to beautifully and competently arrange photos so that it looks stylish and attractive. A collage will be successful and noticeable, in which there are no noticeable boundaries between the photos - instead, the photos seem to flow into each other. This effect can be achieved by performing simple operations in Adobe Photoshop.
You will need
- - Adobe Photoshop program
Instructions
Good day, dear readers. Today I decided to prove to you that the best way to learn theory is in practice. Even if you are a beginner, in literally an hour you can achieve a good result without understanding anything in Photoshop! Look, this picture was created purely thanks to gradients. They are applied to different elements and in different variations.
If you read this article to the end, you will not only learn how to make a smooth color transition in Photoshop, but also apply this knowledge in practice in relation to text, shape, create beautiful flickering rhombuses and much more.

I have already made this picture. If you want, then you can create yourself exactly the same, or maybe even better, but I will teach you according to a different example. Which one? Find out at the end of the article. I will draw with you and describe the process at the same time, I myself do not yet know what I will get. Thanks to this, I will be able to see what problems you may encounter and help resolve them.
Basic knowledge and one secret of always winning option
So, first we have to open Photoshop. I highly recommend you download this program ( you can buy the licensed version here ). You will never find better than her. If you are afraid that you will not master it and will spend money in vain, completely forgetting about the program after the first attempt, you can try the online service https://editor.0lik.ru/ ... It is much more convenient to have your own program and very soon you will understand why.
This is what the 2015 version of Photoshop looks like, if you have a different edition, then don't worry. Everything will be about the same. You have a little less options and this is the only difference.
Create a new document.

Choosing a size is one of the most difficult questions for me. As a basis, I took the maximum image size for a post on social networks. 800x500, but as you can imagine, this is not the point. It all depends on the goals and objectives that you are going to perform with Photoshop.

Look, the panel on the right contains all the main buttons, including the gradient. However, now it cannot be found. How so? I myself faced this problem when I started learning how to work with Photoshop. You read an article, and half of the information you have to look for in third-party sources. Google, Google, Google.
May a very clever reader forgive me, who knows everything very well for small deviations from the topic. I want all blog visitors to be able to work with my lessons. Perhaps someday it will be very useful for you. It will save you a lot of time.

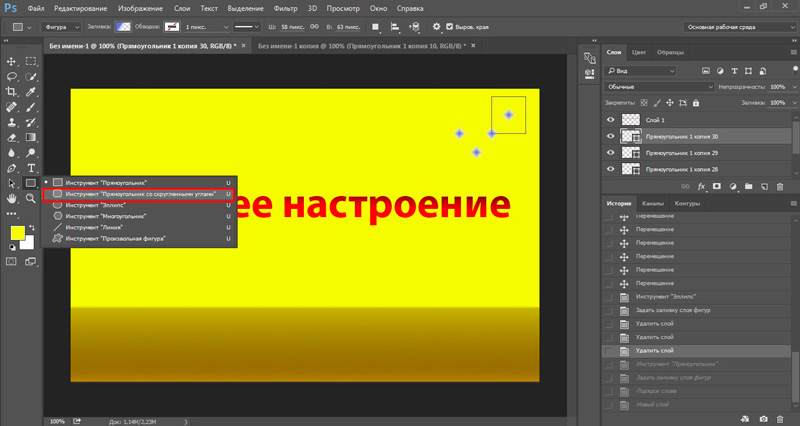
In the lower right corner of almost every button, except for the magnifying glass, there is something like an arrow. This indicates that there are several tools hidden in the button.

Hold the left mouse button on the button for a few seconds to open an additional menu and select a gradient.

Another additional menu opened at the top. It is used exclusively for gradients. Poke at the text - a special text menu will open at the top, a brush and ... well, you get the idea.

Click on the arrow next to the color icon. This is where standard transitions are stored, or those you uploaded.

If you do not consider yourself a design genius, then I recommend that you download free templates from the Internet. There are plenty of them. Firstly, it saves time, and secondly, several similar options, as a rule, are combined into a theme created in the same style. this can be easily applied to one picture and it will almost always look good.

Installing new templates is no problem. Download them from the Internet then select the nut in the upper right corner and find the link "Download ...".

Select a folder with downloaded files on your computer and save.

They will be added to the bottom of the list.

Fill
Now let's learn how to fill. Choose any option you like (we will move on to creation a little later) and click on it. Anywhere on the screen, hold down the left mouse button and move in any direction. The location of the color transition depends on it.

See the difference.

You can twirl anywhere.

To prevent the movement of your line from shifting and the gradient from blurring, hold down the Shift key while setting the direction.
You see, the color transition is now in the center. We'll take a closer look at the settings when creating our own gradient. Now I will only talk about the center offset. We click on this plate.

Grab the color below with the left mouse button and move it to the left or right.

Here's what I ended up with.

How to apply a gradient to text to make letters look modern
Now let's write something. We select the corresponding button.

If you need to change the size or the font itself, pay attention to the panel at the top of the screen. Everything is simple there.

Now press Ctrl and at the same time click on the icon of the new text layer. Be careful, you need to click not on the text, but on the rectangle, as shown in the screenshot below.

Now we create a new layer. There are three options for solving the problem: we simultaneously hold down Shift, ctrl, N; use the panel on top, find there "Layer - new - create"; use the button in the quick menu on the right. In the picture below, I showed it with an arrow.


Now, to remove the highlighting at the edges of the letters, you can poke on the selection, and then click on any part of the picture. You get the following result.

The work with the text does not end there. Look, we have 2 layers: one with a gradient and the other with letters. Why did it happen there? I will explain as much as I can. Write in the comments if it's not clear. You wrote the text. Photoshop realized that these were letters and even suggested that you enlarge them, reduce them, change the font, and so on.
Then you have selected this piece. We created a new layer, if we draw an analogy, cut out a stencil from paper and filled it. At this point, Photoshop got lost. He stopped seeing your letters. For him, it is just a part of some picture, like a rhombus, square or circle in the carved center. If you go to work with the letters on a layer, you will fail, if you want to apply a gradient to the text - the same thing.
If now you decide to move the text somewhere and you climb into the corresponding section, and then start moving the arrow, then everything will move out.

We are removing the text layer to avoid confusion. Click on it with the right mouse button and select the desired option.

Gradient views, shape fills, and asterisks
If you paid attention to the gradient bar on top, you might find that they are different: linear, radial, angular, mirror or diamond-shaped. It is not difficult to see the differences, for this it is not necessary to read the articles, just open a blank sheet and try to apply one or another option. See what happened.

The only thing worth noting is that if you want to see the perfect result, like in my picture, the arrow needs to be directed from the center.

Now let's get back to our picture. Let me teach you one interesting trick. Color transitions can be used within the shapes that you draw. This is very useful, especially for those who are going to build websites.
So, choose a rectangle or a circle. It does not matter.

Now the fill color.

Go to the gradients section.

We need a rhombus here.

You see, this is an interesting effect, but the white color spoils everything. We need a transparent one. Found inside templates. If you see such a grid inside the template, then this is what we need.

Play around with the settings and you will have your ideal one.

Now let's clone this flash. Choosing a move. Just click on the button.

Now hold down alt and drag the duplicate to the side.

I got the following result.

How to create a new gradient and buttons for websites
And finally, I'll tell you how to create gradients from scratch yourself, and at the same time figure out their settings. Let's create a nice button? I will add a rounded rectangle to my picture.
This is how it looks. This time we will not use the inner fill. It is not very convenient to work with a new template through it. Let it be just black for now.

Select the familiar tool and click on the plate.

New gradients are based on old ones. Click on any. The old version will not disappear anywhere. Then just come up with a new name for it and save it.

The upper control points can be used to control the transparency levels.

With the help of the lower ones, work with color is carried out. To expand the gamut, click next to any point and it will be duplicated.

You can create as many as you like.

To make the transition look modern, you need to smooth out the colors. Do not touch this indicator and everything will be ok. It should be 100%. Ready. You can click on "OK" or "Save" - it all depends on your desire.

Now we repeat what we have already done recently with the text. Hold down ctrl, poke the button of the desired style in the center and create a new one based on it.

Now add the transition and voila.

Add text to the button and that's it. It is not clear why the necessary contraption is finished. By the way, you can download my source if you like ( Download gradient.psd source ). You can open it in Photoshop and enhance my picture. I think it won't be difficult.

So that is all. You now know quite a bit about gradients. If you are a designer, layout designer, site creator or want to become one, and this lesson was really useful for you - subscribe to the newsletter and learn more about what interests you. You can also pay attention to this site: https://photoshop-master.org/disc149/ ... Here you can find tons of both paid and free courses that will teach you real, professional work with Photoshop.
Good luck and see you soon.
Hello dear novice webmasters. Again .
In this article I will tell you how to make it transition from dark shades to lighter ones, as well as, from one color to another.
This action is called a gradient, and since it is essentially a background image, it is executed by the background property, which takes two values:
1.linear-gradient - color transition from one edge or corner to another.
2.radial-gradient - color transition from the center to the edges.
It is written as follows:
background: -moz-linear-gradient (top, # ff0000, #ffcfcf);
top, # ff0000, #ffcfcf);
Below, using an example, we will analyze in detail each element of this record.
Unfortunately, the gradient still has problems with rendering in browsers, and with the W3C specification, so you still have to use prefixes in the values.
A prefix is put at the beginning of the value, and starts with a dash.
We will have to insert such a list into the element selector, creating a gradient for it, in order for your very beautiful background to be correctly reflected in all browsers. Beauty requires sacrifice.
Это самый простой, двухцветный градиент. Разберём подробно значения свойства background
В первой строке задаётся фон для браузеров не поддерживающих линейный градиент.
Следующие 5 строк — для отображения фона в разных браузерах. Сначала пишется значение градиента с префиксом в начале.
Затем, в круглых скобках:
top — направление от которого начинается первый цвет (может быть bottom , left , right )
#ff0000
— через запятую первый цвет; 
#ffcfcf — через запятую второй цвет;
У Safari, до 5-ой версии, и у Chrome до десятки был свой собственный синтаксис, заметно увеличивающий код. Наверное поэтому, градиент для этих версий, зачастую, не указывается, особенно при наличии большого количества цветов.
Можно сделать переход цвета не горизонтально, или вертикально, а из угла в угол. Для этого существуют следующие направления:
bottom right — от правого нижнего угла к левому верхнему;
bottom left — от левого нижнего к правому верхнему;
top right — от правого верхнего к левому нижнему;
top left — от левого верхнего к правому нижнему;
Можно сделать переход цвета от центра блока к краям. Тогда в значении вместо слова linear (линейный), ставиться radial (радиальный)
#gradient
{
background
: #ff0000
;
background
: -moz-radial-gradient
(center, ellipse cover, #ff0000, #ffcfcf
);
background
: -webkit-radial-gradient
(center, ellipse cover, #ff0000, #ffcfcf
);
center, ellipse cover, #ff0000, #ffcfcf
);
center, ellipse cover, #ff0000, #ffcfcf
);
width
: 600px
;
height
: 400px
;
border
: 1px solid #333
;
}

А теперь давайте сделаем, так сказать, что-то типа радуги. Для этого добавим в вышеприведённый код ещё пару цветов, и зададим в процентах объём каждого цвета (количество цветов не ограничивается)
Объём цвета задаётся от 0% до 100%, (первый — 0%, последний — 100%, остальные между ними в порядке следования). Рассмотрим этот вариант на радиальном градиенте. На линейном делается всё аналогично.
#gradient
{
background
: #ff0000
;
background
: -moz-radial-gradient
();
background
: -webkit-radial-gradien
t(center, ellipse cover, #ff0000 0%, #00b630 30%, #6ff5f5 70%, #ffcfcf 100%
);
background
: -o-radial-gradient
(center, ellipse cover, #ff0000 0%, #00b630 30%, #6ff5f5 70%, #ffcfcf1005
);
background
: -ms-radial-gradient
(center, ellipse cover, #ff0000 0%, #00b630 30%, #6ff5f5 70%, #ffcfcf 100%
);
width
: 600px
;
height
: 400px
;
border
: 1px solid #333
;
}

Принцип, я думаю, понятен. Так что строку для Safari до пятой версии, и Chrome до десятой, попробуйте написать самостоятельно.
Градиент задаётся любому блоку HTML (body, div, h1-6, p, ul, ol), и как глобальным, так и встроенным стилем (это для сайта на WordPress).
Теперь несколько слов о том, как и где подбирать цвета. Есть сервисы по созданию градиентов, предлагающие и цвет, и процент объёма, и код градиента, но выбор у них ограничен предложением.
Поэтому я пользуюсь инструментом colorscheme.ru , в котором можно подобрать цвет в неограниченном диапазоне, и оптимально подобранных последовательностях и сочетаниях.

В верхнем ряду панели выбирается количество сочетаемых цветов. Пройдя по «Угол 30°» меняется диапазон выбора.
В «Регулировка схемы», тон делается темнее или светлее. В «Список цветов», все цвета, присутствующие на схеме, располагаются по насыщенности, и с кодом в подписи.
В общем неограниченные возможности по подбору цветовой гаммы для создания градиента.
Желаю творческих успехов.
— Рабинович! У вас есть разменять сто долларов?
— Нет, но спасибо за комплимент!
Две одесситки:
— Роза, как тебе нравится моё новое платье?
— Извини, Сара, я спешу, мне сейчас не до скандалов!
Мы рады приветствовать вас на очередном нашем уроке посвященном работе в в Adobe Photoshop. В этой статье речь пойдет о том, как создавать плавные переходы в программе на границе между изображениями/цветами. Это очень полезный навык, который вам наверняка пригодится, так что приступим!
Делаем плавный переход между цветами
Т.к. Фотошоп является профессиональной программой обработки изображений, очень часто одного и того же результата можно добиться несколькими способами. Так и с переходами.
Через инструмент “Градиент”
Вы, наверняка, знакомы с данным инструментом. Поэтому переходим в к панели инструментов слева и выбираем “Градиент” .
После того, как инструмент выбран, под главным меню появится панель настроек Градиента, где вы сможете выбрать шаблон градиента и установить дополнительные параметры по своему желанию.

К сожалению, стандартный набор градиентов включает в себя не так много шаблонов, поэтому вы можете воспользоваться поиском и расширить свою коллекцию, или же создать свой вариант.


Чтобы переход был именно цветовым, а не прозрачным, нужно задать настройки еще и для контрольной точки непрозрачности (см. скриншот ниже):

После того, как все готово, остается применить изменения, нажатием “ОК”, и залить градиентом холст. Для этого образуем выделенную область, которую хотим залить, или применяем градиент на весь холст. Просто кликаем ЛКМ (левой кнопкой мыши) в нужном месте и тянем столько, сколько необходимо.

Важно! Обратите внимание на то, какой вид заливки выбран:

В нашем случае “Линейный градиент” .
Через “Слой-маску”
К этому способу прибегают уже опытные пользователи. Все действия будут происходить уже через палитру слоев. Приступим:

Через растушевку выделения
Суть данного метода в том, чтобы создать плавный переход на границе залитого объекта/картинки и фона. Приступим!
- Нам понадобится инструмент “Прямоугольная область”.

- Теперь нужно создать выделение:

- Когда выделение уже готово, с помощью горячих клавиш SHIFT+F6
вызываем окно, где необходимо ввести значение в пункте “Радиус растушевки”
.

- После, нужно залить образованное выделение. Для этого снова воспользуемся горячими клавишами SHIFT+F5
и выбираем цвет заливки.

- После применения изменений получаем такой результат плавного перехода:

- Остается снять выделение с помощью CTRL+D
и готово:

Как видите, нет ничего сложно в том, чтобы сделать плавные переходы в Фотошопе между цветами. Мы представили целых 3 способа, как это сделать, каждый из которых подходит в определенной ситуации.
На этом все! До встречи в наших следующих уроках!
Перемещаем вторую фотографию на ранее открытую.
Подробнее о соединении фотографий можно прочитать в .
Затем с помощью инструмента "Перемещение" (Move Tool) задаём желательно расположение фотографий относительно друг друга. Надо сделать так, чтобы одна фото перекрывала другую, в месте перекрытия и будет смонтирован плавный переход. Для удобства можно временно уменьшить непрозрачность изображений в Панели слоёв , также неплохо поставить направляющие на границах перекрытия.

Теперь определим, какая фотография будет сверху, и при необходимости изменим расположение слоёв в Панели слоёв. У меня сверху будет изображение с Твиттером.
Затем ставим непрозрачность слоёв с изображениями обратно на сто процентов.
И, теперь, перейдём собственно к созданию плавного перехода между фотографиями, в данном примере мы сделаем это с помощью слой-маски и применением чёрно-белого градиента.
К слою с верней фотографией добавляем слой-маску , кликнув по соответствующей иконке внизу палитры, при этом цвета в цветовой палитре автоматически изменились на чёрный основной цвет и белый фоновый, в Панели слоёв появится значок маски на соответствующем слое. Затем открываем в инструментальной палитре инструмент "Градиент" (Gradient Tool). В левом верхнем углу рабочего окна Фотошопа кликаем по треугольничку для открытия палитры градиентов, и выбираем самый первый, имеющий название "От основного цвета к фоновому". Затем проводим линию от одной направляющей до другой в направлении, указанном на рисунке.

Для того, чтобы провести линию градиента строго горизонтально (или, для других случаев, строго вертикально), следует зажать клавишу Shift.
В результате мы получим плавный переход к прозрачности правого края верхнего изображения, что даёт эффект плавного перехода между двумя фотографиями.
На иконке маски в Панели слоёв мы увидим следующие изменения, чёрный цвет показывает полную прозрачность, а белый, наоборот, полную непрозрачность изображения, к которому применена слой-маска.

Вот, собственно, и всё, задача выполнена!


