Today we are going to talk about artistic filters in Photoshop. With the help of these filters stylization is possible for painting (oil, pastel, pencil), imitation of surfaces and structures. With these filters you can create works of art from your photos.
A filter is a tool for changing an image. This can be blurring, sharpening, stylizing, bumping, changing colors, and more.
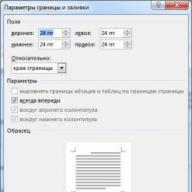
All filters can be found in the "Filter" tab, which is located at the top. When you click on this tab, a menu appears in front of us.

Watercolor. A watercolor painting effect.
Simulates drawing with watercolors. But not very good. With a couple of tricks, you can achieve great results. Maketwo copy the photo with Ctrl + J, then select the “Watercolor” filter.
We see the settings
- Brush Size (Brush size).
- Brush Detail Determines how accurately the details will be saved.
- Texture (Texture). Determines the strength of the paper texture.

We adjust the settings to taste. On the left we see the texture, on the right the result.

Marine watercolor / luceluceluce
Change the Blend Mode of the first layer toScreen (Lightening or Screen)and the second onMultiply (Multiplication)... Add masks to both layers. Keep the Alt key pressed to create a black mask. Use a white brush and a watercolor brush available on the internet to paint with masks. This way you will simulate typical color transitions. Photoshop has done some preliminary work and prepared a sketch. With brushes and textures, you can get the effect you want.

Colored Pencil. Simulates a colored pencil drawing.
The Colored Pencil filter uses the current background color as the color of the paper on which the drawing will be drawn. That is, even before applying the filter, you need to make a small decision. The colors in the photo will turn to the colors of the pencils. The color of the paper will be visible between the pencil strokes.
- Pencil Width (thickness of a pencil). Adjusts the thickness of the strokes.
- Stroke Width (Stroke pressure). Simulates hard or weak pressure on a pencil.
- Paper Brightness.

Since small details rarely work well, it's best to work with large photographs. It is difficult to get a good result with a one-time use of the filter. Therefore, I recommend making several copies of the image, applying different settings on different copies and using layer masks to draw those areas that best fit this part of the photo. The texture of the paper makes the image look more realistic. In this case, the texture is in a layer above all other layers and I used the layer's blend modeMultiply (Multiplication) with little transparency.

sexy woman / stryjek
Smudge Stick. The effect of a smooth, soft image.
The filter softens the image by adding diagonal strokes, making highlights brighter and less detailed. This filter uses the colors of an image to simulate feathering. In this case, you can set the stroke length, which naturally affects the details and sharpness / blur. You can change the brightness of different areas of the picture and the intensity of the brightness.
- Highlight Area.
- Intensity.

Since the content of the picture does not change, it is possible to create a “photo-realistic” picture. To do this, make two copies of the original and go to the filter. On the bottom layer, set stroke length, brightness zone and intensity to 0... On the top layer - stroke length - 10, brightness zone - 10 and intensity - 3... Change the blending mode of this layer toOverlay (Overlay) and set the opacity to 50%.
This will ensure that the strokes are not too even. Of course, it is important to choose the right motive here. Fantastic collages are more suitable here than, for example, a portrait.

The Temple / Zuboff
Cutout (Application). Turns a photo into a colored paper applique.
The filter combines similar colors and simulates an appliqué of glued pieces of paper. The number of levels determines the number of colors in the collage. Edge Simplification - How the pieces of paper were cut accurately and precisely. Edge Precision only reacts when abstraction level is not set to 0. The lower the scale value Edge Simplicity and higher scale value Edge Fidelity, the less distortion. Image brightness does not change
- No of Levels defines the number of color levels
- Edge Simplicity.
- Edge Fidelity.

That is, using this filter, you can achieve an illustration effect. Even a simple outline is sufficient to define the content of an image. Here, too, it is very important to choose the right image. Here, too, it makes sense to use different layer blending modes, for example,Overlay (Overlay).

Green forest with fog / andreiuc88
Fresco (Fresco) . Fresco painting:
This filter simulates the application of paint to a still fresh plaster, at least in theory. The choice of motive is very important here too.
- Brush Size (Brush size).
- Texture (Texture). Adjusts the sharpness of the edges.

In order to make the picture look like a mural, I applied a filter with the settings p brush size - 1, brush details - 10, texture - 1, applied a texture with a stucco look and usingImage - Correction - Hue / Saturation reduced the saturation of the image. Then I changed the blend mode of the layers toMultiply (Multiplication).

Saint Mary Magdalene / zatletic
Dry Brush. Imitation of a drawing with a dry brush.
The result of applying this filter is a drawing very similar to the dry brush technique (painting with a lot of paint with a little water).
- Brush Size (Brush size).
- Brush Detail Determines how much detail to keep.
- Texture (Texture). Adjusts the strength of the paper texture.

Here you can apply a filter with settings brush size - 1, brush details - 10, texture - 2... The snapshot is already becoming like a painting. Make a copy of the layer and apply the filter again with the settings brush size - 10, brush details - 10, texture - 1 and change the opacity of the layer to 50%. The texture of the paper can improve the effect.

Mediterrane Impression / pk200258
Rough Pastels (Pastel). Pastel drawing effect.
Using this filter gives a pastel effect. In the upper part of the dialog box, you set the stroke length and degree of detail. At the bottom, the properties of the material on which the pattern is applied, the size of the texture, the relief and the direction of light are determined.
- Stroke Length
- Stroke Detail. Determines how strong the strokes will be.
- Texture (Texture). Allows you to select a texture: brick (brick), burlap (burlap), canvas (canvas), sandstone (sandstone).
- Scaling.
- Relief (Relief).

The settings depend on the motive. After setting the filter, it is necessary to remove (or partially remove) the filter action on some parts of the image using a mask.

meditation / pepe
Film Grain. Superimposes the grain to simulate filming with a film camera:
On contrasting pictures it gives a rather interesting effect. Grain scale(Grain) controls grain size,Highlight Area is the percentage of highlights, and Intensity is the exposure.
- Grain (Grain). The amount of grain in the image.
- Highlight Area. Increases the brightness of the final image.
- Intensity. Adjusts the brightness and sets the intensity of the bright areas.

Make two copies of the image and apply a filter with settings on the top layer grain - 8, brightness zone - 14, intensity - 2... Change the blend mode of the top layer toMultiply (Multiplication), and the layer below it onScreen... This will give you a high-contrast image with grain.

Fine art image / konradbak
Plastic Wrap. Gives the impression that the picture was placed inside a plastic bag or film.
- Highlight strength. Determines how strong the polyethylene glare will be.
- Detail. The level of detail for the outline.
- Smoothness. Smooth glare.

Fashion Couple Dramatic / Gabi Moisa
Underpainting. Creates the effect of drawing under different surfaces.
- Stroke Length
- Texture Coverage
- Texture (Texture).
- Scaling.
- Relief (Relief).
- Light. Allows you to choose from which side the relief will be illuminated.

In this case, I took a canvas texture scale of 50%and relief height - 5. Light - bottom right, stroke length 0to get the outline. Here's the result:

Grand Cru Rotwein / Wilm Ihlenfeld
Palette knife (Spatula). Imitation of an image applied by a tool such as a wide knife.
Allows you to imitate the technique of oil painting, performed with a special tool such as a wide knife (spatula or palette knife). The image becomes emphatically rough.
- Stroke Size (Stroke size). Adjusts the size of the stroke around the edges of the path.
- Stroke Detail (Detail of the stroke).
- Softness. Smoothes the shot.

Unfortunately, the filter only affects small areas of color. Color transitions are not affected. This can be fixed by choosing a suitable texture and blending it with a blending mode.Multiply (Multiplication)... Then merge the layers (original and texture) and make two copies. Apply a filter with settings on the top layer stroke size - 50, stroke detail - 3, softness - 0... Set the opacity of the layer to 80% and change the blending mode of the top layer toScreen (Lightening).

dutch mills 3 / dzain
Neon Glow. Creates a neon glow along the outline of the subject in the image.
Converts an image to a monochrome negative and adds a light stroke, "glow", to the outline of objects.
- Glow Size
- Glow Brightness

Feuerwehrschlauch / 77SimonGruber
Paint Daubs. Creates the look of an oil painting.
Gives the picture the appearance of an oil painting.
- Brush Size (Brush size). This parameter is already familiar to us.
- Sharpness.

A filter with settings is applied here brush size - 25 and sharpness - 20... Brush type - broad and medium hard. Overlaid texture with blending modeMultiply (Multiplication) and a transparency of 25%. Then a copy of the layer was made and the blending mode was selected.Softlight
(Soft light) and transparency 50%
 rotes Italien / Grischa Georgiew
Sponge (Sponge). Sponge effect.
- Brush Size (Brush size).
- Definition.
- Smoothness.
 Lüneburger Heide / Thorsten Schier
Poster Edges. Enhances the contours of the picture.
- Edge thickness.
- Edge intensity.
- Poserization (Posterization).

Superhero businessman / Nomad_Soul
We will talk about other filters and their application in the next article.
Step 1: Convert the background layer to a Smart Object
There are two ways to apply any filter to a layer, including an oil paint filter. The first of these is a regular, static filter, which means that by applying the filter we will make permanent, irreversible changes to the pixels of the layer.
Another way is to use the filter as a smart filter, which will save the filter settings and make it fully editable in the future (this method is called Non-Destructive and it is always better, because the filter settings can be changed and even temporarily disabled or removed. ).
So, open the original photo in Photoshop, open (if not open) the layers panel, our photo is now the background layer, right-click on the background layer and select the line "Convert to Smart Object". As a result, we have a smart object from the background layer, this is indicated by the icon located in the lower right corner of the layer thumbnail:
The background layer has been converted to a smart object.
Step 2: Selecting the "Oil Paint ..." filter
It starts in the usual way. through the main menu tab Filter -\u003e Stylization -\u003e Oil Paint (Filter -\u003e Stylize -\u003e Oil Paint).
Note. For some reason, in my Photoshop assembly, the filter is not translated, the name and interface are left in English.
This will open the filter dialog box. In Photoshop CS6, the dialog took up the entire screen, but now in the CC version, the window is much smaller and fits perfectly with the rest of the interface. At the very top there is a preview window, and below it are various options for controlling the oil paint effect, we will now look at all of them:

"Oil Paint ..." filter dialog box
Preview window
The filter provides the ability to view its action in real time right in the document, but this is not always convenient, for example, if the original image is large and does not fit at 100% scale on the monitor.
Fortunately, the preview window at the top of the filter dialog gives us an easy way to view and analyze portions of an image at 100% scale. Of course, only a small part of the image will fit in the preview, but you can easily jump to the desired sections by simply clicking on that place in the document. you want to watch.
When you hover your mouse over the image, you will see that the cursor has changed to a small square that represents the borders of the preview window. Just click on the place you want to see you want to see. Here I clicked on the area between the yellow and pink flower buds:

Preview in the filter window at a scale of 100%.
Directly below the preview window is the current zoom level indicator, by default it is set to 100%. To change the display scale use the plus and minus icons.
And finally, the "Preview" option to the right of the window enables / disables previews within the document itself. whether or not to see that we are a preview of the oil painting effect inside the image itself. You can also enable / disable preview in the document by pressing P.
Brush options
The filter options in the dialog are divided into two main parts. The first contains options for setting the brush: Stylization, Cleanliness, Scale and Bristle Detail. We use these parameters to customize various aspects of the strokes.
Below the brush options are the lighting options that control the direction of the light source, as well as the overall contrast of the effect.
We'll start by looking at the brush options. But before we proceed, make sure the Lighting option is checked (checked in the checkbox). The reason is that without lighting effects, we cannot see our oil paint strokes. Also, with the lighting option turned on, increase the Shine parameter, which adjusts the contrast of the strokes so that you can clearly see the brush strokes in the image. The value does not need to be made too large, 2.0 is fine. However, this is only needed now to make it easier to learn how the brush options work. We'll take a closer look at the lighting settings later, but for now let's get back to the brush options.
Stylization
The first parameter of the brush is Stylization. It sets the style of brush strokes, ranging from coarse smears at the lowest setting to very smooth strokes at highest settings. This is how the document will look if you drag the styling slider to the left, down to its lowest value (0.1). As you can see, the minimum "Stylize" value makes the strokes rounded, roughly outlined, the picture is given a detailed look:

Filter "Oil paint with minimum Stylization"
As the Stylize value increases, strokes are smoothed and lengthened. And if you move the slider all the way to the right to a maximum value of 10, the document will look like this:

The effect using the maximum Stylize value.
For my image I will choose something in between, I think the value 4 will do. The value, of course, depends on the original image.
This is what my drawing looks like with a value of 4:

Effect with a Stylize value of 4
Cleanliness
The second brush setting is "Cleanliness". She controls length brush strokes that range from short, choppy strokes at low settings to long, stringy strokes at high settings. Short strokes make a painting look more textured and detailed, while long strokes give a less detailed, smoother look.
This is how the document looks with the Cleanliness slider dragged to the left.

The effect obtained with the Clarity slider set to 0.
And this is the type of document with the maximum value of "Purity":

The picture is when the "Clean" is set to 10.
I think that long, blurry strokes are better for this image, but at maximum Clarity they are too long. I would like to bring back a little more detail, so I decrease the setting to 7. Another value may be better for your image.
Scale
So we've learned that the Stylization setting controls the smoothness of the strokes, while the Cleanliness controls the length. The third setting, Scale, controls the size (or thickness) of the brush itself. Use lower scale values \u200b\u200bfor thinner, narrower brushes, or higher values \u200b\u200bfor larger, thicker brushes.
I lower the Scale value down to its minimum value (0.1). At the lowest level, strokes look like they were painted with a very thin brush. Note also that since thin brushes tend to use less paint, we don't see a pronounced relief from the paint on the canvas:

The effect at the lowest Scale value.
Now let's see what happens if you drag the slider to the opposite end, increasing the scale to the maximum value (10). The strokes are much thicker, as if using a large brush. And since we used a larger brush, the relief from the brush strokes on the canvas is more pronounced compared to the thinner brush we used earlier:

The effect at the maximum "Scale" value.
Bristle Detail
The fourth brush setting controls the grooves left by the brush bristles. At lower values, the grooves are light and soft, becoming deeper and more pronounced as the setting is increased.
I will lower the Bristle Information value to the minimum value (zero). To see the effect better, I zoomed in on the slice to 200%:

Result with Bristle Detail set to zero.
Let's increase the parameter to the maximum value of 10. The grooves become much stronger and more obvious:

Effect with Bristle Detail set to 10.
Of course, the maximum and minimum values \u200b\u200bof the above settings are rarely used in practice. I am using the following settings for my image:
- Stylization - 4
- Cleanliness - 7
- Scale - 7
- Bristle Detail - 5
This is what my picture looks like with the above filter options:

Intermediate result.
Lighting options
Below the brush parameters is a section with lighting settings. Despite the fact that there are only two of them ("Angle" and "Glitter"), they play a critical role in shaping the effect of converting a photograph into an oil painting. Before we start setting the lighting parameters, we first need to make sure the checkbox to the left of the word “Lighting” is checked.
Angle
This parameter controls the direction of the light falling on the painting, which affects the direction of the shadows and highlights created by the oil paint strokes. To change direction, click position the mouse cursor inside the circle, hold the cursor and move it to rotate the disk. Alternatively, you can manually enter the angle numbers in the input field. For example, an angle value of 90 ° corresponds to the direction vertically from above, a value of 180 ° - the light comes from the left.
In my case, it feels like the image itself has a light source that comes from the top left corner, so I'll set it to about 135 °:

Pressing the left mouse button and moving the cursor inside the circle.
For comparison, this is what this painting initially looked like before changing the lighting angle, back when the light was coming from the lower right corner. Pay attention to the shadows and highlights:

An oil painting effect with light coming from the lower right corner.
And here's how it looks after turning towards the top left corner. Below, the white and yellow flowers have lost their relief detail after the lighting change, while others, such as the yellow flower near the center, are now displayed in more detail:

The same picture after moving the light source to the upper left corner.
Shine
Finally, the Glitter option controls the brightness of the light source, which affects the intensity of shadows and highlights (paint smears, not the actual image). Setting the Shine to its lowest value, zero, essentially turns the light off, giving the effect an almost flat appearance (or rather, no effect).
Increasing the value to the maximum of ten creates too strong, unnatural shadows and highlights. In most cases, a fairly low value works best, somewhere around 0.5 - 4. Here I set the Shine value to 2:

Average "Gloss" value.
Disabling lighting options
Now that we've covered the lighting options and how important they are to the overall appearance of brush strokes, why don't we turn off the lighting? Simply put, turn off to see the strokes! Why don't you want to see brush strokes? Well, with the brush strokes visible, we get the bump effect created by the shadows and highlights from the bump of the paint on the canvas. Turning off the lights smooths the image, which gives us a very clean, soft and smooth result.
To turn off the lighting, just uncheck the option of the same name (in the English interface - Lighting). This will not completely disable the effect created by the oil paint filter, but will give the following result:
Filter operation when the lighting option is off.
Finally, when you have everything set up, click OK to apply the filter action and close the dialog box.
In this tutorial, you will learn how to create an oil painting effect in Photoshop. I will try to explain everything in as much detail as possible so that even beginners who first opened the program can cope.
The picture above shows the effect we will be creating in this tutorial. If you want to get a more advanced result, like the screenshot below, then I suggest trying my action.
For work we need a stock photo. The picture from the lesson is paid, but you can download an archive with alternative options or take your own photo.
Document preparation
Step 1
To begin with, open the photo with which we will work. We pass File - Open (File - Open), find the required file on your computer and click on the Open button. Next, we check the document settings:
- Photo must be in RGB mode, 8 bits / channel (bit / channel). To check, go to the menu Image - Mode (Image - Mode).
- To obtain a high-quality result, it is better to take the size of the picture in the range of 2000-3500 pixels in width / height. To check, go to Image - Image Size (Image - Image size).
- The photo must be a background layer. If this is not the case, proceed Layer - New - Background from Layer(Layer - New - Background from layer).

Step 2
If in the previous step you changed the size of the document, then on the panel Window - History (Window - History) at the bottom, click on the button in the form of a camera to create a new picture. Then click on the empty square to the left of the created snapshot to define a new source for the archive brush.

Step 1
Now let's start directly creating the effect. Add a new layer Layer - New - Layer (Layer - New - Layer) and call it Large Details.

Step 2
We activate Art History Brush Tool (Y) (Archival art brush). On the top panel, set Area (Diameter) by 500 pixels, Tolerance (Tolerance) - by 0 pixels and Style (Style) - on Tight long (Condensed long). Then we right-click on the working canvas, in the menu that opens, select a soft brush, set Size (Size) by 20 pixels and paint over the entire image.
Please note that the detail of the result depends on the size of the brush. The smaller it is, the more details will be drawn.

Step 3
Create a new layer Layer - New - Layer (Layer - New - Layer) and name it "Middle Details".

Step 4
We activate Art History Brush Tool Size (Size) by 10 pixels and paint over the entire image.

Step 5
Add a black mask

Step 6
Now on the toolbar, click on the color square and in the window Color picker (Color selection) choose black (# 000000). We activate Brush Tool
Please note that the layer mask is selected in the layers panel. If you made an extra stroke, then you can restore the desired area by switching to white brush color. Black hides, white restores.
Also, while working, adjust the diameter of the brush in order to more carefully work out small details. Use the [and] keys to quickly resize.

Step 7
Create a new layer Layer - New - Layer (Layer - New - Layer) and call it "Small Details".

Step 8
We activate Art History Brush Tool (Y) (Archival art brush). We leave all the settings that were in step 2, only change Size (Size) by 5 pixels and paint over the entire image.

Step 9
Add a black mask Layer - Layer Mask - Hide All (Layer - Layer Mask - Hide All) to hide all the contents of the layer.

Step 10
Now choose black (# 000000), activate Brush Tool (B) (Brush), select a soft brush and paint over the areas where you want to keep more detail.

How to create the embossing effect
Step 1
Press Ctrl + Alt + Shift + E to create a separate copy of all visible layers. Then Ctrl + Shift + U to desaturate the resulting layer.

Step 2
We pass Filter - Stylize - Emboss (Filter - Stylize - Emboss). Install Angle (Angle) 135 degrees, Height (Height) - 3 pixels and Amount (Effect) - 200%.

Step 3
At the top of the Layers panel, switch the Blend Mode of this layer to Hard light (Hard light).

Congratulations, this is how the final result looks like:

The picture above shows the effect we created in this tutorial. If you want to get a more advanced result, like the screenshot below, then I suggest trying my action.
With this action, you can create a realistic oil painting effect in Photoshop in just a couple of mouse clicks. You just need to open a picture in the program and run the action. He will do the rest of the work for you! The result is a multi-layered result that is easy to customize to your taste.
Also included in the action are 10 color variations and 5 textures to overlay on the photo. AT special video you can see detailed instructions for using the action.

Turning a photo into a painting is one of the most requested topics in the lessons of working with graphic editors. Modern 2D applications are so sophisticated that they give the opportunity to try themselves as a real artist, even for those who have never been able to draw well. Sliders, checkboxes, and other settings work just as well as paint palette and canvas.
One of the confirmation of the high interest of users in the topic of painting - the appearance in the arsenal of the latest version of Photoshop filter Oil Paint ("Oil paint"), with which you can turn an image into a painting in a matter of seconds. And if you have a modern graphics adapter, you can watch the changes being made in the preview window in real time. However, like any other tool, the Oil Paint filter is imperfect. In particular, it does not provide the ability to separately control the size and nature of strokes in different parts of the image. Therefore, other methods for obtaining a picture from photography remain relevant. In this review, we'll look at both Oil Paint and three other ways to get this effect.
⇡ Using the Oil Paint filter
Oil Paint is one of the new filters in Photoshop CS6 that uses the Mercury Graphics Engine (MGE). The latter uses OpenGL and OpenCL technologies and makes it possible to significantly speed up the result, shifting part of the work to the GPU. However, unlike some of the other new CS6 filters, Oil Paint also works with older video cards, but in this case only processor resources are used for calculations.
For convenience, the command for invoking the Oil Paint filter is placed directly in the Filter menu.
The filter contains six sliders, four of which are related to brush settings and two are related to lighting settings. The Stylization and Bristle Detail sliders add contrast to the simulated brush strokes. They create light boundaries between each curve or swirl and thus make the effect more pronounced. The difference between these two settings is that the first adds an extra random effect to the drawing created by brush strokes, while the second affects mainly the contrast.
The Cleanliness slider allows you to change the detail of each brush stroke. High values \u200b\u200bof this parameter correspond to painting with a new soft brush, while low values \u200b\u200bgive the effect of painting with an already dirty brush with stuck together bristles - the image will have more grain.
With the parameter Scale ("Scale"), you can, in fact, change the size of the brush.
With regard to lighting related settings, Angular Direction determines the angle at which the simulated light reaches the canvas surface, which in turn affects the contrast between strokes. When lighting changes, strokes can appear bright or dark. The Shine parameter sets the overall strength of the effect.
⇡ Turn a photo into a painting using filters
This method of creating a picture from a photograph is interesting because it allows you to get a completely acceptable result without using a virtual brush. The secret lies in the consistent application of filters, of which there are a great many in Photoshop.
Note that filter settings will be different for images with different resolutions, so you may need to adjust them. We show the settings for a resolution of 1024x768.

So, after loading the original image into Photoshop, use the keyboard shortcut CTRL + U to open the Hue / Saturation window. Increase the saturation of the image to forty-five.
Open the filter gallery by choosing it from the Filter menu. Go to the Glass filter. Since we want to get the image as if it were placed on the canvas, set the texture type in its settings to resemble a canvas (Canvas). Other parameters should be selected depending on the image resolution. Reduce distortion by setting a lower value for the Distortion parameter, and select a low value for the Smoothness parameter.
Click on the New effect layer button at the bottom of the filter gallery window to add an additional layer to apply the filter.
Assign the Angled Strokes filter. It simulates brush strokes applied at a specific angle. Set the Stroke Length to 3 and Sharpness, which determines how sharp the image is, reduce to one.
Add another effect layer using the same New effect layer button. Assign the Filter to Paint Daubs ("Oil painting"). The key setting here is the Brush Type. In this case, select the Simple type, and then reduce the brush size to four and lower the Sharpness value so that the strokes are less distinct.

Create the last layer of the effect. Assign filter Texturizer ("Texturizer"). It adds a canvas texture to the image. In its settings select the appropriate type of texture - Canvas ("Canvas"). Then select the scale of the texture (parameter Scaling) and its relief (parameter Relief).

The main work has been completed. To apply filters to the image, click the OK button. It remains to sharpen the strokes. Create a copy of the layer using the CTRL + J command. Select the Desaturate layer command Image → Adjustments → Desaturate ("Image" → "Adjustments" → "Desaturate").
Now apply the Filter → Stylize → Emboss to the top layer ("Filter" → "Stylize" → "Emboss"). In its settings, reduce the value of the parameter Height ("Height") to one, and the value of the parameter Amount ("Effect"), on the contrary, increase to 500.

For the current layer, change the blending type to Overlay ("Overlap"). Done!

⇡ "Painted" oil painting
Here's another fun way to turn any photo into an oil painting. It is more time consuming than using the new Oil Paint filter, but it gives you more room for creativity.
Open the image.

Create a new layer and using the tool Fill ("Fill"), fill it with white. Select the Art History Brush tool ("Art history brush"). In palette History ("History") check the box Set the Source for History Brush ("Determines the source for the archive brush").

In the tool settings, select the 63 Oil Pastel brush, and in the Area field, set the spread area to thirty.
Right click on the image and reduce the size of the brush and paint the layer. The smaller the size, the smaller the stroke size will be and the more detailed the picture will be.

Apply filter Filter → Sharpen → Unsharp Mask ("Filter" → "Sharpen" → "Unsharp") to make the strokes more expressive. Increase the value of the parameter Amount ("Effect"). Finally, apply the Texturizer filter to create the illusion of a canvas. In Photoshop CS6, this filter does not appear by default in the Filter menu, and is invoked through the Filter Gallery. Select in the list Texture ("Texture") - Canvas ("Canvas") and, focusing on the preview window, select the values \u200b\u200bof the parameters Scaling ("Scale") and Relief ("Relief").
The image now looks like an oil painting.


⇡ Almost real painting in Photoshop
Most of the painting simulation techniques in Photoshop are based on the application of a specific sequence of filters. These methods have one serious drawback - they often lack the personality of the artist. In this tutorial, we'll show you one painting imitation technique that allows you to create a unique, one-of-a-kind painting based on any photograph.
The secret of the originality of the images obtained using this method is that the user himself applies strokes in an arbitrary way. But in order to paint a picture in this way, it is not at all necessary to have the talent of an artist.
So open the image that will serve as the basis for the painting. Increase the canvas size slightly. To do this, run the command Image → Canvas Size ("Image" → "Canvas size").

Execute the command Edit → Define pattern ("Define pattern"). Create a new layer and fill it with white using the tool Fill ("Fill"). Make it a little transparent by lowering the Opacity value ("Opacity") to 80% so that the original image shows through the top layer.

Create a new layer and arm yourself with the Pattern Stamp tool. From the list of patterns on the toolbar, select the option that you saved earlier with the Define pattern command. Check the Aligned checkbox to position the strokes correctly and the Impressionist (Effect) checkbox to give them an impressionist style.
Select one of the brushes in the settings for the Pattern Stamp tool ("Pattern stamp"). Customize its profile using the settings in the Brush palette ("Brush"). It is desirable that the profile looks like a brushstroke of a real brush - a trace of the villi should be visible in it and the texture of the canvas should be visible. Start painting directly on the image with short small strokes. They can be applied in a completely arbitrary way, trying to ensure that the profile of the brush is visible on each stroke.

In the process of painting a picture, the size of the brush can and even should be changed. In areas of the image where detail is low, such as the sky or the sea, you can use larger brushes. In the same areas where there are many small details, it is better to reduce the size of the brush used so that the elements of the painting are better defined on the canvas.
The process of creating a picture takes a lot of time, since you have to pay attention to every recognizable detail in the image. However, it is precisely this “handwork” that makes the picture realistic. The position of the brush strokes defies description by some algorithm, it is exclusively the work of the artist. When there are no light spots left in the image, you can save the result.

⇡ Conclusion
This article has covered several ways to get a painting from a photo in Adobe Photoshop, but there are many other programs that can achieve a similar effect. There are many free ones among them, for example FotoSketcher. This program offers over twenty painting styles, from watercolors and pencil drawing to cartoon drawing. Each style has several settings with which you can influence the appearance of the finished "painting".

Despite the fact that using FotoSketcher you can quickly get a number of interesting artistic effects, there is still not enough freedom in programs of this kind to implement creative ideas. Many operations are done according to a template, and therefore the result is more or less similar to the previously obtained pictures. So Photoshop was, is and remains the main tool for the digital artist.